
Picture this: You open your e-commerce dashboard on the first day of the month and see $1,200 in guaranteed sales – before you’ve even had your morning coffee. This isn’t a fantasy; it’s the power of recurring orders in WooCommerce.
Subscription models have transformed countless businesses across industries:
- Food boxes delivering fresh ingredients weekly.
- Beauty products arriving monthly with seasonal selections.
- Pet supplies automatically shipping before you run out.
- Online courses with recurring membership access.
- Book clubs delivering new titles on a predictable schedule.
- Household essentials like cleaning supplies delivered on autopilot.
If that model fits your business but you don’t know how to start, in this guide, you’ll learn exactly how to add this revenue-generating engine to your WooCommerce store.
You’ll discover both the standard functionality of WooCommerce Subscriptions and how to enhance it with powerful tools that transform basic subscriptions into personalized experiences your customers won’t want to cancel.
Ready to build predictable revenue into your business model? Let’s get started.
Benefits of setting up recurring orders on WooCommerce
Adding subscription options to your WooCommerce store creates powerful advantages for both you and your customers.
- Predictable income stream – Recurring orders transform sporadic sales into reliable monthly revenue. Instead of starting each month at zero, you begin with guaranteed income. This predictability makes financial planning more accurate and enables confident business decisions.
- Improved cash flow management – With subscription revenue flowing in on a regular schedule, you can better manage your inventory purchases, marketing investments, and operational expenses. This stability reduces financial stress and allows you to focus on growing your business rather than constantly chasing the next sale.
- Reduced administrative tasks – Say goodbye to manual invoicing and payment follow-ups. Subscription systems automatically handle billing cycles, payment processing, and renewal notifications. Your team can redirect their energy toward customer service and product development instead of repetitive billing tasks.
- Lower customer acquisition costs – When customers commit to recurring orders, your marketing costs decrease dramatically. The expense of acquiring a new customer is typically 5-25 times higher than retaining an existing one and rising year on year. With subscriptions, you’ll spend less on constantly filling a leaky bucket of one-time purchasers.
- Enhanced customer satisfaction – Subscriptions create convenience for customers. They never run out of essential products, don’t need to remember to reorder, and avoid the frustration of unexpected stock-outs. This hassle-free experience builds loyalty and long-term relationships.
Top reasons customers cancel recurring orders
While recurring orders offer numerous benefits, they still get cancelled. As a store owner, you need to understand why that happens, learn the common cancellation triggers, and proactively address them in your subscription program:
- Lack of value – When customers don’t feel they’re getting their money’s worth, they leave. This happens with declining product quality, stale content, or repetitive offerings that no longer excite.
- Inflexible plans – Customers resent being locked into rigid subscription terms. Without options to pause, skip, or modify orders, they’ll cancel entirely rather than deal with unwanted deliveries.
- Underutilization – “I never use it enough to justify the cost” is a common cancellation reason. If products pile up unused, subscribers feel wasteful.
- Poor customer experience – Frustrating interfaces, unresponsive support, and technical glitches create friction that drives subscribers away.
- Competitor advantages – Lower prices, better features, or superior quality from competitors can lure customers away.
- Life changes – Relocations, financial adjustments, or shifting interests naturally impact subscription needs.
- Payment problems – Even satisfied customers can be lost to expired cards or failed transactions if not handled properly.
How to set up subscriptions using the WooCommerce Subscriptions plugin
The WooCommerce Subscriptions plugin is the standard solution for adding recurring payments to your store. While it has a premium price tag ($279/year), it gives you the most complete subscription management system for WordPress.
Here’s how to create your first subscription product:
- Install and activate the WooCommerce Subscriptions plugin.
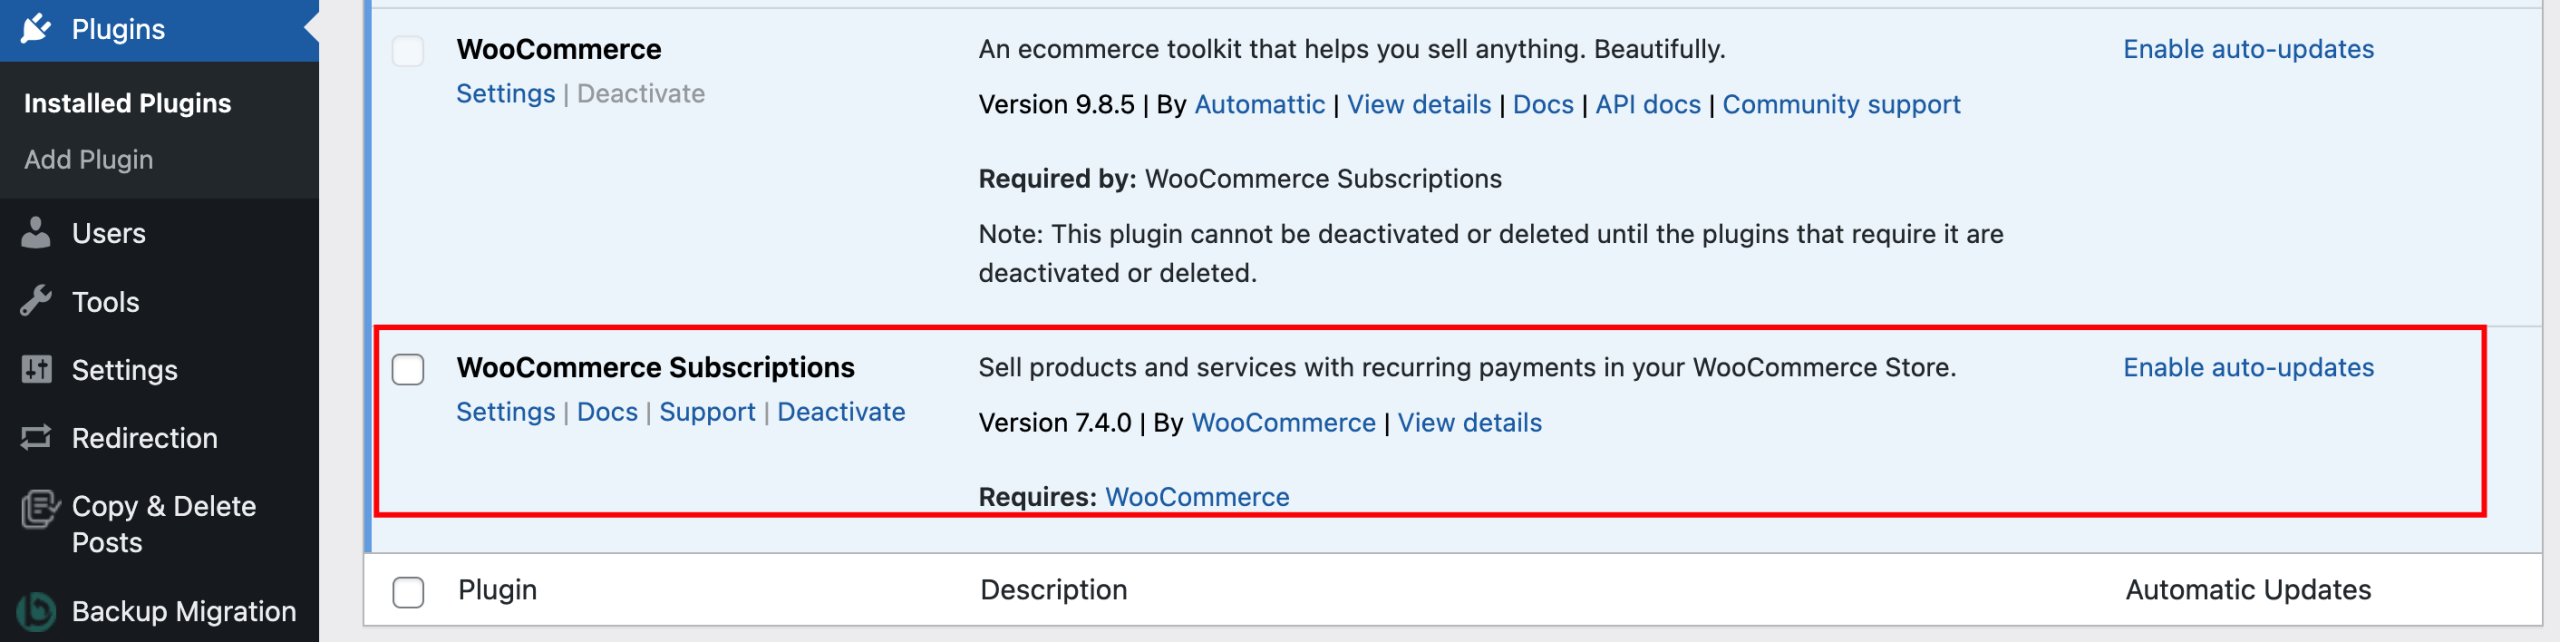
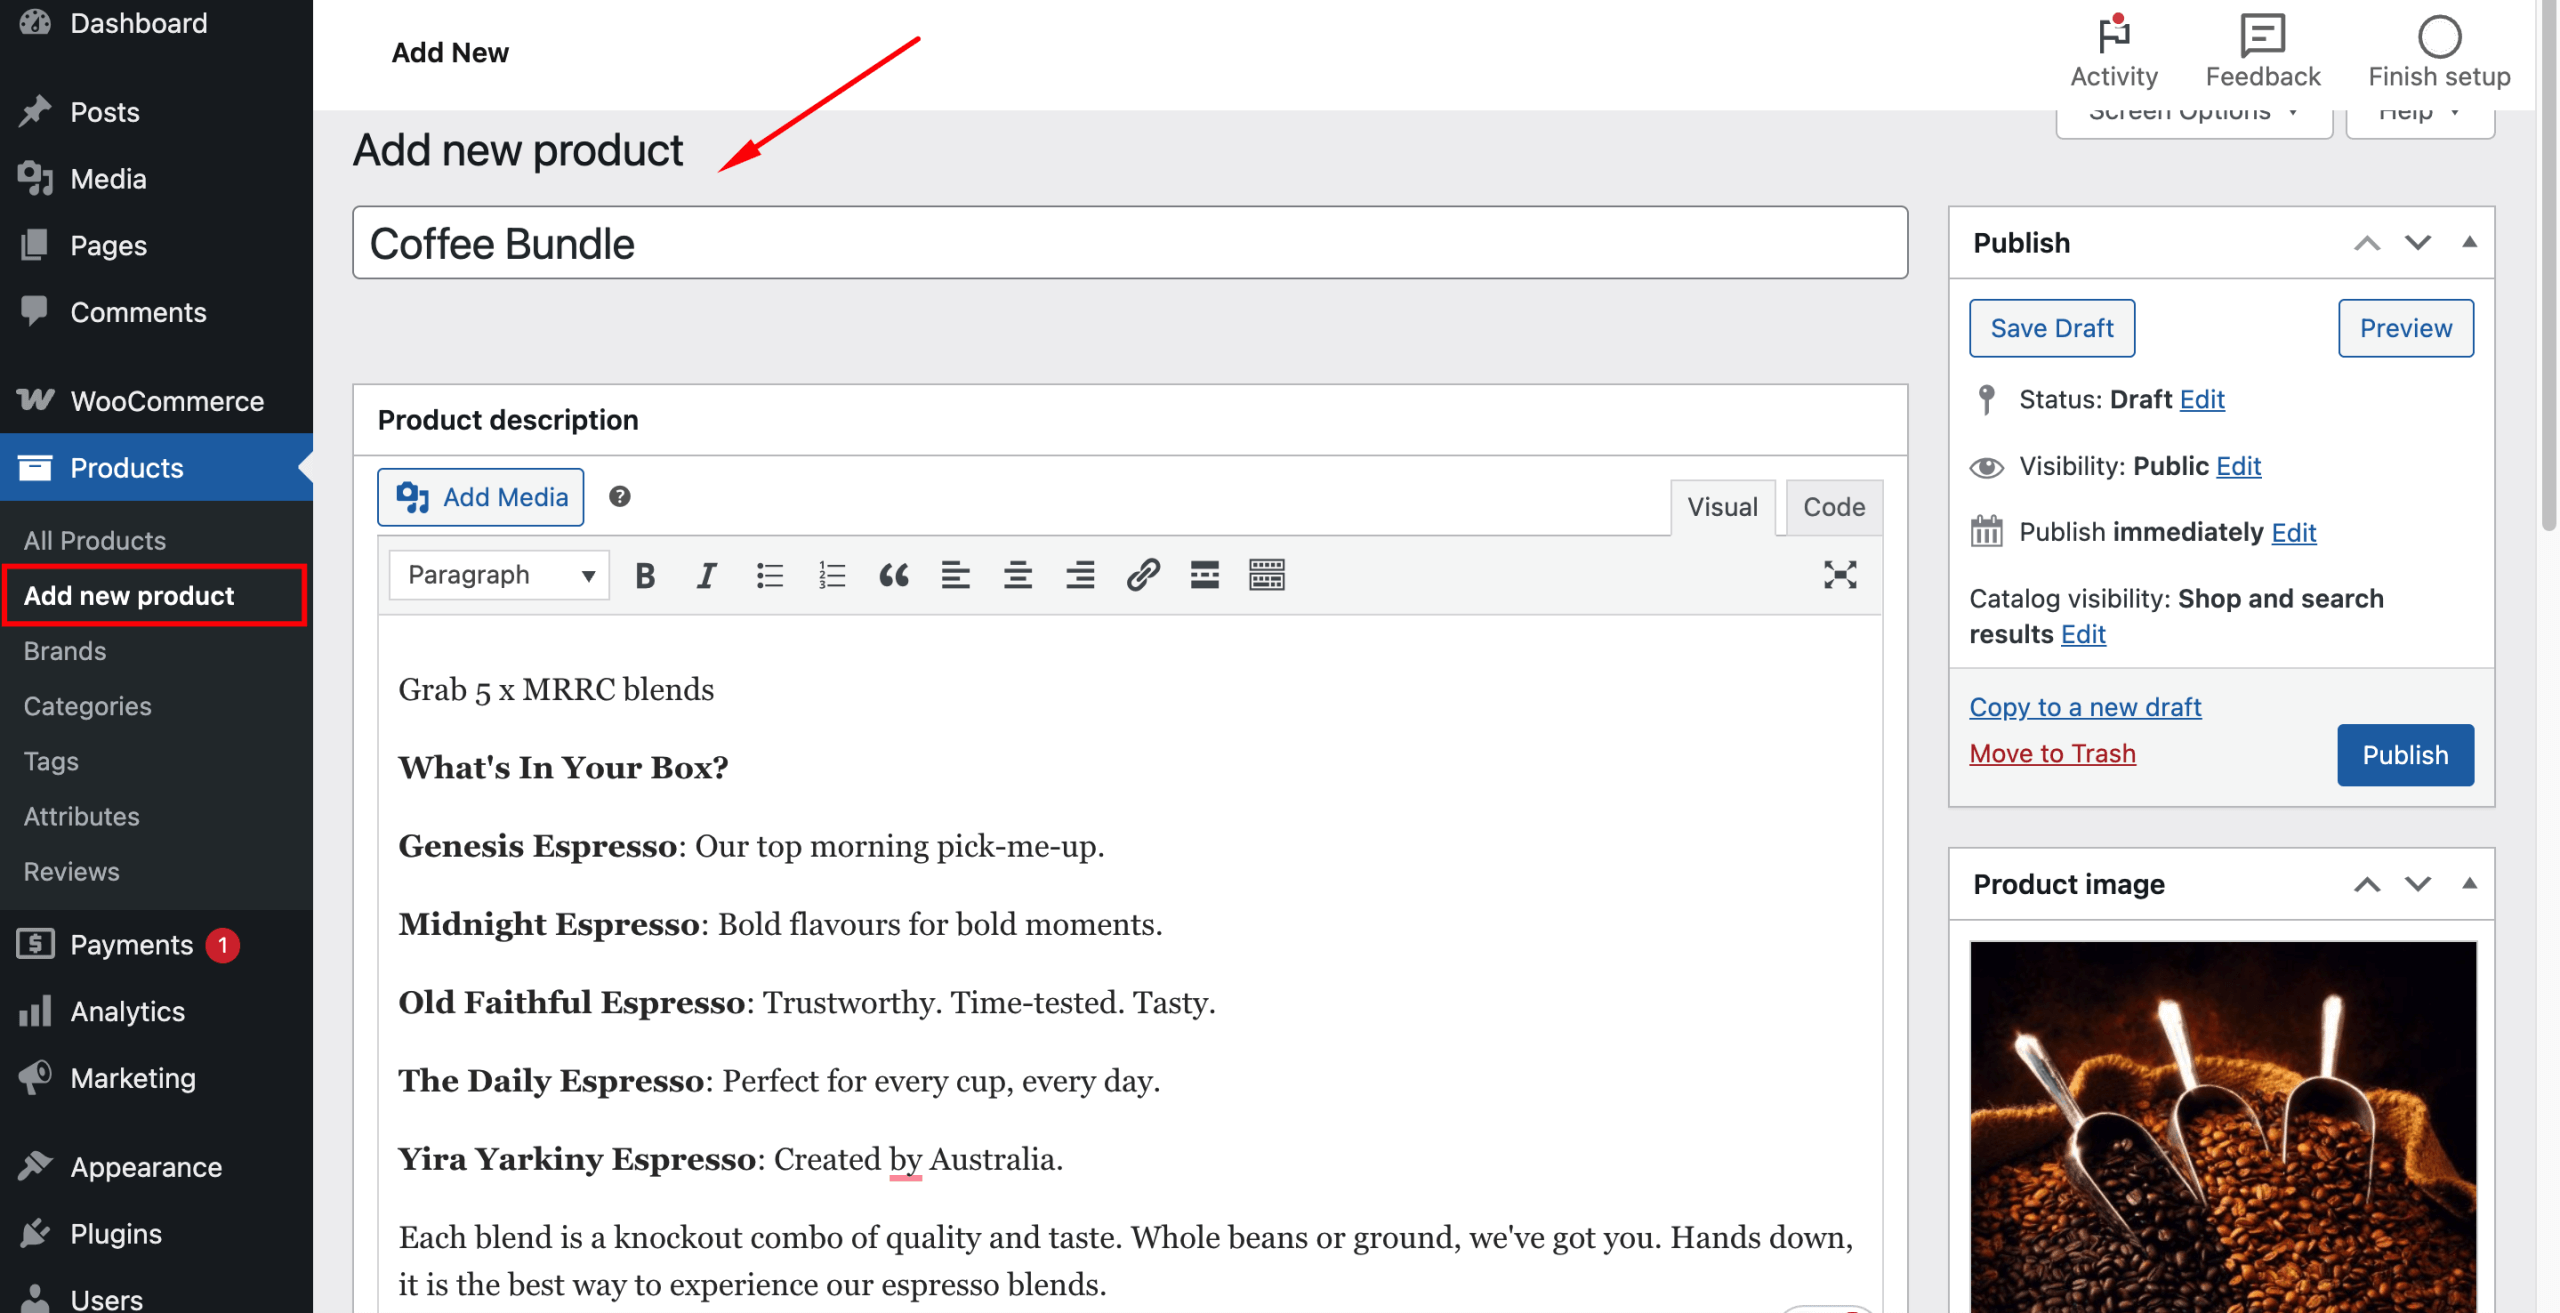
- Go to Products → Add New in your WordPress dashboard and enter your product name and description.
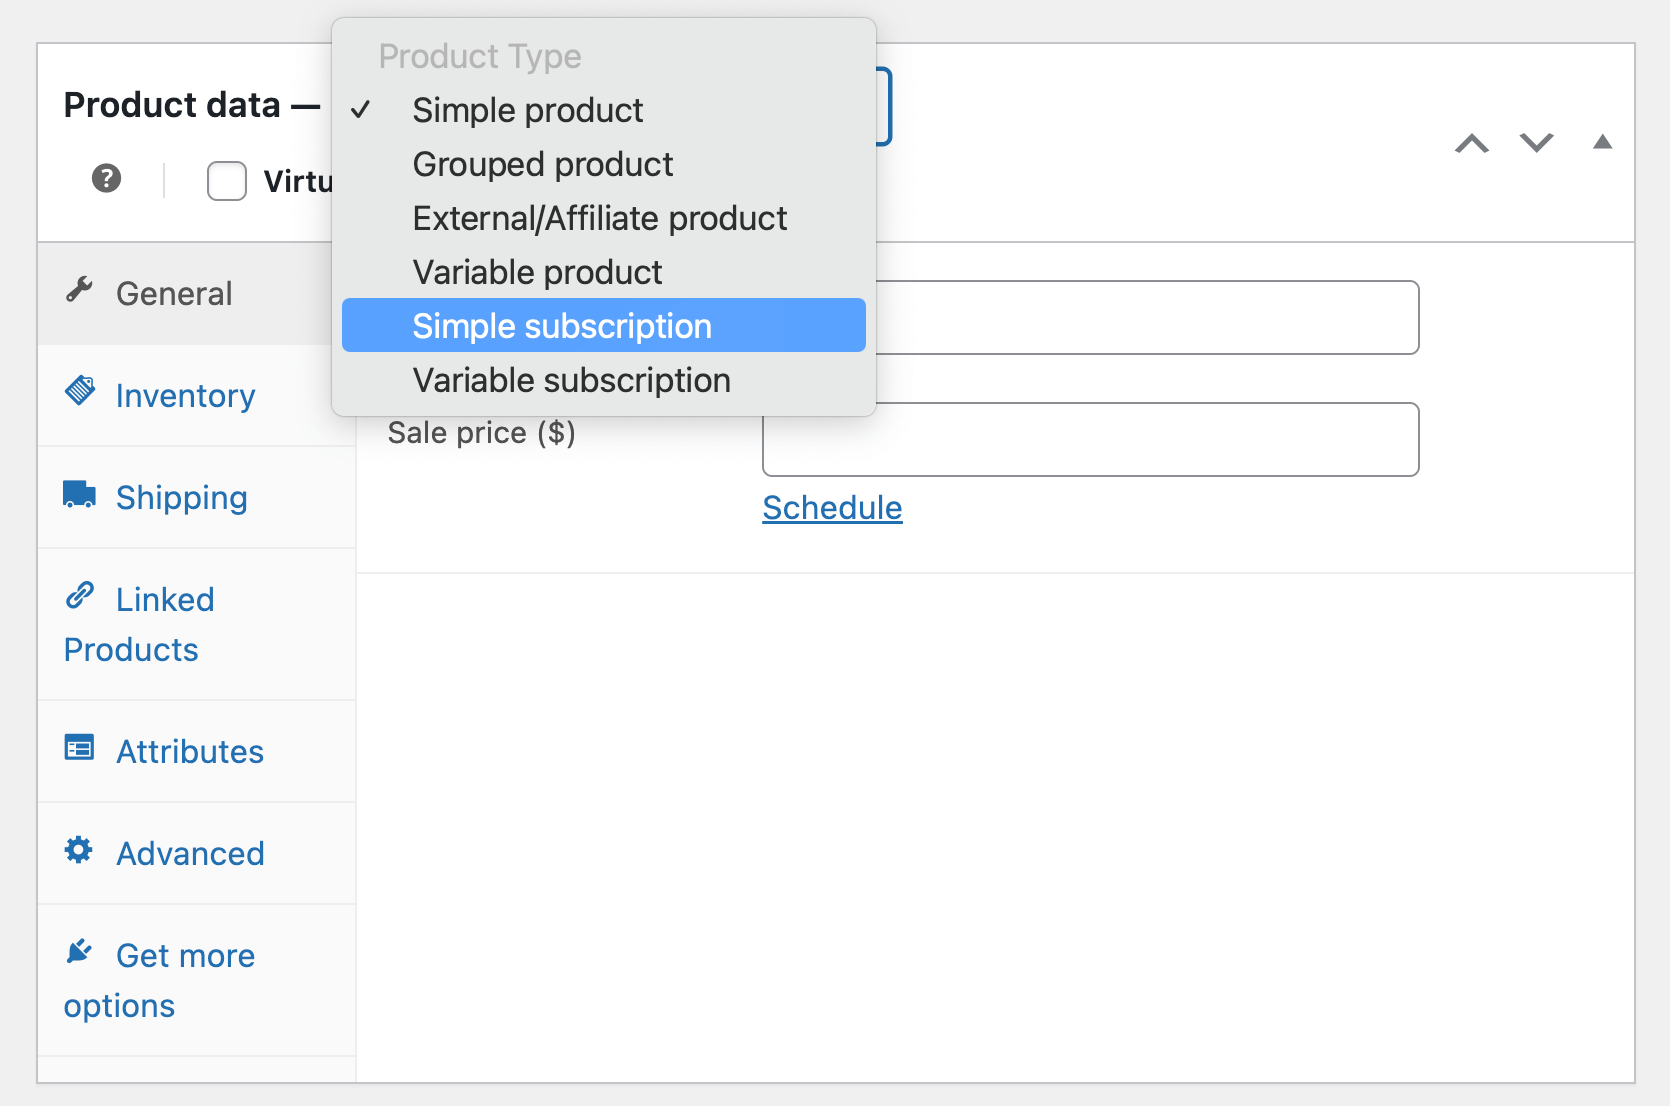
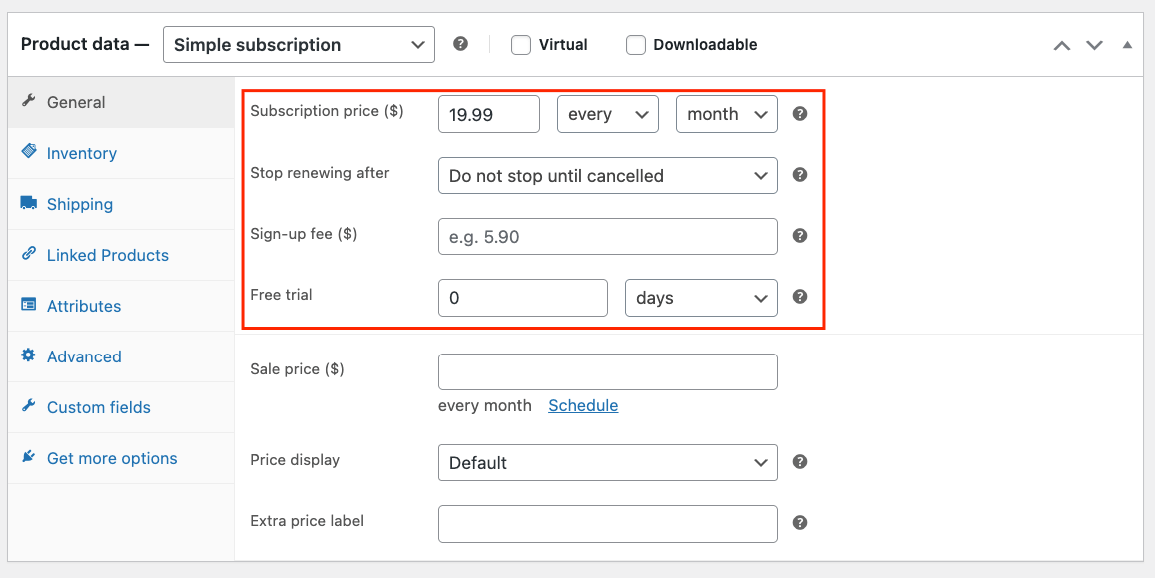
- In the Product data panel, select Simple subscription from the dropdown.
- Configure your subscription settings.
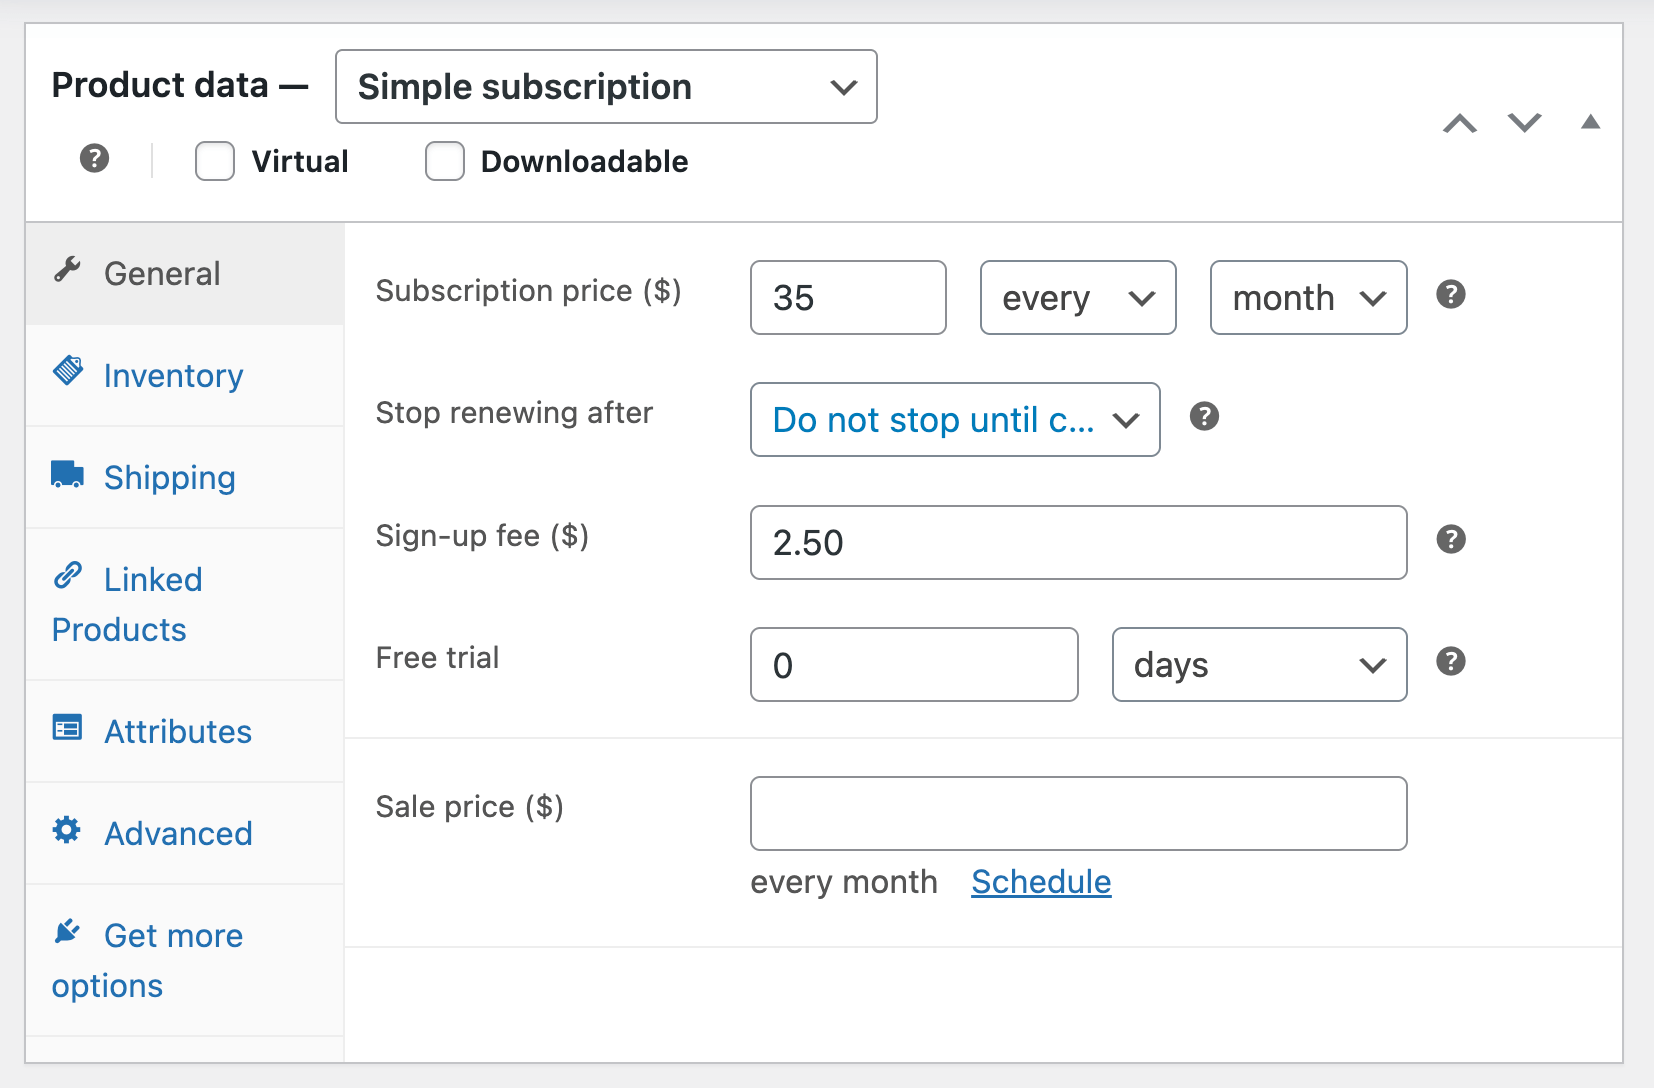
- Subscription price: Enter the amount customers will pay regularly.
- Billing interval: Choose how often to bill customers (daily, weekly, monthly, annually).
- Subscription length: Set how long the subscription will run, or select “Do not stop until canceled”.
- Sign-up fee (optional): Add a one-time charge at signup.
- Free trial (optional): Offer a trial period before billing begins.
- Add product images, categories, and tags just like with a standard product.
- Click Publish to make your subscription available.
For more flexible options, you can create Variable subscription products that let customers choose between different subscription plans with varying prices, features, or billing schedules.
Once this is published, customers can purchase your subscription product, and the WooCommerce Subscriptions plugin will automatically handle recurring payments, renewal notifications, and subscription management.
How to set up free trials within WooCommerce Subscriptions
Adding a free trial period to your subscription products encourages customers to try before they commit financially. Here’s how to set it up:
- Edit your subscription product and locate the Free trial field in the Product data section.
- Enter a number and select the period (days, weeks, or months).
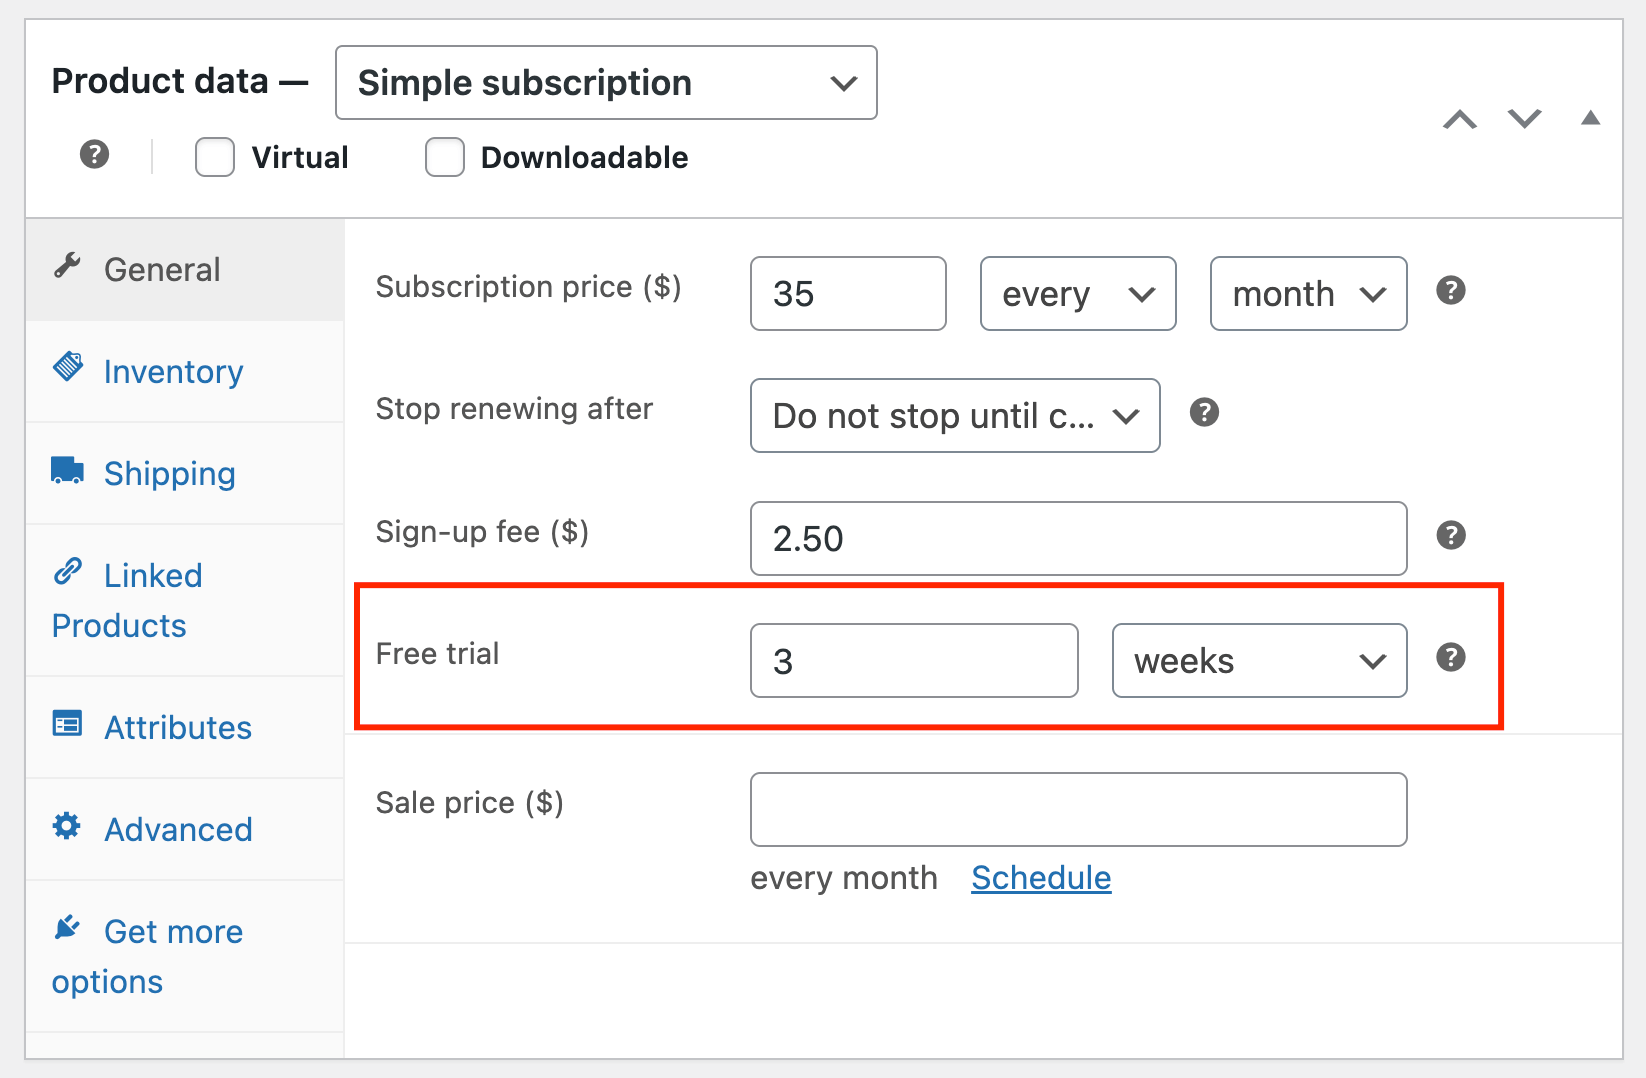
- Save your product.
During the trial, customers can access your product without being charged the recurring fee. If there’s a sign-up fee, that’s still collected up front. When the trial ends, automatic billing begins.
While WooCommerce Subscriptions provides this basic framework for recurring orders, it has notable limitations:
- The standard payment tiers are rigid and difficult to customize.
- Customers can’t easily modify their subscription details or personalize their orders based on changing preferences.
- Shop owners are expected to work with a “one-size-fits-all” approach, which often fails to meet the expectations of modern consumers who want customized experiences.
How Advanced Product Fields transforms WooCommerce Subscriptions
WooCommerce Subscriptions is a great foundation for a solid recurring orders setup, but it doesn’t address a lot of the main reasons why customers typically cancel – bad user experiences and lack of options.
To fix that, you need a plugin like Advanced Product Fields (APF), which lets customers personalize their subscriptions through a variety of input options like text fields, dropdowns, checkboxes, color swatches, image selections, and file uploads. This customization directly tackles several subscription pain points:
- Combats the lack of value by letting customers tailor orders precisely to their needs.
- Makes rigid subscriptions flexible as customers can modify selections month to month.
- Promotes regular usage through personalization that matches customer preferences.
For example, a coffee subscription service can allow subscribers to:
- Select the grind type from image swatches, depending on their preferred method.
- Adjust the quantity of each blend using number fields.
- Add one-time products like storage tins through checkbox options.
- Set delivery frequency with radio buttons.
This flexibility leads to higher satisfaction rates, as customers feel in control of their experience. The price adjusts automatically based on these selections, allowing customers to tailor orders according to their budget while increasing your average order value through strategic upsells.
How to set up customizable recurring orders in WooCommerce using Advanced Product Fields
Creating subscription boxes with customizable options can significantly boost customer satisfaction and sales. With Advanced Product Fields (APF) for WooCommerce, you can easily set up recurring orders that allow customers to personalize their purchases.
This guide walks you through setting up a beauty subscription box with variable products, pricing options, and upsell opportunities.
Step 1: Create your product basics
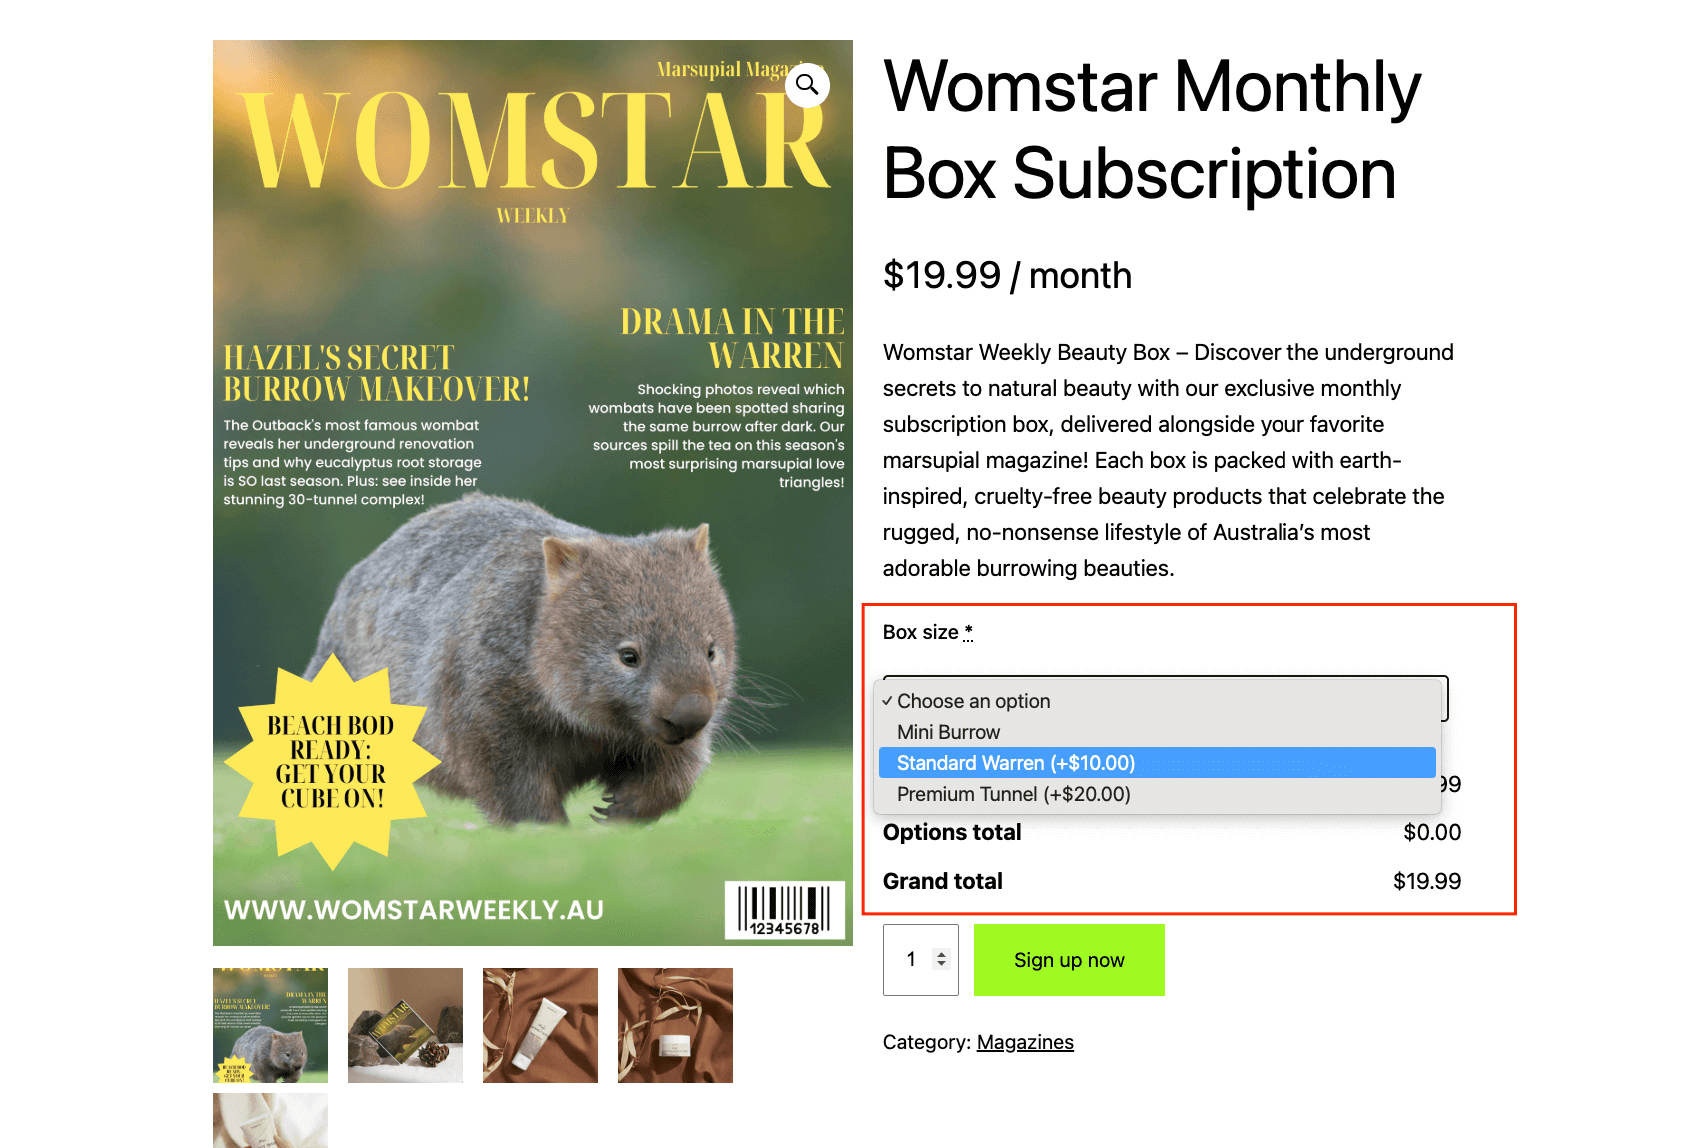
- Create a new product in WooCommerce and set the product type to “Simple subscription”. For this example, let’s create a Womstar Weekly magazine subscription with a beauty box.
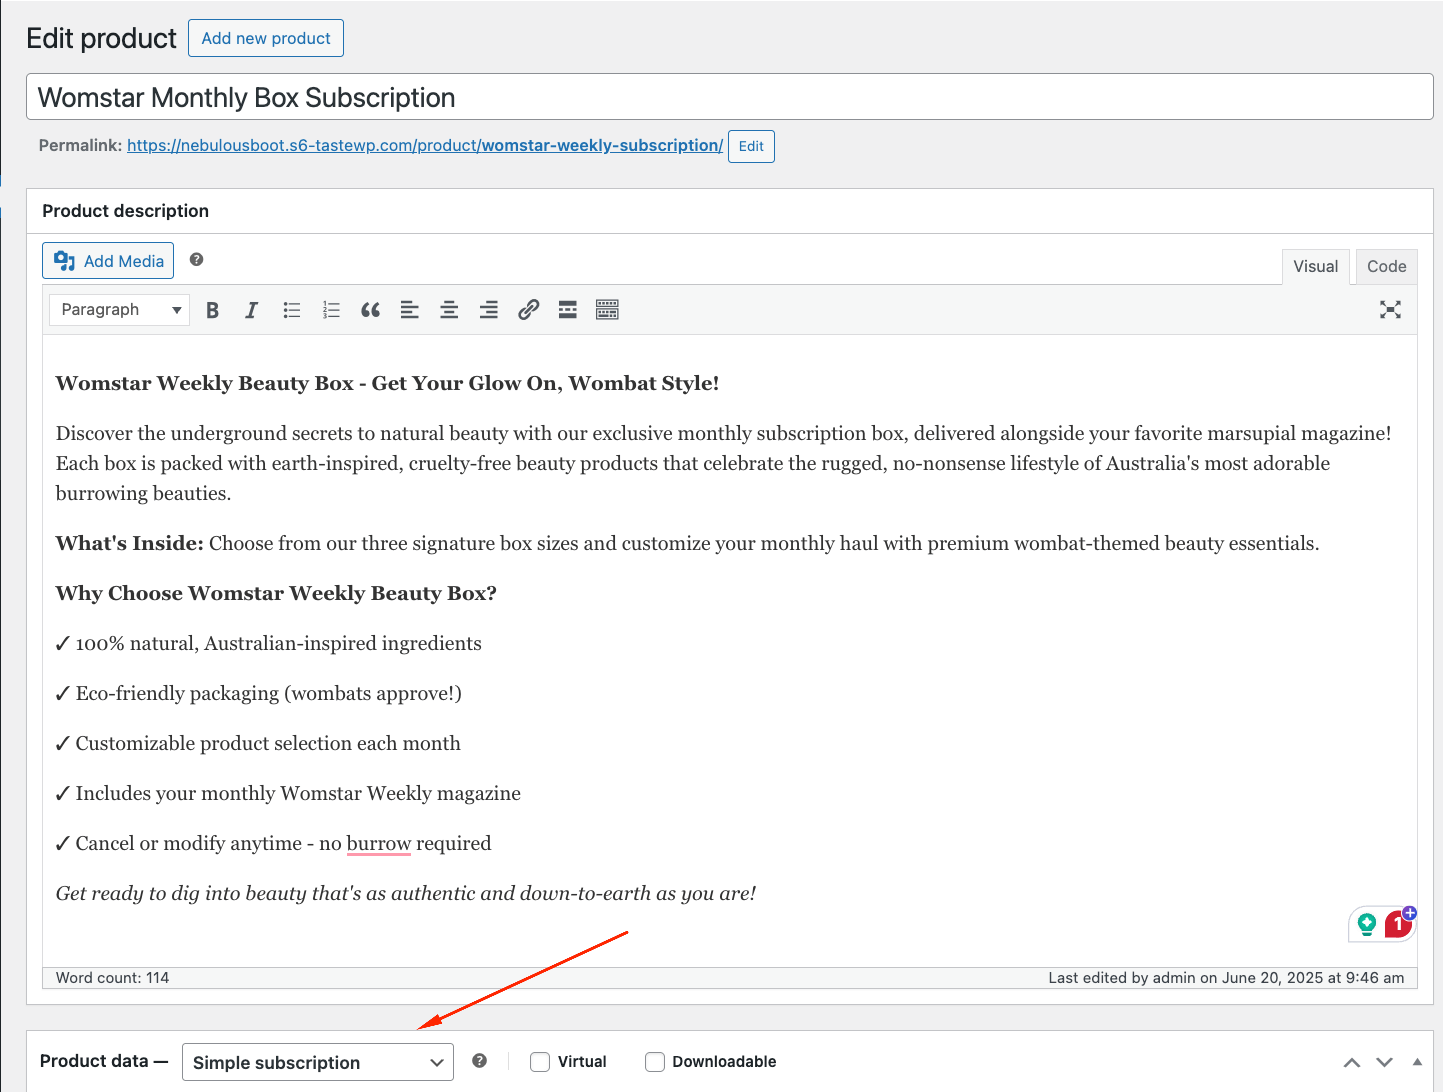
- Add your description and product gallery photos.
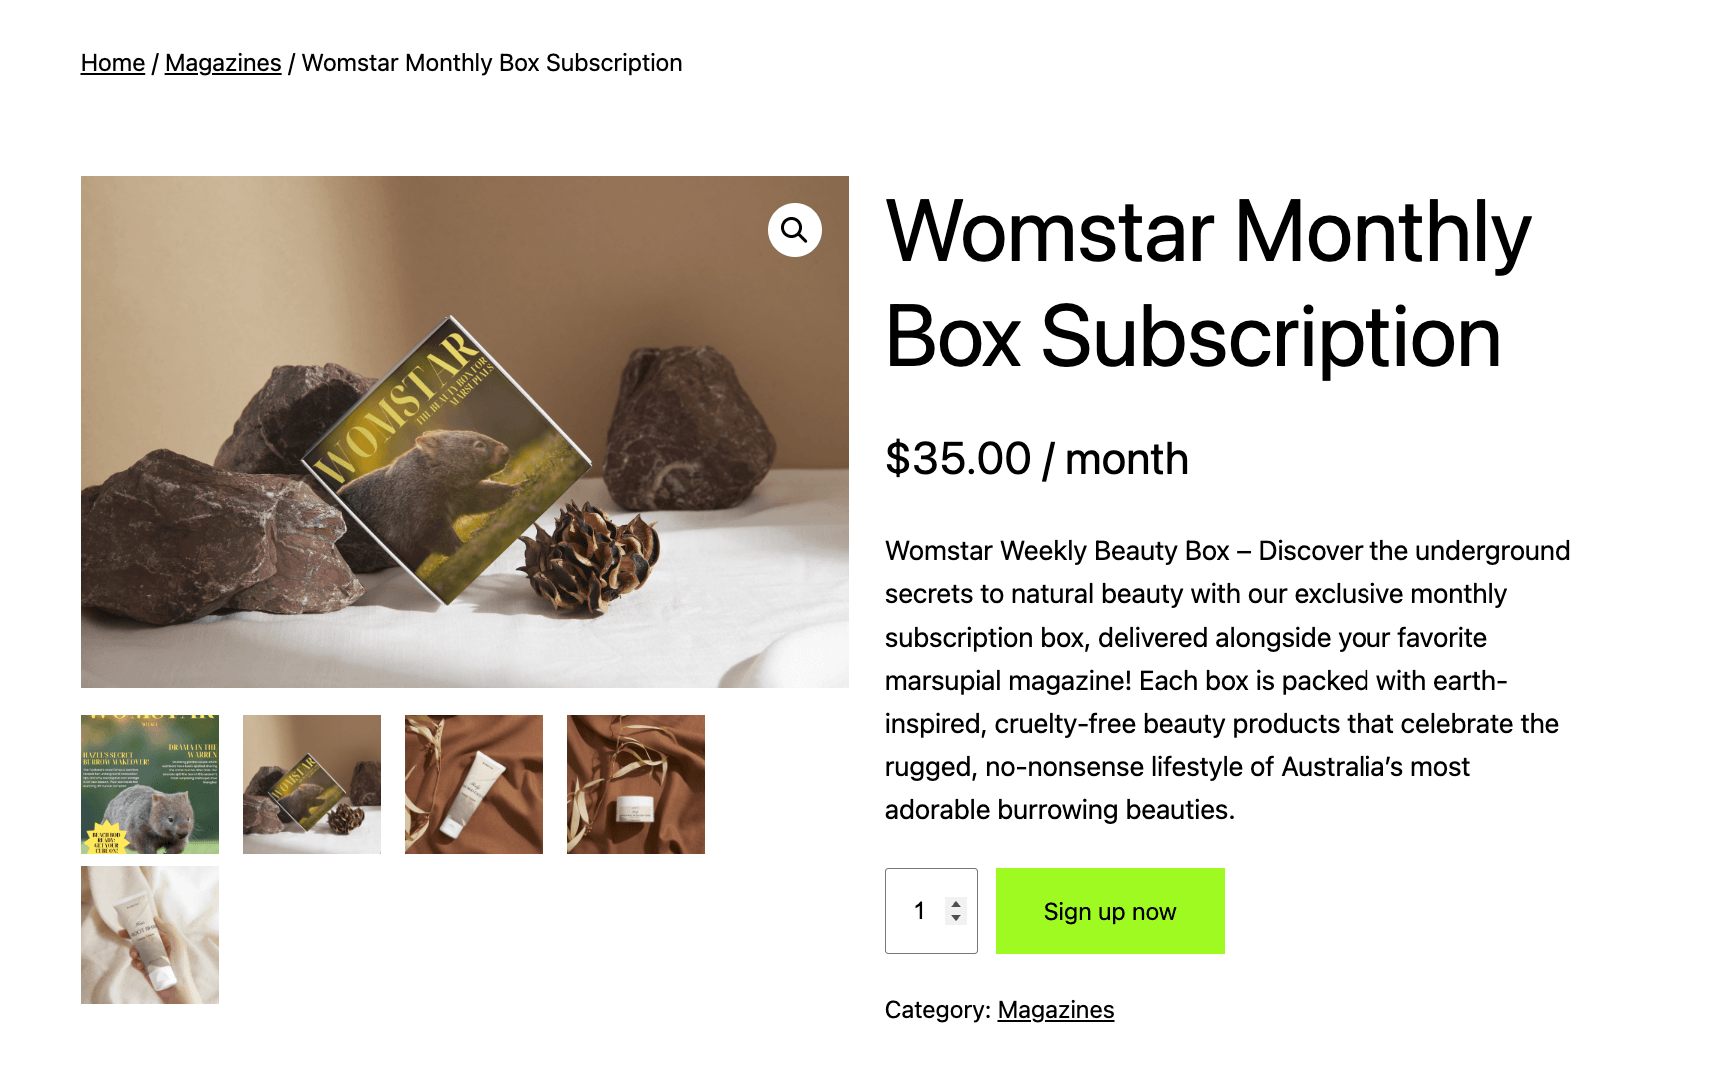
- Set the subscription price to be the lowest tier of your plan (you’ll see why in a bit).
Now that the basics are done, let’s go to the customizations.
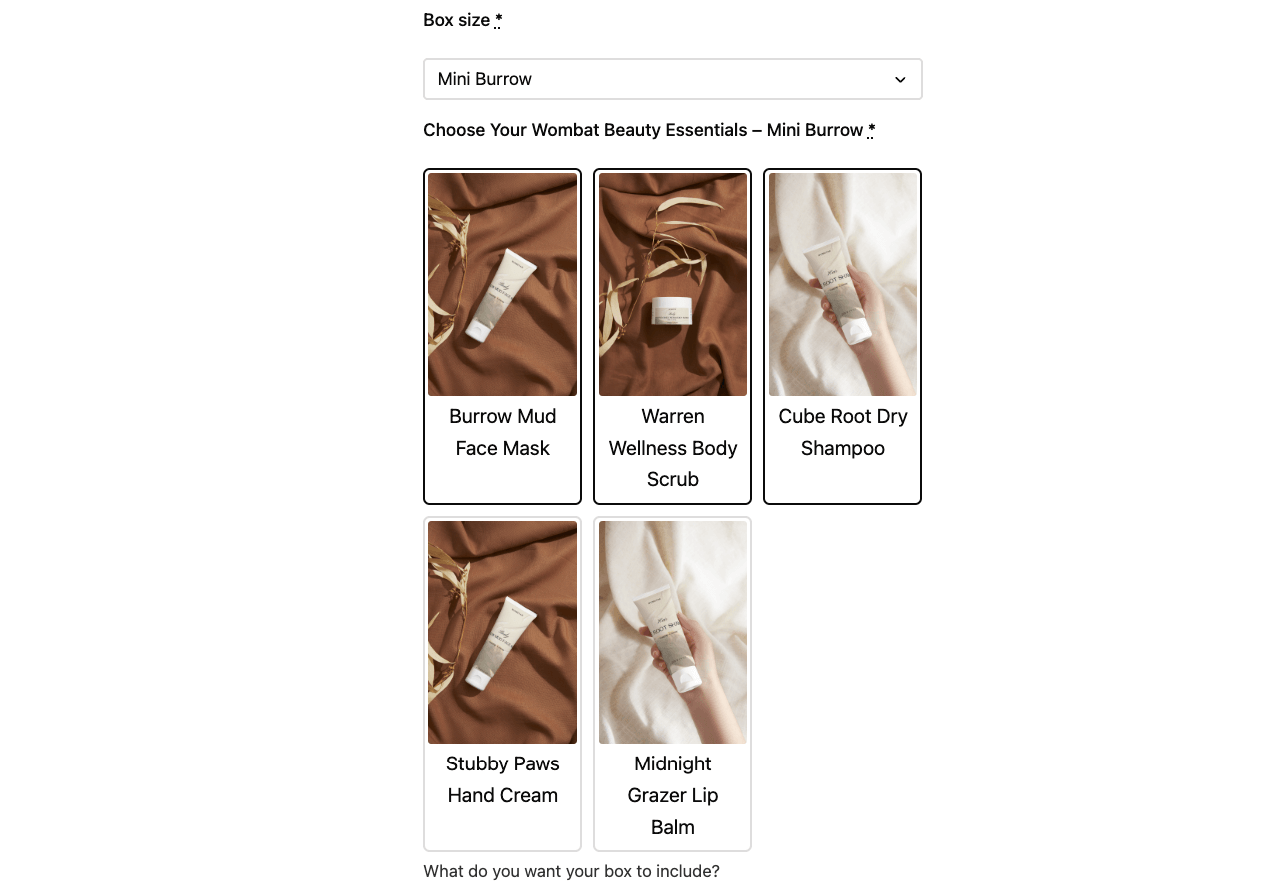
Step 2: Set up box size options
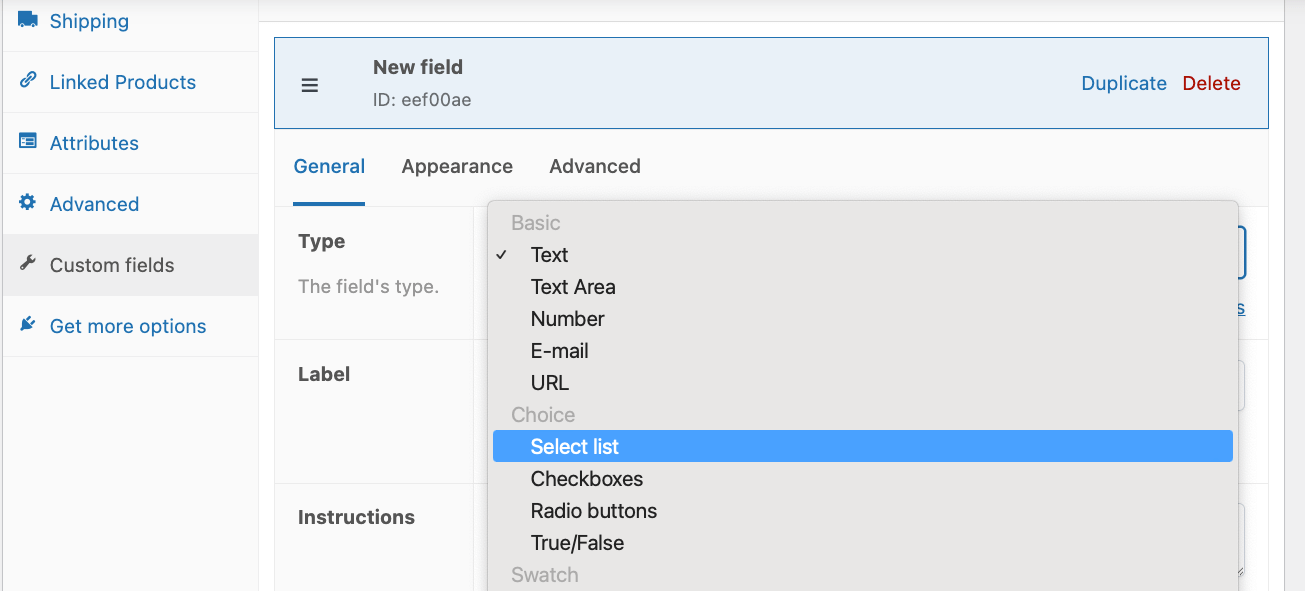
- Go to the Custom fields tab on the right side and add your first field.

- Choose the “Select list” field type from the dropdown menu and name it.
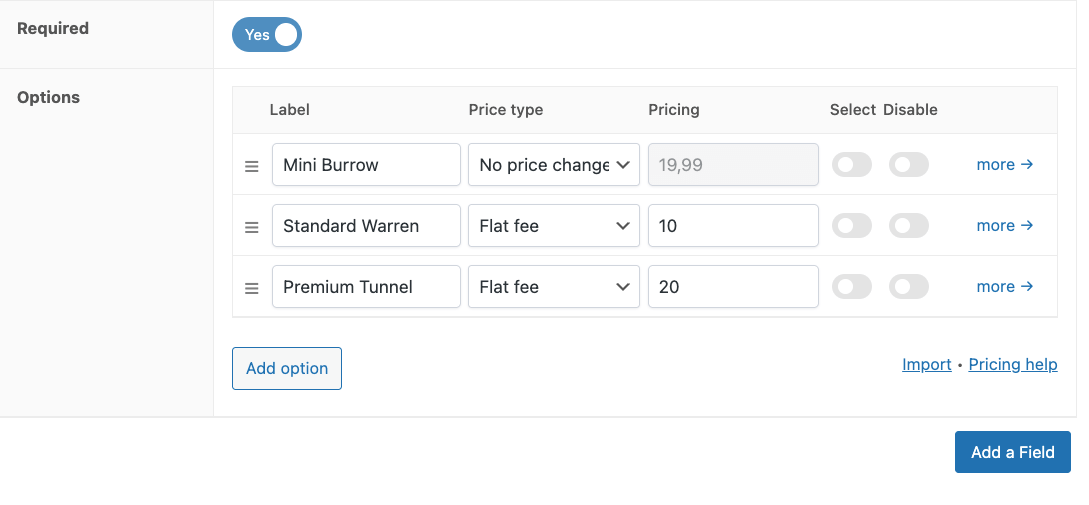
- Add different options such as “Mini Burrow”, “Standard Warren”, and “Premium Tunnel”, and set the pricing type of the second and third tiers to “Flat fee”. This way, when customers choose a higher tier, they’ll pay the correct price.
- Make sure it works on the front end too.
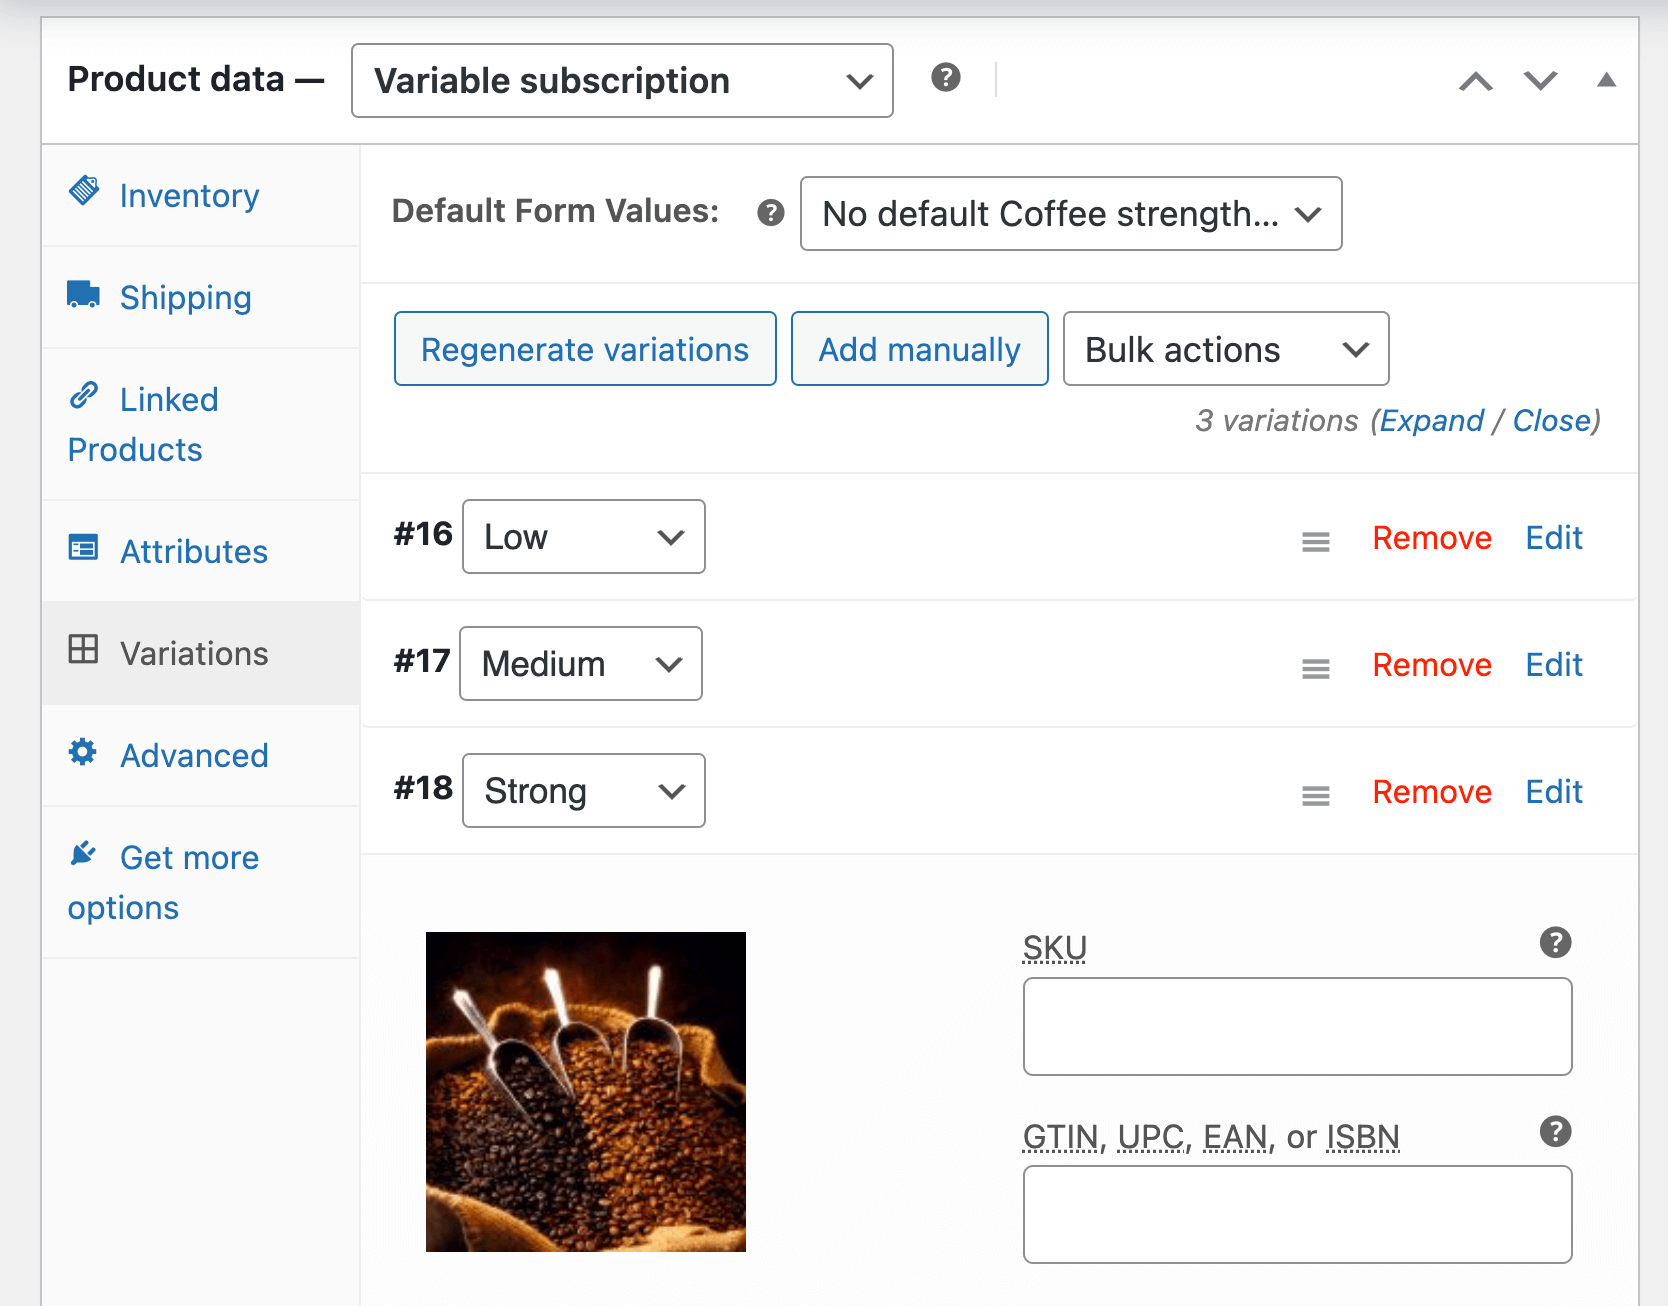
Step 3: Add variable product selection with images
Now, you want your customers to be able to choose the products they want in their boxes. However, since you have different tiers, you need to set limits on the products they can add. To do this, we’ll create 3 separate fields and place conditional logic on them – one for each tier.
- Add a new field for product selection using the “Multiselect image swatches” field type and name it.
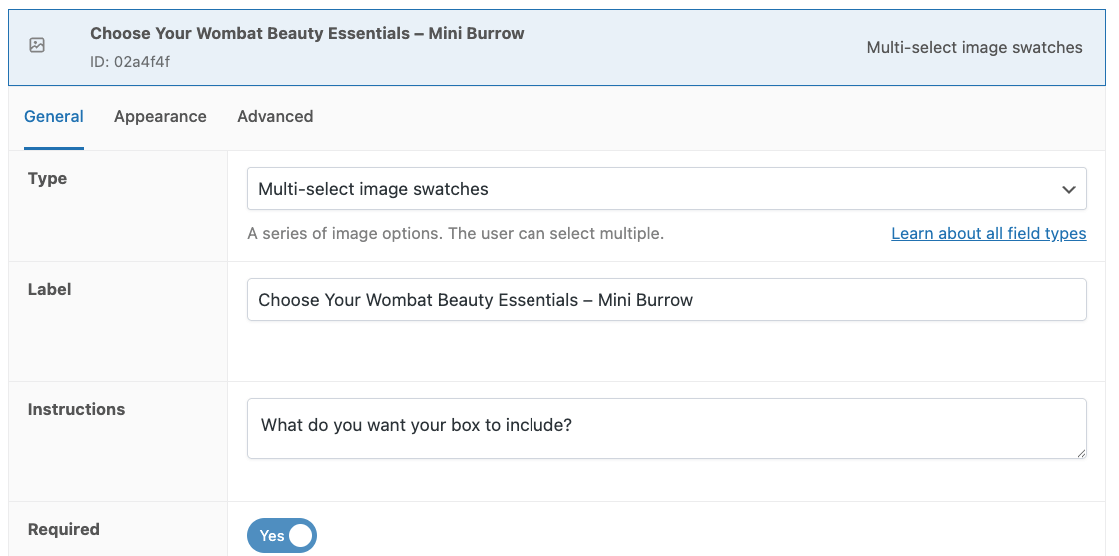
- Add multiple options with images: “Burrow Mud Face Mask”, “Cube Root Dry Shampoo”, and “Warren Wellness Body Scrub”.
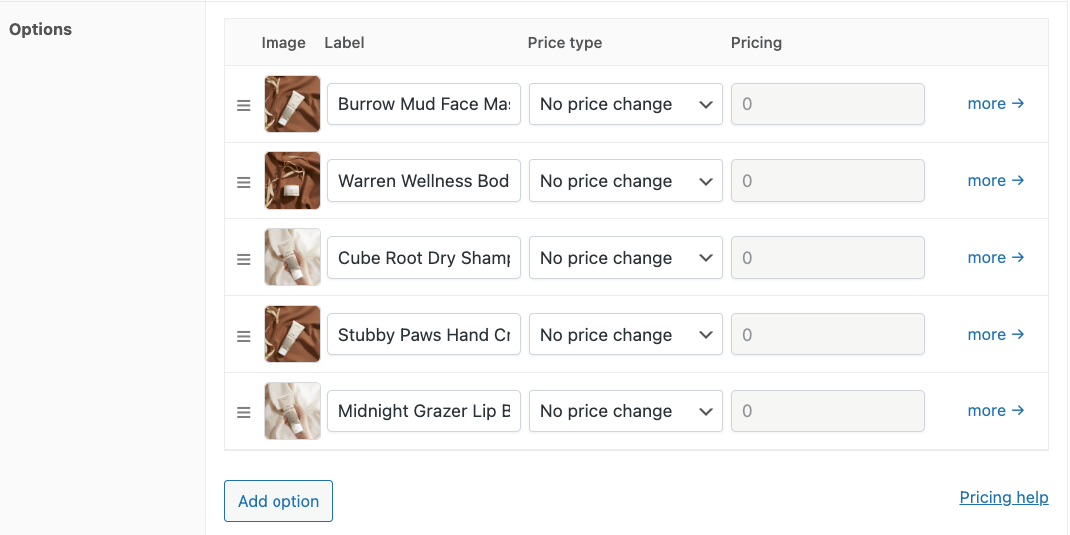
- Set minimum and maximum quantities so that they can only choose up to 3 products.

- Go to the Advanced tab and create a rule group that requires the “Mini Burrow” tier to be selected in order for this field to show up.
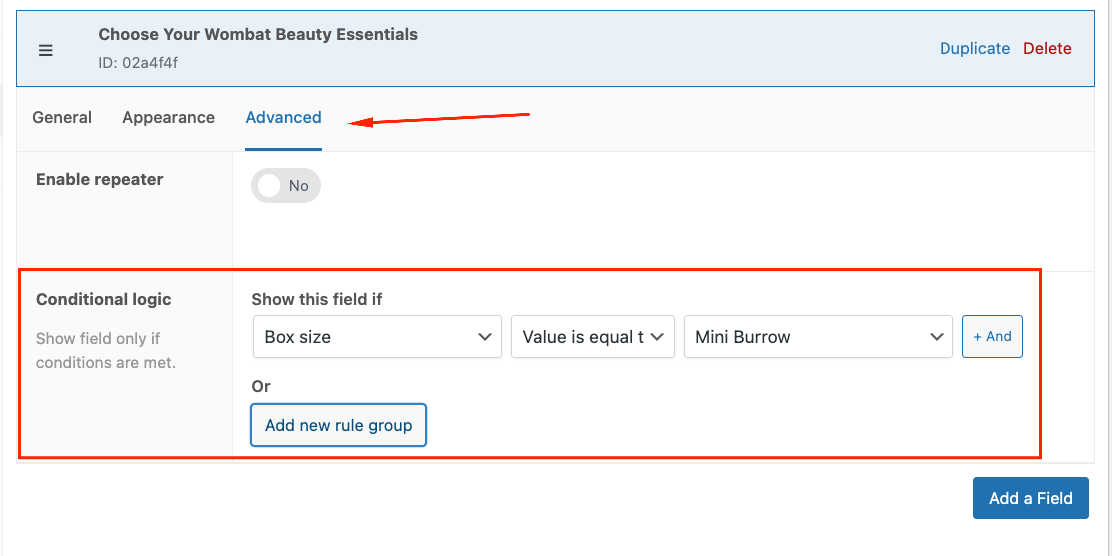
- Now repeat the same process for the other tiers. The only things you need to change are the maximum quantities and the rule group.
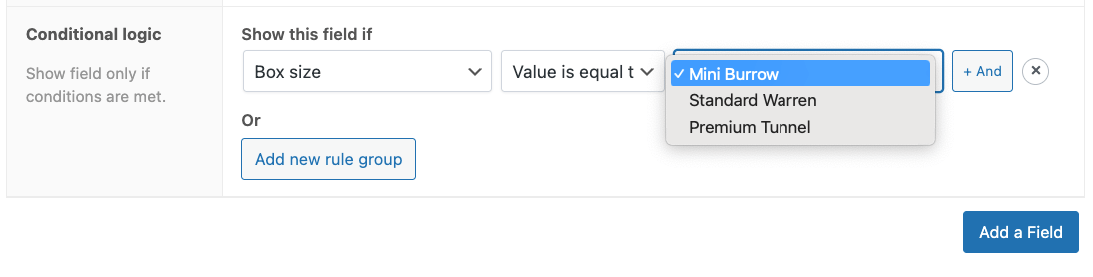
- And again, always test on the front end.
Step 4: Add upsell options
With Advanced Product Fields, you can add additional products as options. This allows you to strategically place related products and services. When the user adds a product, it will be automatically included in their cart, adjusting the stock accordingly on the back end.
It’s also very easy to do!
- Create a Products field for upsells and title it.
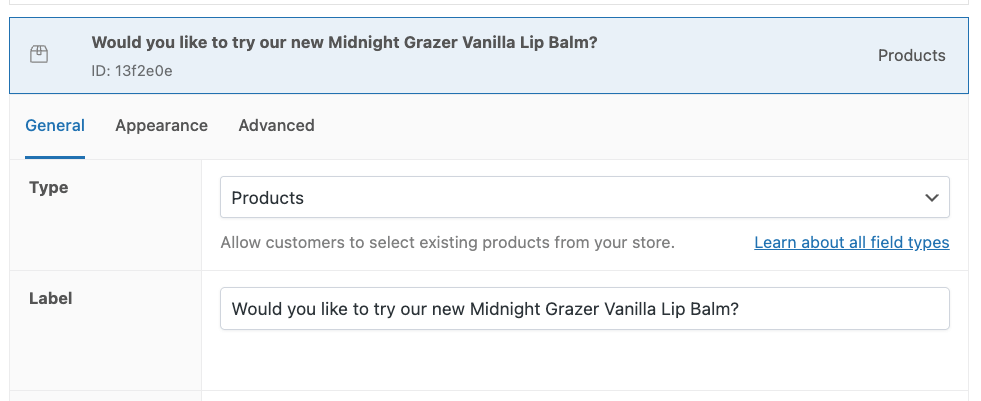
- Choose how you want the product to be displayed: check boxes, radio buttons, select lists, and even product cards. If you choose any of the advanced options with quantities, the buyer will have to specify how many they want to add. Otherwise, it’s just one item.
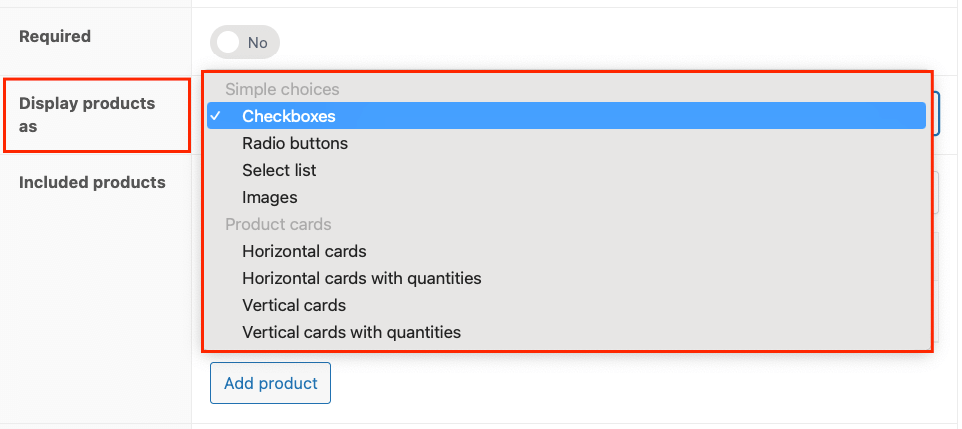
- Then, you can either choose specific products or auto-populate the section with other items in the same category.
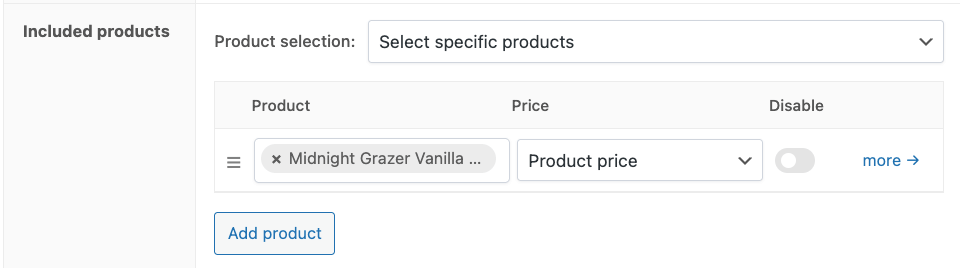
- Now, customers can choose to add as many related products as they want (unless you specify limits).

This setup gives customers a personalized experience while making subscription management easier for you. The front end display will show a clean interface with box selection at the top, followed by product options with images, quantity selectors, and additional upsell checkboxes.
Set up recurring orders for your WooCommerce store today
Recurring orders transform your WooCommerce store by creating predictable revenue, improving cash flow, and reducing administrative tasks while giving customers convenience and continuity.
Getting started with WooCommerce Subscriptions provides the essential foundation for subscription products, but it offers limited customization options and inflexible payment models.
With Advanced Product Fields by Studio Wombat, you unlock the full potential of your subscription business:
- Custom product configurations
- Personalized ordering experiences
- Dynamic pricing adjustments
- Conditional logic for smart product recommendations
This powerful combination keeps subscribers engaged longer and boosts your recurring revenue. Ready to transform your subscription business? Download Advanced Product Fields for WooCommerce today and start offering subscription experiences your customers won’t want to cancel.
