You’re here because you want to increase your average order value through strategic product recommendations. Smart move.
While the concept of cross-selling (suggesting complementary products to increase sales) seems straightforward, the actual implementation in WooCommerce can feel surprisingly unclear. Which settings should you use? Where do cross-sells appear? How many products should you recommend?
Here’s the good news: WooCommerce includes native cross-selling functionality that doesn’t require additional plugins. You can start implementing cross-sells today without spending extra money.
The not-so-good news? The built-in features have limitations.
This guide walks you through everything step by step.
- First, we’ll set up cross-sells that appear on cart pages using WooCommerce’s default functionality.
- Then, we’ll explore how to leverage the related products feature for automatic recommendations.
- Finally, we’ll look at advanced options for stores ready to take cross-selling to the next level.
Now, let’s turn those single-item purchases into profitable bundles.
What is cross-selling?
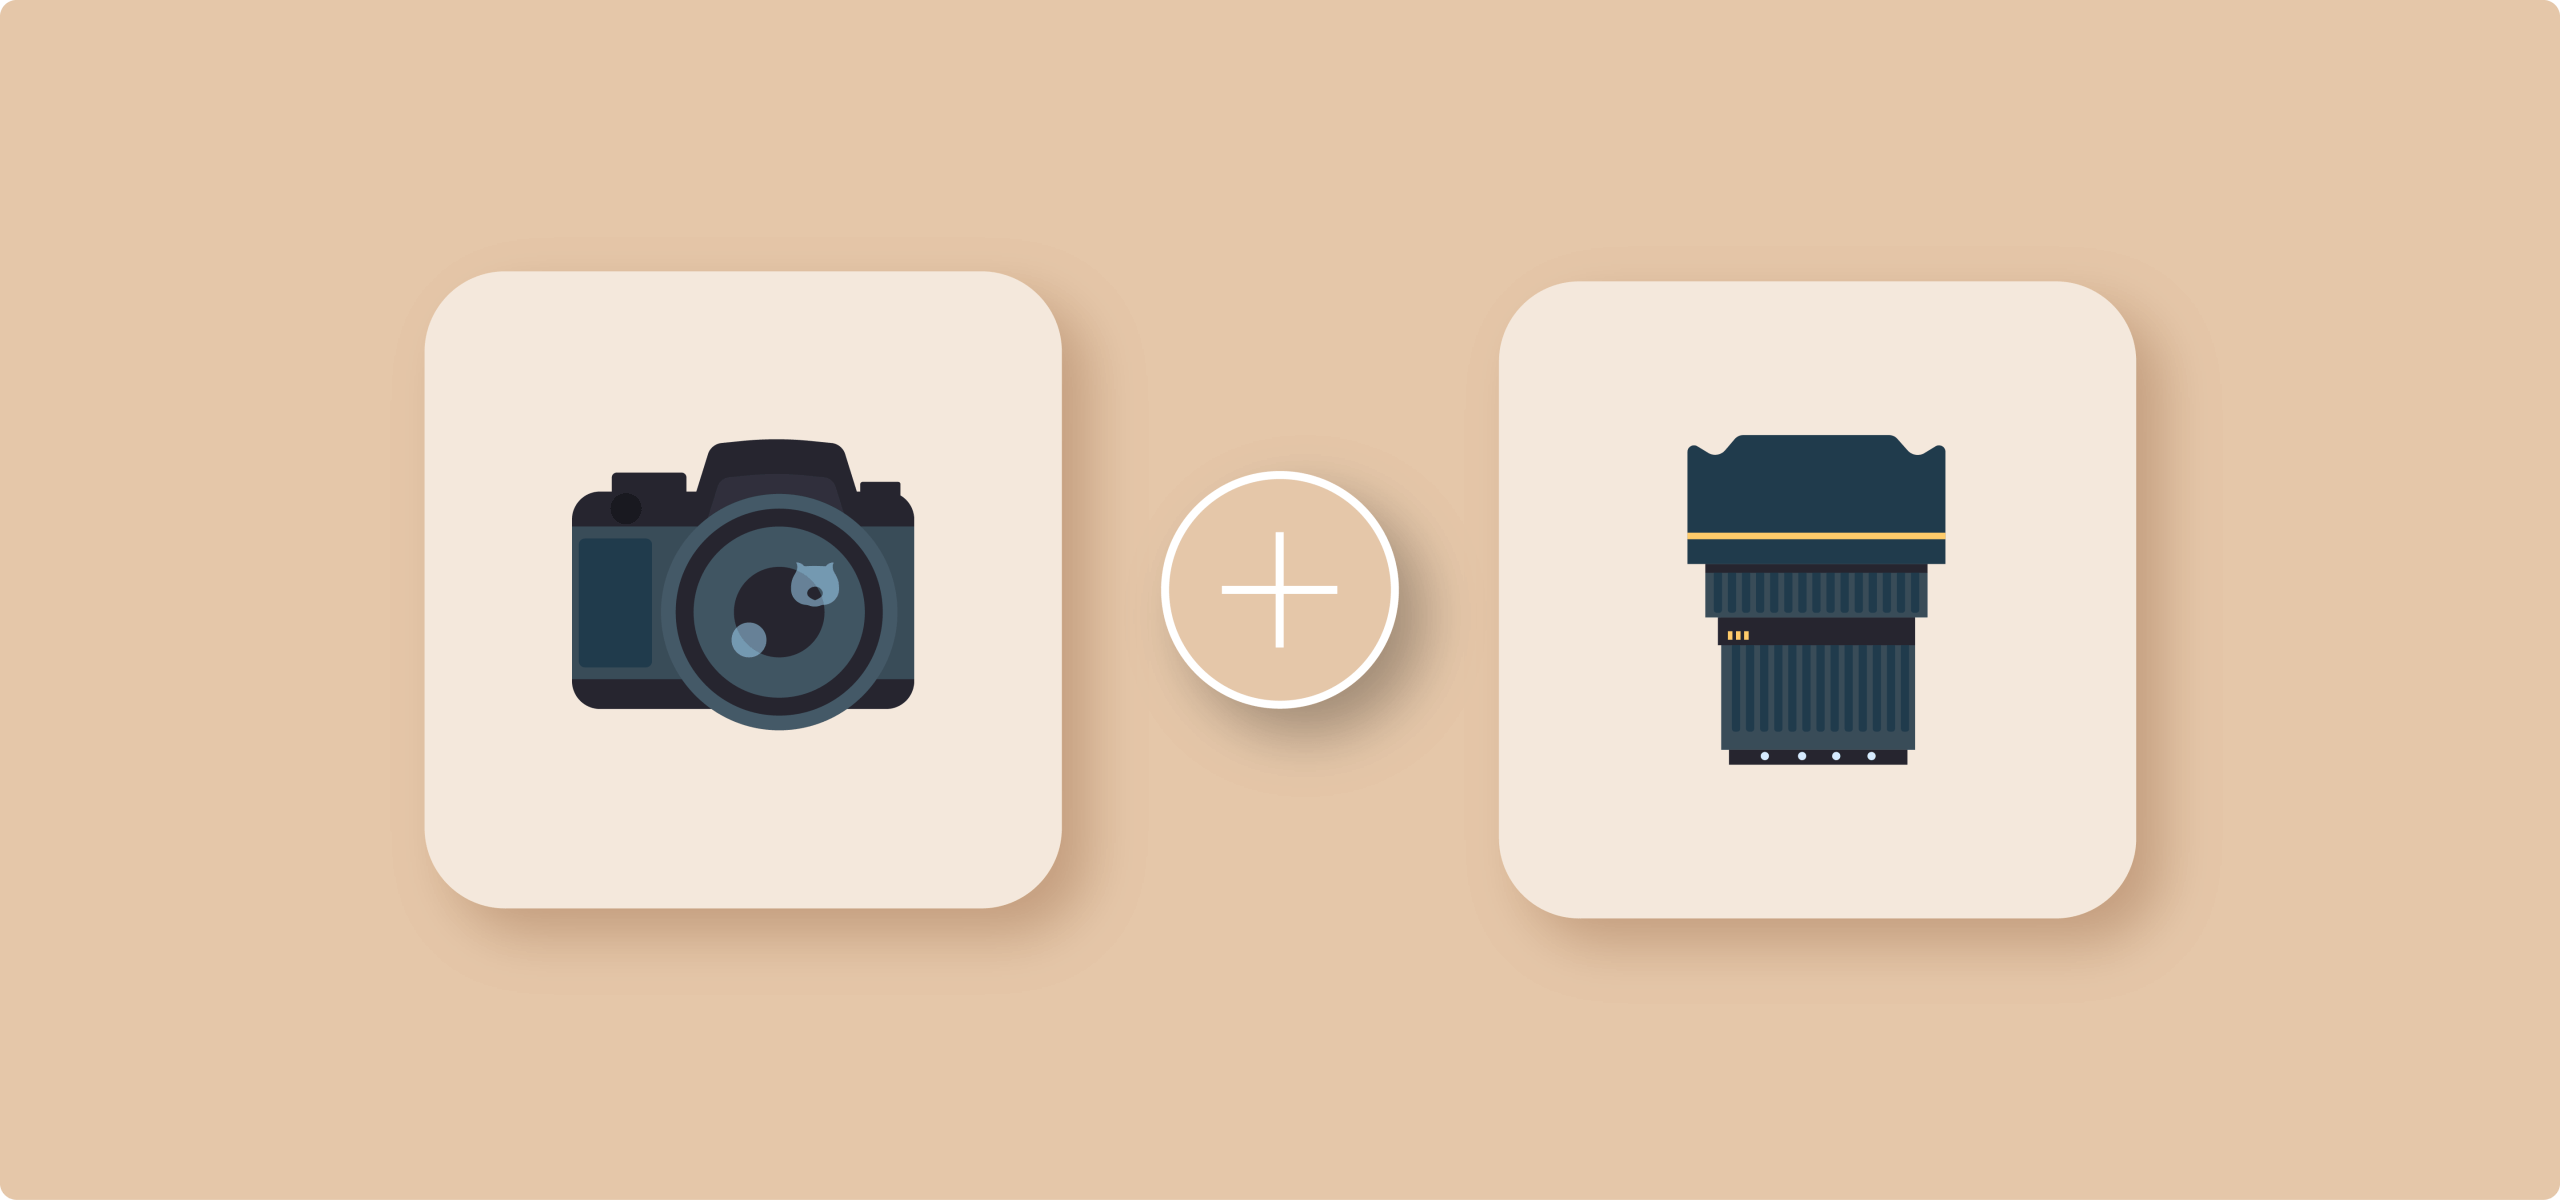
Cross-selling is recommending complementary products that work with the main product. These aren’t random suggestions – they’re carefully chosen items that enhance or complete the original purchase.
The goal? Solve additional customer problems. When someone buys a camera, they’ll probably need memory cards and a protective case. When they purchase a laptop, they might need a mouse or a laptop bag. Cross-selling addresses these natural, related needs.
Effective cross-selling feels helpful rather than pushy. You’re not bombarding customers with unrelated products – you anticipate their needs and offer genuine solutions.
Cross-selling commonly appears in 3 locations:
- Product pages display recommendations in “You may also like” or “Frequently bought together” sections.
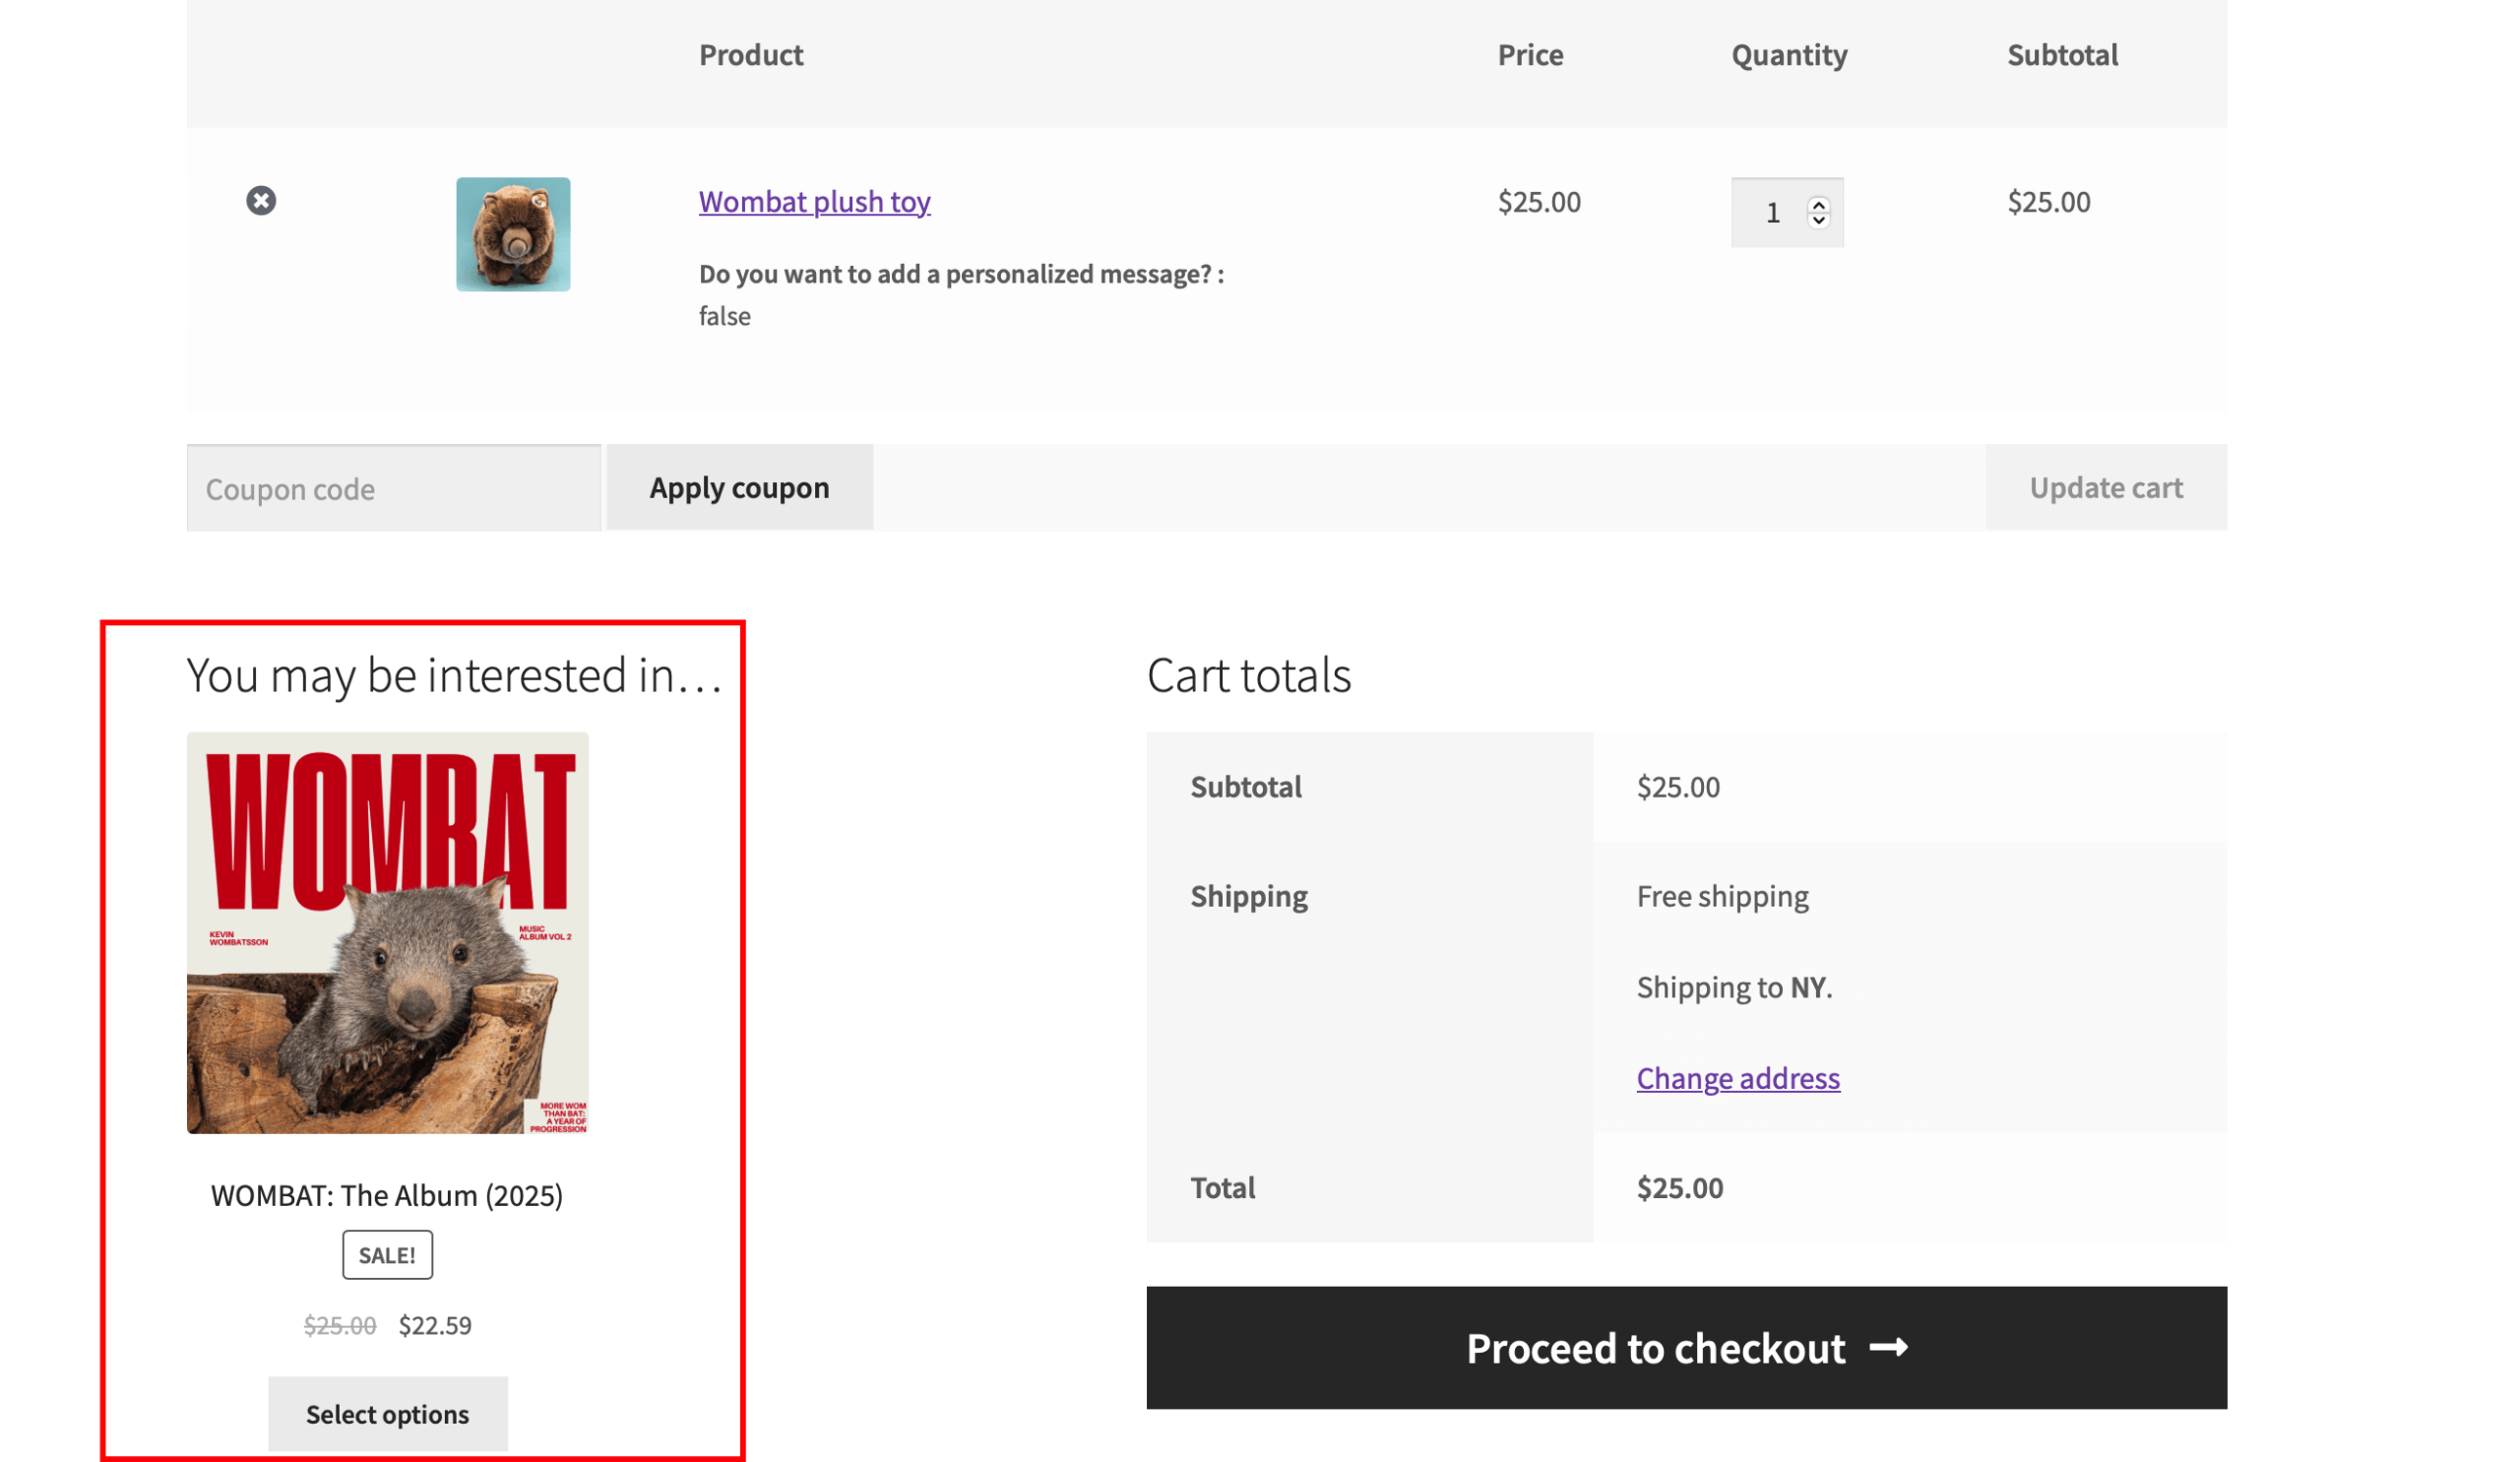
- Shopping cart pages show cross-sells when customers review their items (WooCommerce’s primary native location).
- Checkout pages present last-minute additions before payment.
Each placement serves a different purpose.
- Product pages help during browsing.
- Cart pages catch customers when they’re committed.
- Checkout pages offer final conveniences.
Cross-selling vs upselling
Cross-selling and upselling both increase order value. The difference lies in what you’re recommending.
| What is it? | Example | When to use it | |
|---|---|---|---|
| Upselling | Upselling encourages customers to purchase a higher-end version of their chosen product. Same category, higher price. | Customer wants to buy a $800 laptop, you offer them a $1,200 model with better specs. | Upselling works best before the purchase decision – while customers compare options. |
| Cross-selling | Cross-selling suggests additional, complementary products. Different categories that work together. | Customer wants to buy a $800 laptop, you offer them a $50 laptop bag and $30 mouse. | Cross-selling excels after the primary decision, when customers think about what else they need. |
Cross-selling best practices for WooCommerce stores
The 3-product rule
Display 3-4 cross-sells maximum. More overwhelms customers, fewer makes you miss opportunities. This sweet spot gives choices without decision paralysis.
Intentional product selection
Choose cross-sells that make sense. Follow these criteria:
- Cost less than the main product’s price: Nobody wants to see a $2,000 accessory for their $500 purchase.
- Solve problems created by the main purchase:
- Laptop → laptop bag (protection during transport)
- Phone → screen protector (prevents damage)
- Printer → ink cartridges (necessary for operation)
- Enhance the product’s use:
- Camera → memory card (more storage)
- Gaming console → extra controller (multiplayer fun)
- Coffee maker → specialty beans (better taste)
Strategic placement
- Cart page: Your best conversion opportunity. Customers have already decided to buy, they’re in purchasing mode, and this is where WooCommerce’s native cross-selling shines.
- Product page: Good for discovery, but lower urgency. Customers are still browsing and comparing options.
Common mistakes to avoid
❌ Random, unrelated suggestions (“Buy socks with your laptop!”)
❌ Cross-sells more expensive than the main product
❌ Set-and-forget approach (review performance monthly)
❌ Ignoring mobile display – test how cross-sells appear on phones
Remember: Cross-selling should feel like helpful advice from a knowledgeable friend, not a pushy salesperson.
Step-by-step guide to set up cross-selling on cart pages
Setting up cross-sells in WooCommerce takes just minutes. Here’s exactly how to configure products that appear when customers view their cart.
- Log in to your WordPress admin dashboard. Navigate to Products → All Products.
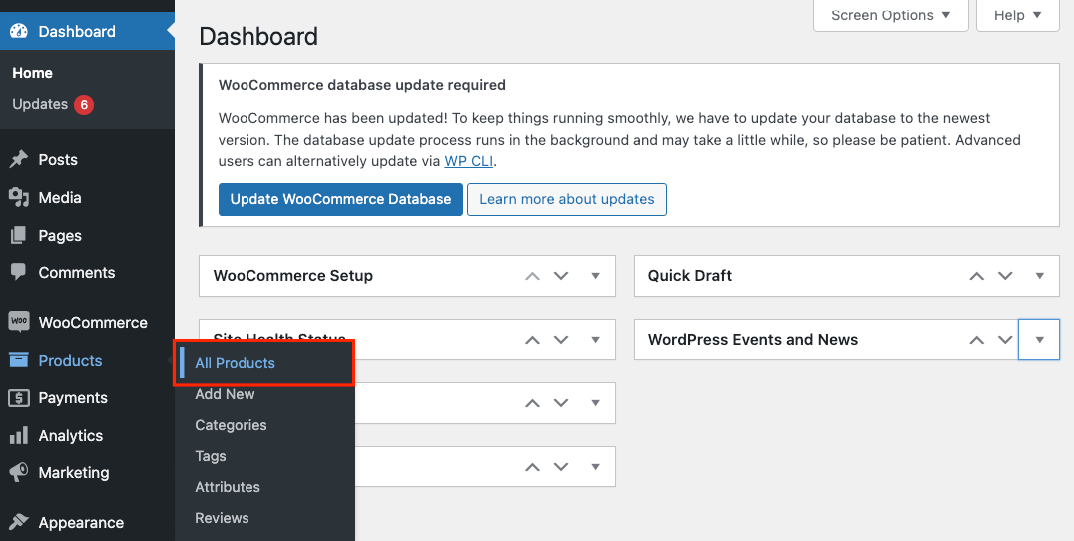
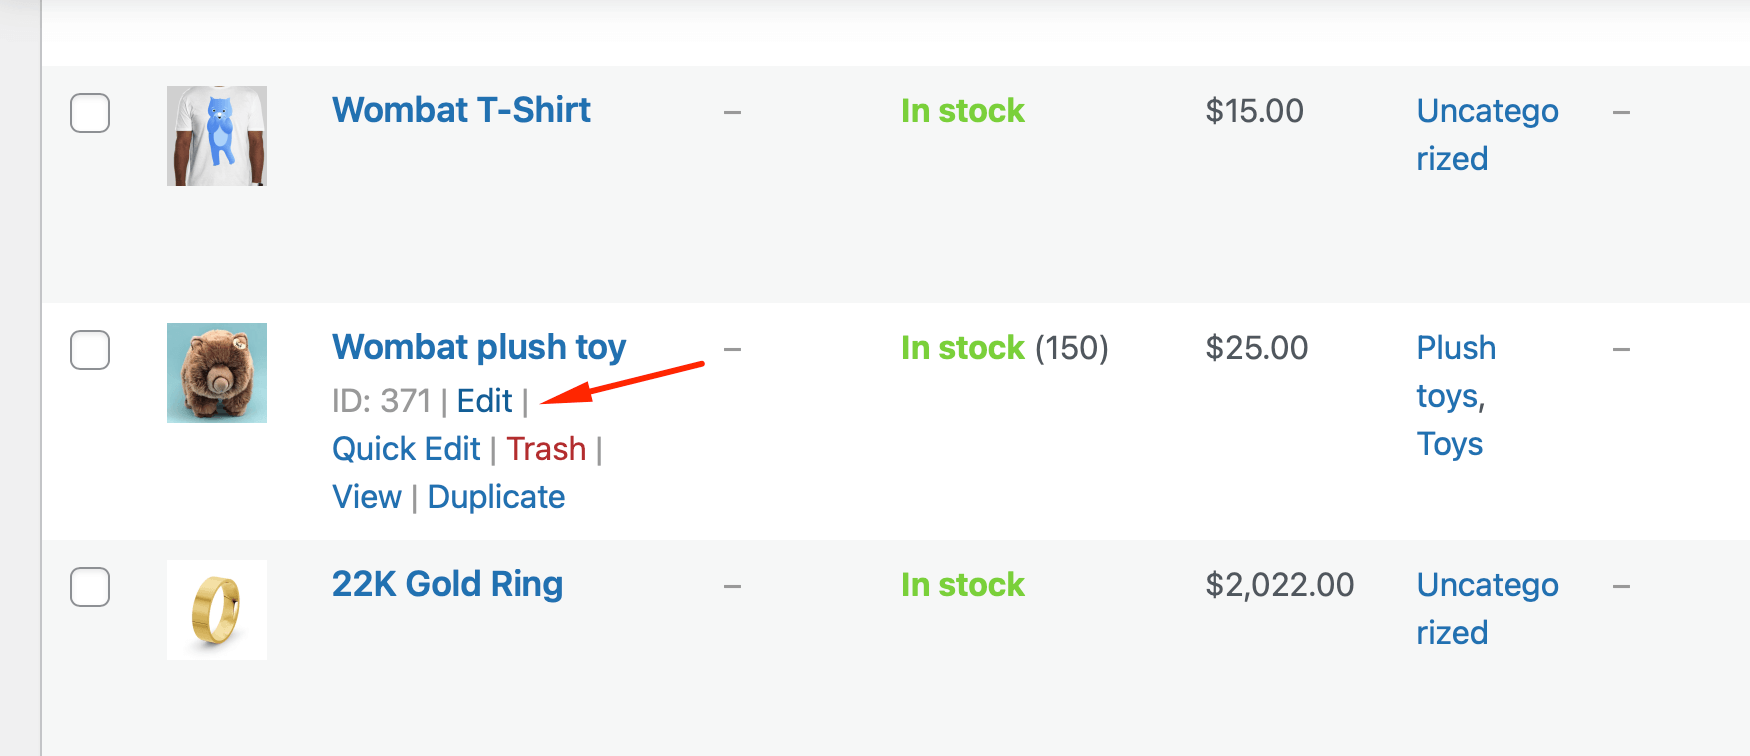
- Select a product you want to add cross-sells to. Click Edit.
- Scroll down to the Product data section. Click the Linked Products tab.
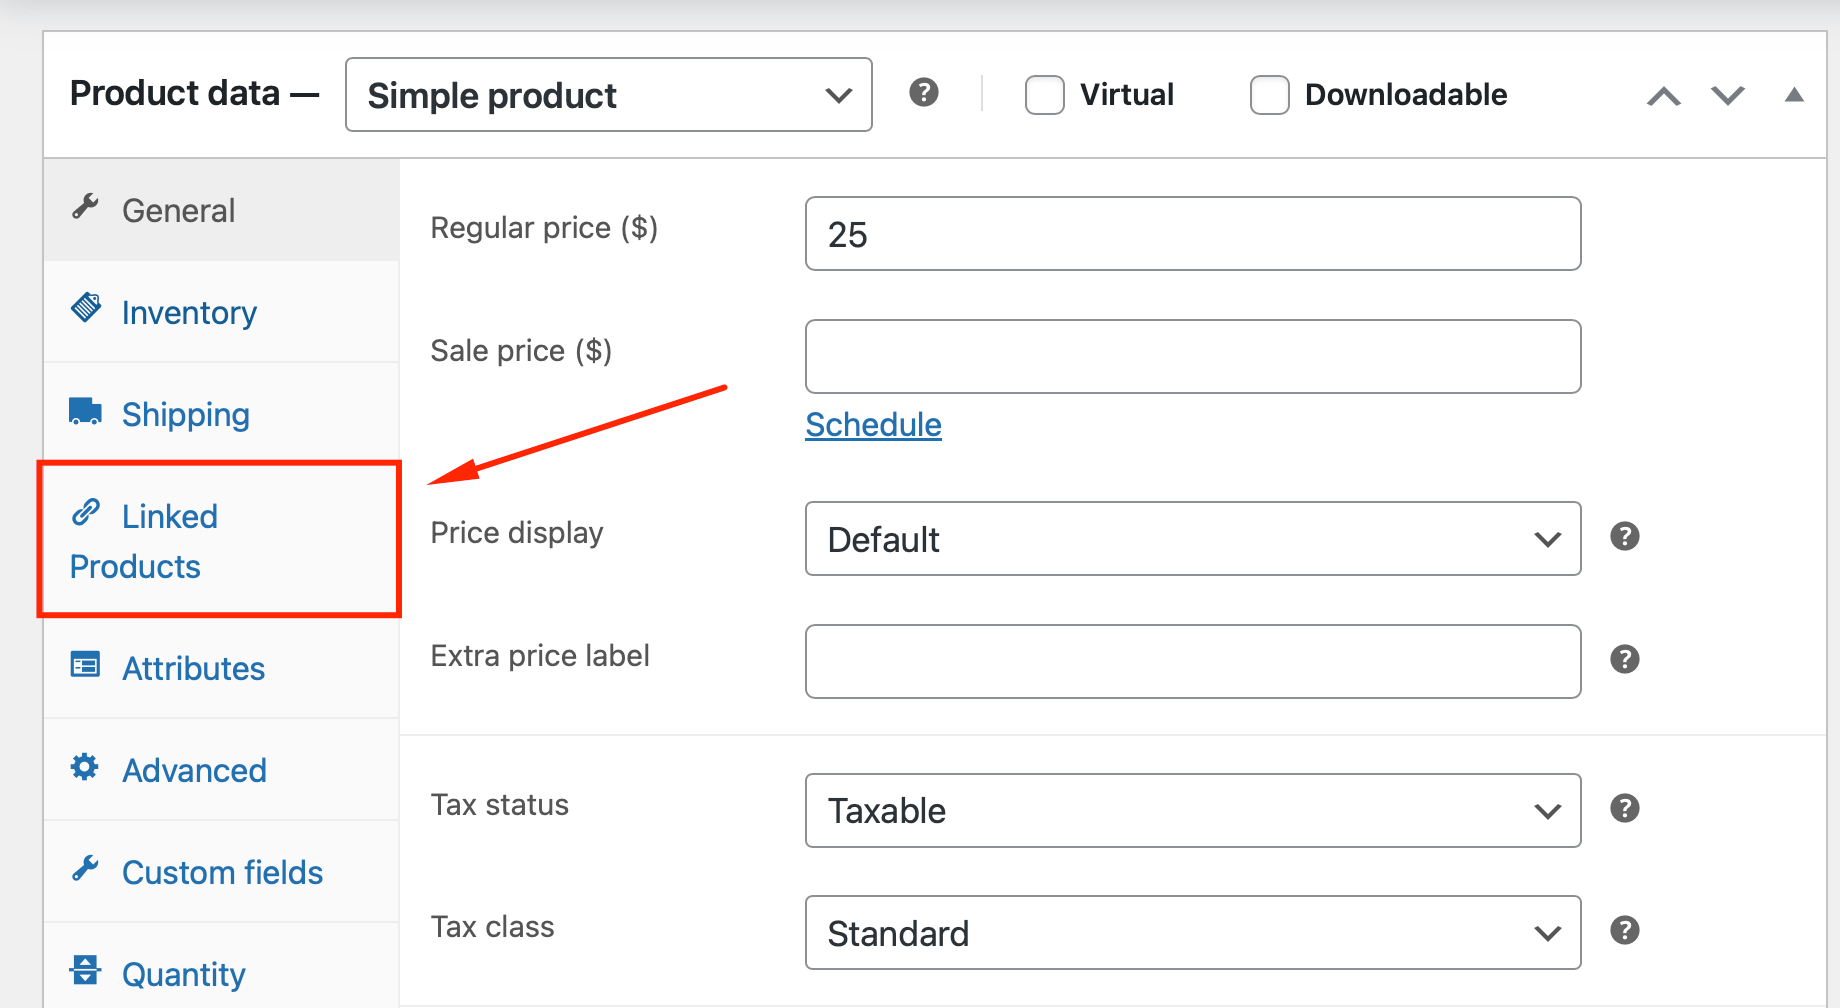
- In the Cross-sells field, start typing product names. A dropdown appears with matching products. Select each product you want to recommend.
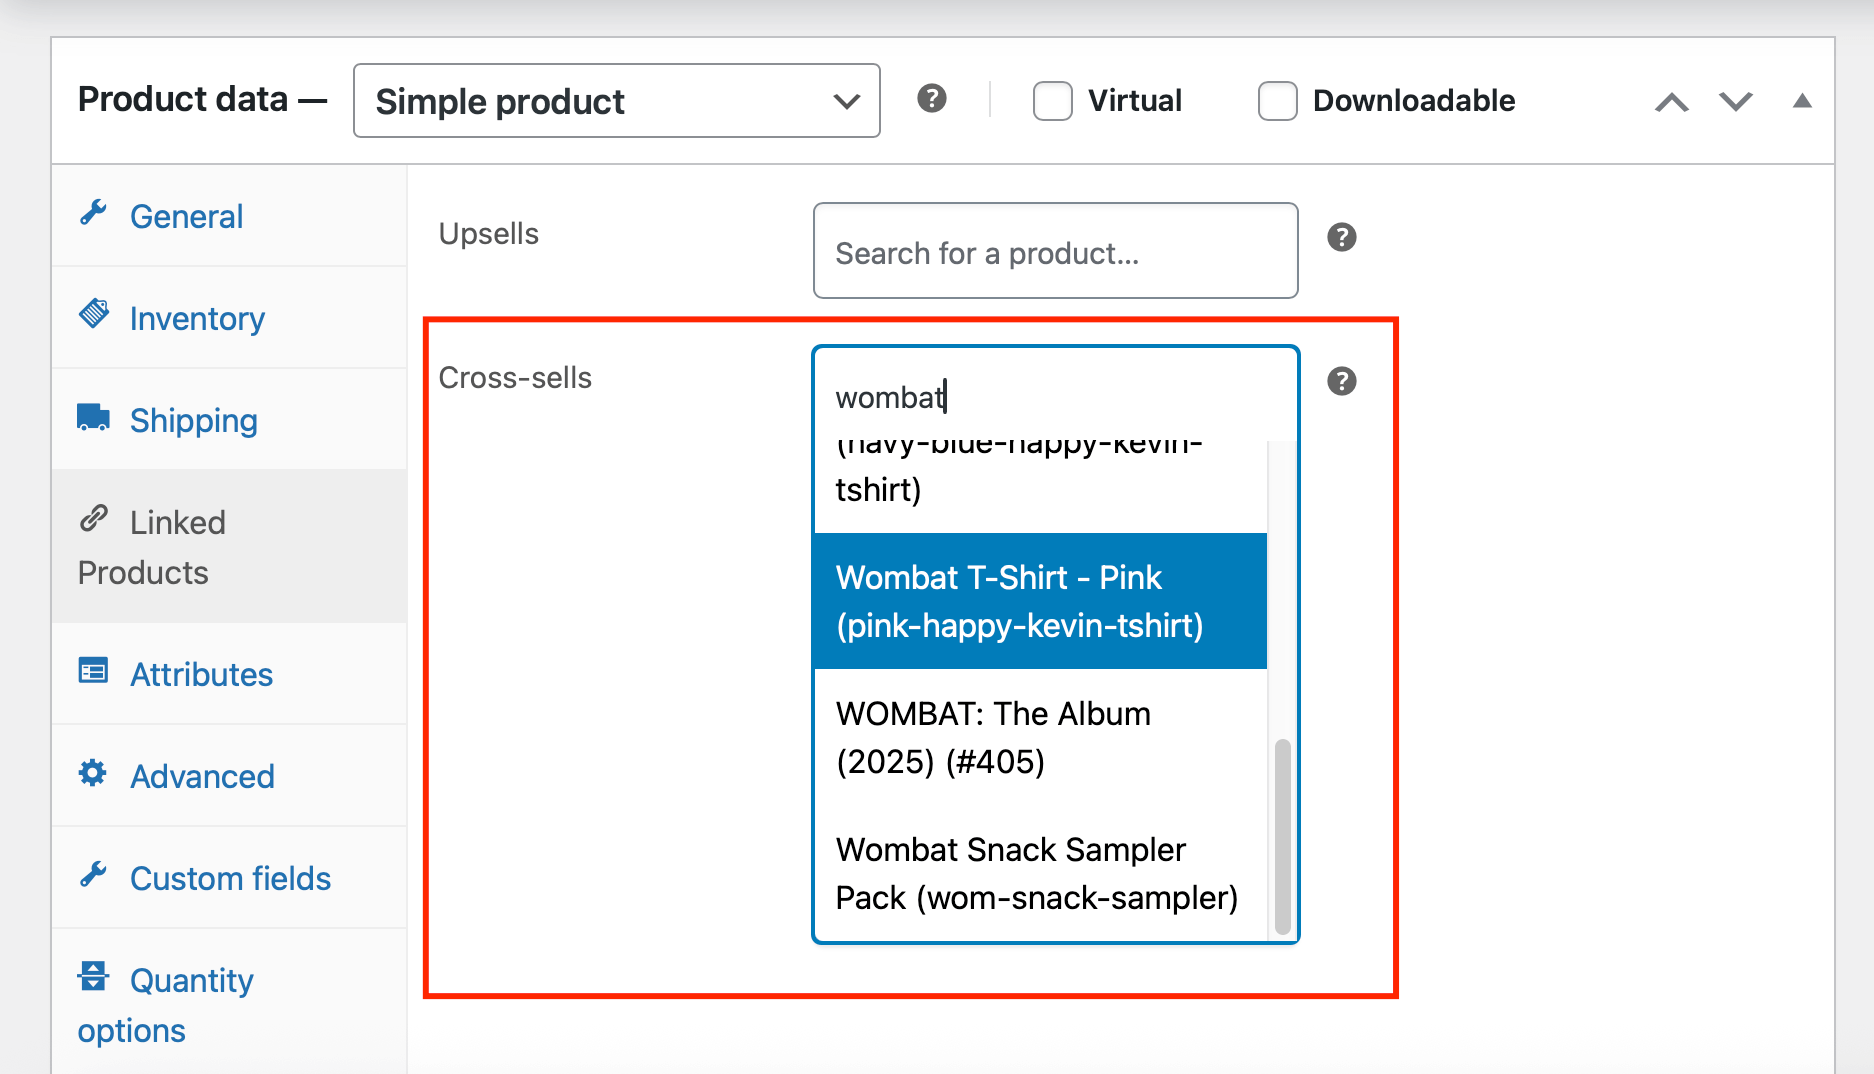 You can add multiple cross-sell products. Simply keep typing and selecting until you’ve added all desired recommendations.
 - Click Update to save your changes.
That’s it! These products now appear in the cart when customers add the original product.
Important considerations
- Choose complementary products. Phone cases for phones, batteries for electronics, and cleaning kits for cameras. Whatever you choose, make the connection obvious.
- WooCommerce displays up to 6 cross-sell products by default. Even if you add more, only 6 appear.
- Cross-sells only show when the specific product is in the cart. No product in cart = no cross-sells displayed.
Limitations to know
This native functionality works well but has restrictions:
- Limited display customization
- No advanced targeting rules
- Same cross-sells for all customers
For advanced features, you’ll need plugins.
How to cross-sell using the Related Products functionality
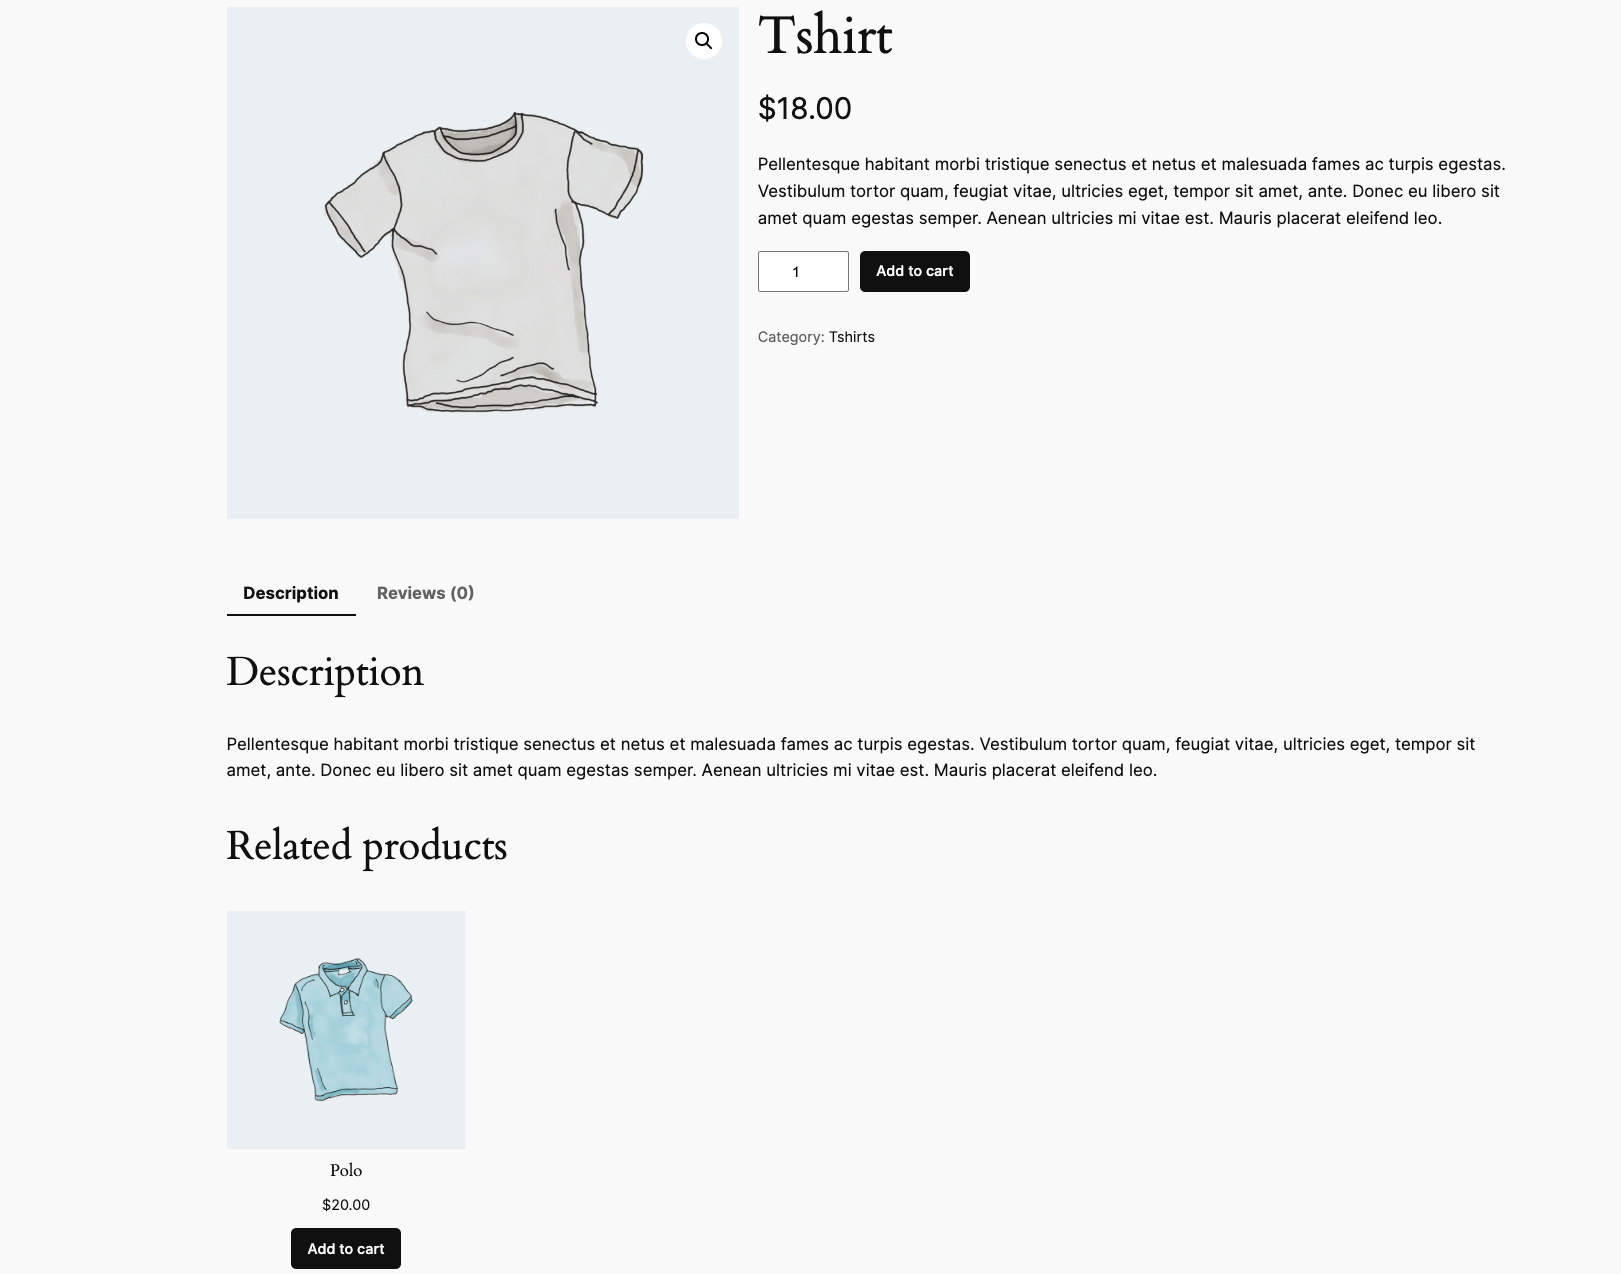
Related Products is a native WooCommerce feature that automatically displays products based on shared categories and tags. Unlike cart-based cross-sells, these appear on product pages.
The beauty? Once configured, it runs automatically.
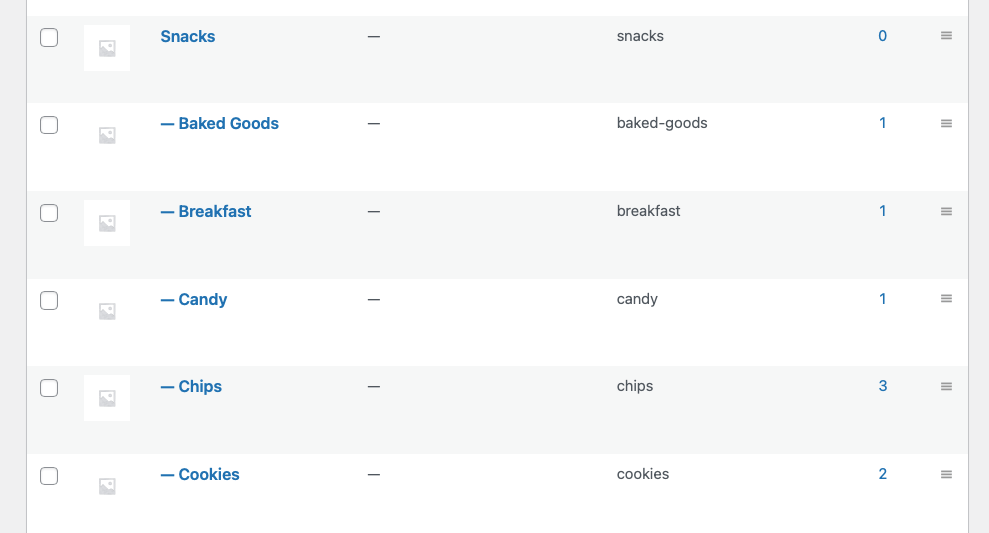
Step 1: Properly categorize your products
Navigate to Products → Categories in your WordPress dashboard. Create categories that group complementary products together. In the example below, Snacks is the main category, while the ones below are its subcategories.
When editing products, assign them to relevant categories in the Product Categories section. Think strategically – products in the same category will appear as related to each other.
Step 2: Add strategic tags
Tags create connections between products in different categories, and you can add those in the Product Tags field.
Use tags to link complementary items that might live in separate categories.
Example in action:
- Tag both “iPhone 15” and “Wireless Charger” with mobile-accessories
- Tag “Running Shoes” and “Athletic Socks” with running-essentials
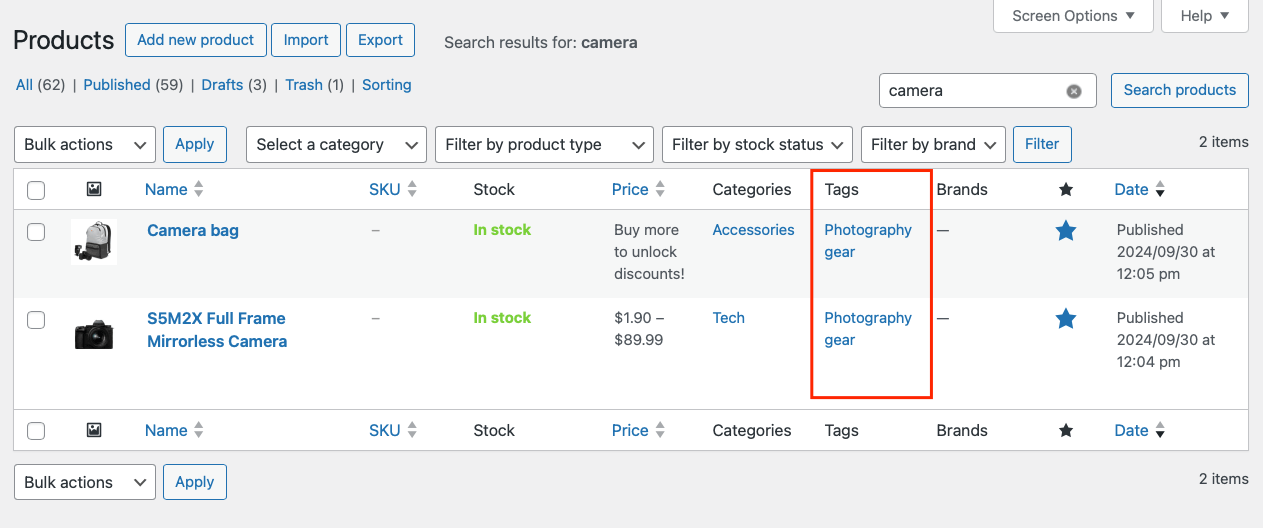
- Tag “DSLR Camera” and “Camera Bag” with photography-gear
How it works
WooCommerce automatically:
- Displays related products based on shared categories and tags
- Shows them on single product pages without configuration
- Updates recommendations as you modify product organization
Pro tip: The algorithm prioritizes products with the most shared attributes. Products sharing both categories AND tags appear more frequently than those sharing just one.
Limitations of native Related Products
While convenient, the built-in feature has restrictions:
- Limited customization for appearance
- No control over the selection algorithm
- Cannot specify exact products to display
- Fixed display location on product pages
To verify your setup works, view product pages while you’re logged out. Related products should appear automatically.
Advanced customization with shortcodes
Need more control? The [related_products] shortcode offers additional flexibility.
Basic usage: [related_products limit=”4″ columns=”2″ orderby=”price”]
Available parameters:
- limit – Number of products to display (default: 4)
- columns – Number of columns for layout (default: 4)
- orderby – Sort products by price, title, or date
For complete shortcode documentation and advanced modifications, check the official WooCommerce documentation.
When you need more power
For advanced cross-selling features, consider dedicated plugins like Frequently Bought Together by YITH and Product Recommendations by Woo.
Both plugins offer cross-selling functionality but take different approaches – Woo’s tool focuses on automated, data-driven suggestions with detailed analytics, while YITH emphasizes customization options and seamless integration with their other plugins.
For example, Product Recommendations uses a lightweight search algorithm that analyzes order history to automatically discover meaningful product relationships and adapts to new trends and seasonal patterns without manual configuration. Frequently Bought Together, on the other hand, allows customers to select product variations (size, color, etc.) directly within a modal popup when adding frequently bought together items, without leaving the product page.
Enhancing cross-sells with Advanced Product Fields for WooCommerce
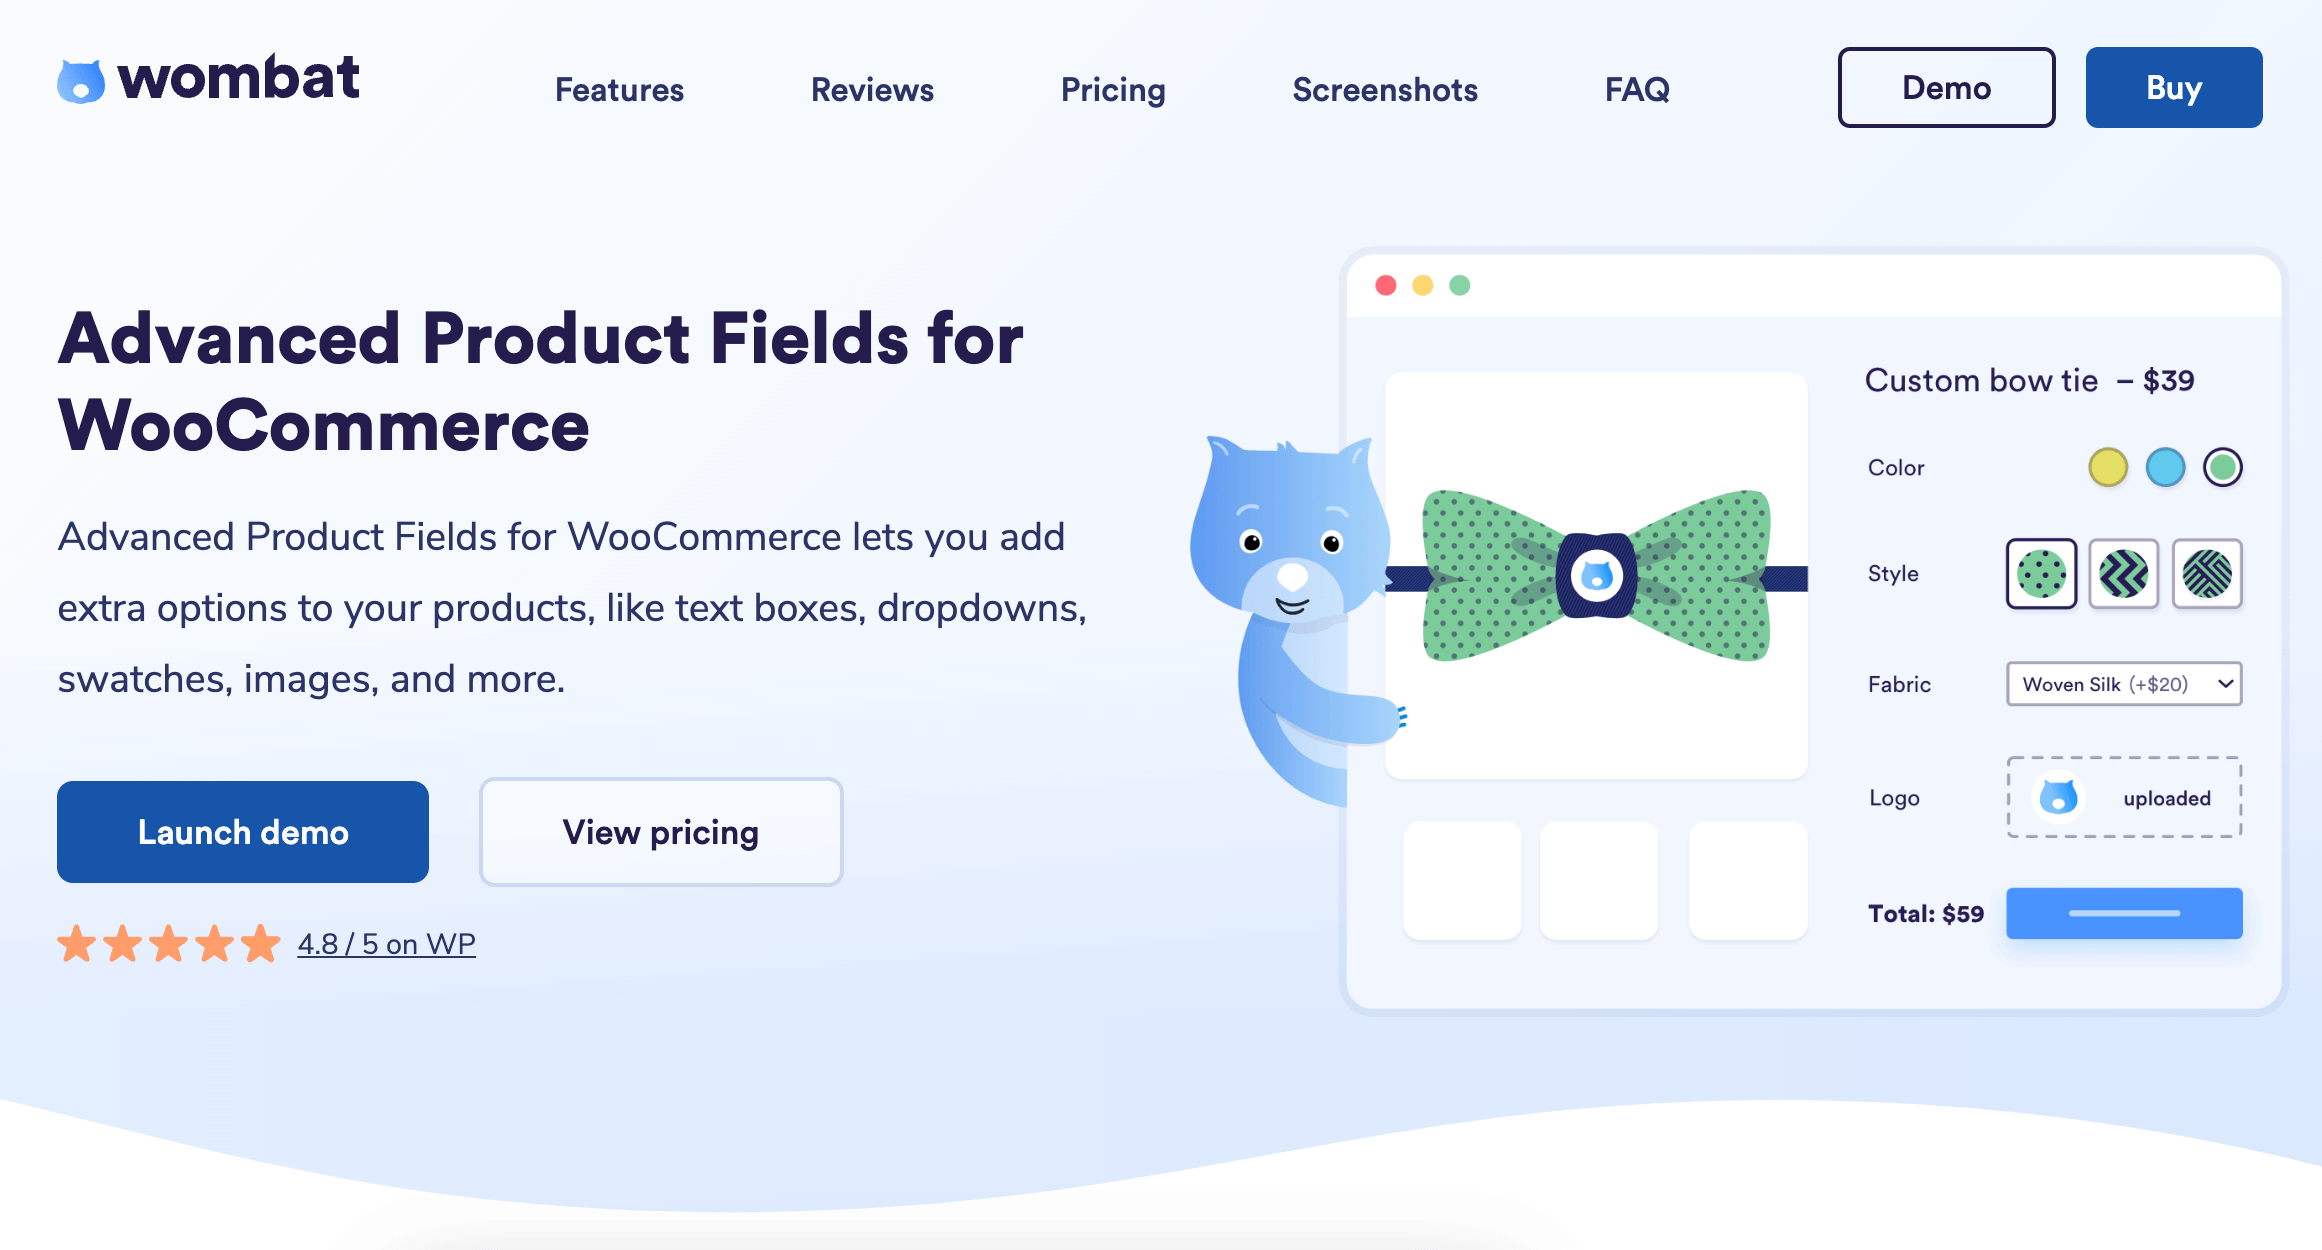
Want to take cross-selling beyond simple suggestions? Let customers build their own bundles.
Think about it: When customers create their own product bundles, mix-and-match selections, or gift boxes, they’re essentially cross-selling to themselves. They choose complementary items based on their specific needs. No guesswork required.
This approach works brilliantly for:
- Gift box businesses (customers pick items for the perfect gift)
- Snack subscription services (choose your monthly selection)
- Meal prep companies (build your weekly menu)
- Craft supply stores (create project bundles)
Advanced Product Fields for WooCommerce makes this possible.
APF transforms standard WooCommerce products into customizable experiences. Instead of showing a simple “Add to Cart” button, you can display interactive selection options in a way that best suits your products. You can add:
- Product selection fields (for bundle building)
- Quantity controls (set minimum/maximum items)
- Conditional logic (show options based on previous selections)
- Dynamic pricing (adjust costs based on selections)
What makes this approach special? Inventory tracking remains simple because each selected item links to existing child products in your catalog. This means stock levels update automatically, and you don’t need to manually track anything.
The result: Customers feel empowered to choose exactly what they want. You benefit from higher-order values and happier buyers.
Setting up a mix-and-match product box
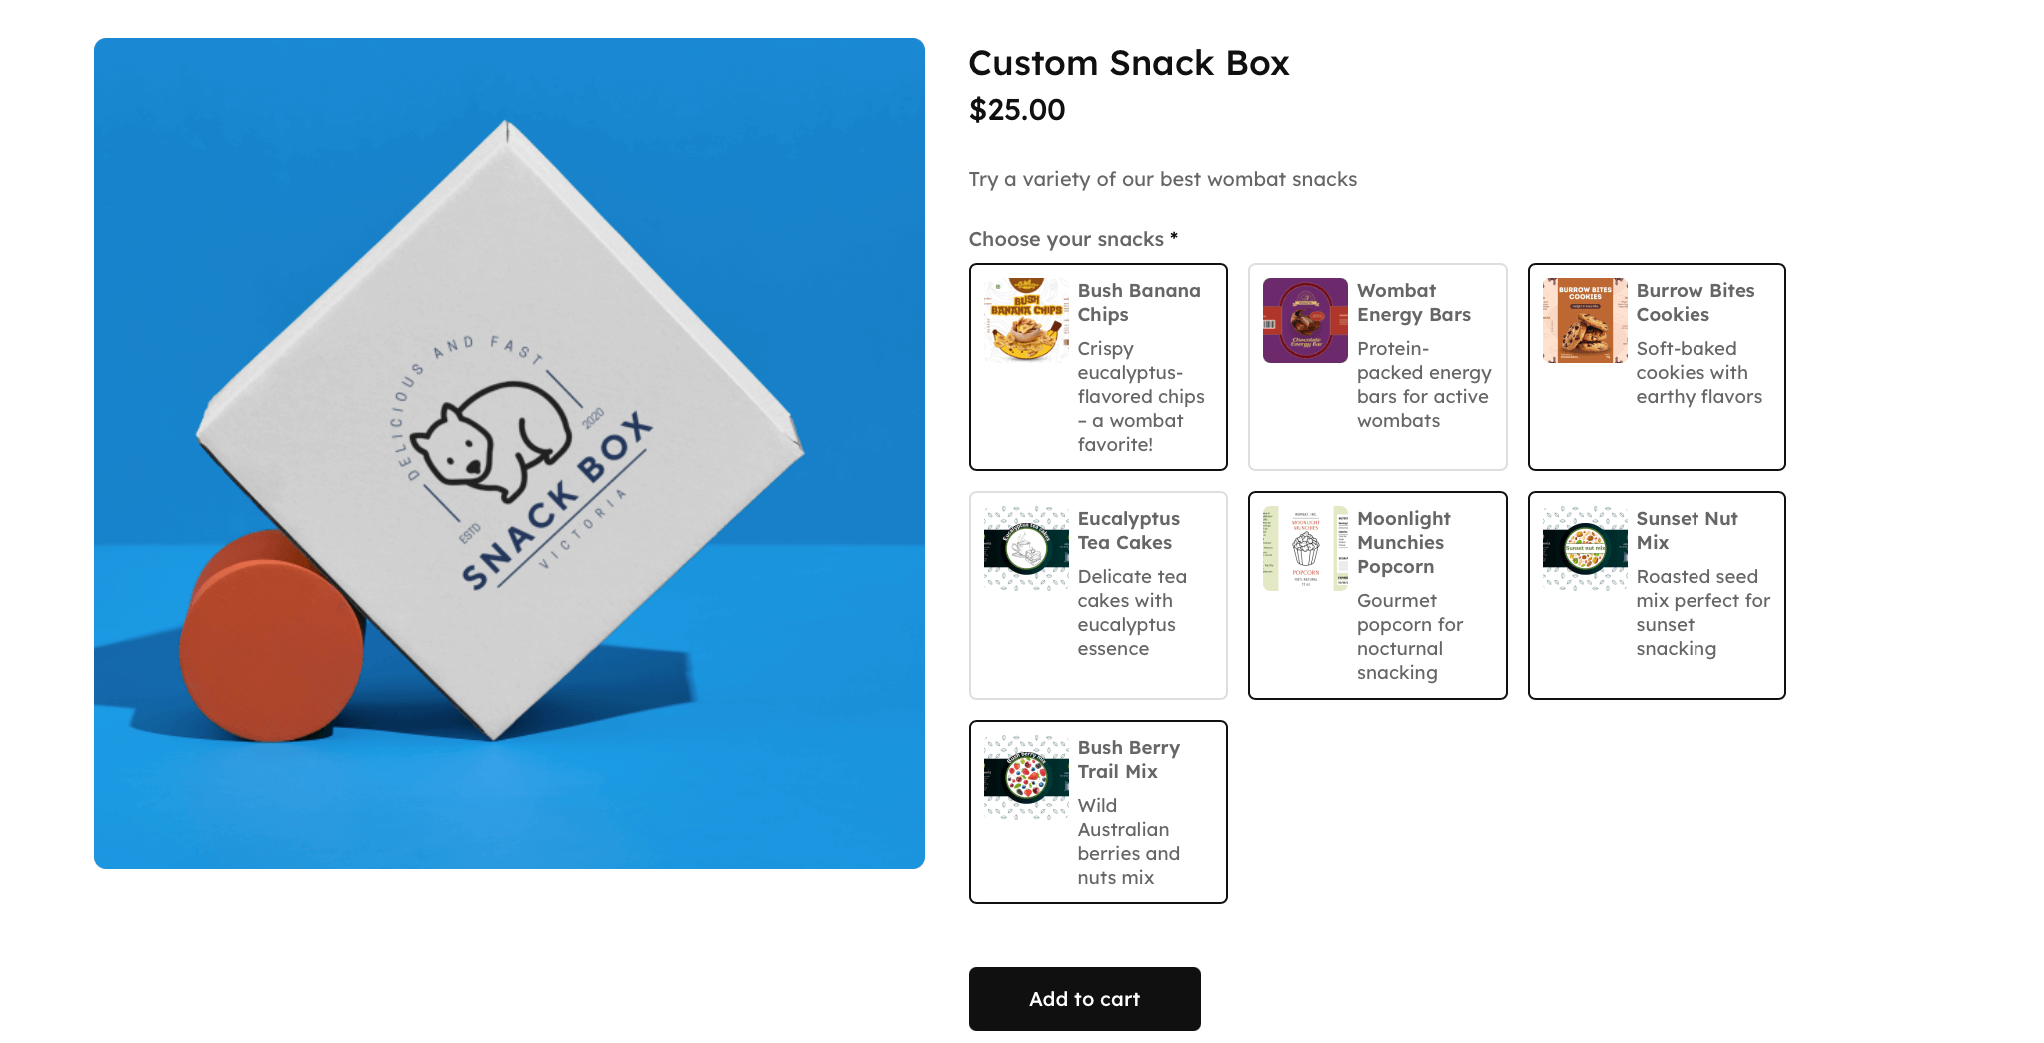
Now, here’s how to create a “Build Your Snack Box” product where customers select 5 items from your collection.
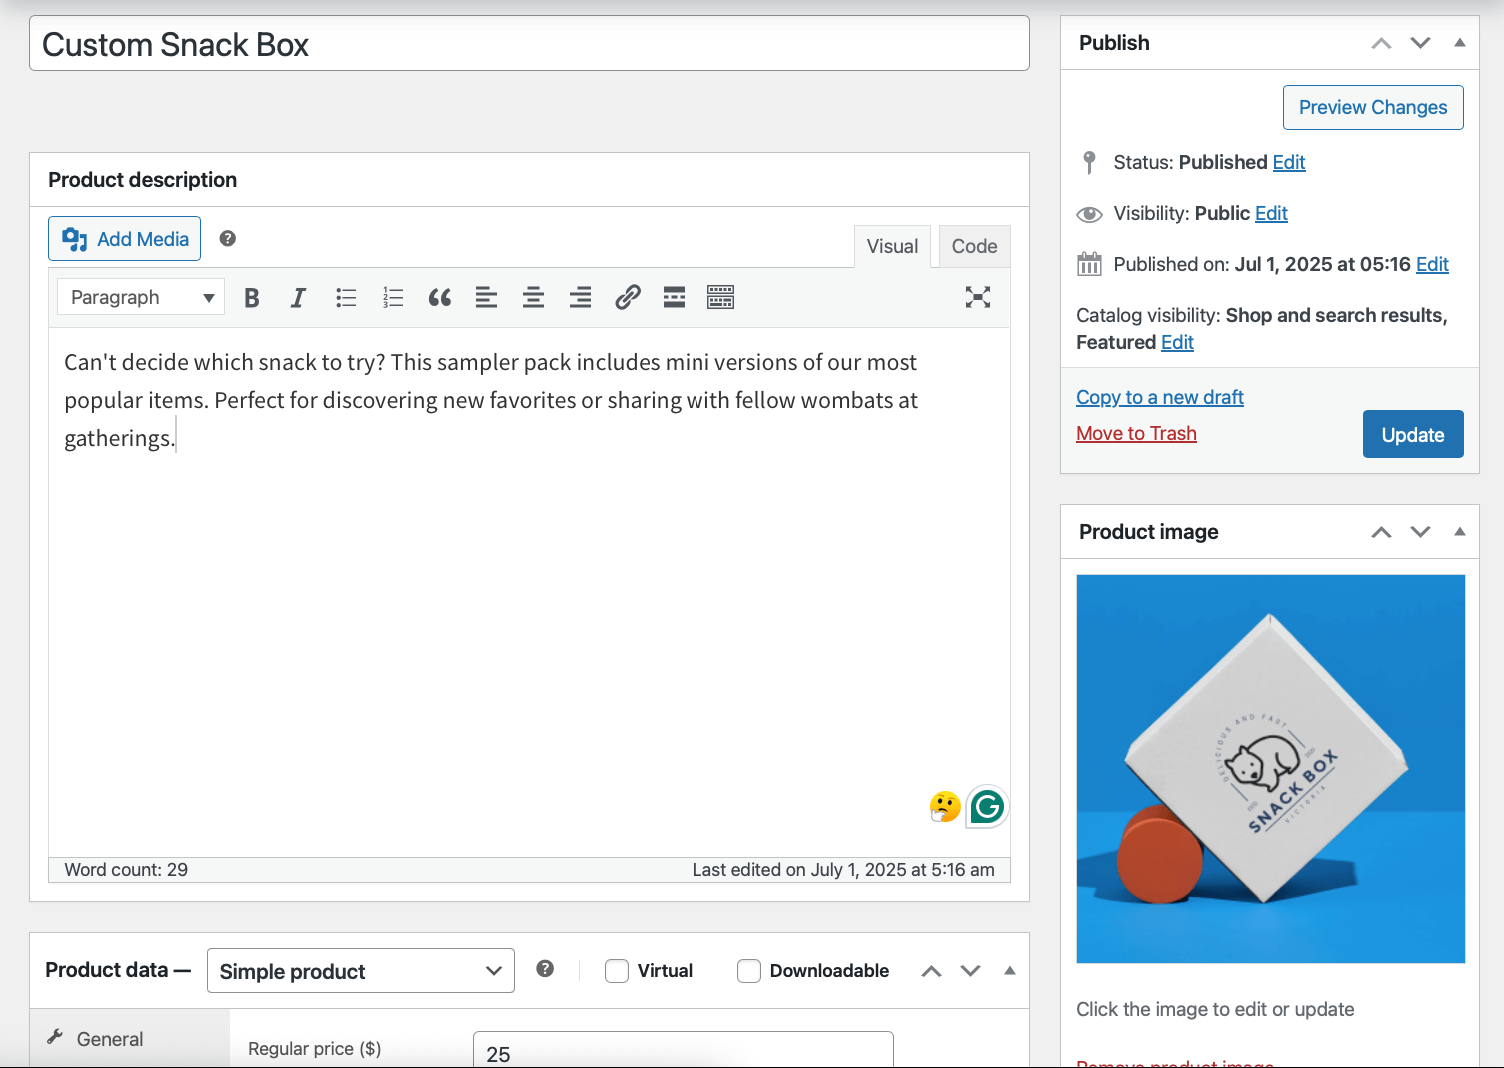
- First, create a new WooCommerce product called “Custom Snack Box.” This serves as your base product that customers will customize.
- Navigate to the Custom Fields tab and click Add Field.
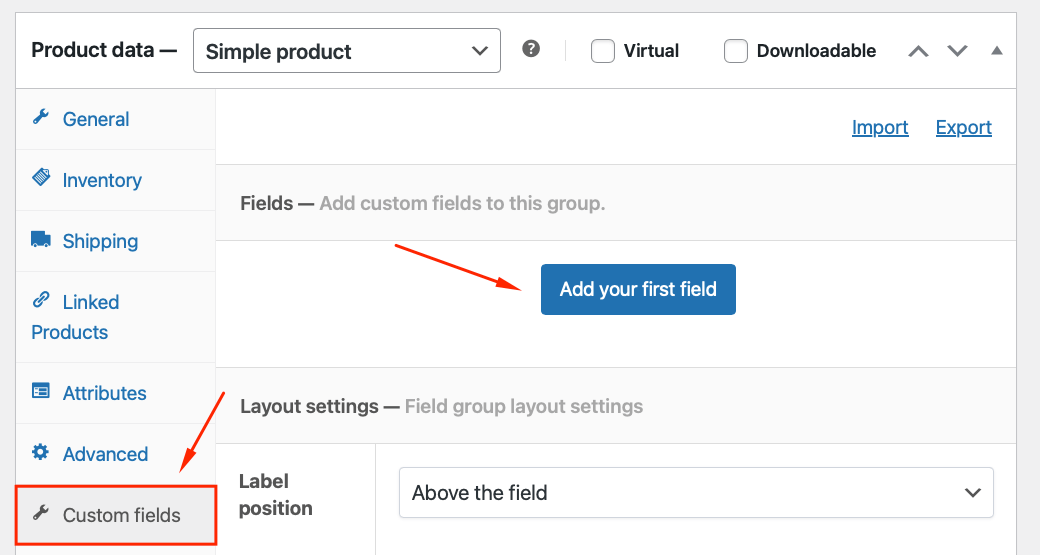
- Select the Products field type and add a label.
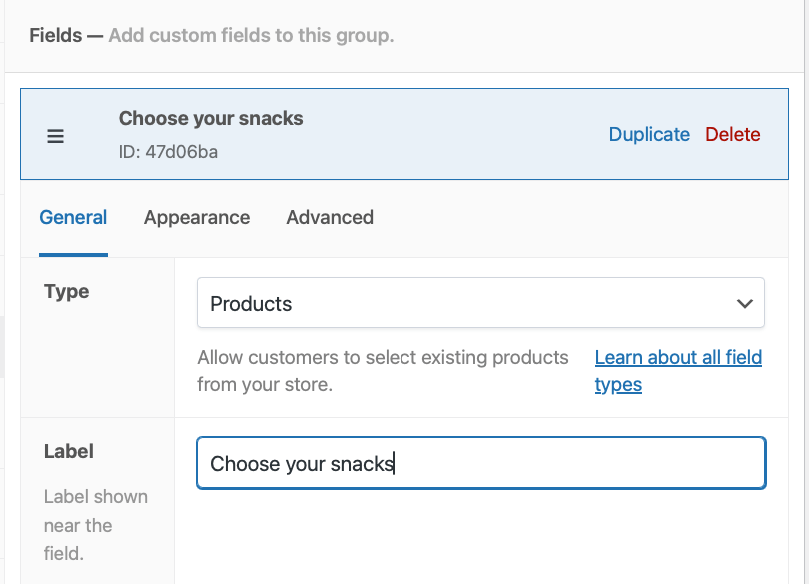
- In the Display products as field, select one of the Product cards options from the display dropdown. This shows products with images – perfect for visual selection.
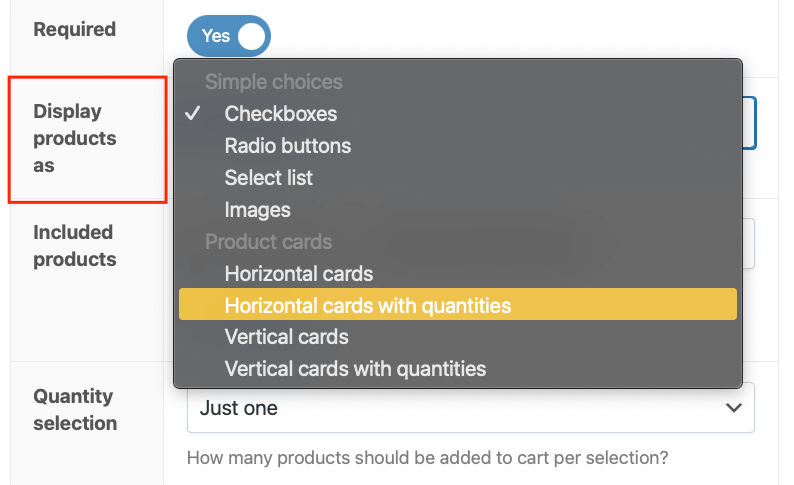 Enable the quantity selector if you want customers to be able to add multiple units of the same snack.
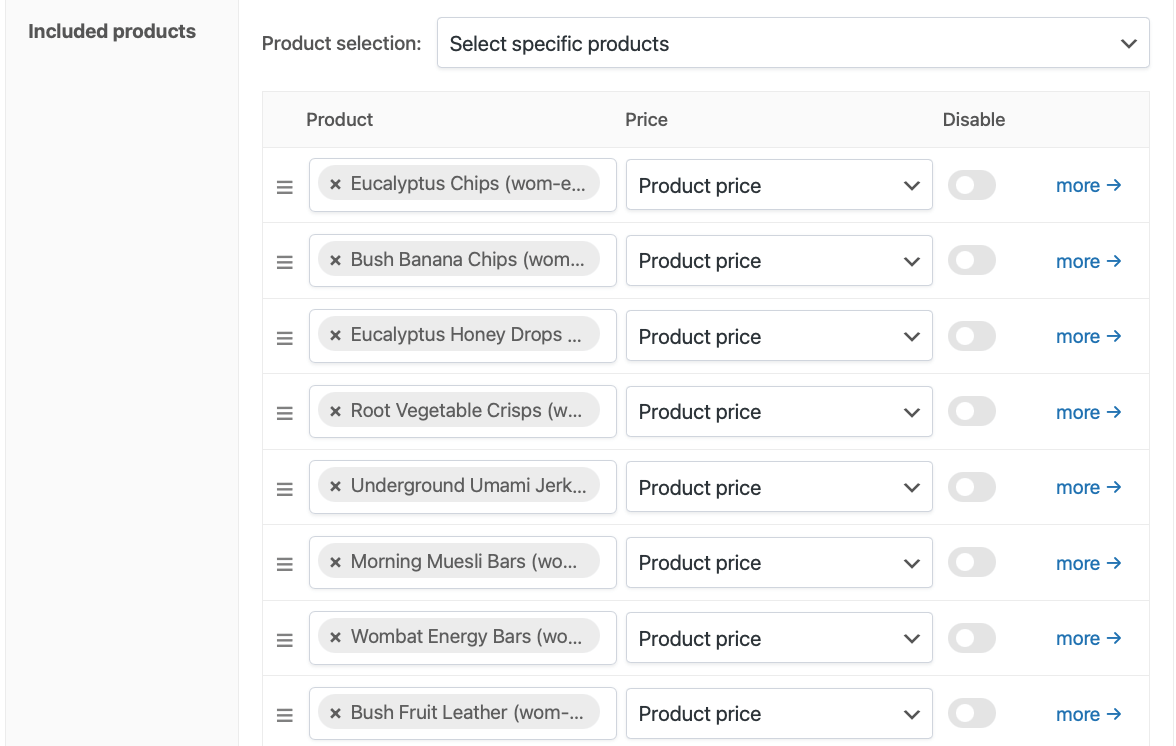
 - Set your product selection. You have 2 options:
- Manual selection: Choose specific snacks to include.
- Automatic population: Display all products from your “Snacks” category
- For this example, we’ve manually selected 10-15 snack options, including a variety of sweet, savory, healthy, and indulgent.
- Set the minimum to 5 and the maximum to 5. This ensures every box contains exactly 5 snacks.

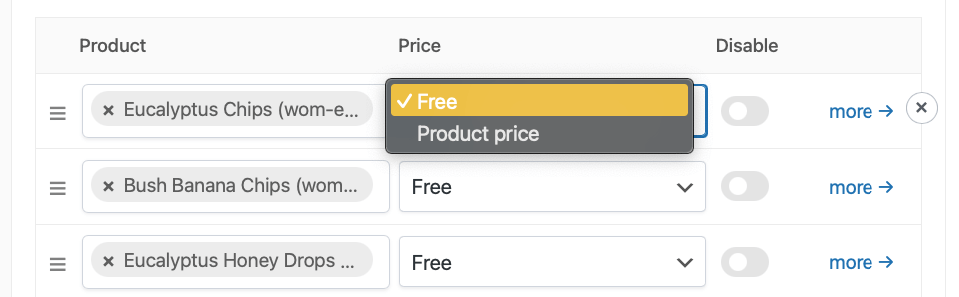
- Choose whether snacks add to the base price or if the box has one flat rate. For simplicity, set a fixed box price of $25 regardless of selection and the product price to “free”.
The frontend result? Customers see an attractive grid of snack options, they click to select their 5 favorites, and each selection updates the box contents in real time.
Implement your cross-sell strategy today
Cross-selling transforms single purchases into profitable bundles. The benefits are clear: increased average order value, enhanced customer experience, and maximized revenue from existing traffic.
And thankfully, implementation doesn’t have to be complicated.
Start today with WooCommerce’s native cross-sell features. Add a few complementary products to your bestsellers, test what works, and monitor your results.
As your strategy evolves, you can scale up. Move from basic cart suggestions to dynamic product bundles and interactive selections.
Ready to take cross-selling beyond basic recommendations? Advanced Product Fields for WooCommerce opens up possibilities like customizable gift boxes and build-your-own bundles, turning cross-selling into an engaging customer experience.
