Everything you need to know about the Live Content Preview add-on
This document explains how the Live Content Preview add-on for Advanced Product Fields for WooCommerce works and how it can be set up.
Introduction
As you already know, Advanced Product Fields allows you to add form input fields to your product pages so your customers can personalize their product before adding it to the cart.
The Live Content Preview add-on takes everything a step further and allows you to build a product configurator with live preview capabilities. Any text or images added by customers can be instantly previewed on any of the product gallery images or other images added by our plugin.
Here are a few cool things the plugin can do for your WooCommerce products:
- Users can select a font and see a live preview of their text rendered in that font.
- Similarly, the customer can live preview text in different colors.
- Customers can upload an image which will then be live previewed on a larger image.
In this guide, we will show you how the Live Content Preview add-on works.
Table of contents
- Installing the add-on
- Prerequisites and important notes
- Step-by-step guide to setting up a live preview:
- Using custom fonts:
Installing the Live Content Preview add-on
To install the Live Content Preview add-on, follow these steps:
- Log into your Studio Wombat account and download the plugin.
- Install the plugin in your WordPress admin dashboard by going to Plugins → Add New and browsing to the downloaded ZIP file.
- Once the plugin is installed & activated, go to WooCommerce → Settings → Product fields → Live Content Preview and enter your license key.
- Click Activate.
You’re now ready to use the plugin.
Prerequisites
Before you can use the Live Content Preview add-on, you must have a WooCommerce product configured with some APF input fields. If you do not know how to do this, please read our Advanced Product Fields getting started guide. It explains in detail how to add fields to your products.
Important note: The Live Content Preview add-on only works with local fields. Make sure to create your fields via the “Custom Fields” tab in the “Edit Product” screen, and not as global fields under WooCommerce > Product Fields.
Setting up live content items
In this section, we will show you how to build the actual live preview features by means of this example product.
Display content of a text field on the product’s image
Let’s start by displaying the content of a text field to the product’s image. While the user types text in the textbox, it will be displayed on the product image in real time. To follow this tutorial, make sure your product has at least 1 text field created with APF.
To start, edit your product and navigate to the Custom fields tab in the Product data box. Scroll down to the Live Content Preview section and click Add New.
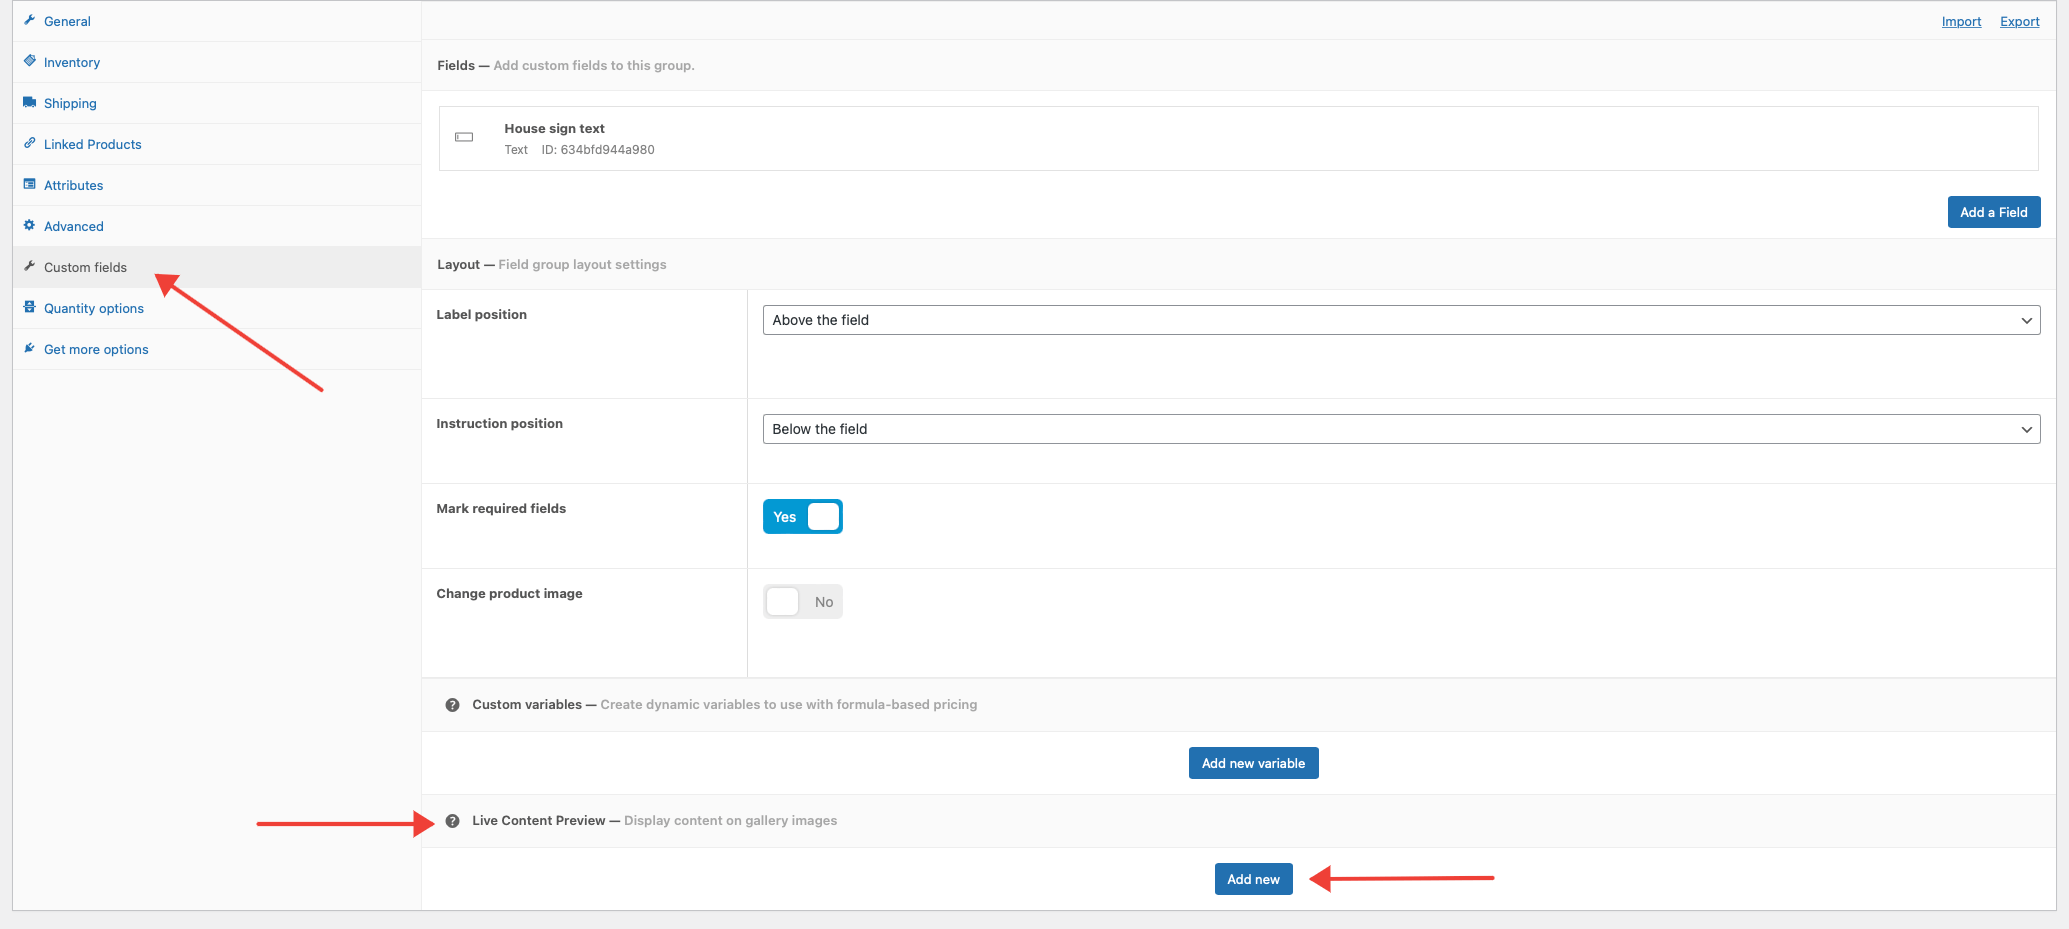
A popup wizzard appears guiding you through the configuration of your content preview. There are 3 steps and we will go over them in here:
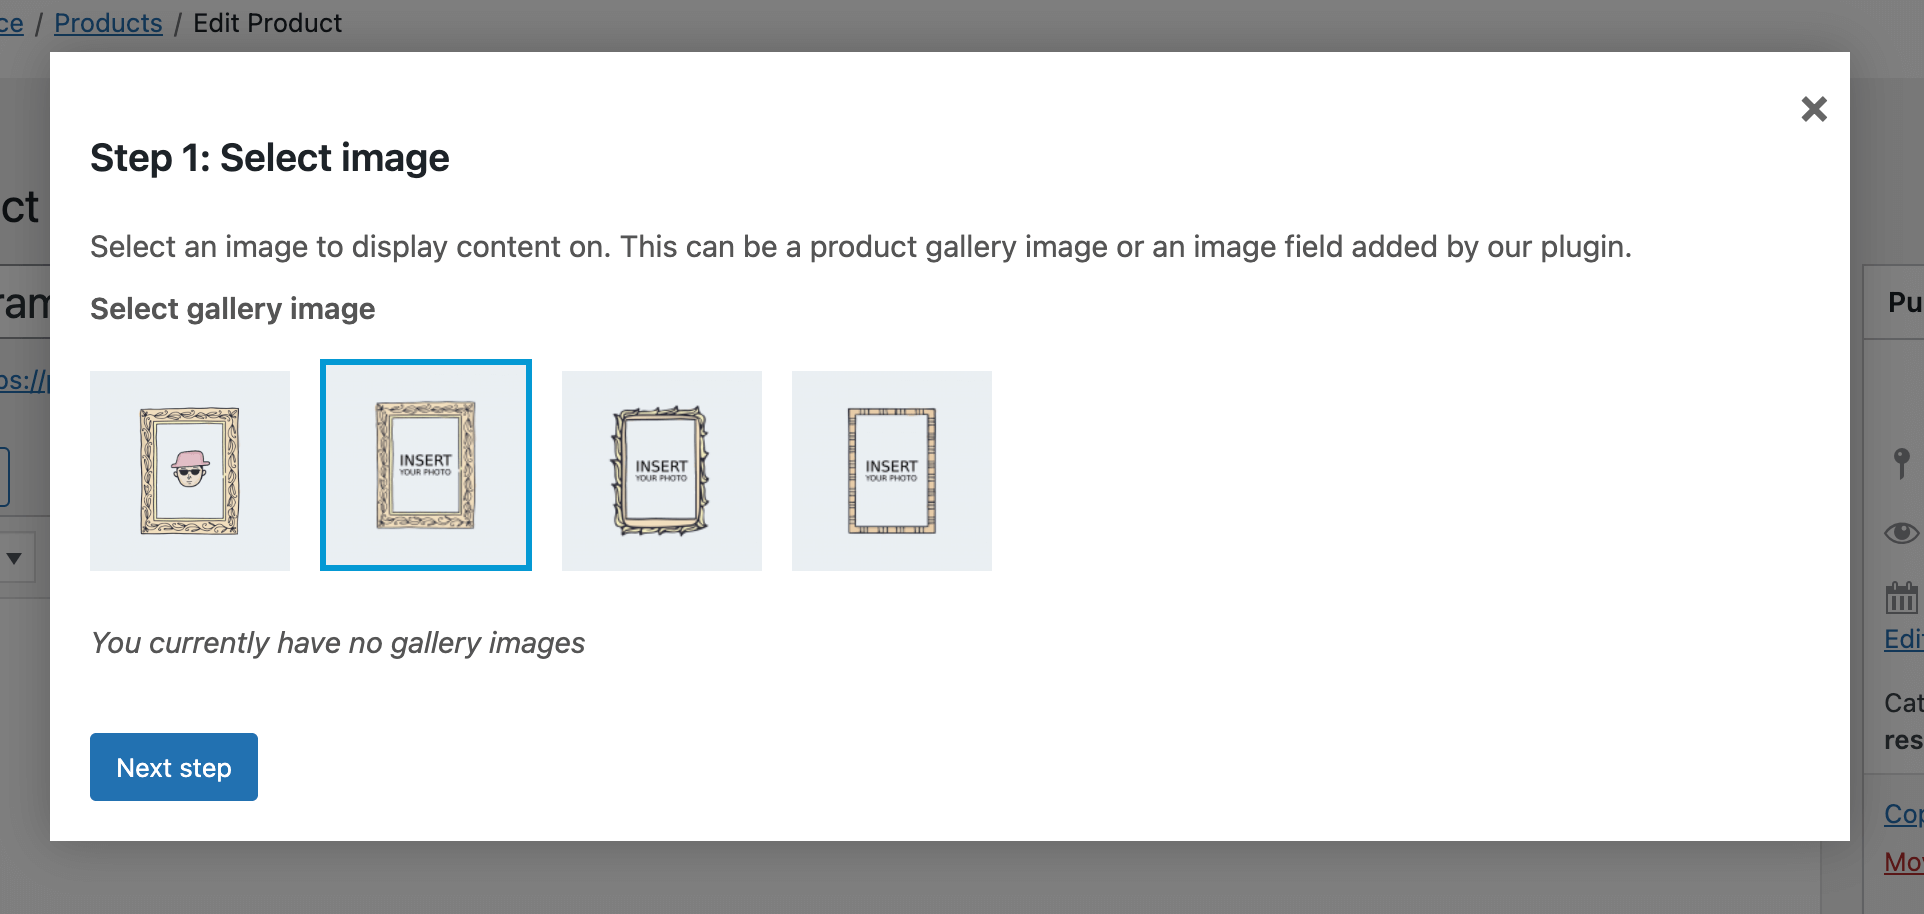
Step 1: select image

In the first step, you can select the image on which the customer’s text should appear. In our demo, we only have one image so we can immediately press next. But if you have set more images in the Image Gallery setting of your product, you can pick any of those to display content on.
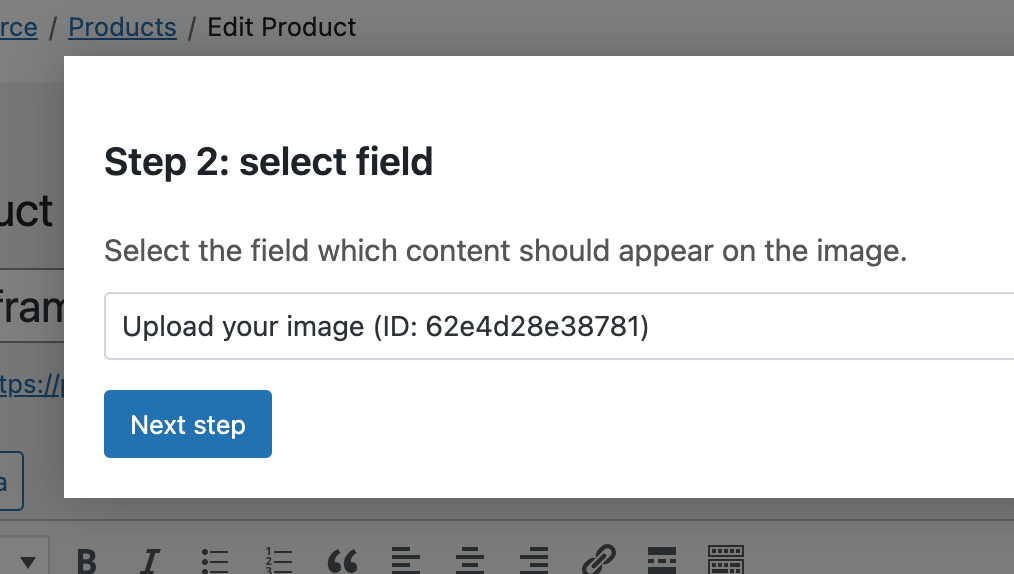
Step 2: select field

In the 2nd step, you can select the input field of which the content should appear on the image. Anything the user types in this field, will be shown on the image selected in the previous step.
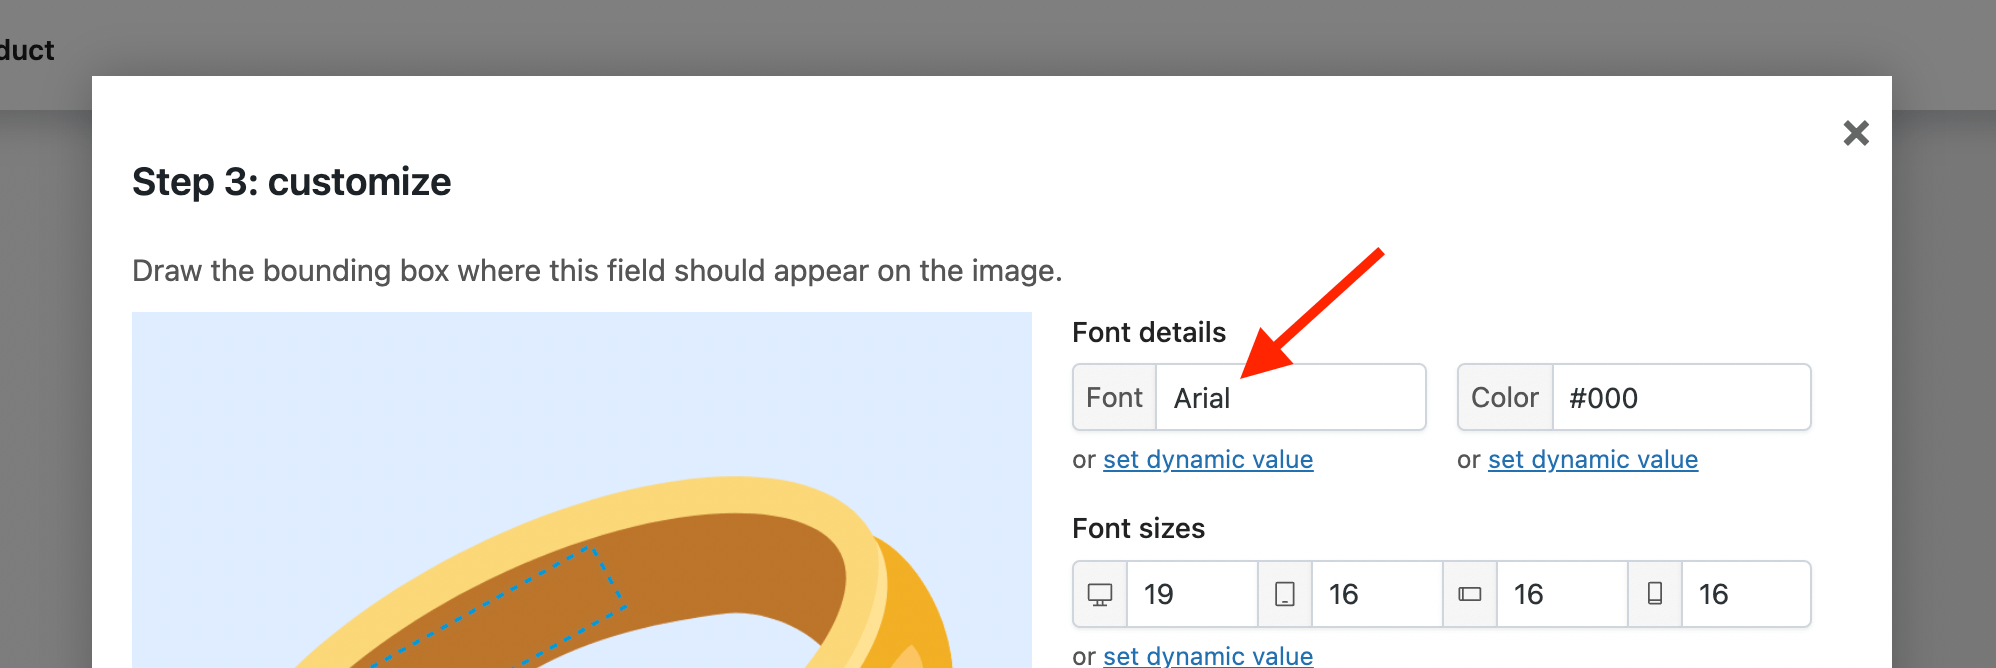
Step 3: customize
This next step is where the magic happens. Here, you can configure how and where the text should appear on the image. The configuration happens in 2 steps. First, you draw a bounding box on the image to the left. This box indicates where the text should appear. Next, you can set appearance options such as font size, font style. etc… Here’s a quick demo:

Here are the settings we used for this particular demo:
- We drew a bounding box in the center of the plaque.
- Set the Color to white (#fff).
- Increase the font size on mobile to 20.
- Set Alignment to Center so the text appears centered.
Once your configuration is ready, don’t forget to update your WooCommerce product so all changes are saved. Below is a demo of the result. Notice how image zooming also works!

Change live preview based on options selected by the user
Now that we have our live preview of the text, it would be great if we can change some properties, like color or size, based on what the user selects. In our example above, the text appears in white, but what if we have an option allowing the user to choose another color? In that case, we want the live preview to reflect that.
To do this, first we need to add an extra field to our demo which allows the user to select a color. We chose a simple select list with 3 values:

Next, go back to the Live Content Preview section and click Configure next to the configuration you created earlier.

The configuration wizzard opens back up and shows the last step from previously. Find the Size setting on the right side of the wizzard and click Set a dynamic value. This allows you to change the color based on selections from another field. You’ll see the default value of the color is set to white (#fff). Click Add new condition.

- As Condition Type select “if product field value changes”. This will be preselected.
- As Field, we chose the select list we created earlier. This is the list the user can choose a color from.
- Select any of the field values from that select list (Red in our case).
- Set the New value. In other words, set to which color the live preview should change when the user selects “Red” from the “Select a color” list.
Repeat these steps for any other colors you have and save your work.
The final result looks like this:

You can change more aspects than just the color. You can change the font family, font size, and alignment.
Display an uploaded image on the product’s image
With our add-on, you can also show a live preview of images uploaded by your customers. The process is similar to adding text, as discussed above. In the Product Data section, select the Custom fields tab, just like we did earlier in this guide. Scroll down until you see the Live Content Preview section and click Add new.

Step 1: select image
In the first step, you can select the product image on which the customer’s uploadeded image should be embedded on. You can pick any of the images defined in the WooCommerce Image Gallery setting of your product.
Click Next Step.
Step 2: select upload field
In the next step, you can select the File Upload field you created with Advanced Product Fields for WooCommerce. This is the field where your customer will upload their image and it will appear live on your gallery image selected in step 1.
Step 3: customize
This next step is where the magic happens. Here, you can configure how and where the image should appear. The configuration happens in 2 steps. First, you draw a bounding box on the image to the left. This box indicates where the uploaded preview should appear. Here’s a quick demo:

On the right side of the screen, you can tweak additional settings to define the uploaded image appearance.
The Shape setting determines how the uploaded image should be displayed: as an oval (circle) or as a rectangle.
The Fitting Mode setting determines how the image should be displayed within the bounds:
- Standard fill: The image will be filled within the bounds. If the uploaded image is not the same aspect ratio as the bounds, the image will be stretched or squeezed to fit within the bounds.
- Scale to fit: If the image is larger than the bounds, the image will be resized to fit within the bounds while maintaining aspect ratio. If the image is smaller than the bounds, it will be centered within the bounds.
That’s it! Here’s a quick demo of the final product:

Adding custom fonts
When creating your Live Content Preview configuration, you can also set the font in which text should be displayed in:
You can enter any web-safe font, but you can also add your own custom fonts.
Step 1: upload your font(s)
To upload your custom font, go to WooCommerce → Settings → Product fields → Live Content Preview and upload your font(s) there.
Give your font a name (you will need this later) and browse to the file. Click Save changes and the font will start to upload. Make sure the font files are in .woff or .woff2 format.

Step 2: add the font name to the settings
Now all you have to do is add your custom font name (which you entered in step 1) to your Live Preview configuration:

Bonus step: build a font picker
Now that you know how to add custom fonts to your live previews (if you missed this, refer to “Adding Custom Fonts” above), you can build a font picker. This feature will let your customers select a font, instantly displaying a live preview of their text using the chosen font.
Here are the steps to achieve this:
- Upload all the fonts the user will be able to choose from. If you’re unsure on how to do that, read “Adding Custom Fonts” above.
- With Advanced Product Fields for WooCommerce, create a field of type Select and add the fonts as options. The option names don’t have to be the same as the font names you uploaded in step 1. Here’s what our example configuration looks like:

- Go back to the Live Content Preview you’ve already created and click Set Dynamic Value underneath the font setting:
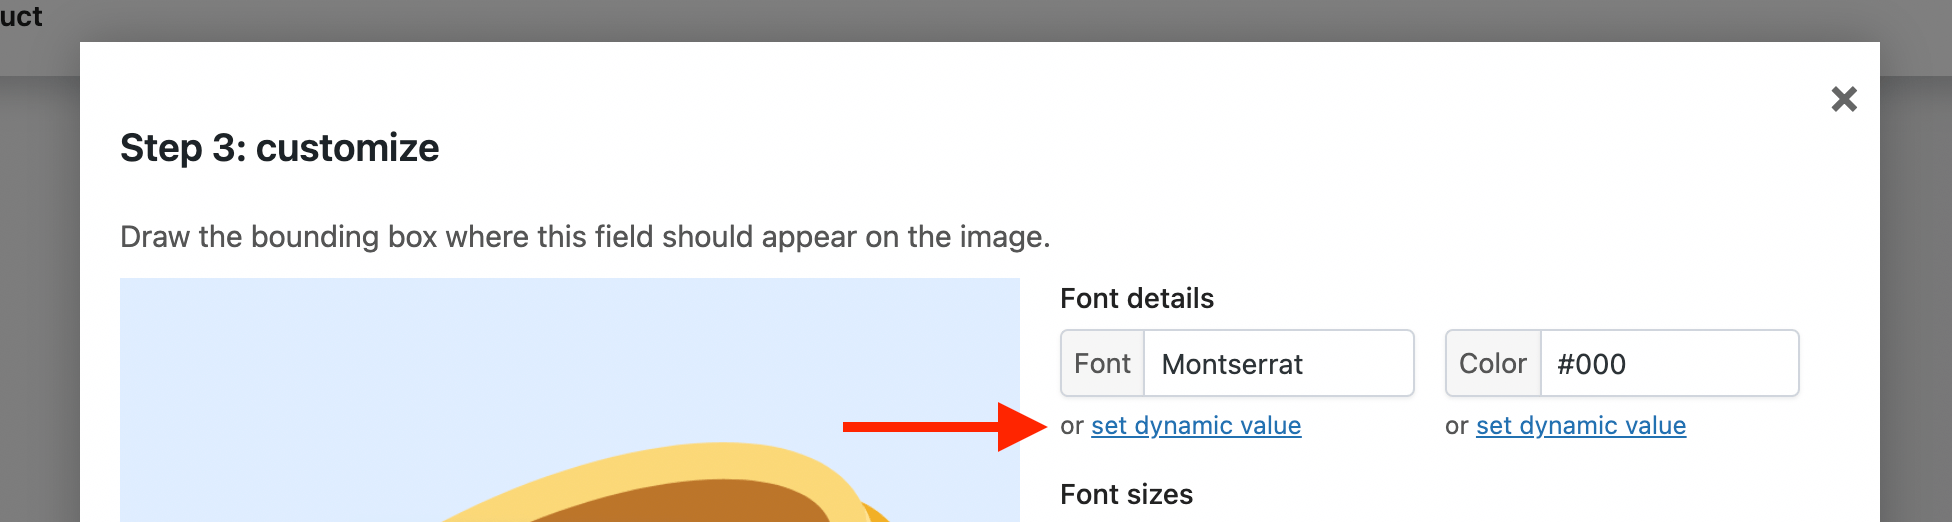
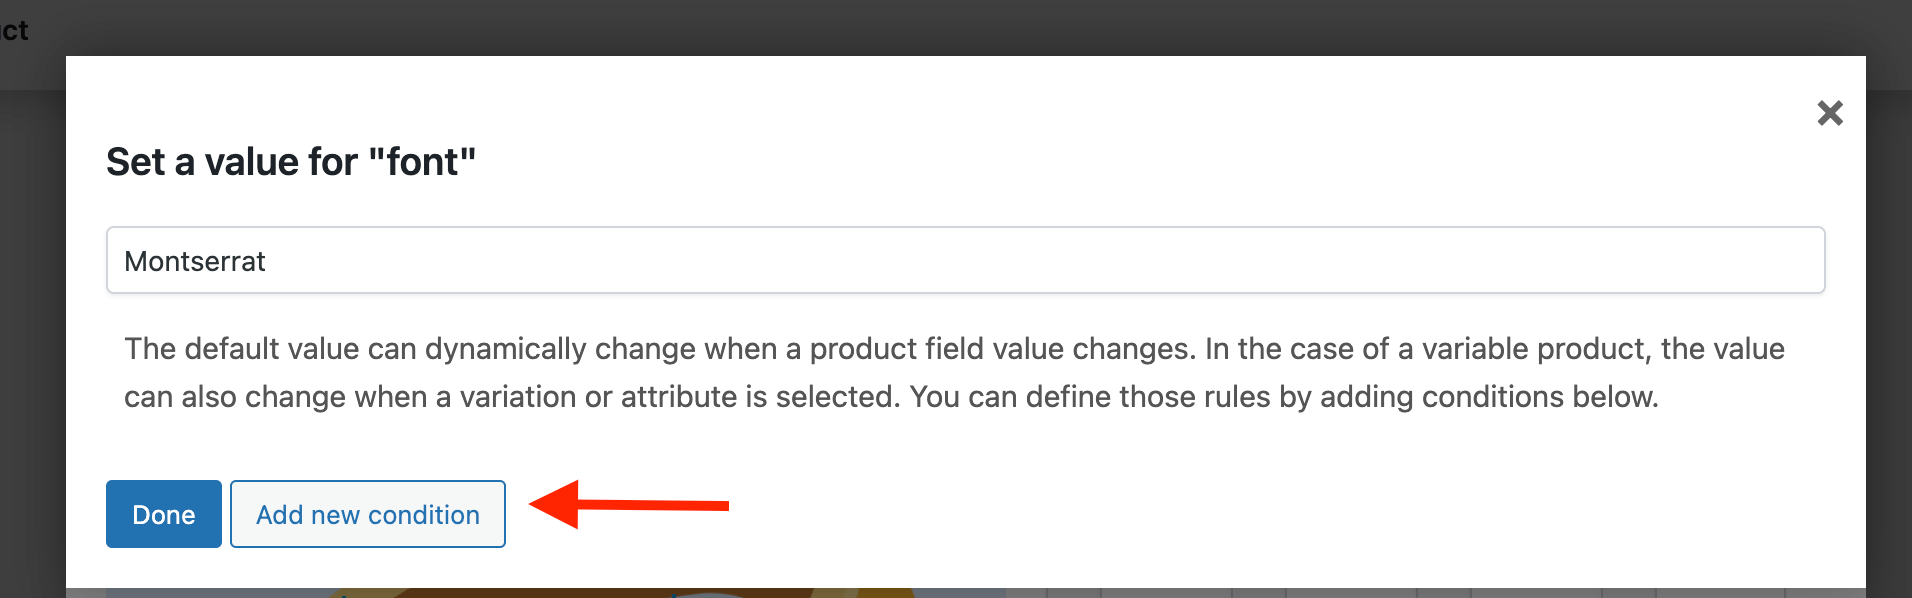
- In the next popup, we’ll link the field created in step 2 to our custom fonts. The default font value is shown at the top (“Montserrat” in our example). Click Add New Condition:
- In the next window, you can link one of the font choices to one of the fonts you uploaded:
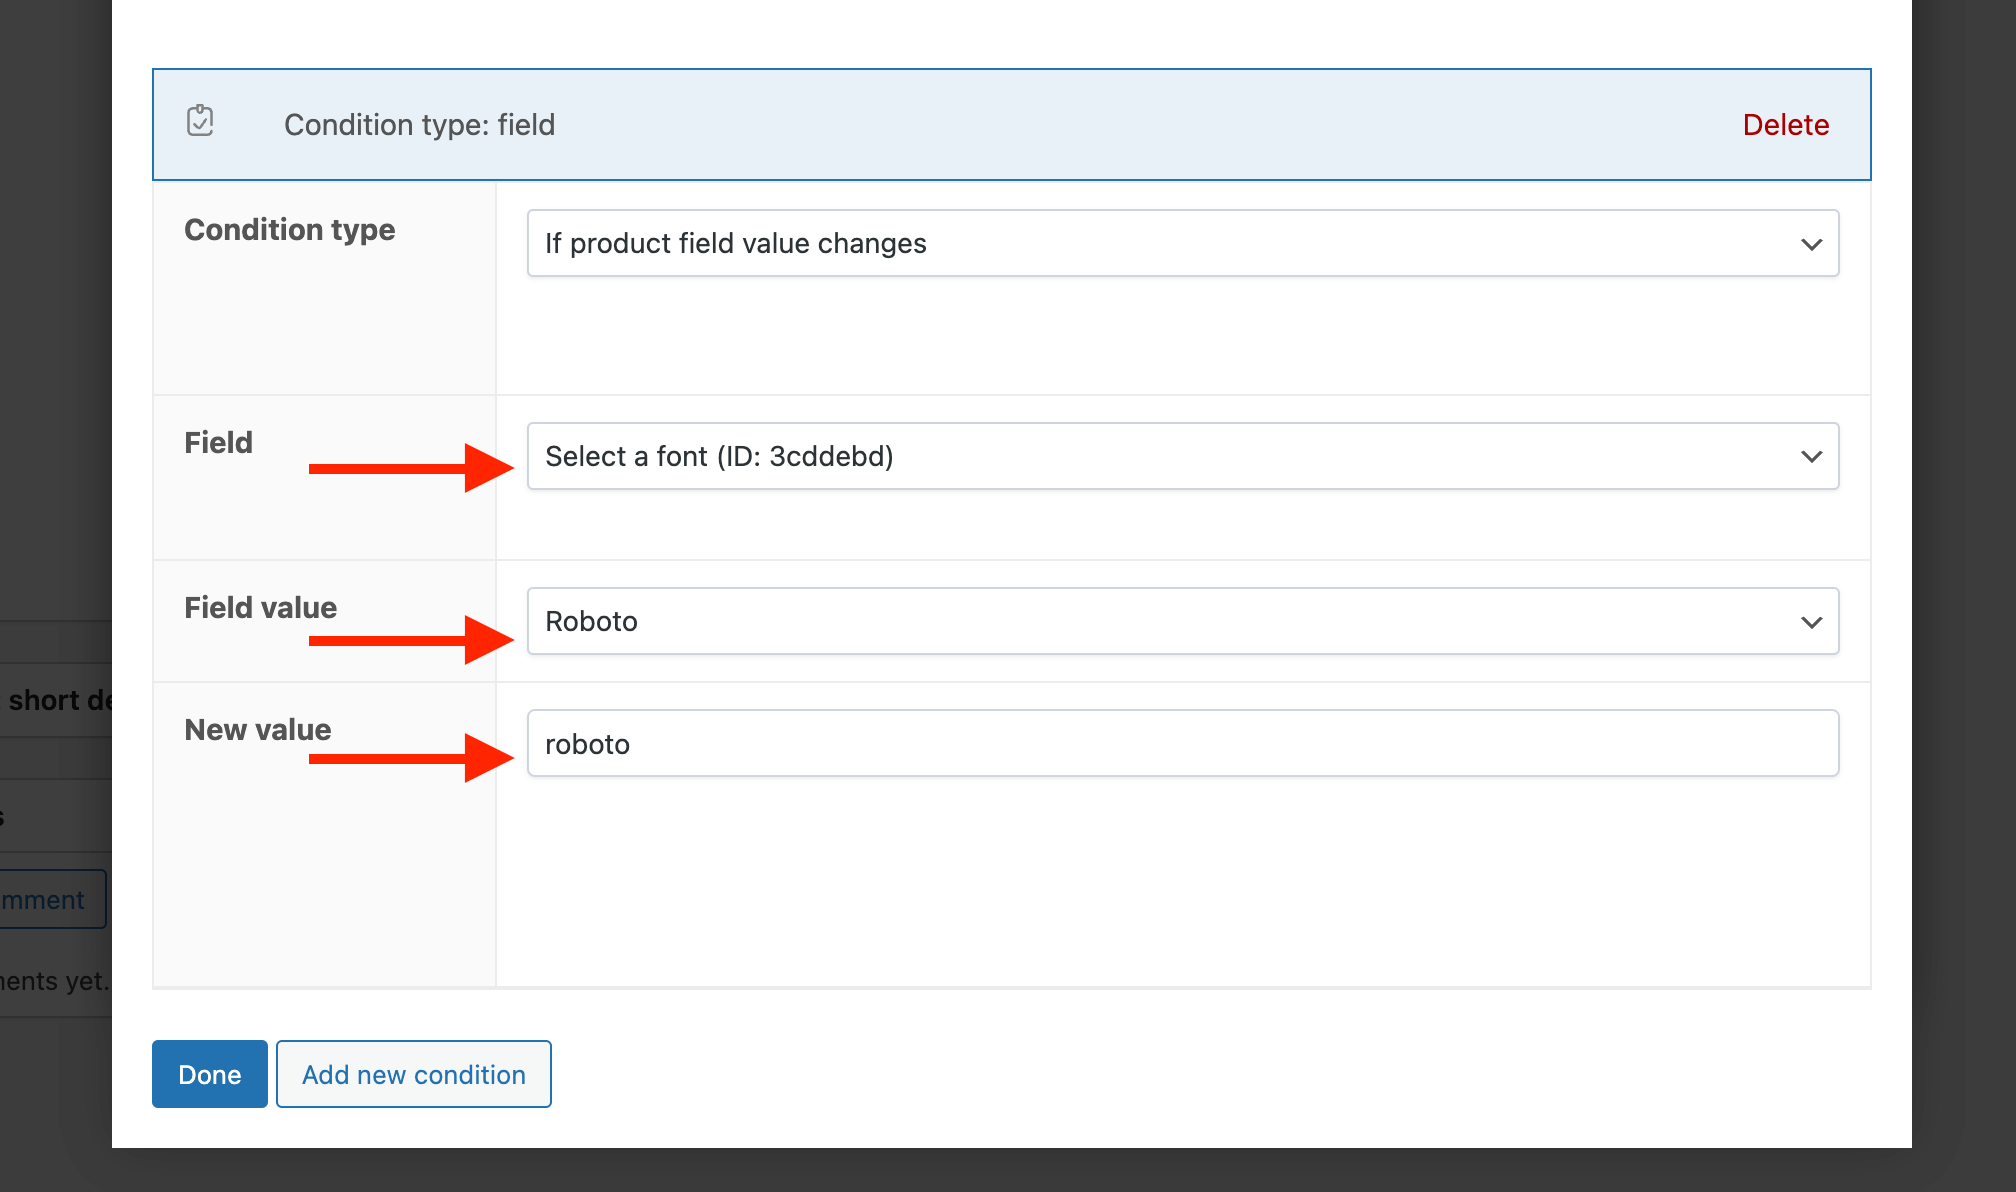
- Point the Field setting to the Select field created in step 2.
- Point the Field Value setting to one of the options.
- As New Value, enter the corresponding font name you uploaded via WooCommerce → Settings → Product fields → Live Content Preview (as seen in “Adding Custom Fonts” above).
- Repeat step 4 and 5 for all the font choices.