
Looking to add shoppable images to your WooCommerce store? This guide is here to help you do it.
Shoppable images are powerful user experience features that can drive sales in your online store. But since WooCommerce doesn’t support them by default, you might be wondering how you can add them.
Well, you’ve come to the right place. This is what we’ll cover in this guide:
- What shoppable images are, plus their benefits to e-commerce stores.
- Whether you can add shoppable images to WooCommerce without a plugin.
- How to use the Shoppabe Images plugin to add shoppable images to your WooCommerce store.
- Tips for getting the most out of shoppable images.
So, first things first, here’s what shoppable images are.
What are shoppable images?
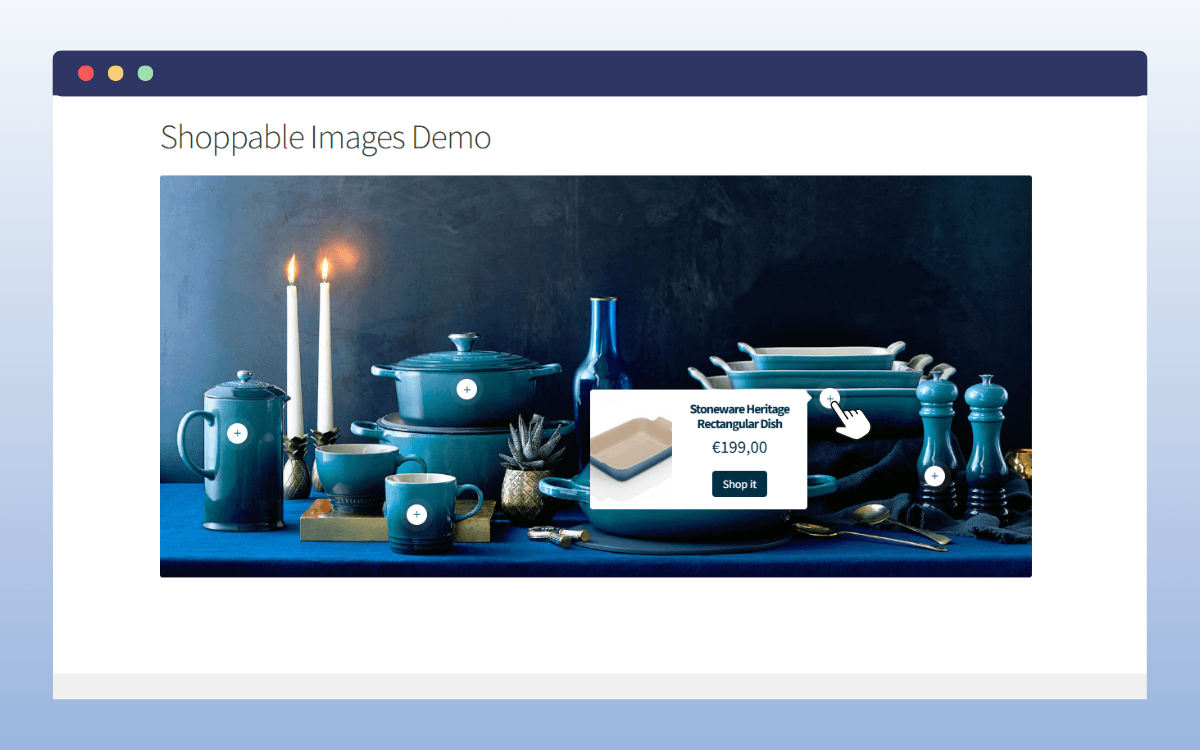
Shoppable images are interactive product images that allow customers to click or tap on products within an image to view or purchase them. They’re usually images of a collection of products, like an outfit or several pieces of furniture in a room.
Specific items in the image are tagged with clickable hotspots that link to product pages or checkout. If customers see something they like, they click the hotspot to go directly to the product page or checkout.
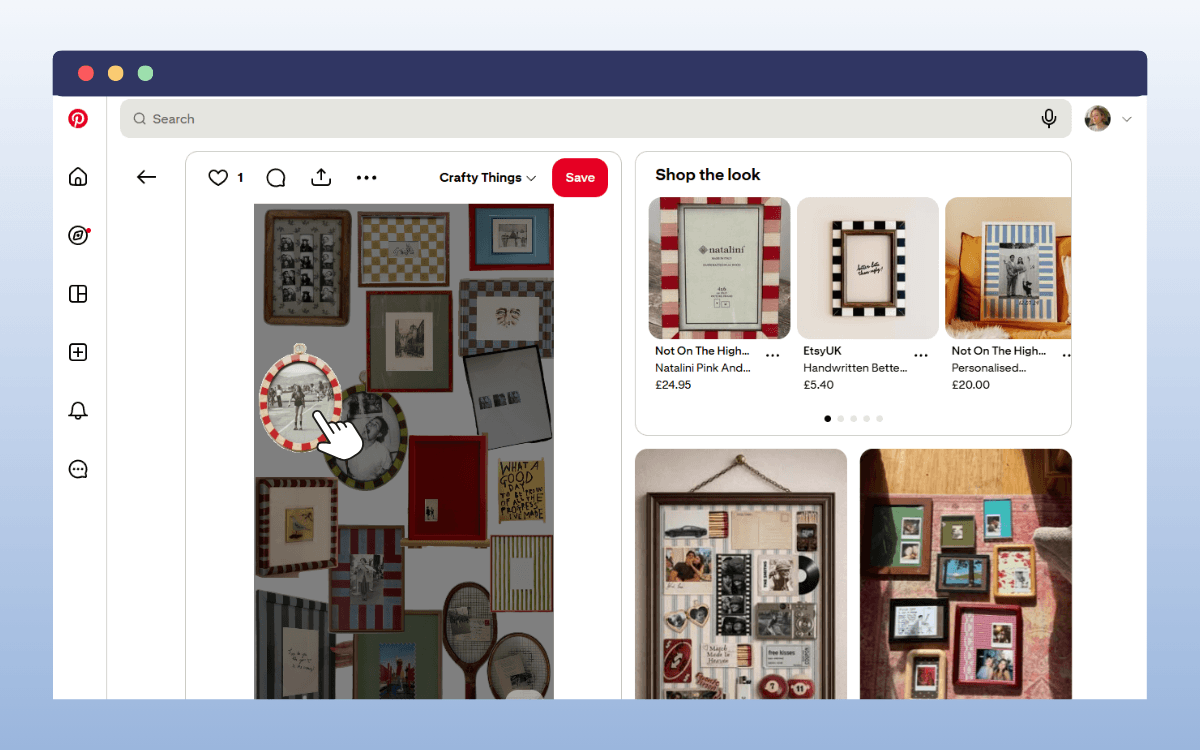
Shoppable images have been around for quite a while. But they’ve been recently popularized by social media platforms. In fact, they’re one of the key drivers of social commerce. Almost every social media platform, including Instagram, Facebook, and Pinterest, allows shoppable posts.
Even video-based platforms like YouTube and TikTok have shoppable videos. The most popular e-commerce platforms, including Amazon, Shopify, and WooCommerce, also support them.
Shoppable images in e-commerce stores
If a shopper is already on your e-commerce site, they’re further down the funnel than a social media user. So, where do you use shoppable images in your online store?
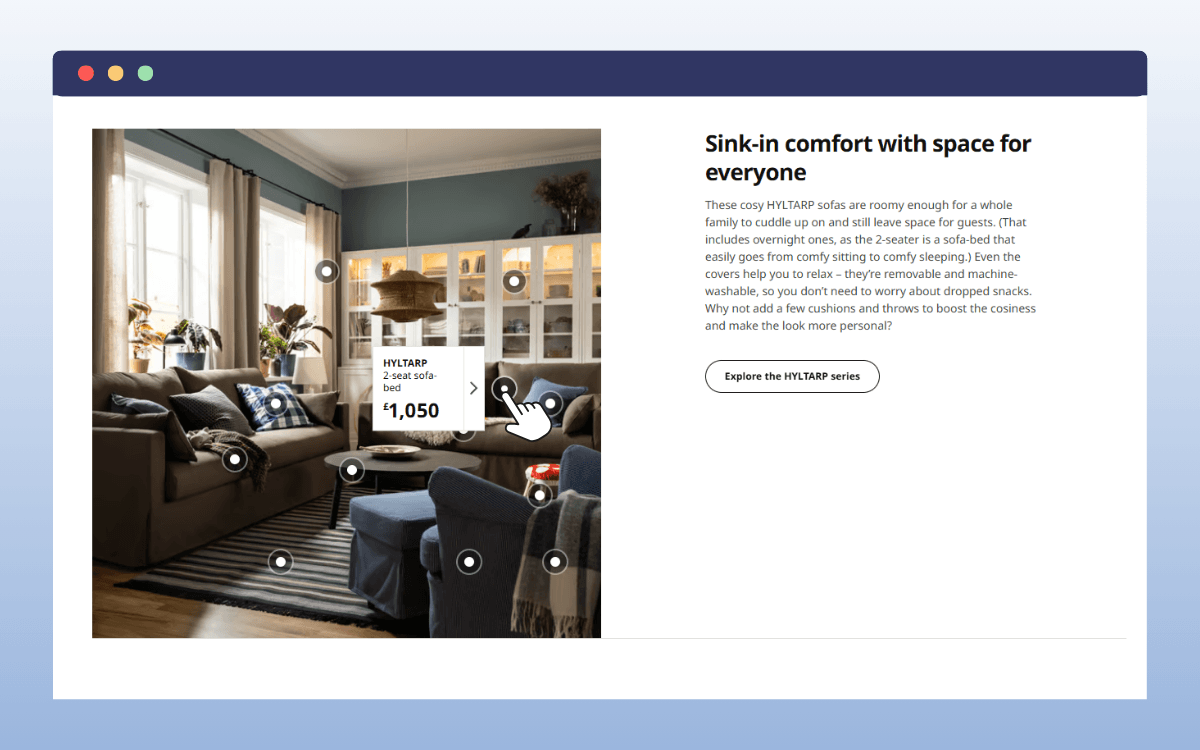
- Hero sections. If you showcase lifestyle images in your hero section, you can embed links to the product pages for the items shown. For example, showcasing how the furniture you sell fits in a living room and adding links to the product pages for each piece.
- Lookbooks. With lookbooks, you have full galleries of lifestyle images. It only makes sense to make the images shoppable so customers can easily buy what they like.
- Blog posts. Let’s say you sell leather bags. You can create a blog post on how to clean a leather bag and add shoppable images of the bags you sell.
- User-generated content. For example, customer reviews with images or linked social media posts are great places to use shoppable images.
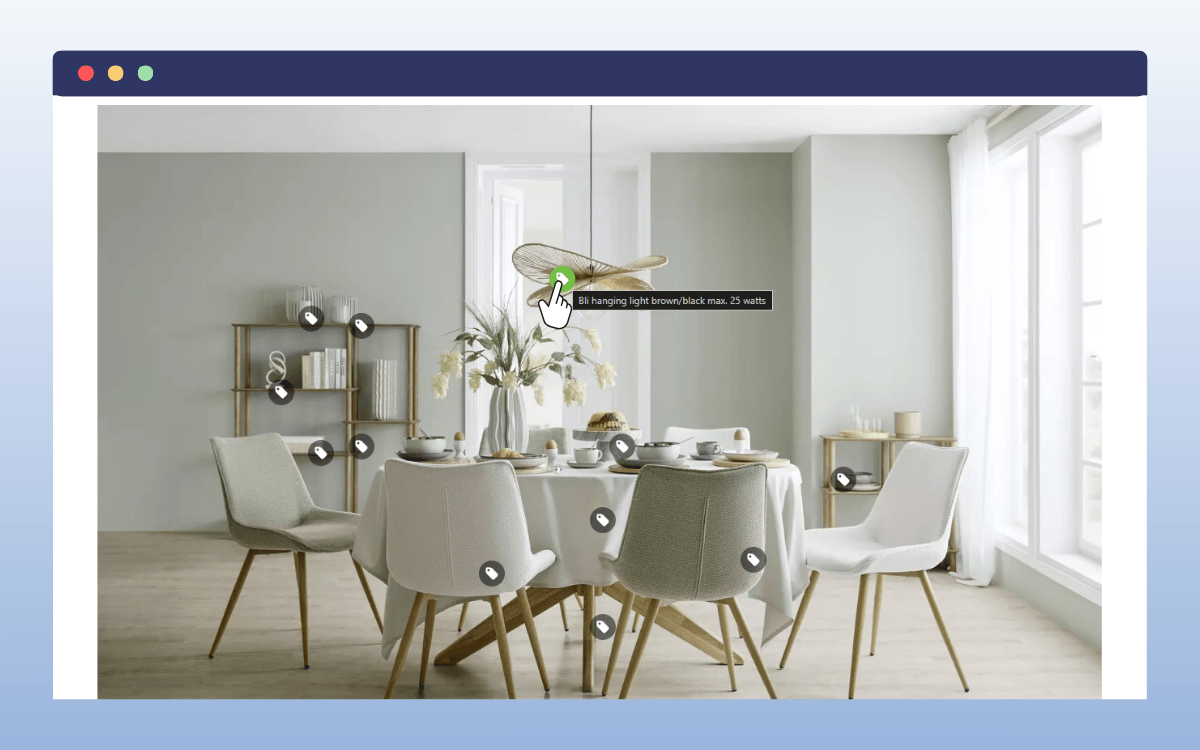
One brand that does this so well is IKEA. IKEA has a Shop by Rooms section where it provides interior design solutions for living rooms, bedrooms, kitchens, etc. Here, you’ll see fully furnished rooms featuring furniture IKEA sells, with each item having a shoppable product tag.
What are the benefits of shoppable images for e-commerce stores?
Here’s why you should use shoppable images in your online store:
A shorter path to purchase for your customers
Shoppable images shorten your customers’ journey from product discovery to checkout. If they see something they like in your hero section, lookbooks, or even reviews, they’re one click away from purchasing it.
Let’s compare this to a traditional e-commerce funnel without shoppable images. If a customer sees a product they like in your hero image, they have to:
- Go to your shop or categories pages.
- Filter and search through your entire product catalog.
- Identify the specific product from its variations.
This process is longer, and you could lose about 10-20% of participants who become bored or distracted, leading to abandoned sessions.
But with shoppable images, the experience is much quicker. This means a smaller chance of getting distracted or bored, leading to higher conversion rates.
A higher average order value (AOV) from cross-selling complementary products
Shoppable images improve how your customers discover and buy complementary products through lifestyle images. They get to see the products in use, and can go directly to buying them.
They don’t have to move between different product pages to find complementary products. This means they’re more likely to buy them.
Why is this important? Cross-selling accounts for about 10-30% of total e-commerce revenue when done well. If customers spend more per order, your AOV increases.
They work well with user-generated content
Customers like to turn to user-generated content, such as reviews, to make buying decisions. If you allow customers to upload visual content, such as images, in your reviews section, you can make these images shoppable.
This way, if a customer thinks “Wow! That looks good on them”, they can click to buy it immediately. No extra steps that could deter them from buying the product.
You can embed them anywhere
You can embed shoppable photos anywhere in your e-commerce site. From landing pages, reviews, and hero images, to blog posts. This is important because every piece of shoppable content is a potential conversion point. Images that would otherwise simply improve the appearance of your posts or pages become tools you can use to convert more customers.
To summarize: Shoppable images allow you to link individual products in the image to where customers can buy them. This shortens the customer’s shopping journey from seeing what they like to actually buying it.
So that’s what shoppable images are as a feature and why they’re important. Now, let’s focus on how you can add them to WooCommerce.

Can you add shoppable images in WooCommerce without a plugin?
No, you can’t create shoppable images in WooCommerce without a plugin (or some custom code). By default, WooCommerce supports only standard product images and galleries, with no interactivity.
If you want to create a real shoppable image experience in your WooCommerce site, a plugin is the right way to do it. That said, which plugin should you use to do this?
What’s the best shoppable images plugin for WooCommerce?
If you want to add shoppable images to your WooCommerce store, there’s no shortage of plugins to help you get it done. To determine the best one, you need to know what you’re looking for.
Generally speaking, the best shoppable images plugin for WooCommerce should:
- Be easy to use. Because you don’t want this experience to be nearly as frustrating as using custom code.
- Allow you to add multiple clickable hotspots per image. Otherwise, it wouldn’t be as helpful.
- Be mobile responsive. We know that the majority of online shopping traffic comes from mobile devices (around 78%, according to multiple reports).
- Allow you to customize the look and feel of the hotspots to suit your brand.
- Let you place shoppable images on pages, posts, and anywhere else on your site.
For all the above, plus so much more, we highly recommend the WooCommerce plugin, Shoppable Images.

Create interactive shoppable images easily with the Shoppable Images plugin
Shoppable Images allows you to easily turn images in your WooCommerce store into conversion tools by making them shoppable. With this plugin, you can create shoppable images by adding click-to-buy tags pointing to your products.
When customers visit your online store, they’ll be able to click on these tags to buy the products they like from the image. Instead of going back to your shop page or catalog to find the specific product, they click the image and go directly to the product page.
This makes for a smooth shopping experience. But that’s not the only reason we recommend Shoppable Images; here are some more.
Why should you use the Shoppable Images plugin
With the Shoppable Images plugin, you’ll be able to:
- Add as many clickable hotspots as you like. You can add multiple hotspots based on the products in the image. You won’t just be limited to one or two. As expected, you can tag multiple products per image.
- Add shoppable images anywhere using shortcodes. This includes posts, pages, or any other places you feel customers are likely to visit to discover products.
- Design the hotspots to match your brand. You can change the colors, sizes, icons, and corner rounding. You can also make it larger for mobile devices. This allows shoppers using mobile devices to tap on them easily.
- Add an animation to highlight hotspots. The plugin lets you add a pulse animation to each hotspot, showing customers that they’re clickable.
- Style the info window. Shoppable Images lets you style the info window that appears when customers click the hotspot. You can change the text, background color, button color, and more to suit your online store’s design.
Lastly, Shoppable Images is mobile-responsive to cater to customers shopping on their mobile phones. And like all our plugins, it’s lightweight, meaning it won’t add a performance overhead to your site.
Now that we know what the Shoppable Images plugin can do, let’s set it up and use it to create your first shoppable image.
How to add shoppable images to WooCommerce using Shoppable Images
To add shoppable images to WooCommerce using the Shoppable Images plugin, follow these steps:
Step 1: Customize the hotspot appearance
After installing the Shoppable Images plugin on your WordPress site, we’ll be able to customize what your hotspots will look like.
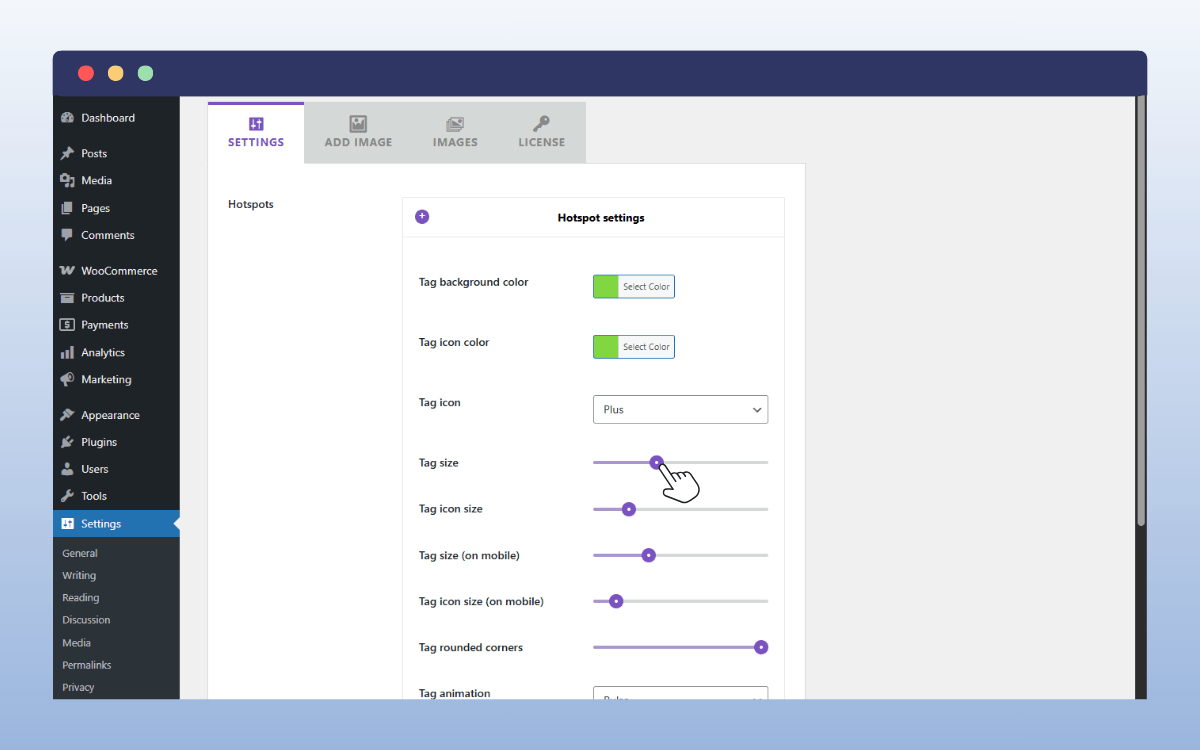
- On your WordPress dashboard, go to Settings → Shoppable Images. This leads you to the Settings tab, where you can start customizing the hotspot.
- Under Hotspot Settings, you’ll be able to edit:
- The background color and the tag icon color.
- The tag icon itself (A plus, target, or tag icon).
- The tag icon size on desktop and mobile.
- Whether to make the corners rounded, and to what degree.
- The tag animation. You can use the pulse animation or leave it as is.
Once you’re done, you can move on to editing the info window and the call-to-action button inside it.
Step 2: Customize the info window and button
This is the window that pops up when the customer clicks or hovers over the hotspot. Here’s how you set it up:
- You’ll see the Info Window Settings below the Hotspot Settings. You’ll use the dropdowns provided to change the:
- Background color.
- Text color.
- Image size.
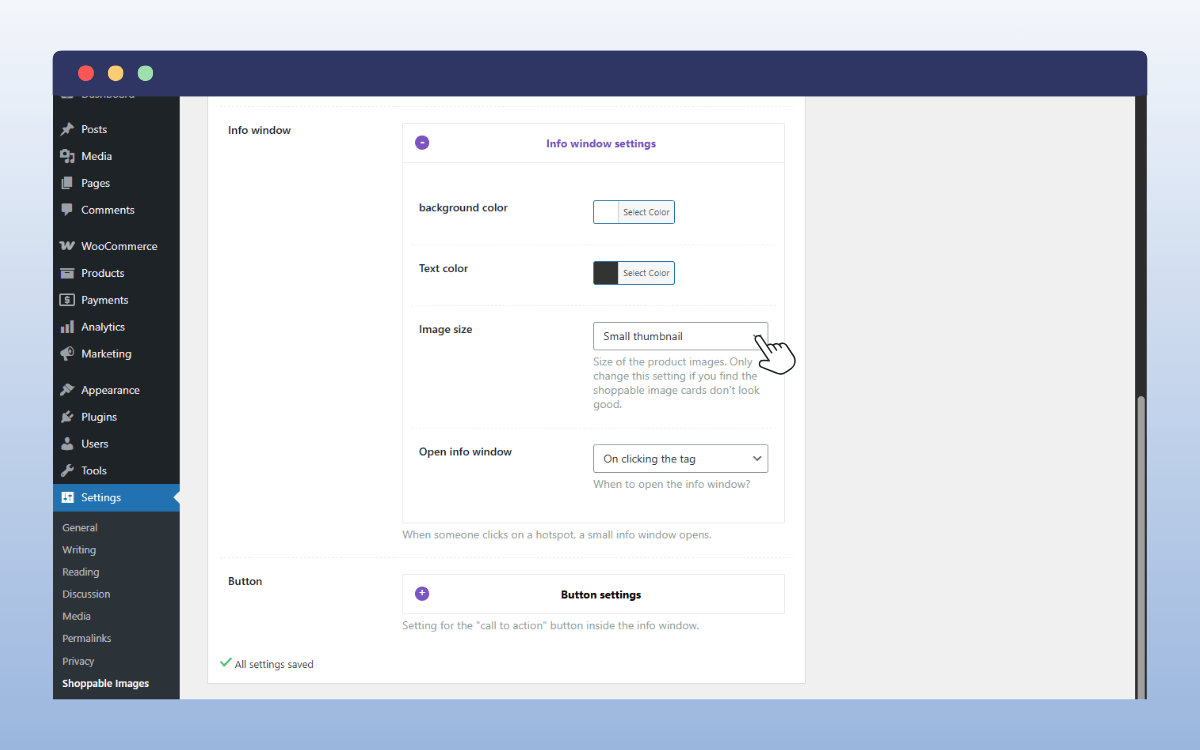
- You’ll also decide what opens the info window. Whether it’s clicking the hotspot or hovering over it.
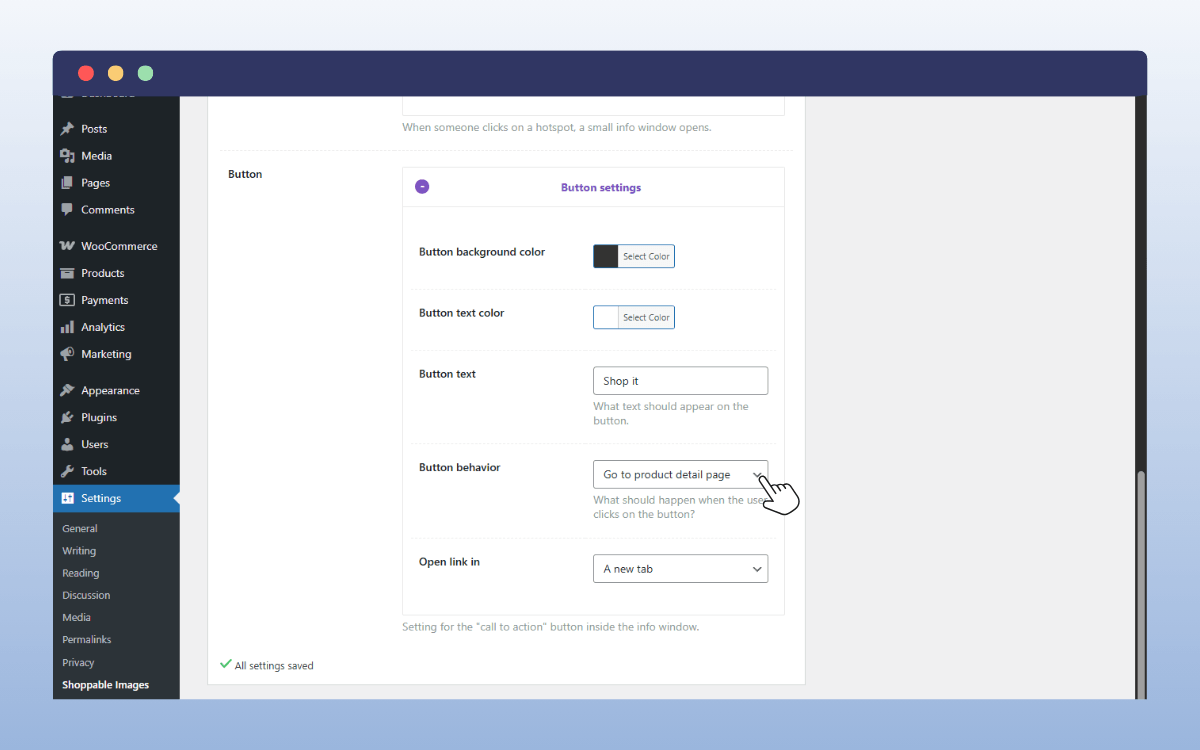
- With the button, you can set similar styling options (button color, text color, and button text).
- That aside, you can set where you want the button to lead. Either go to the product detail page or add the product directly to their carts. You can also choose if clicking the button opens a new tab or the same one.
Once you’re happy with your settings in this tab, move to the Add Image tab.
Step 3: Add hotspots and tag products to your image
Next, click on the Add Image tab. You’ll see a simple guided workflow that takes you through selecting an image, adding tags, and saving it. Which makes this step easier.
- First, click the Select an Image button and choose the image you want to make shoppable from your image gallery.
- After selecting the image, click Use this Image, and it will appear in the Add Image tab.
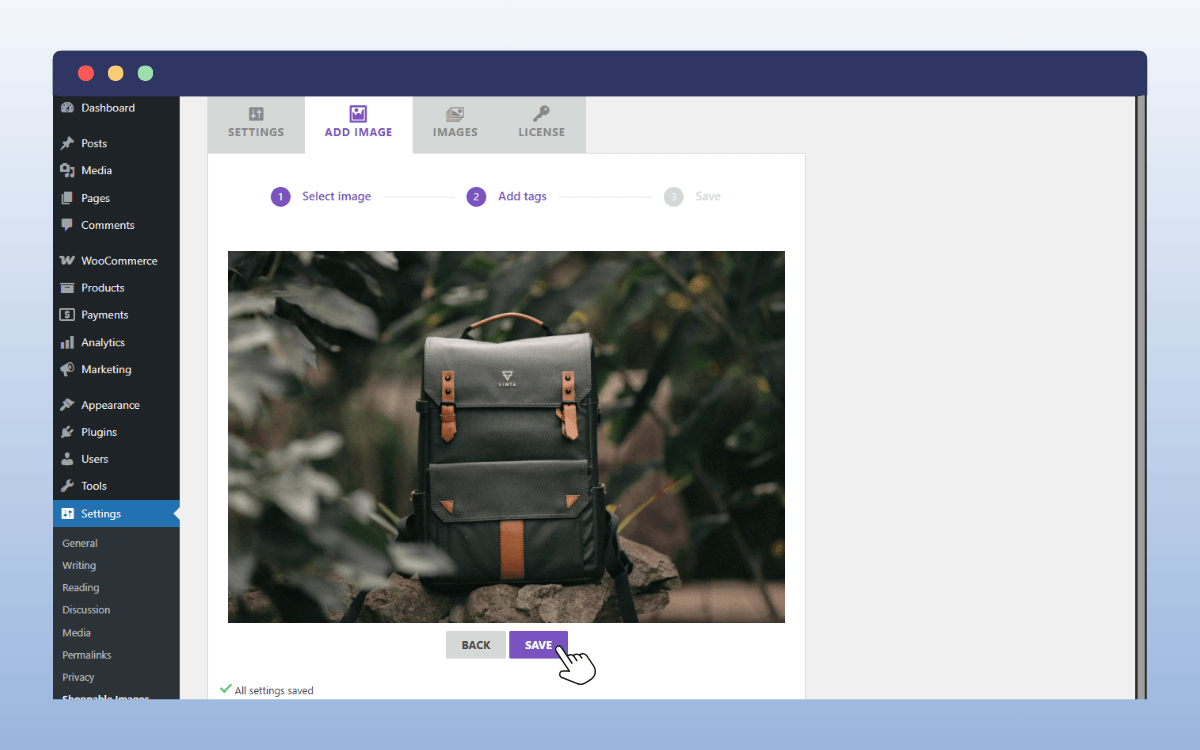
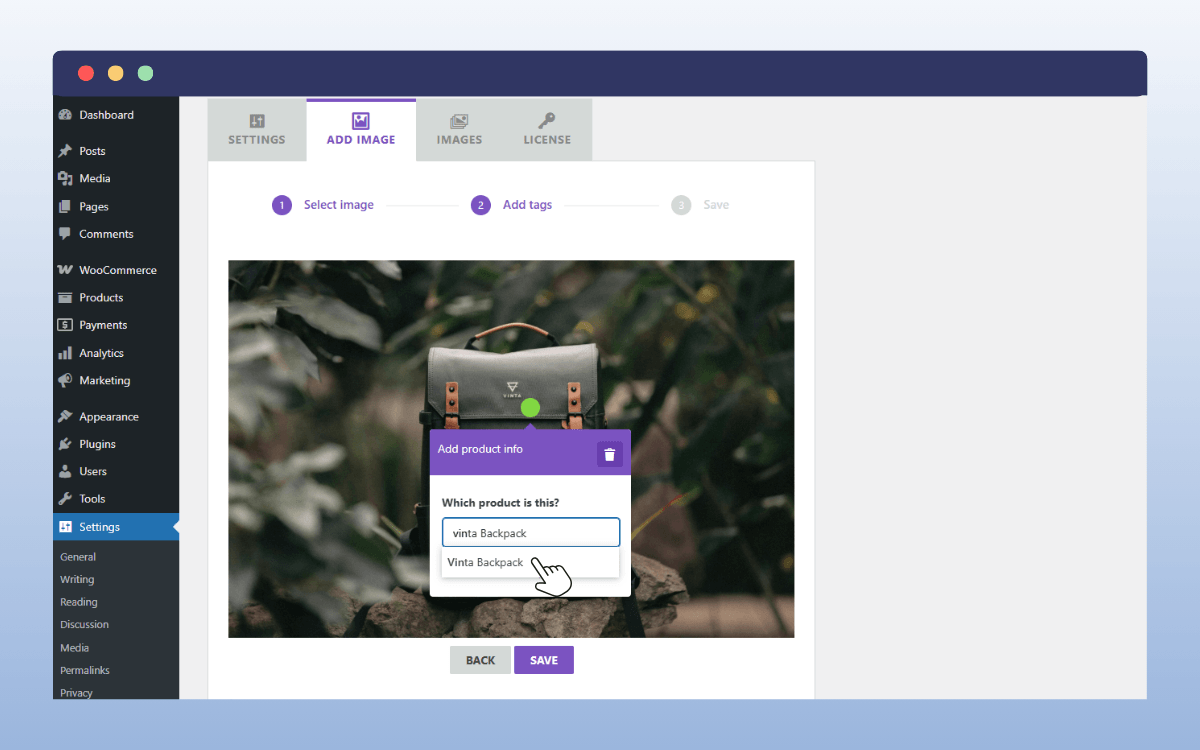
- Click anywhere on the image (preferably on the specific product) you want to add a hotspot.
- A pop-up window appears asking you to link a specific product in your catalog to the hotspot. Search for the product by entering its name and then click to tag it once it appears in the results.
- You can also add a custom product. You’ll enter a new product name, price, and link.
- If you want to tag more products, repeat this process from step 3.
To finish, click the Save button at the bottom.
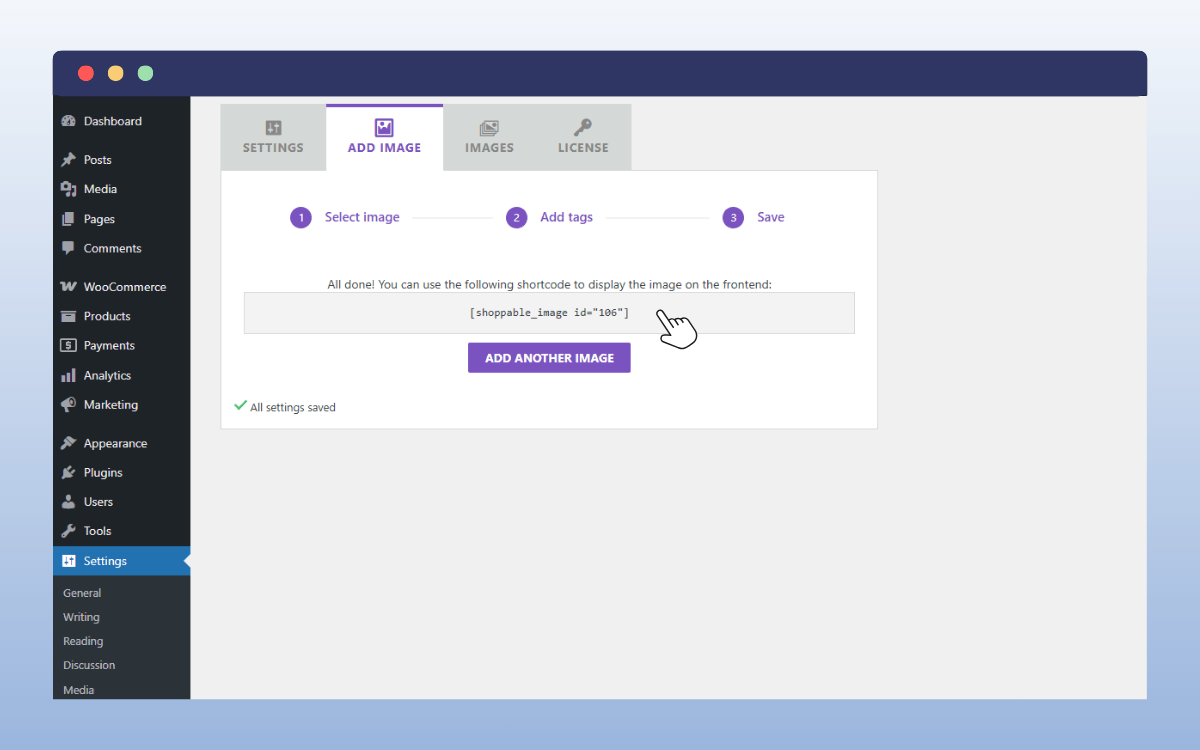
Step 4: Display the shoppable image on the frontend
After clicking Save, you’ll see a shortcode for this image on the same tab.
- Copy this shortcode.
- Under Pages or Posts, select the post or page you want to add shoppable images to, then click Edit.
- Click the plus(+) button to add a shortcode block on this page/post.
- Paste the shortcode you copied from the Add Image tab.
- Click the Save button on the top right, and that’s it. You can go to your site’s frontend and preview how it works.
Customers visiting this page can now click the product(s) in this image to go directly to the product page.
Adding clickable hotspots to your images is just the first step. To get the most out of shoppable images, you’ll need to follow some best practices.
Tips for getting the most out of shoppable images
How you use shoppable images matters a lot. Small decisions in their design, placement, and context can make the difference between those that just look nice and those that actually drive sales.
If you want to make the most of your shoppable images, here are some tips.
Use high-quality lifestyle images
Shoppable images work best when they show products in context. Lifestyle images provide that context, compared to plain white-background product photos.
Lifestyle images show how a product fits into real life. Take the IKEA Shop by Rooms as an example. The images featured here showcase furniture in living rooms, offices, kitchens, bedrooms, etc. In other words, in a real-life setting.
This simplifies their buying decisions, as they can see themselves using the product. Since the image is shoppable, they can go from interest to purchase in a single step.
Avoid overloading an image with too many hotspots
We know that shoppable images usually contain multiple products. But you shouldn’t add too many clickable points. In this case, the experience can become overwhelming for customers. They might have a hard time deciding which hotspots to click and which ones to ignore.
Or, they may not quickly see the hotspots for the products they’re interested in. What’s worse, on mobile devices, hotspots may easily overlap or sit too close together, making it hard for users to distinguish them.
With this type of experience, you’re more likely to lose buyers than gain them.
Embed shoppable photos in content marketing channels
Shoppable images should be part of your marketing strategy. If you have a landing page or blog post, know that these are places where customers may discover a product they like. Instead of adding plain product images and then a call-to-action button at the end, you should add shoppable images here. This way, they can actualize their interest by buying the product right then and there.
Combine them with user-generated content
Potential customers trust images from other customers more than those on your product page. You can make these shoppable, and since customers trust them, this can increase your conversion rate.
Optimize image file sizes
Before uploading the images you’ll use, ensure they’re optimized for file size. Shoppable images are slightly heavier than normal images because they include interactive elements. So if the base image is large and unoptimized, it will likely slow down your site.
Page speed matters because slow-loading pages discourage customers from completing their purchase (leading to high bounce rates). If your bounce rates are high, your conversions will drop.
FAQs about shoppable images
So that’s it on shoppable images in WooCommerce. If you still have some questions on this, here are some of the most common ones answered.
What is a shoppable image?
A shoppable image is an interactive image that lets users click on products to view or buy them directly. Typically, they’re collections of images, with each image having a clickable hotspot. These hotspots reveal a pop-up window linking back to the product page where the customer can buy the product.
How do shoppable images work to enhance online shopping experiences?
They reduce the steps between discovering the product and buying it. If customers find a product they like in your blog post, hero section, or customer reviews, they don’t have to visit your shop page to look for that specific product. They can click the image to go directly to the product page and buy it. No extra steps that might frustrate them.
How do shoppable images increase conversion rates for online retailers?
They make it easier for customers to act on their interests. They reduce the time and effort they would otherwise spend to get the product they like. They can get it right from where they discover it. This smooth experience means more customers are likely to buy, leading to more conversions.
Can I embed a shoppable image anywhere on my WooCommerce site?
Yes. With the Shoppable Images plugin, you can embed shoppable images anywhere on your WooCommerce site using shortcodes.
Start using shoppable images in your WooCommerce store today
Shoppable images allow customers to buy the products they like from an image in one step. They enable customers to act on their interests immediately. This can increase your conversions since more customers will likely buy the product they’re interested in.
WooCommerce doesn’t support shoppable images by default. To add them to your WooCommerce store, you’ll need the Shoppable Images plugin. You can create unlimited shoppable images with this plugin and display them anywhere on your site.
You’ll have complete control to design the clickable hotspots to suit your store’s design and brand. Including designing specifically for mobile users.
Get the Shoppable Images plugin and start driving conversions with shoppable images in your WooCommerce store.
