Are you running a print store, personalized gift store, or another similar WooCommerce store? Then you probably want to accept 1 or more files from your customers when they purchase your products. To do that, you need to add a file upload field to your product page.
WooCommerce doesn’t have any out-of-the-box features to add file uploads to your products, so we’ll use a plugin to achieve the desired result.
This tutorial uses WordPress, WooCommerce, and the Advanced Product Fields for WooCommerce plugin to add file upload capabilities to your product pages. Let’s dive in!
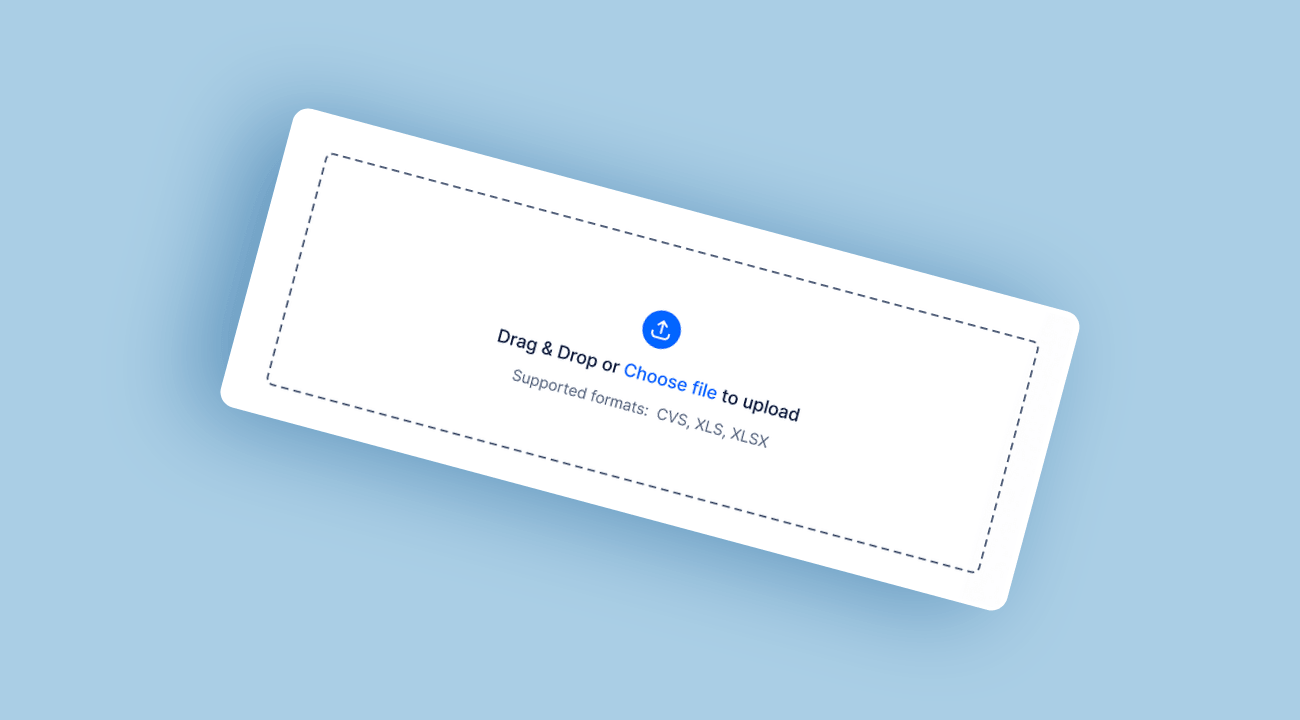
What does the WooCommerce file upload field look like?
We’re going to add a file upload field to a WooCommerce product. The field will look similar to the image below:
Here is a working example of a file upload field on a demo product.
When to use a file upload field
Print shops usually require a file upload field, but there are many more use cases. Let’s look at some examples:
- Digital design services: if you’re a graphic designer, you may want to give your customers the ability to upload logos or other illustrations that should be part of the design you’ll make for them.
- Personalized greeting cards: offer your customers a way to create a personalized greeting card by printing their photo on the card.
- Design to code services: allow customers to upload PDFs, PSD (photoshop), or AI (Illustrator) files so you can convert their design to a fully functional website (code).
How to add a file upload field to your WooCommerce product pages
Unfortunately, WooCommerce does not have an out-of-the-box solution to add file upload fields to products. We’ll be using the Advanced Product Fields for WooCommerce plugin to achieve what we want. This plugin is very powerful as it also allows you to add other types of form fields to your products, which are not available in WooCommerce.
In this tutorial, we assume you already have WooCommerce set up, along with some products.
1. Install Advanced Product Fields for WooCommerce
Below are the steps to install the plugin:
- If you haven’t done so already, get the plugin here.
- Download the plugin and install it on your WordPress site via Plugins → Add New.
- Once you’ve installed and activated the plugin on your WordPress website, navigate to WooCommerce → Settings → Product fields from the dashboard to activate your license key.
2. Add a file upload field to a product
Edit the product you’d like to add a file upload field to via WooCommerce → Products. In the Product data metabox, navigate to the Custom fields section and click Add your first field.

Set the field’s Type setting to File Upload and add a label, such as “Upload your file”. Next, save your product by clicking Update.
That’s all there is to it! Visit your Woo product page and you’ll see a file upload field:

Notice that the file upload field looks like the standard HTML upload input field. If you’d like to change the design of your upload field, continue reading!
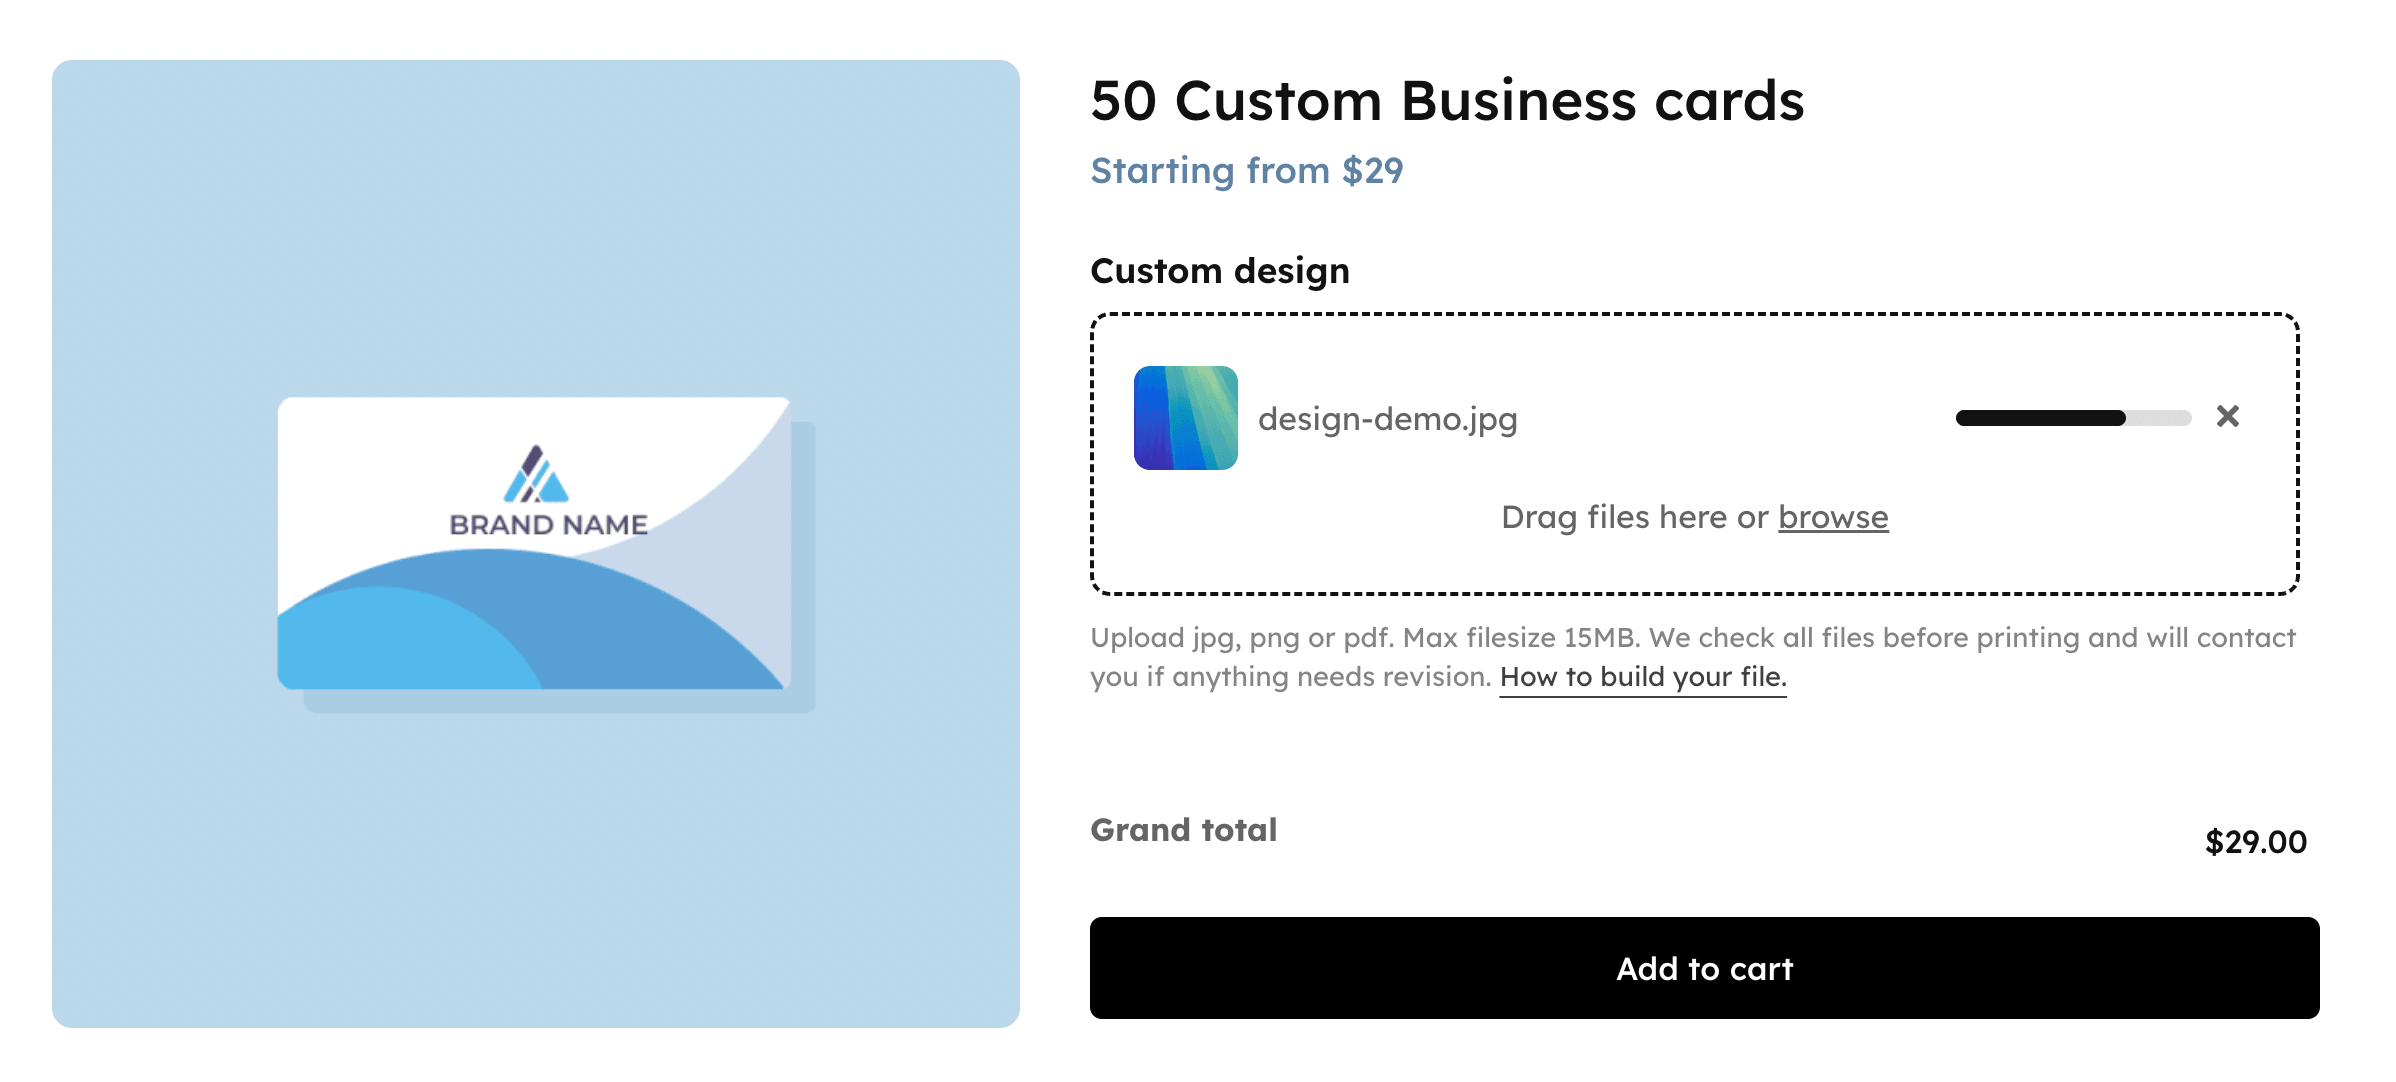
How to enable a modern (Ajax) uploader with progress bar and drag & drop
Up to this point, we have used the standard HTML file input to upload files. It doesn’t look very appealing and doesn’t have any advanced features. You can change the standard upload field into a modern uploader.
For those interested in the technical terms: under the hood, it uses Ajax technology which allows you to perform complex actions without refreshing the page. In short: it delivers a better user experience for your customers.
There are a few benefits to activating the modern upload field:
- Progress bar: each upload will display a progress bar. This is particularly handy for uploading large files.
- Drag & drop support: customers can drag & drop files directly from their computer. No need to browse for the files (although this is also possible, of course).
- Easily add or remove files.
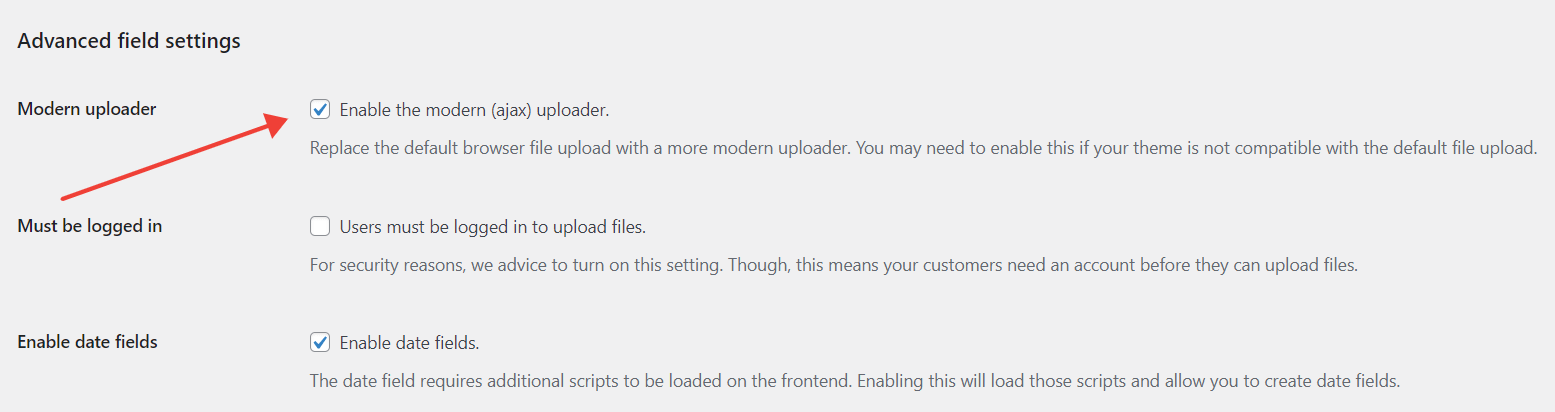
To enable the modern uploader, go to WooCommerce → Settings → Product Fields and enable the Modern Uploader setting.
Notice how the file upload field looks different now. It now contains a progress bar when uploading files:

How to allow uploading multiple files in WooCommerce
The file upload field will only accept one file by default. Luckily, you can change that to allow multiple files.
Go to the file upload field you created earlier in this tutorial, find the Allow Multiple setting, and turn it on.
How to restrict allowed file types
You can use the file upload field to upload any of the file types that WordPress allows out-of-the-box. Here’s a list of file types WordPress allows.
It is good practice to restrict the allowed file types to the absolute minimum, even if all allowed file types are safe to use. If you want customers to upload PDFs, you should not give them the ability to upload Word documents too. By restricting the file types, you make your site more secure and your customers get a better user experience.
To restrict the accepted file types, go back to the file upload field you added earlier in this tutorial and find the Accepted File Types setting.

You can define accepted file types in this setting. Your customer will see an error if they try to upload any other file type.
How to accept additional file types WordPress doesn’t support, such as PSD or AI files
WordPress is quite secure, so it won’t allow you to upload just any file. For example, by default they do not allow ZIP files, Photoshop (PSD) files, or Illustrator (AI) files.
If you want to allow file types WordPress doesn’t support out-of-the-box, there are 2 ways you can still accept them:
- Via a plugin like File Upload Types.
- Via a code snippet. We’ve prepared it for you in our knowledge base (valid license required to access the snippet).
How to limit the allowed file size for the WooCommerce file upload
With another important setting you can limit the allowed file size. This will prevent your server’s hard drive from filling up with large files.
To limit the file size, go back to the file upload field you added earlier in this tutorial and find the Maximum File Size setting. Per default, the maximum file size is 1 megabyte.
Note that your server also imposes an upload limit. Usually this is somewhere between 4-128MB. Increasing the plugin’s setting won’t work as your server will still prevent uploading larger files.
Set the minimum or maximum allowed files to a specific number
In some cases, you may require an exact number of files from your customers. By setting a minimum and/or maximum allowed number of files, you can define how many files you require.
To do that, you will need the Image Upload Features add-on. This add-on plugin adds a lot of extra functions to the file upload field, including setting a minimum and maximum number of files.
Editing images in the browser before uploading
If you’re using our Image Upload Features add-on in combination with Advanced Product Fields, your customers can edit images right in the browser before uploading them. This ensures you always get the correct image format you require.

To enable the editor, install the Image Upload Features add-on and enable the image editor via WooCommerce → Settings → Product Fields → Image Upload.
Once enabled, go back to the file upload field you created earlier in this tutorial and check these additional settings:

Find out what each setting means below:
- Minimum file size: if you’re expecting images of a certain quality, you can define a minimum needed file size (in megabytes).
- a Minimum width: the minimum required width of an image (in pixels).
- a Minimum height: the minimum height of an image (in pixels) you expect.
- Automatically resize: turn this on to automatically resize images which exceed the maximum width or height. Resizing won’t affect the aspect ratio.
- Maximum width: this setting appears if Automatically Resize is turned on. If the uploaded image is larger than this width (in pixels), it will be automatically resized.
- Maximum height: this setting appears if Automatically Resize is turned on. If the uploaded image is larger than this height (in pixels), it will be automatically resized.
- Enable image editor: this setting allows users to edit the image in an editor. Users can do the following operations (if you’ve enabled them):
- Crop
- Resize (either freely or by the aspect ratio you’ve defined)
- Rotate
- Flip
Final thoughts on how to add a file upload to WooCommerce products
Advanced Product Fields for WooCommerce, and its add-ons, makes it extremely easy to accept file uploads from your WooCommerce product pages. You can fully customize the upload experience and securely accept files from your customers. The uploaded files will be available to you in the order admin screens of WooCommerce.

Hi there
This is a great plugin, but I have one problem. The image upload field is configured to show on a specific category of products, but when it comes to the order itself – the image uploaded isn’t shown as part of the order. Any idea why this is?
Hi there,
This sounds like an issue we need to take a deeper look at. Can you use our technical support form on the website? Thanks!