Most WooCommerce store owners face the same frustrating problems. Discounts stack in unexpected ways, and suddenly your margins disappear. Wholesale prices show up incorrectly at checkout. Customers abandon their carts because they forgot to enter a coupon code.
That’s because WooCommerce’s default coupon system can create unnecessary friction. Customers must remember and manually type codes, and setting up bulk discounts requires complicated configurations. Feed plugins can’t read coupon-based prices, leading to Google Shopping rejections and wasted ad spend.
Automated discount rules fix all of this. WooCommerce Discounts calculates and displays prices everywhere – product pages, cart, checkout – without requiring coupon codes. The system applies discounts automatically when customers meet your conditions, whether that’s buying a certain quantity, belonging to a specific user role, or reaching a cart total threshold.
In this guide, we’ll walk you through setting up 8 discount types that work automatically and display consistently across your entire store.
The 8 essential discount types and how to set them up (properly)
Let’s show you the essential discount types you’ll need to know. We’ve included detailed guides that you can take a look at, which cover all the steps needed to set up each specific discount. Let’s get started with percentage discounts.
1. Percentage discounts
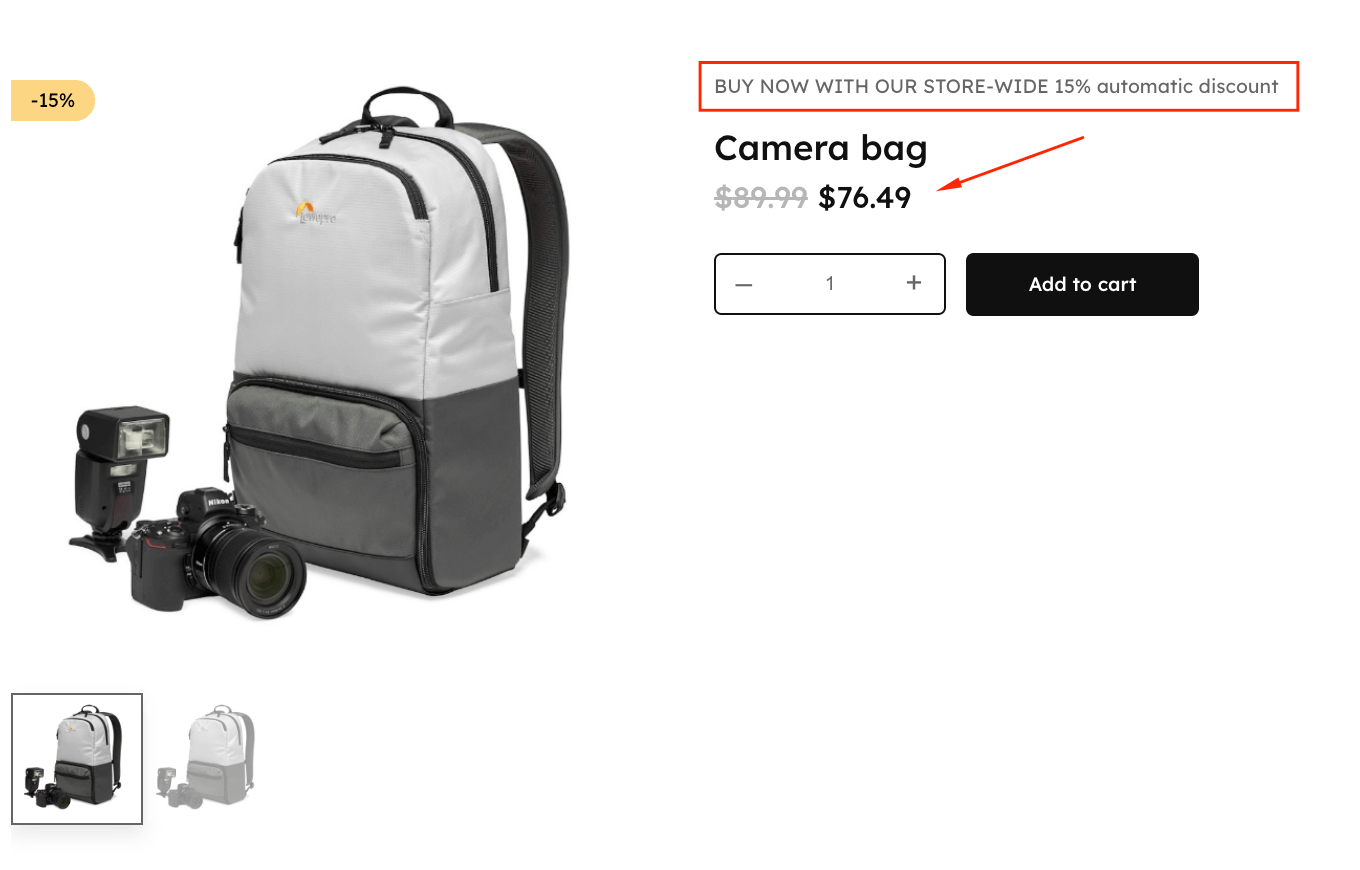
Percentage discounts apply a percentage reduction to products in a cart. You can apply them per product or per cart total.
Best practice: Use round numbers like 10%, 20%, or 25%. Customers find these easier to calculate mentally, and round numbers feel more trustworthy than odd percentages like 17% or 23%.
Display tip: Always show the original price with a strikethrough next to the sale price. This simple visual reinforcement strengthens value perception and reminds customers they’re getting a deal.
Learn how to set up order total discounts with our cart-based discount guide.
2. Fixed amount discounts
Fixed amount discounts apply a dollar reduction when minimum quantities are met. The setup process mirrors percentage discounts. The only difference is selecting a fixed dollar amount instead of a percentage in the initial configuration.
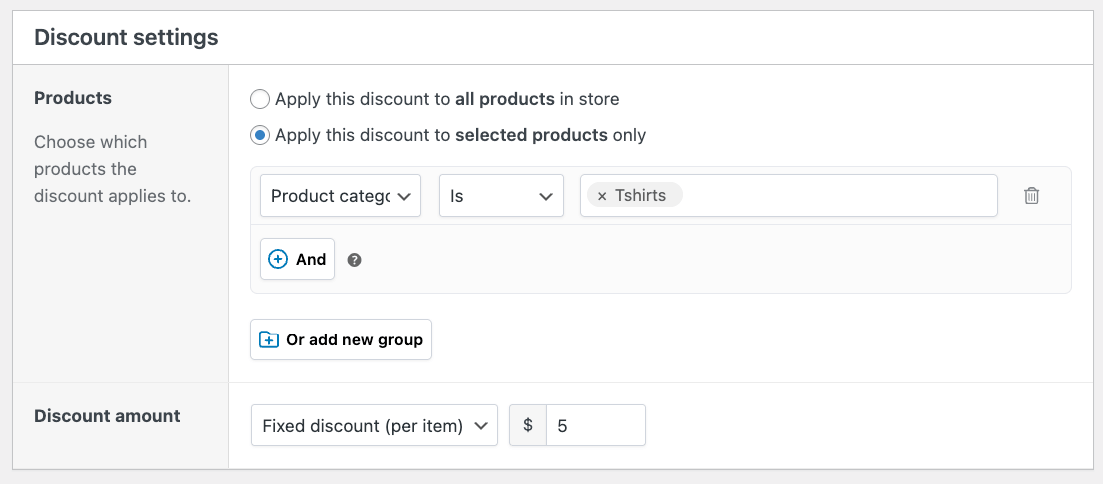
Best practice: Match your discount to the price point. A $5 discount works well for items under $50, but use $25 or more for items priced above $200.
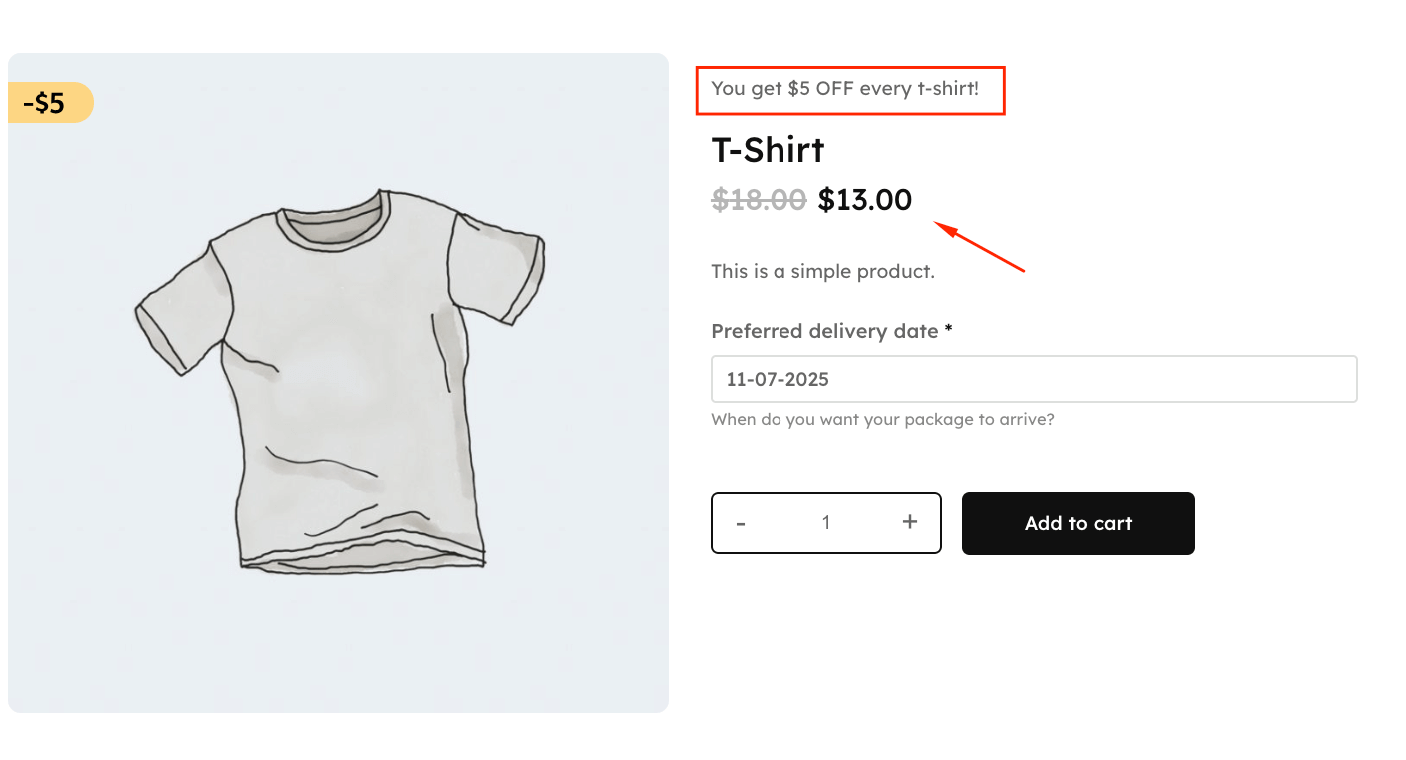
Fixed discounts feel more valuable on lower-priced items where the percentage would seem small. Customers respond better to “$5 off” than “8% off” on a $60 purchase.
3. Buy one, get one (BOGO)
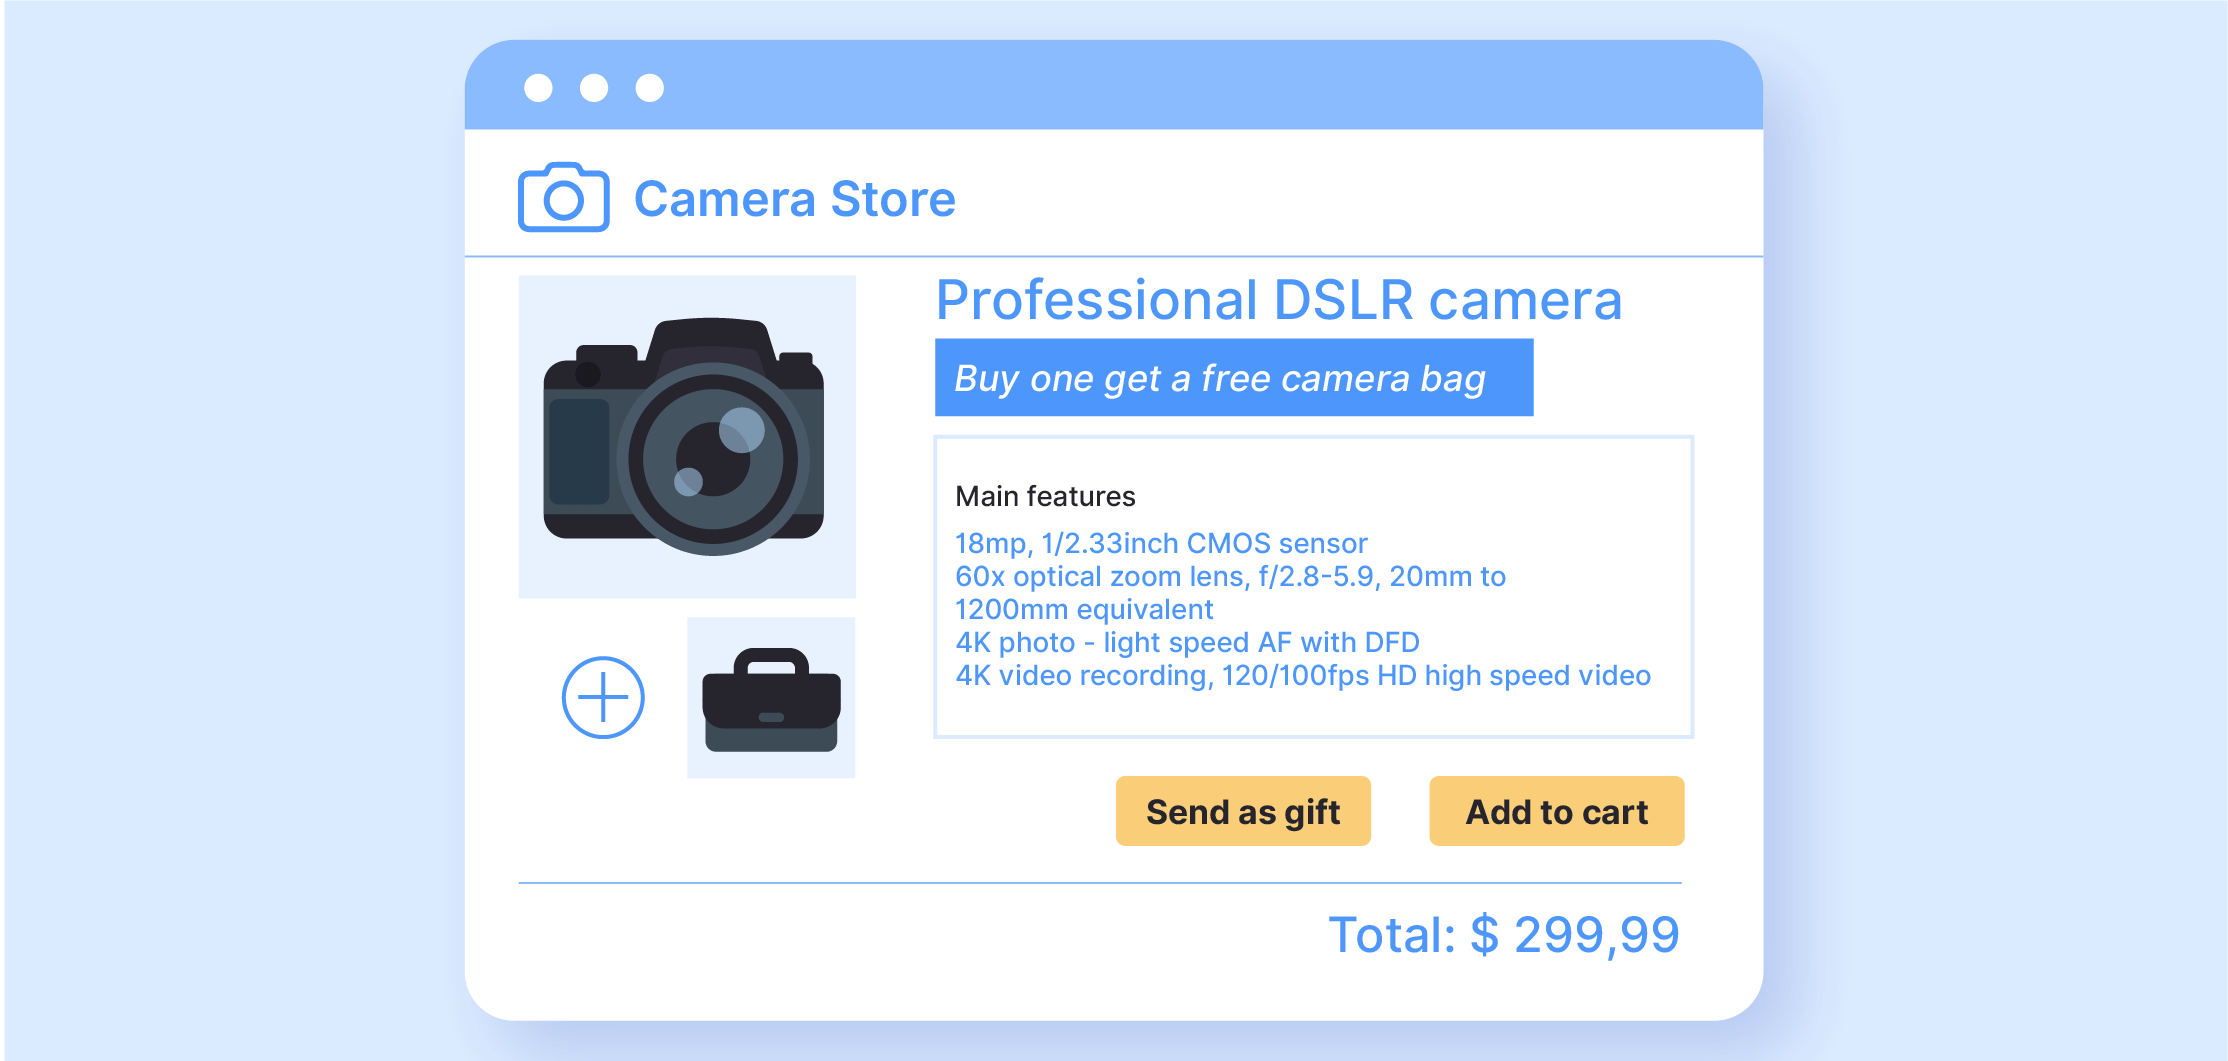
Buy one get one (BOGO) discounts automatically add free products when customers purchase specific items. You can offer the same product for free (buy 2 pairs of socks, get the 3rd one for free) or a different one (buy a camera, get a camera bag for free).
The choice will depend on what your specific needs are. Do you need to move excess stock or discontinued items, or just encourage higher spending by offering low-cost items with high perceived value as gifts?
We recommend that you use BOGO deals only on products with a 60% or higher margin. This ensures you maintain profitability even when giving one away.
Items like samples, accessories, or branded merchandise work exceptionally well.
Display tips:
Show “FREE” badges on product images alongside crossed-out prices for maximum impact. Add a gift box icon in the cart when the free gift threshold is met. Display “Spend $X more to get [free gift name]” messages to encourage customers to add just one more item.
You can even create a sense of urgency with “Only 50 free gifts remaining” counters when stock runs low.
Learn how to set up BOGO deals and free gift promotions with our detailed tutorials.
4. Bulk (or tiered) quantity discounts
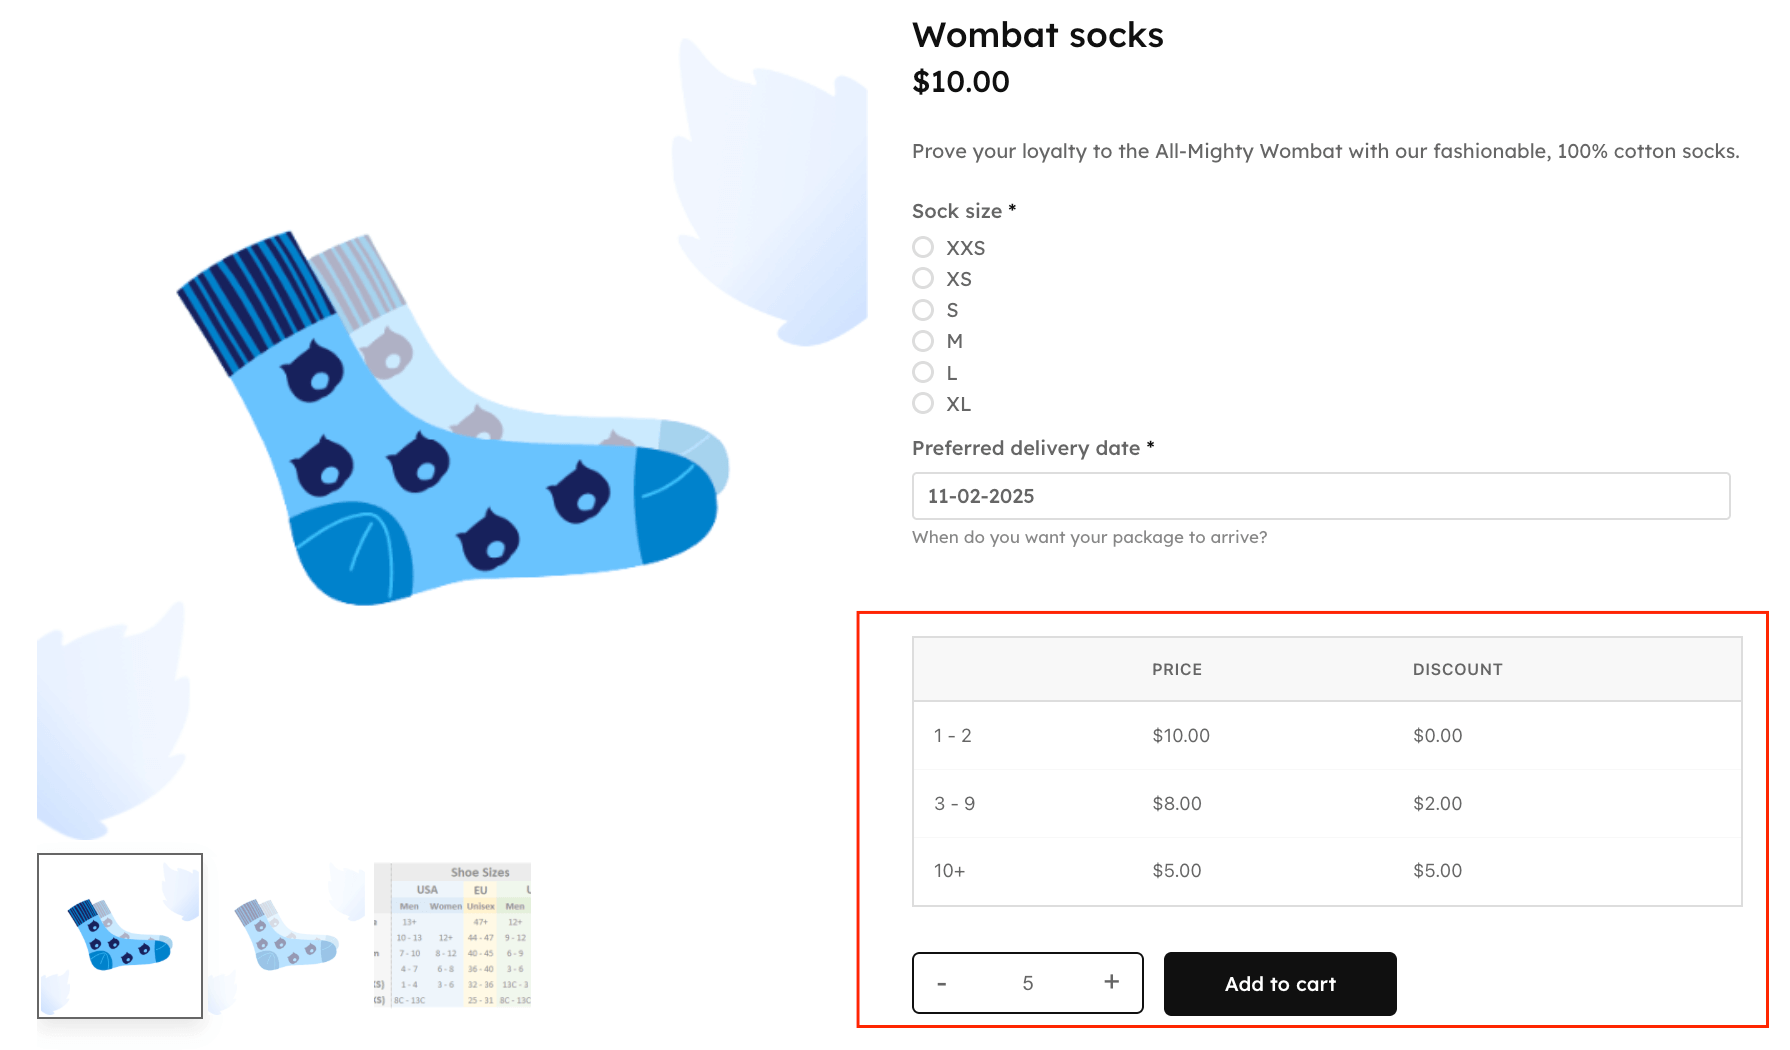
Bulk quantity discounts apply tiered rates when customers reach quantity thresholds. Buy 5 items, get 10% off. Buy 10 items, get 20% off. It works well with normal customers, but it’s also a must if you want to attract wholesale buyers.
Best practice: Start your first discount tier at 3-5 items minimum. Setting it lower trains customers to never buy singles, which hurts your margins on standard purchases.
If you want to set up bulk discounts, you’ll need to install WooCommerce Discounts, create a bulk discount rule with your quantity tiers, and enable the pricing table to display on product pages. Customers see exactly what they’ll save before adding items to their cart.
5. Category discounts
Category discounts apply reductions when customers select products from specific categories. Instead of discounting individual products, you discount entire product groups at once.
Best practice: Create a dedicated “Sale” category and move products in and out rather than constantly editing discount rules. This approach saves hours of administrative work during promotions.
Exclude your top 20% bestsellers from category sales. These products don’t need discounting, and protecting them maintains their perceived value.
Seasonal strategy: Schedule category discounts to auto-activate for end-of-season clearance. Set them up once in September for winter clearance, and they’ll run automatically when the time comes.
Read more about applying category discounts with our tutorial.
6. Role-based pricing
Different customer groups see different prices automatically when logged in. Your retail customers see standard prices, while wholesale buyers see their special rates. No coupon codes required.
Best practice: Set wholesale discounts between 15-30%, depending on your margins. Set minimum order quantities to ensure wholesale orders remain profitable after the discount.
Create a “Wholesale” user role in WordPress, set up a role-based discount rule in WooCommerce Discounts, and wholesale customers see their special pricing instantly when logged in. No manual price adjustments needed.

Learn how to set up advanced user role discounts with our comprehensive guide.
7. Cart threshold discounts
Cart threshold discounts apply when the cart reaches specific conditions, such as a $100 minimum subtotal.
Best practice: Set your threshold about 20% above your current average order value. This encourages customers to add just one more item in order for the discount to apply.
Additionally, display a progress bar showing how close customers are to reaching the discount threshold. “Add $15 more to save 10%” converts significantly better than just stating the rule.
Free shipping combo: Stack your discount threshold with free shipping at the same amount for maximum psychological impact. “Spend $75 for 10% off AND free shipping” provides 2 compelling reasons to increase cart value.
Learn how to set up cart-based discounts that drive higher order values.
8. Schedule-based and flash sale discounts
Time-limited discounts automatically activate and deactivate based on dates, times, or recurring schedules. Set them up once, and they run without manual intervention.
Best practices for flash sales and scheduled campaigns:
- Flash sales: Keep flash sales under 48 hours to maintain urgency without training customers to always wait for discounts. Launch flash sales at consistent times, like every first Friday, so customers can anticipate them and check back regularly.
- Scheduled campaigns: Set up Black Friday and Cyber Monday discounts weeks in advance and let them auto-activate on the day.
Add countdown timers to product pages when sales have less than 24 hours remaining. Show “Sale ends in X hours” prominently above add-to-cart buttons to drive immediate action.
Read about our tips and tricks for setting up sales scheduling.
How to create your first discount rule in WooCommerce Discounts
Let’s walk through creating a practical discount: 10% off accessories for VIP customers. This example combines product category targeting with role-based pricing, a common scenario for stores with customer loyalty programs.
- Download the WooCommerce Discounts plugin from your Studio Wombat account, and upload it as a zip file to your plugins dashboard. Once that’s done, simply activate the plugin.
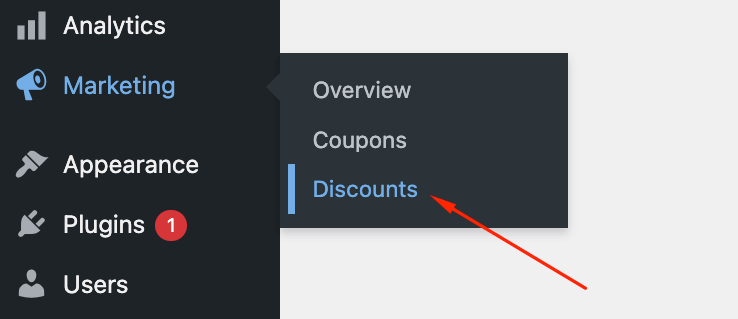
- Go to Marketing → Discounts.
- Click Add New. For our VIP accessories discount, select Flat discount. You’ll see there are 5 other discount types you could choose from:
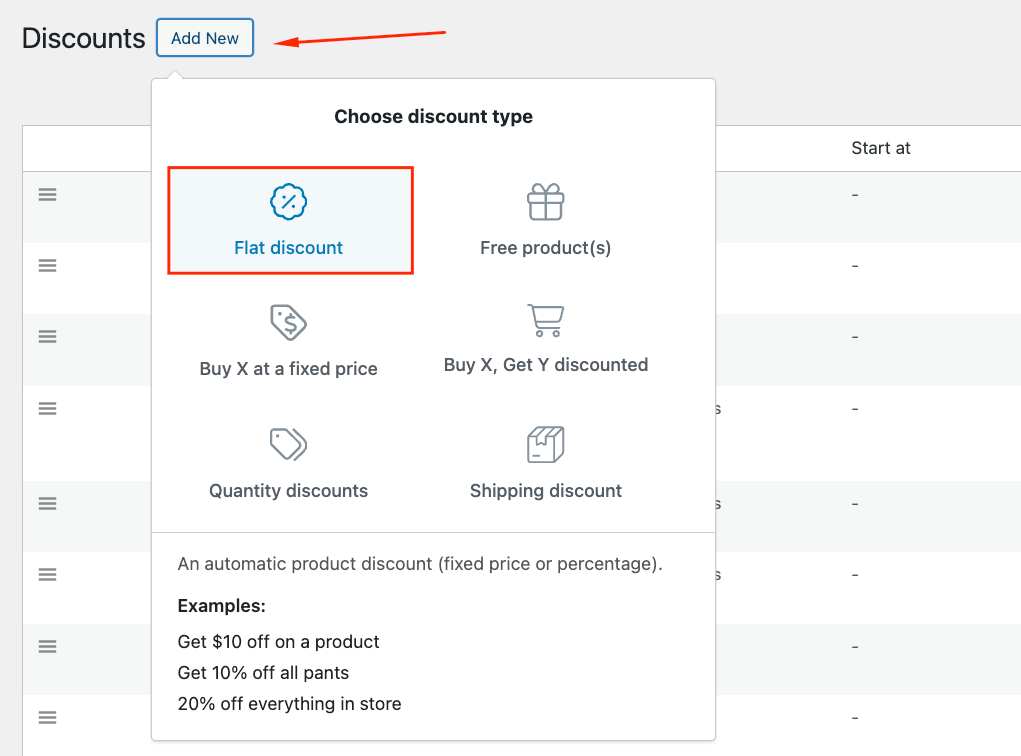
- Flat discount (apply the same discount across eligible products)
- Free products (BOGO deals and gifts)
- Buy X at a fixed price (buy a specific amount of products for a fixed price)
- Buy X Get Y discounted (reward purchases with discounted products)
- Quantity discounts (bulk deals)
- Shipping discount (free or discounted shipping rates)
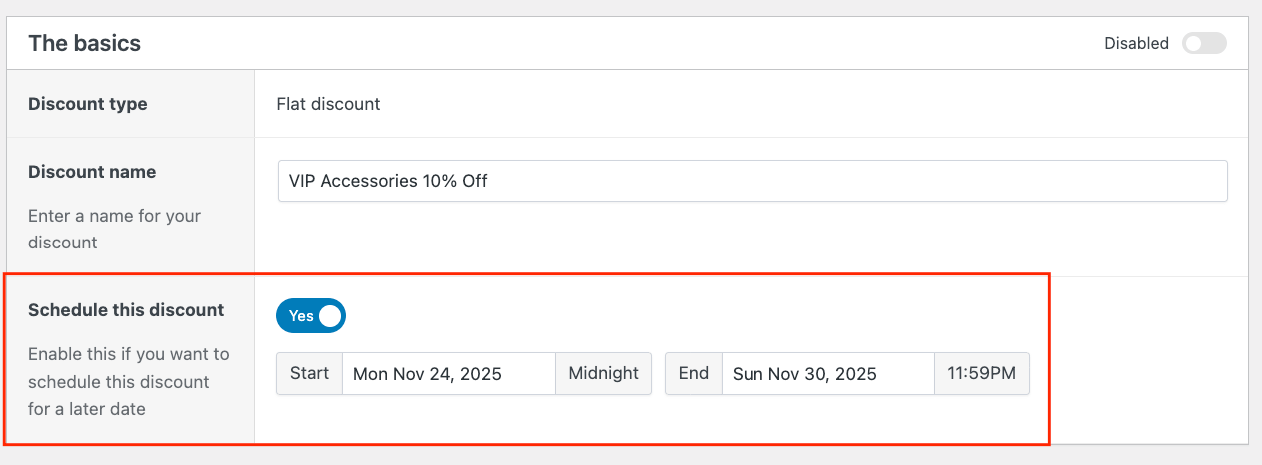
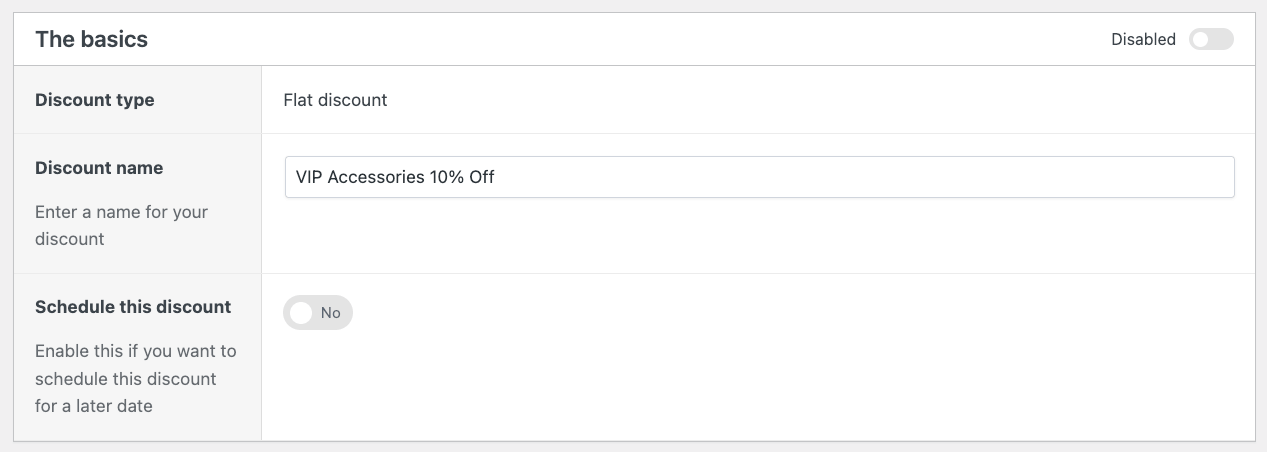
- Name your rule “VIP Accessories – 10% Off” and schedule, if you need to.
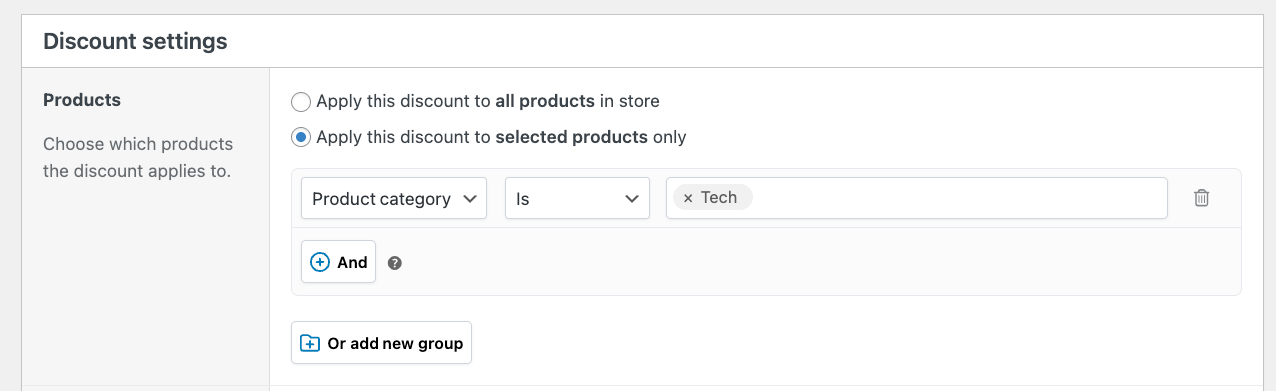
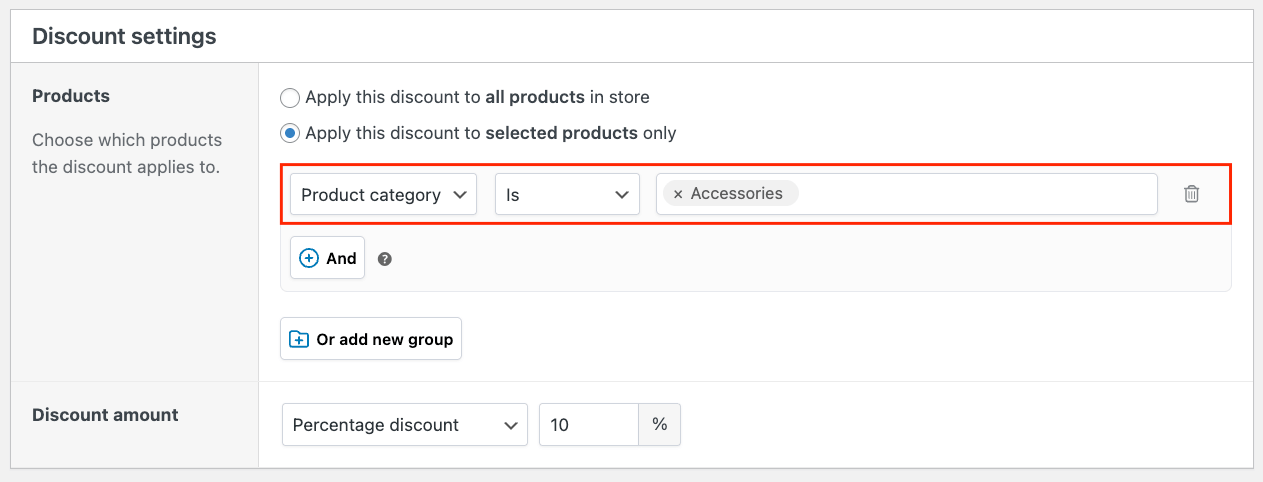
- In the Products section, click Apply the discount to selected products only. Then, choose Categories from the dropdown and select your “Accessories” category. This saves time because new accessories automatically qualify without updating the rule. After that, select Percentage discount and enter 10 as the value.
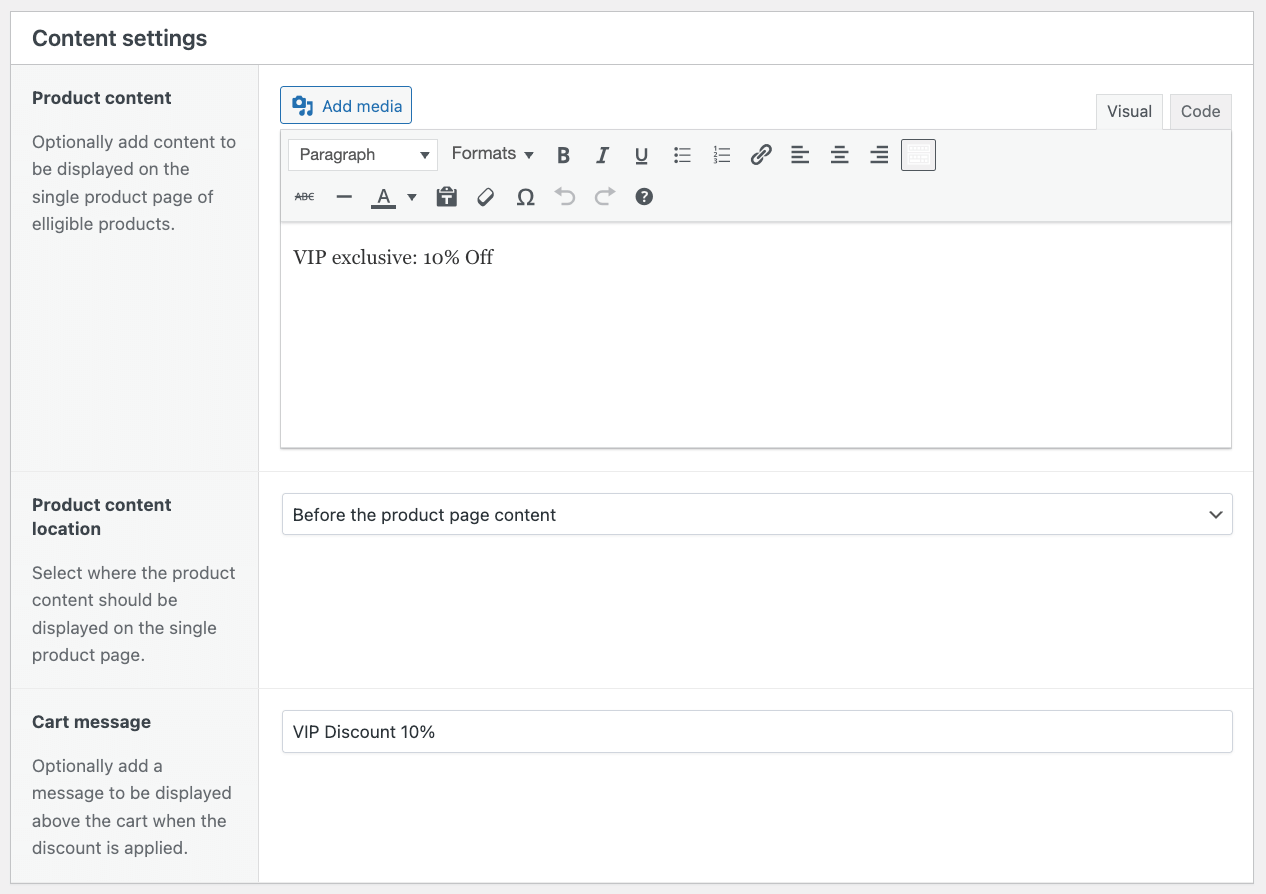
- In the Display section, enable “Show discount on product pages” and add a custom message like “VIP Exclusive: 10% Off”.
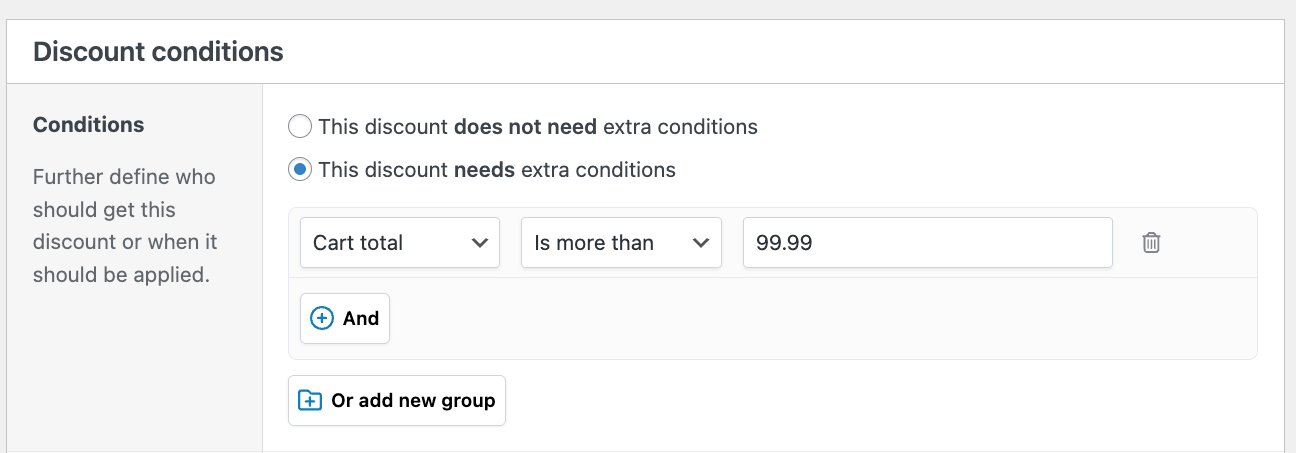
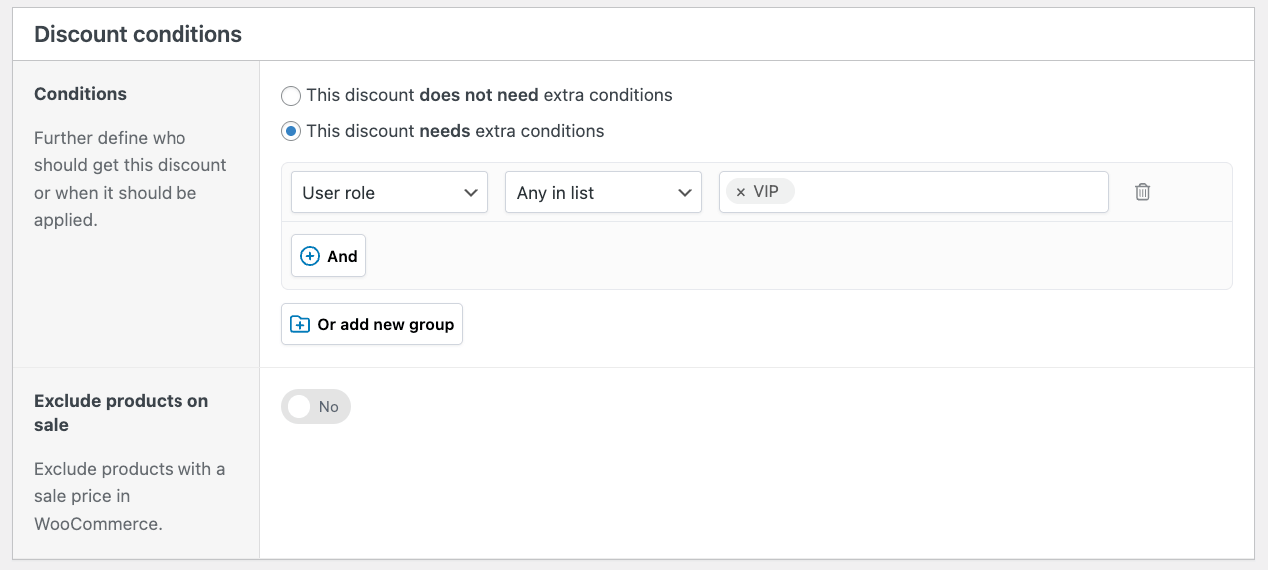
- Click This discount needs extra conditions. Select User role → Any in list → “VIP” from the dropdown.
- Click Publish and test by logging in as a VIP customer and browsing an accessories product.
Other discount combinations you can create
WooCommerce Discounts handles complex scenarios by combining multiple targeting options:
- 20% off electronics for wholesale customers: Combines category targeting with role-based pricing for B2B sales.
- Buy 5+ get 15% off for first-time customers: Uses quantity thresholds with purchase history targeting to convert new buyers.
- $10 off orders over $100 on weekends: Stacks cart threshold requirements with schedule-based activation for weekend shopping incentives.
- 15% off clearance items for newsletter subscribers: Rewards email list members with extra savings on already-reduced inventory.
These discounts are calculated once and displayed everywhere (product pages, cart, checkout, order emails), with no coupon codes required. Your customers see accurate pricing immediately, and your feed plugins export the correct discounted prices to Google Shopping and other channels.
Protecting profit margins while offering discounts
Multiple discounts drive growth, but they can destroy your profits without a clear strategy. However, the solution isn’t avoiding them entirely; you just need to be smart about it.
As an example, we’ll look at a common mistake some store owners make. WooCommerce Discounts allows you to stack discounts. It lets you set rules for discounts to “individual use only” or to allow combinations. Without proper configuration, however, a customer could stack “20% off for new customers” with “30% off Black Friday” and tank your margins.
That means you’ll need to ensure that you’re configuring each discount properly and being smart about what discounts can stack.
How to protect your margins
First, calculate your true break-even point for each discounted product. Include cost of goods sold (COGS), payment processing fees (typically 2.9% + $0.30), shipping and fulfillment costs, and your portion of overhead, like hosting and staff time. A product with 40% gross margin might only have 15% net margin after these costs.
You’ll also need to establish a clear discount hierarchy to prevent destructive stacking. Implement simple rules like “only one major promotion per order” or “role-based discounts don’t combine with sale prices.”
Be selective about which products go on sale:
- Core bestsellers: Exclude high-demand items from store-wide sales. They sell without discounts, so why cut into margins?
- High-margin products: Perfect candidates for BOGO deals, bundles, and upsells where you can afford to give more.
- Slow-moving or aging inventory: Ideal for aggressive category sales and clearance pricing where any revenue beats storage costs.
Set clear conditions and limits:
- BOGO offers: Limit to 1 free item per customer or per order to prevent abuse.
- Bulk discounts: Require minimum quantities like 3+ items to ensure the order remains profitable after discounting.
- Cart thresholds: Set discount triggers 15-20% above your average order value. This encourages customers to add just one more item rather than discounting orders they would have placed anyway.
Perfect your discount strategy today
Successful discount campaigns require prices that calculate correctly everywhere without forcing customers to remember and enter coupon codes.
Start simple. Create one basic rule like 10% off a category, test it thoroughly across your store, then add complexity. Don’t build 15 discount rules on day one. Master the fundamentals first, monitor how customers respond, then layer in advanced targeting like role-based pricing or cart thresholds.
WooCommerce Discounts provides the tools you need for all of this. Intuitive discount setup, automatic prioritization to prevent destructive stacking, flexible scheduling for hands-off campaign management, and comprehensive targeting options that work together without breaking your margins. With proper setup, your discounts drive sales while protecting profitability and maintaining Google Shopping compliance.
Download WooCommerce Discounts and start managing your promotions effectively today.
