Creating discounts
Once you have installed the WooCommerce Discounts plugin and activated your license key, you can start creating discounts straight away!
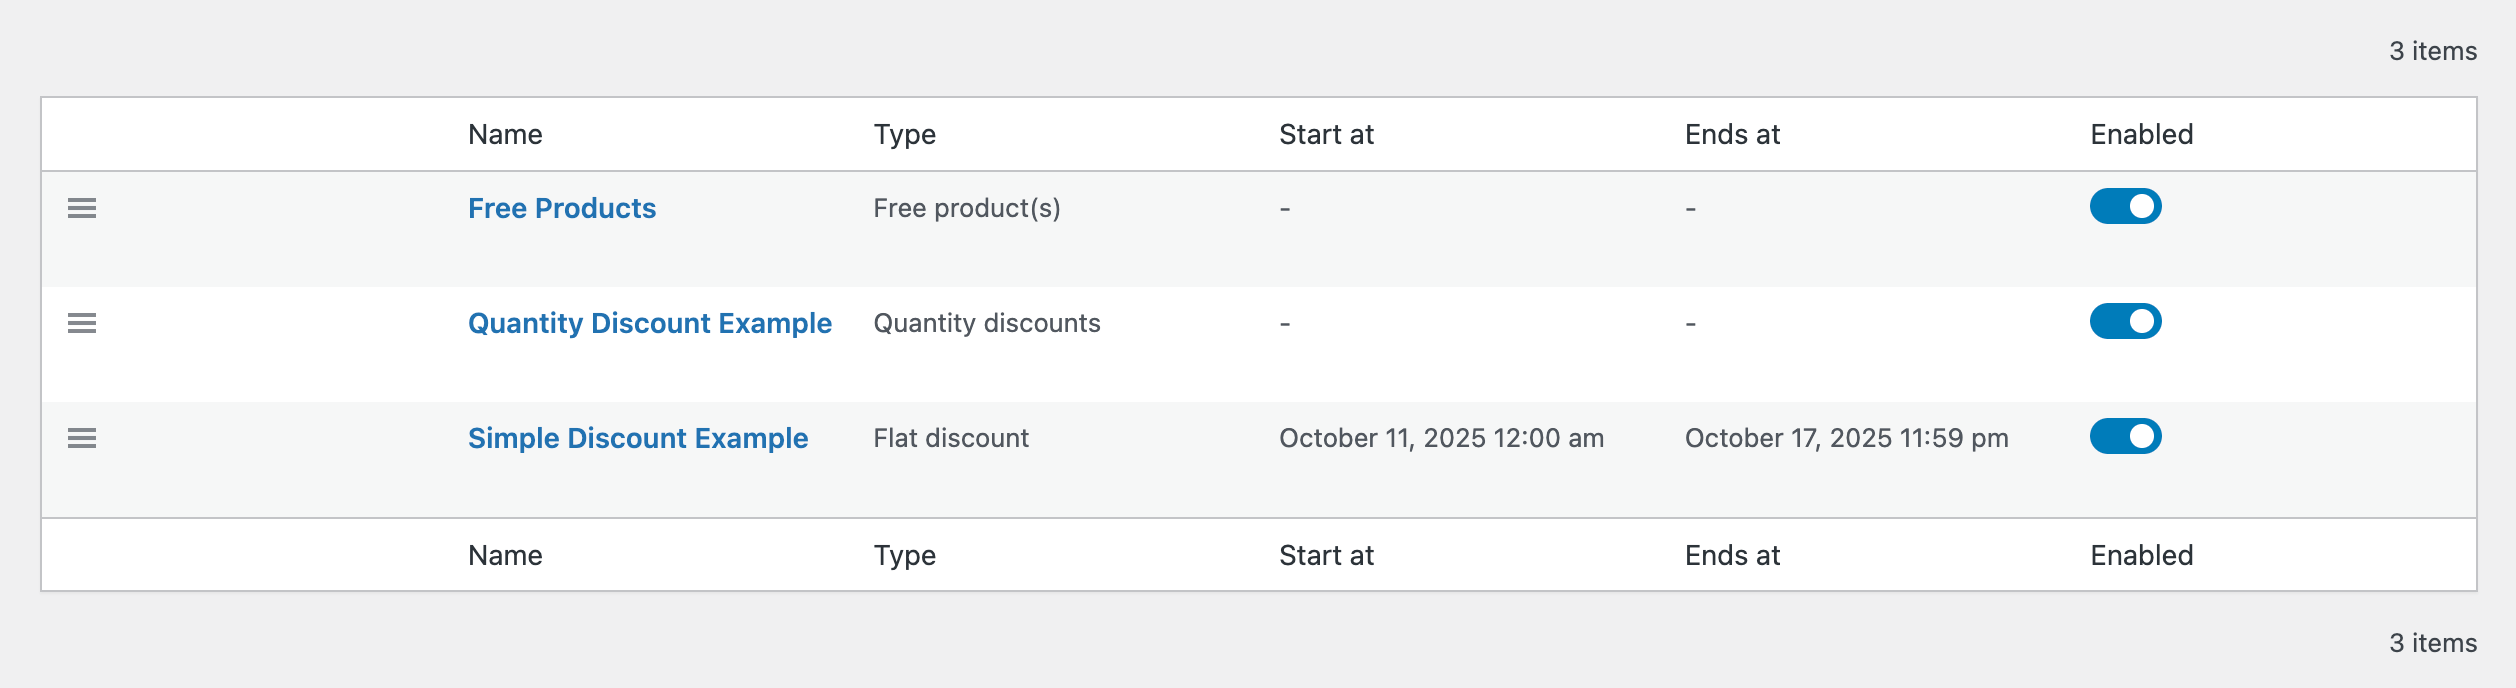
Create your first discount in WooCommerce
- In the WordPress admin dashboard, go to Marketing → Discounts.
- Click “Add New” and a popup appears where you can select your discount type:

- Flat discount: a percent or price amount off.
- Free product(s): Giving free products based on conditions, BOGOF.
- Buy X at a fixed price: e.g. “Buy 4 pants for $100”.
- Buy X, Get Y discounted: give discounts based on other products in the cart. For example “Buy 3 shirts, get a 4th at 10% off”.
- Quantity discounts: give discounts for buying items in higher quantities (bulk).
- Shipping discount: automatically offer free shipping based on conditions.
- Read more about the various discount types here.
- After selecting a discount type, the plugin guides you through a step-by-step process to fine-tune the discount settings. The available options may be different depending on the discount type you choose.
The individual discount steps are outlined in detail below!
Step 1: naming & scheduling

Give your discount a name. It will appear in the discount list in the WordPress admin dashboard for easy reference.
Enable Schedule this discount to set a start and/or end date. If you don’t, the discount will run indefinitely until you disable or remove it.
Step 2: product requirements
The next step depends on the discount type you selected, but it always involves setting product requirements: which products need to be in the cart before this discount applies?
Jump to your chosen discount type below to find out more about this step.
Flat discount
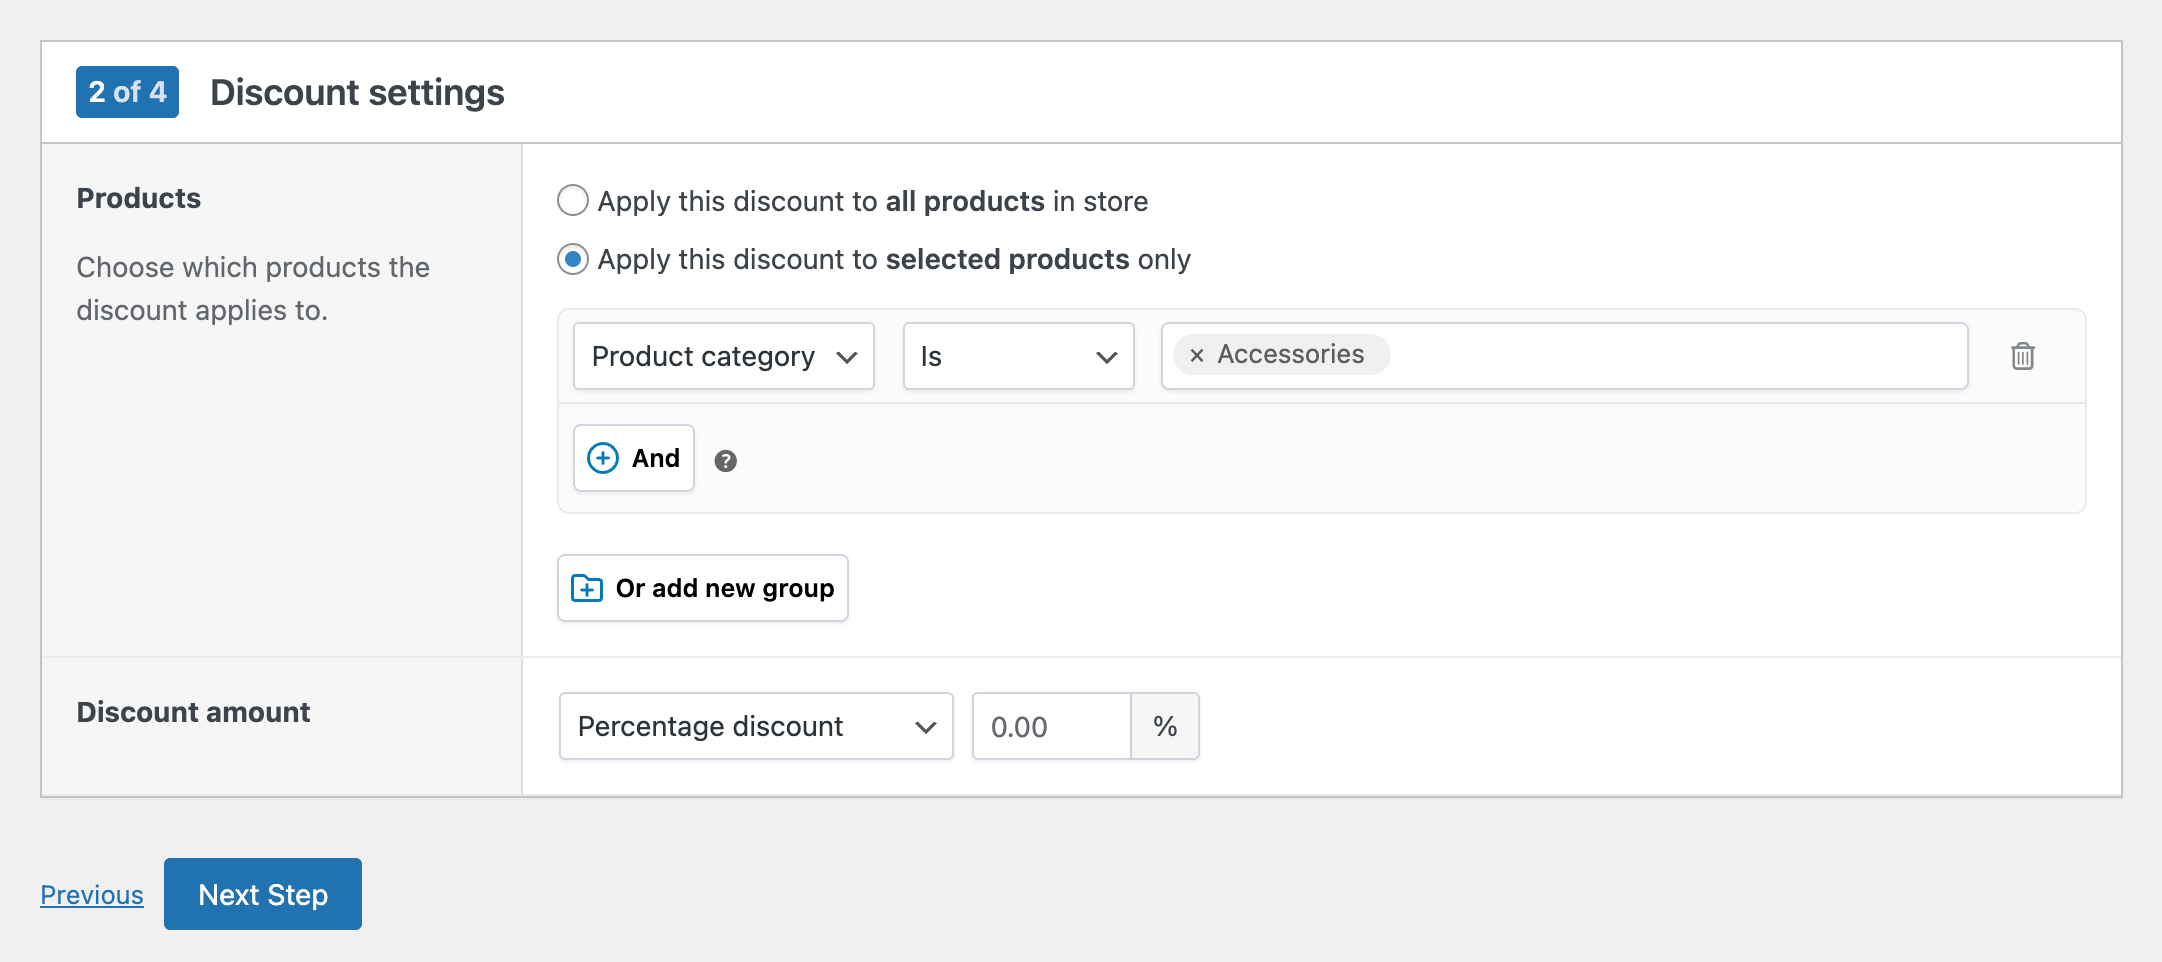
Select which products the discount applies to:
- Apply this discount to all products in store: every product added to the cart will automatically receive the discount.
- Apply this discount to selected products only: the discount will apply only to the products you define. You can select products by name (ID), category, tag, type, variations, or attributes. Use conditions to combine multiple rules if needed (that’s what the “and” button in the screenshot above is for, but you will likely not need it)
Next, define the discount amount as either a percentage or a fixed price (per item).
Free product(s)
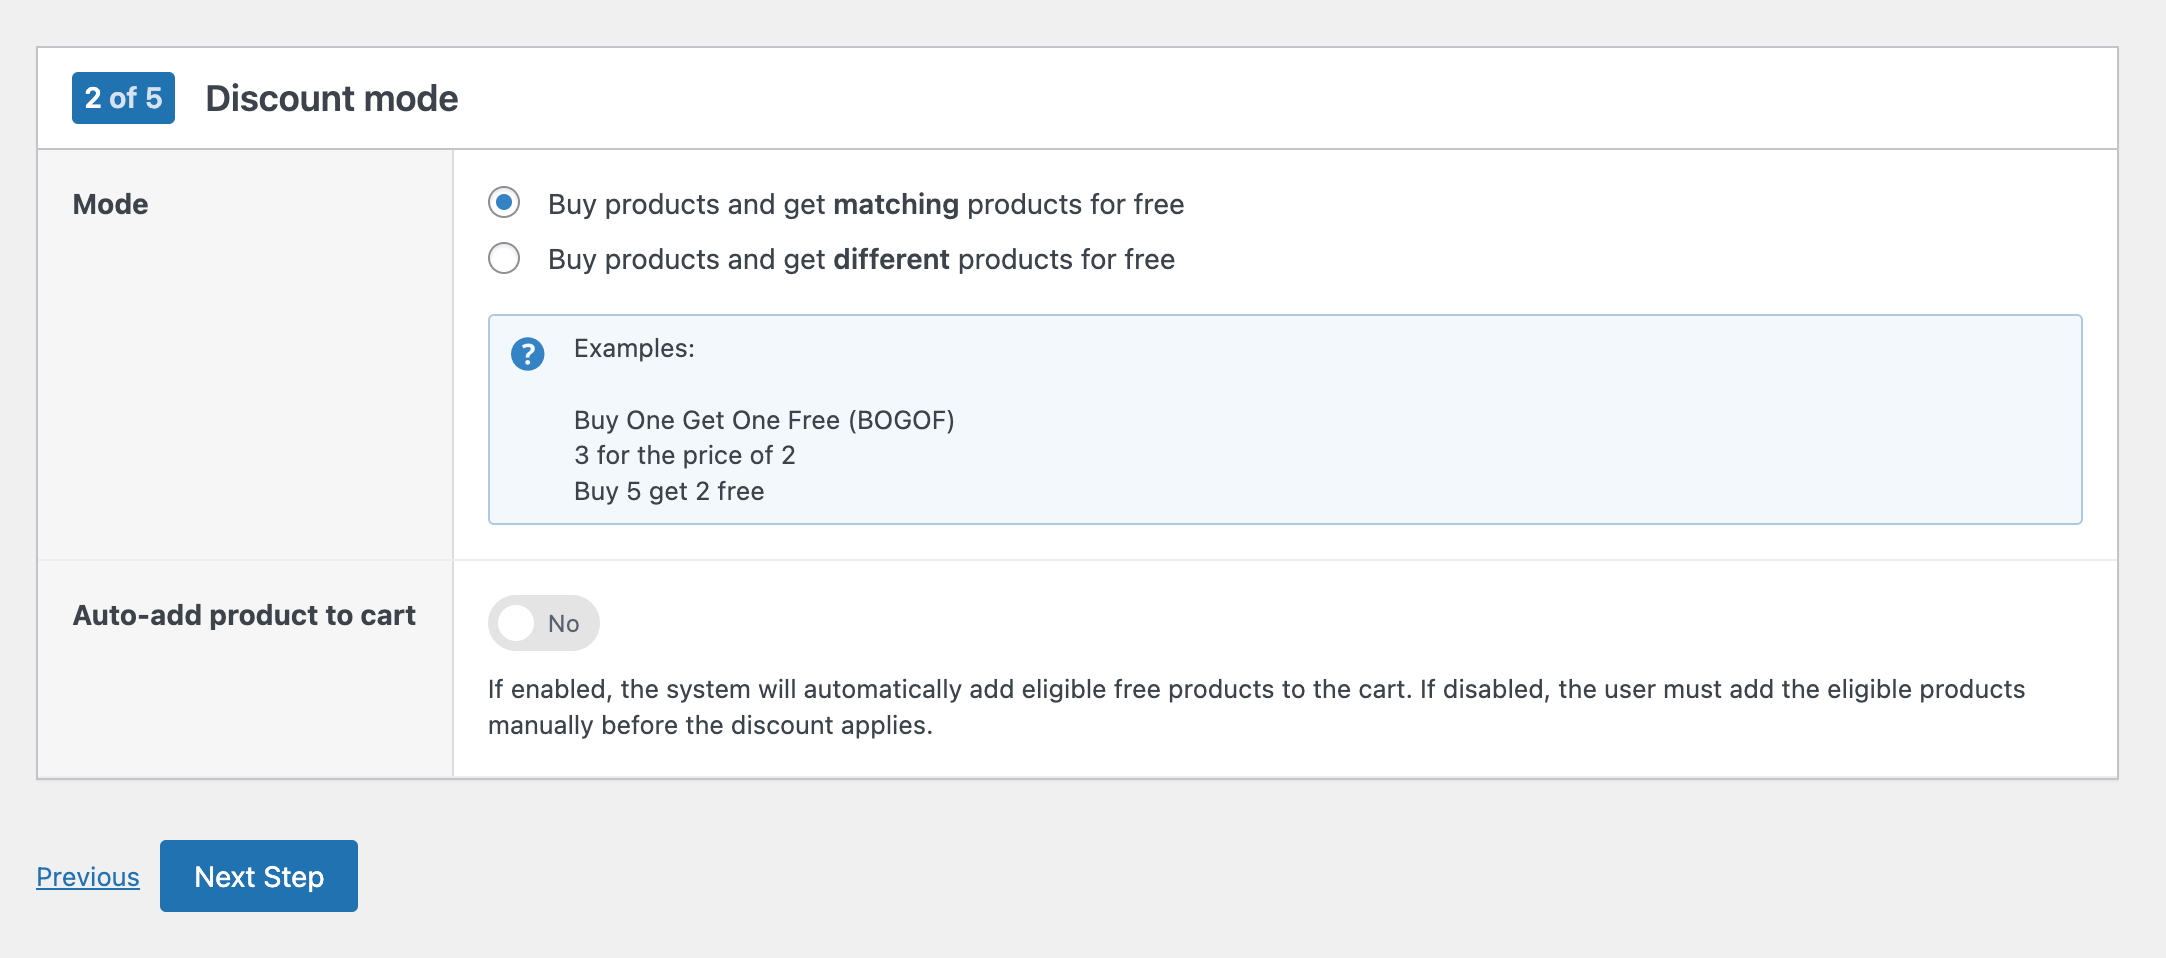
- Choose how to give free products:
- Give matching products for free: the same product is given for free (e.g. “3 for 2” or BOGOF: Buy One Get One Free).
- Give different products for free: a different product is given for free (e.g. “Buy a meal, get a dessert free”).
- You can choose to auto-add the product to the cart. If enabled, eligible free products are added automatically. If disabled, customers must add them manually to the cart before the discount applies.
Click Next Step to continue. Depending on whether you chose Matching Products or Different Products, the next screen will look slightly different.
Matching products
If you selected Matching Products, you’ll now define which products and quantities must be purchased before customers receive matching items for free:
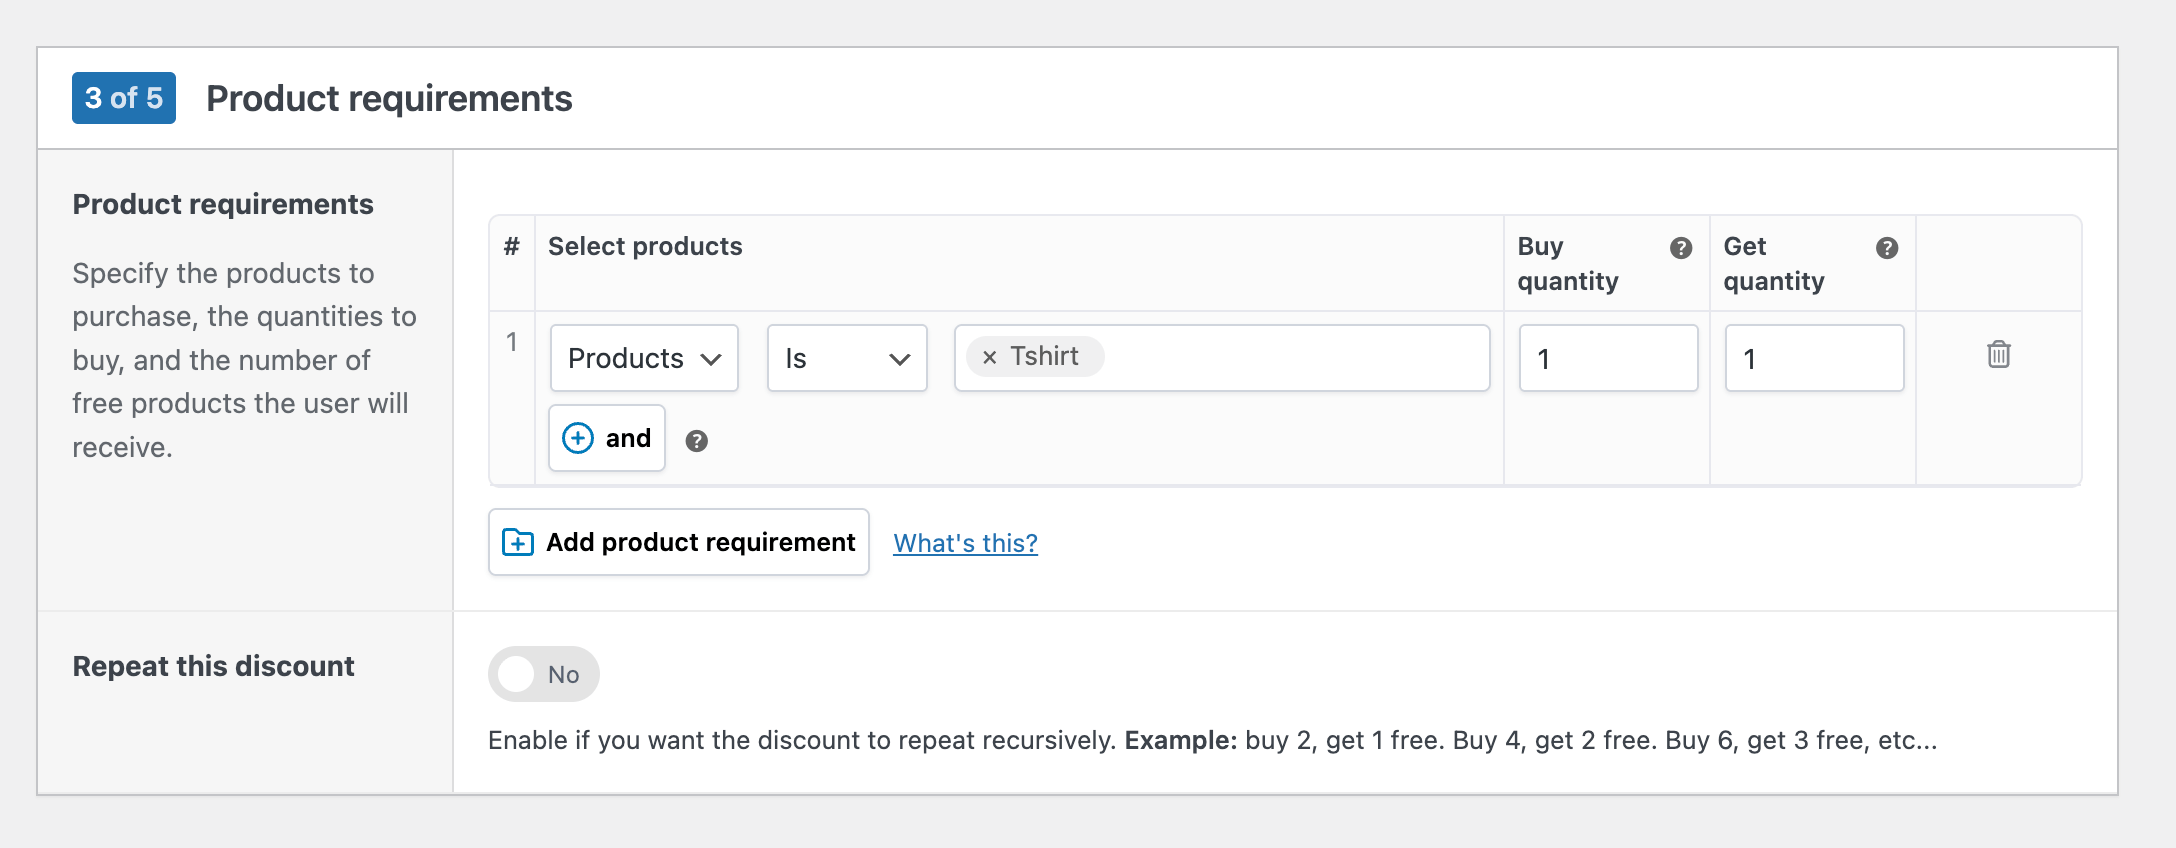
- Select the product(s) that must be purchased. You can select products by name (ID) or whole categories, tags, variations, or attributes.
- Set the quantity the customer needs to buy (“Buy quantity”).
- Set the number of matching products they will receive for free (“Get quantity”).
Different products
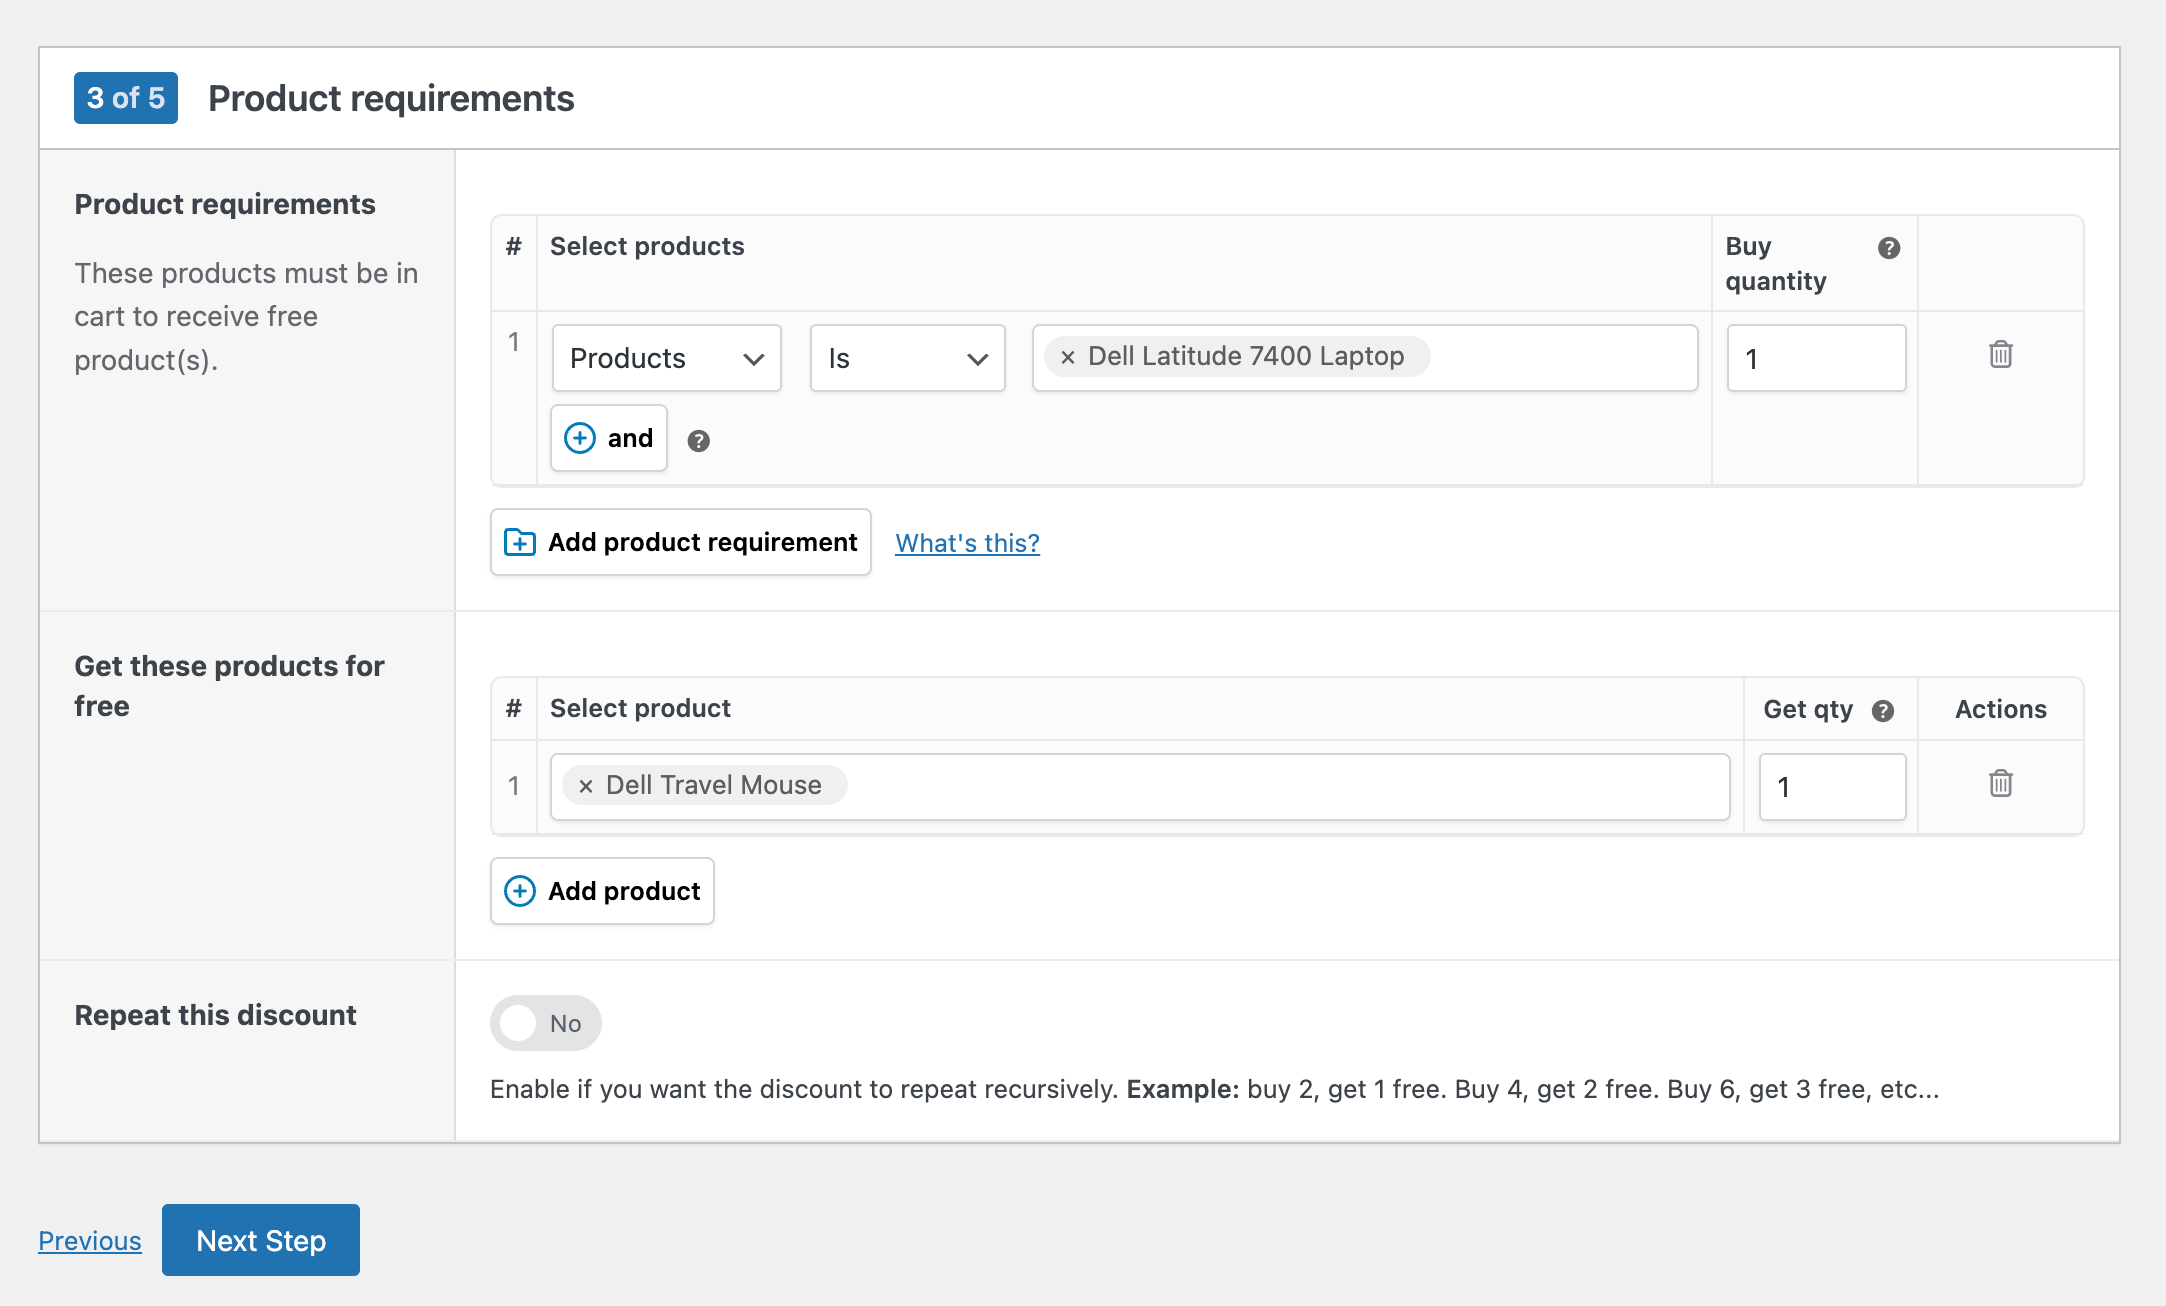
Since you selected Different Products, this screen lets you define two sets of products:
- Product requirements: specify which products and quantities the customer must purchase. You can select single products but also target whole groups by category, tag, variation, or attribute.
- Get these products for free: select which different products the customer will receive for free, and in what quantity.
In the example above, you get a free mouse when purchasing 1 Dell laptop.
Buy X at a fixed price
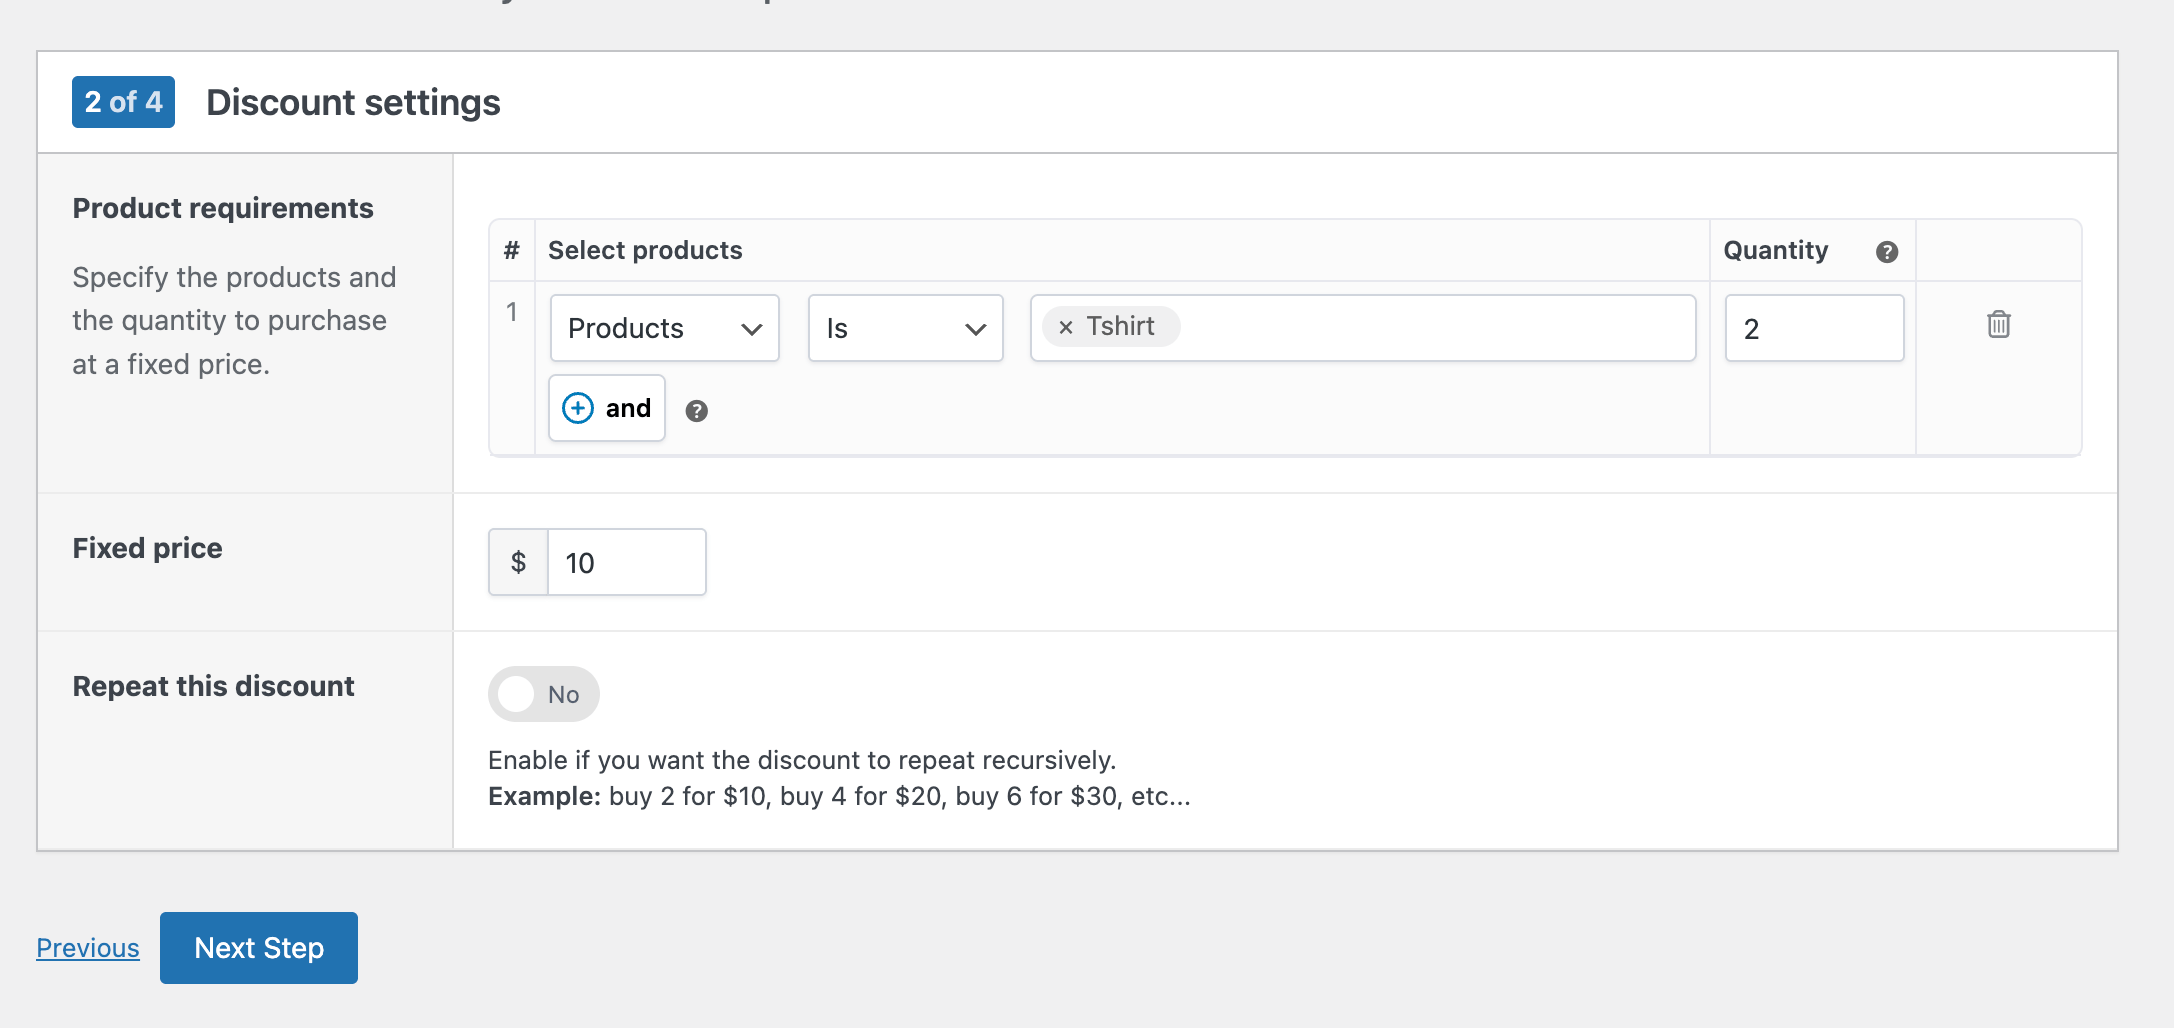
Define the products and quantity customers must purchase to get them at a fixed price. As with all discounts, you can select individual products or you can target groups by categories, tags, variations, and attributes.
Then, set the fixed price for the deal. As with the other discounts, you can target individual products but also groups by category, tag, variation, or attribute.
In the example above, we’ve defined “2 t-shirts for $10”.
Optionally, enable Repeat this discount if you want the offer to apply multiple times (e.g. Buy 2 for $10, 4 for $20, 6 for $30, etc.).
Buy X get Y discounted
Choose how the discount should apply:
- Buy products and get matching products at a discount: the same product receives the discount (e.g. “Buy 2, get the 3rd at 50% off”).
- Buy products and get different products at a discount: a different product receives the discount (e.g. “Buy a laptop, get a mouse at 20% off”).
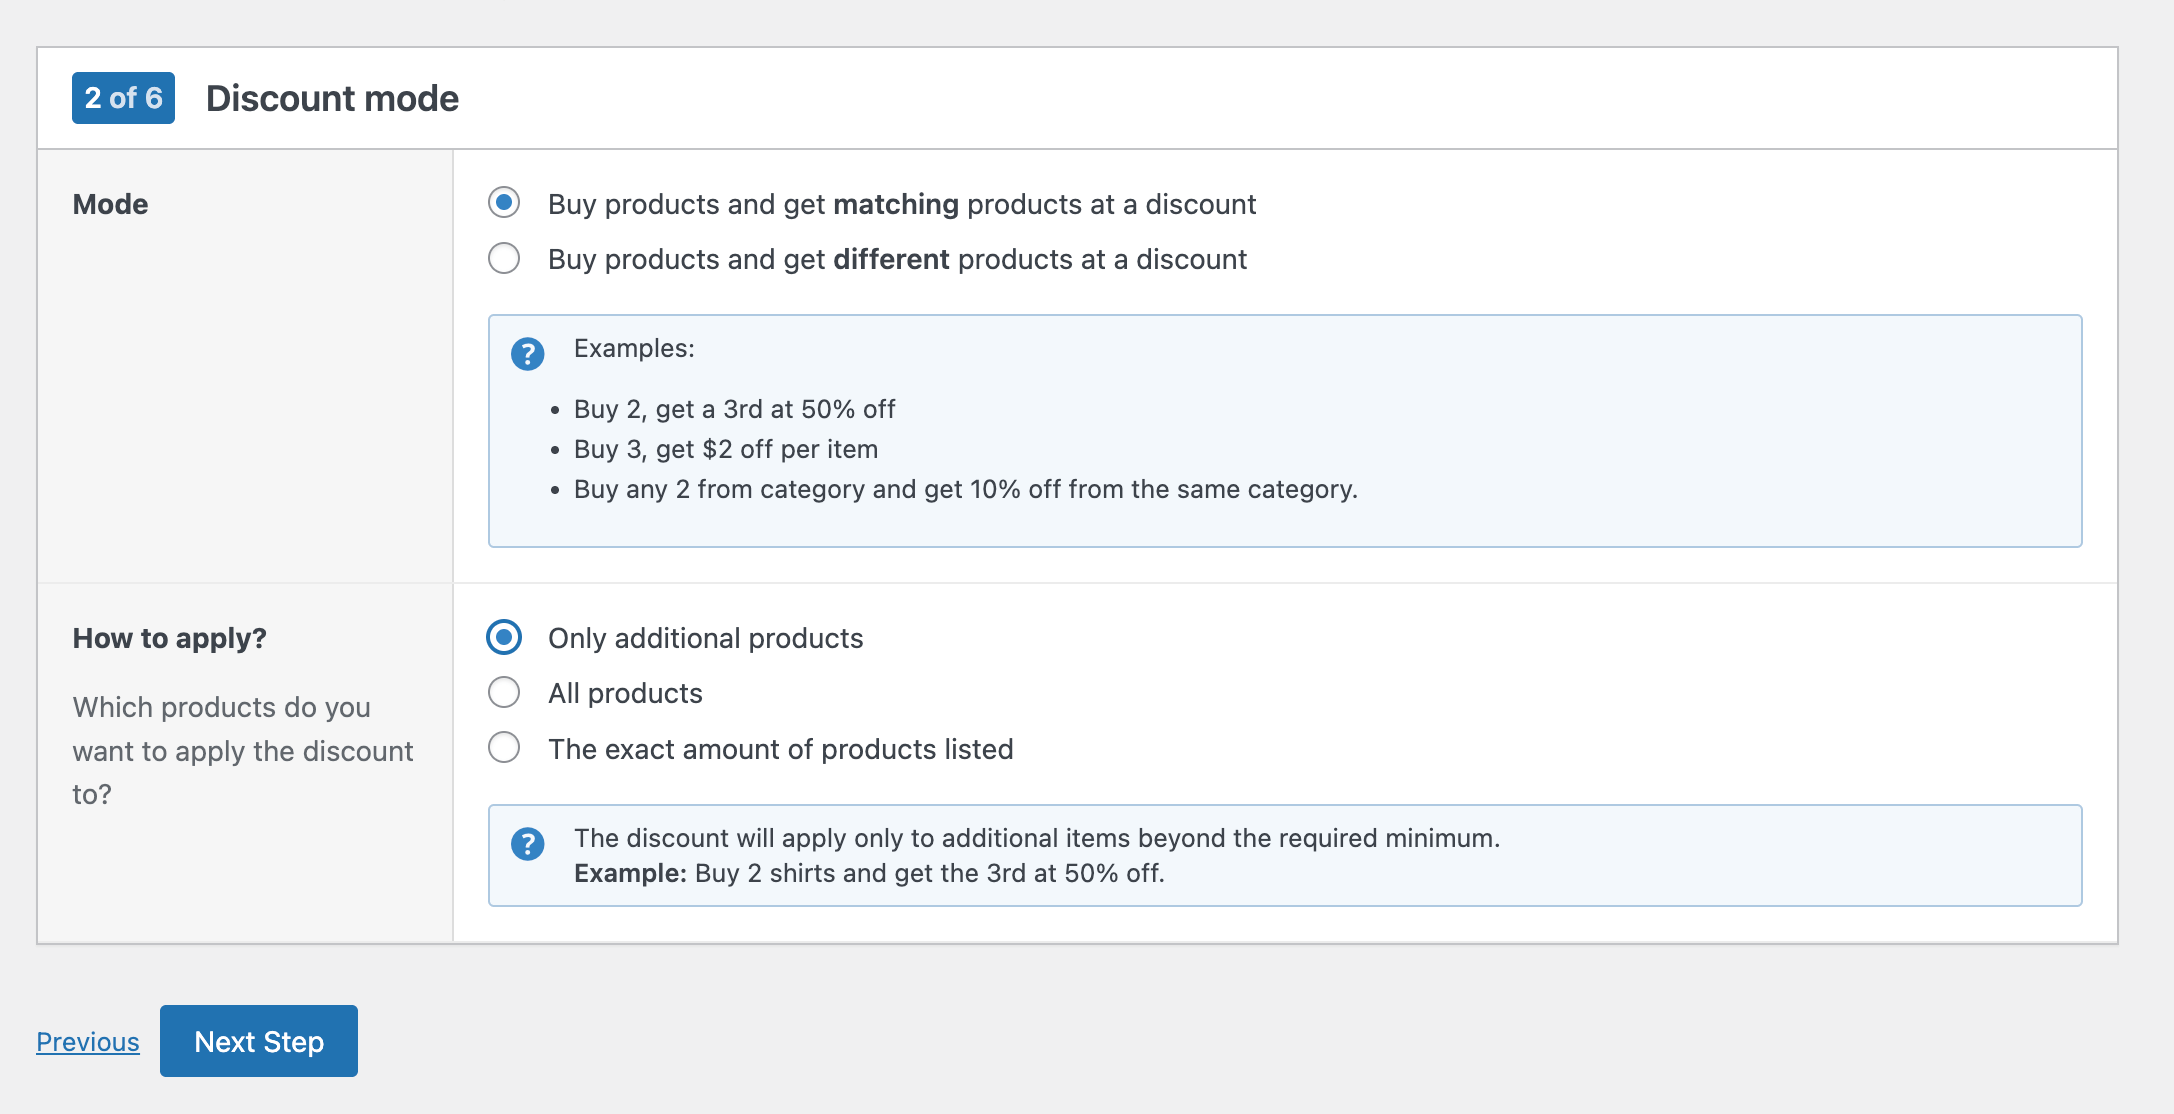
If you’ve selected “Matching Products” in the setting above above, the next step is to choose which products the discount will apply to:
- Only additional products: the discount applies only to items beyond the required minimum. Example: “Buy 2 shirts, get the 3rd at 50% off”.
- All products: the discount applies to all qualifying products, including the required ones. Example: “Buy 2 shirts, get both at 50% off”.
- The exact amount of products listed: When the minimum product requirements are met, the discount will apply only to that set of products. Example: “Buy 5 shirts and get exactly those 5 shirts at 10% off”. If you buy 6 shirts, only 5 will be discounted.
Click Next Step to continue. Depending on whether you chose Matching Products or Different Products, the next screen will look a bit different.
Matching products
If you’ve chosen that this discount should apply to matching products, this is the screen you’ll see:
Define the following settings:
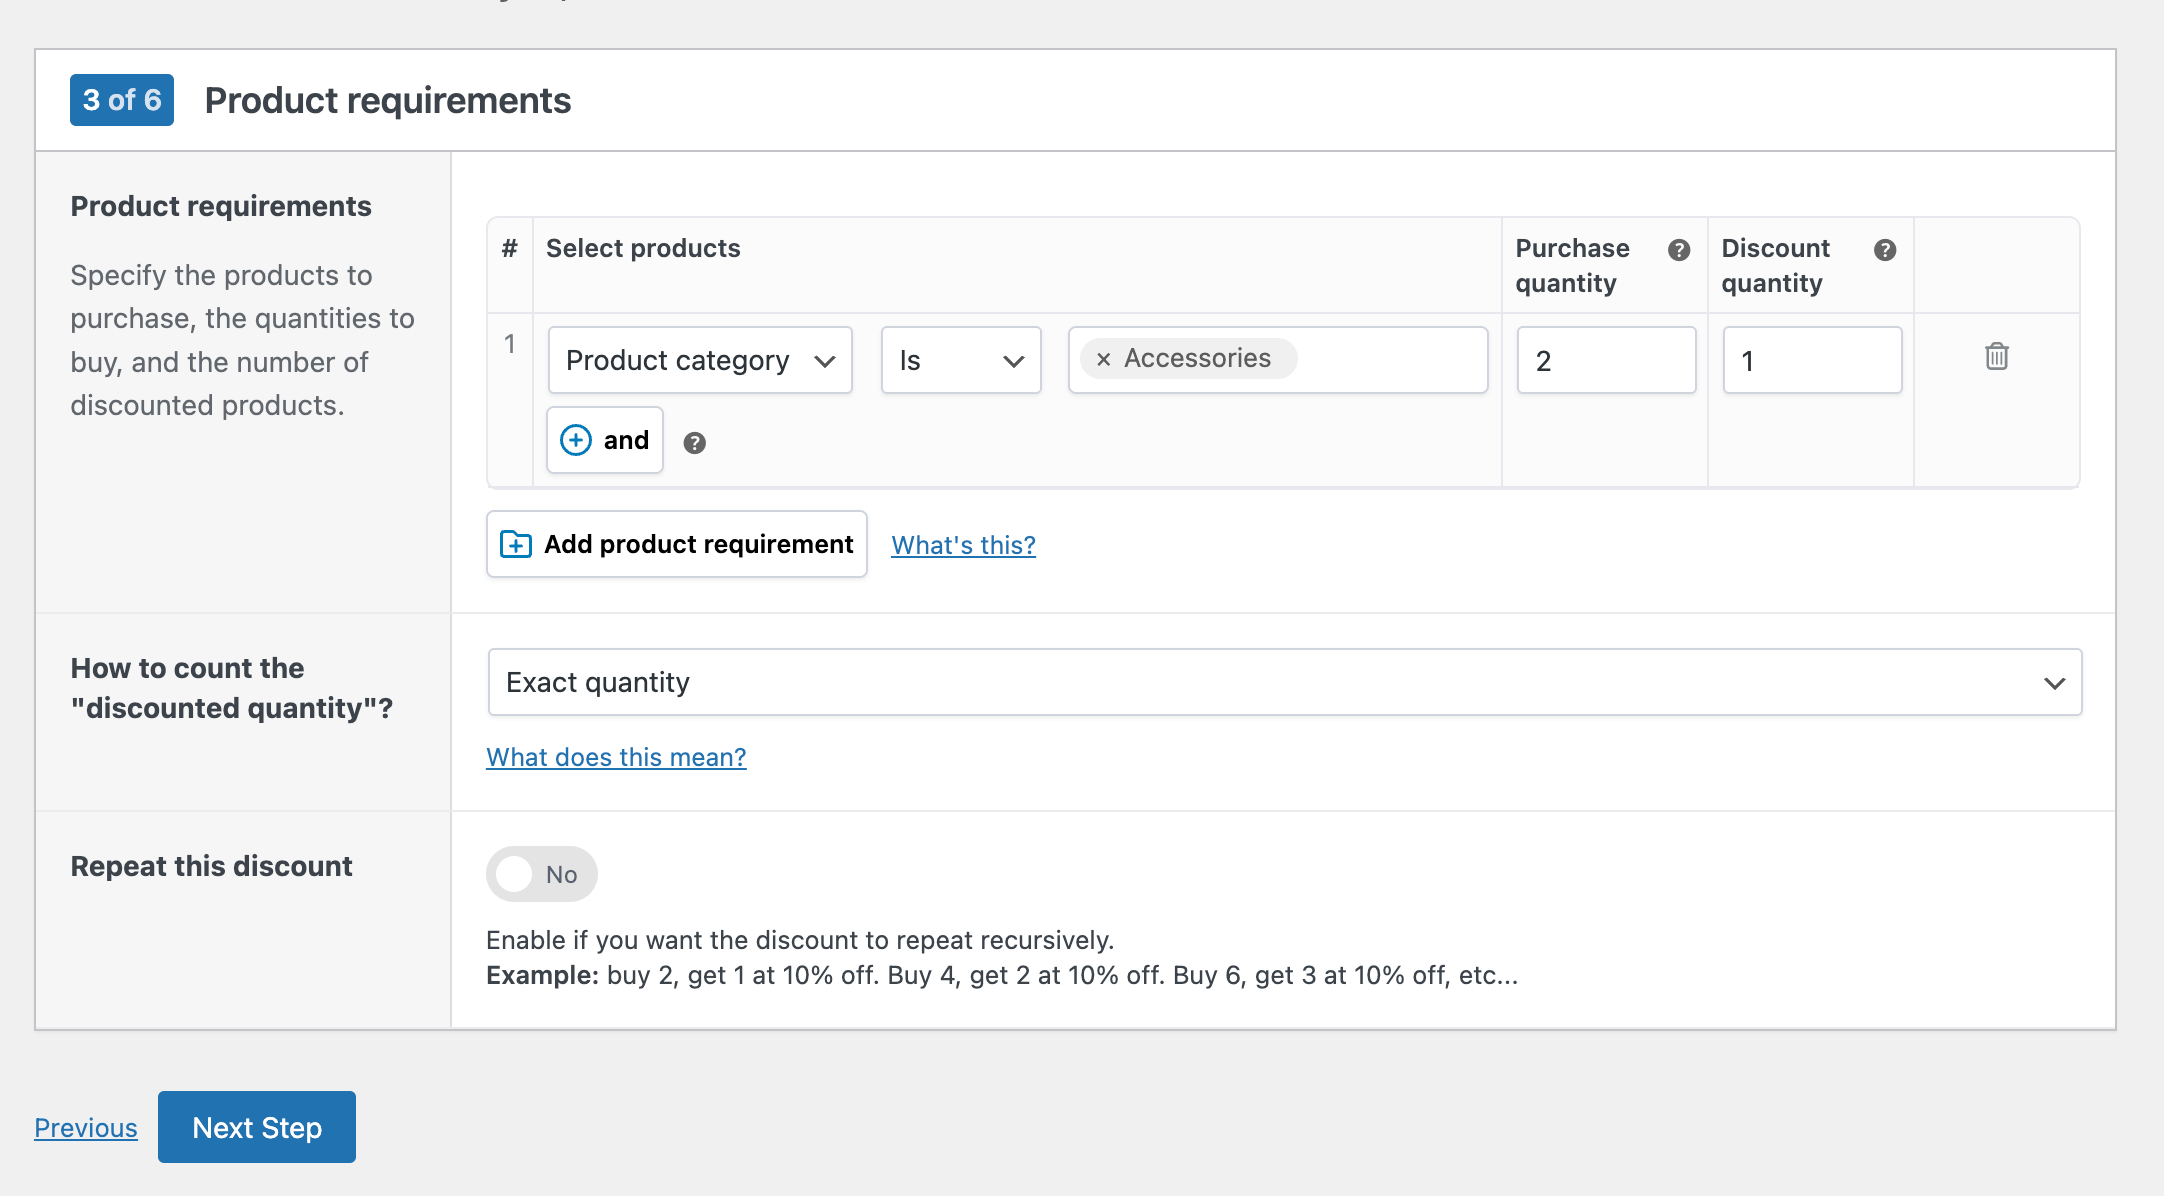
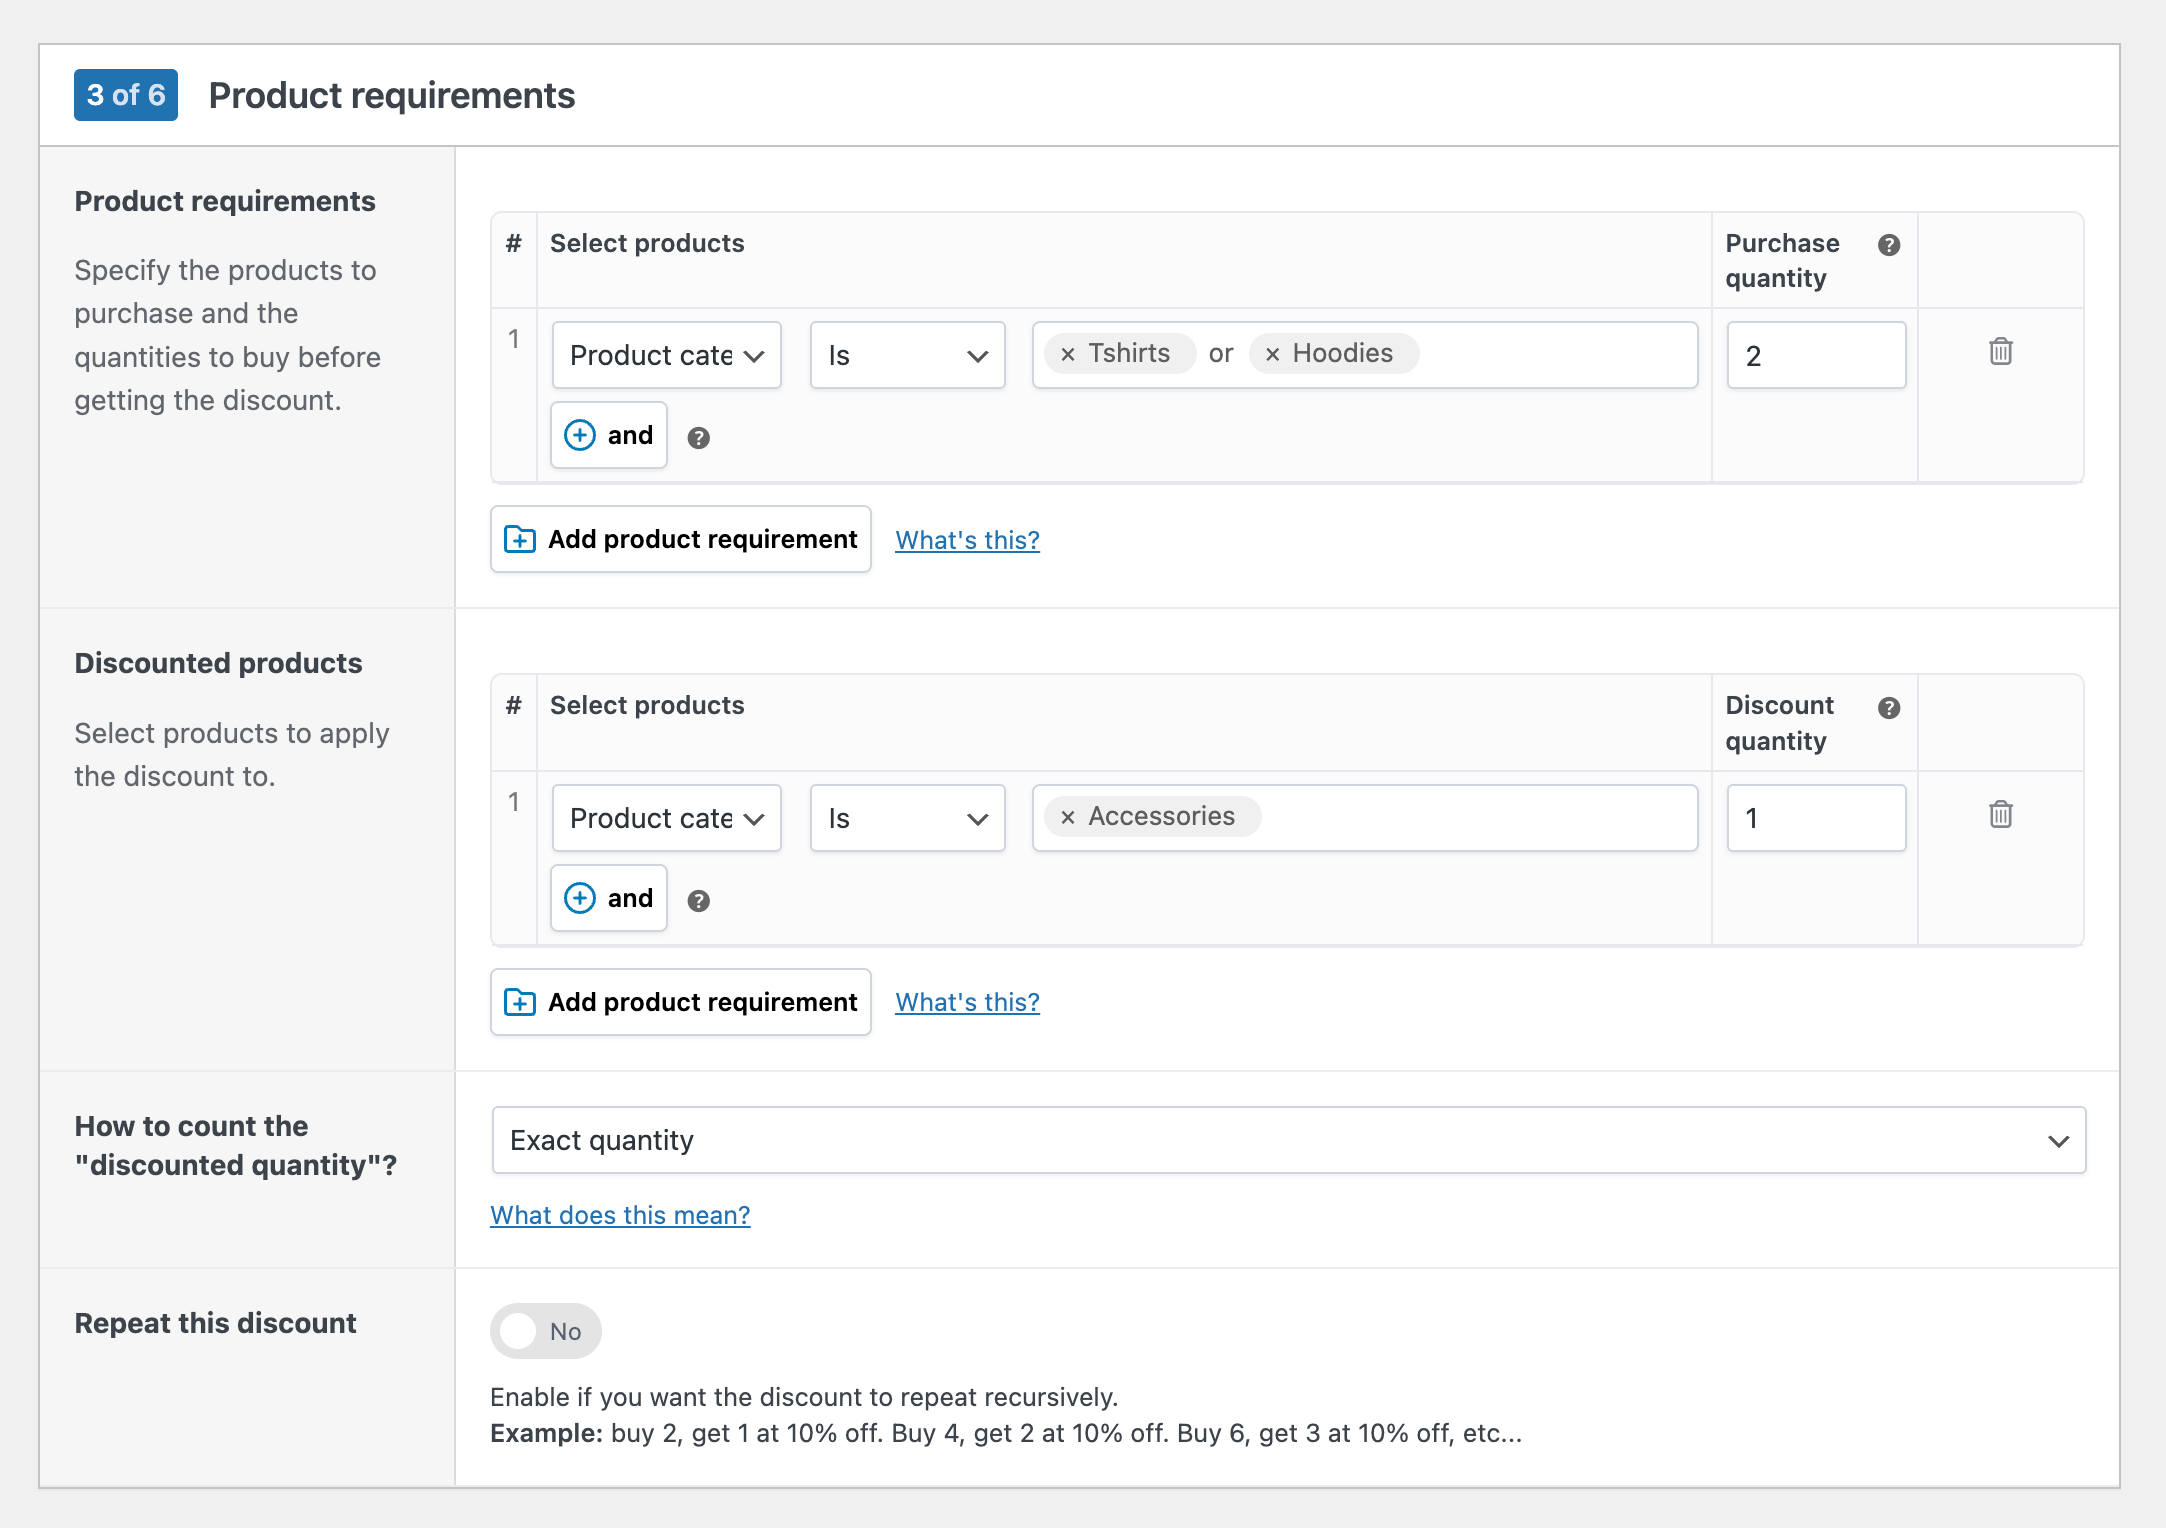
- Product requirements:
- Define which products should be in the cart before receiving the discount. You can target individual products or groups of products by categories, tags, variations, or attributes.
- Define the quantity the customer needs to buy to qualify for the discount (= Purchase quantity).
- Define the quantity the customer can get at a discounted price once the purchase threshold is met (= Discount quantity):
- How to count the discounted quantity?
- Exact quantity: the discount only applies if the exact number of additional items is purchased. For example, if the offer is “Buy 6 T-shirts, get 3 at a discount,” the discount will only apply if exactly 3 additional T-shirts are bought (so 9 T-shirts in total).
- Up to quantity: if the buyer threshold is met, the discount applies up to the specified number of discounted quantity. Using the same example, “Buy 6 T-shirts, get 3 at a discount”: if you only buy 1 or 2 additional T-shirts (instead of 3), each will still receive the discount.
- Repeat discount: if you want the offer to apply multiple times (e.g. Buy 2, get 1 at 10% off, buy 4 get 2 at 10% off, etc).
The example above means “Buy any 2 accessories, get 1 at a discount”.
Different products
If you’ve chosen that this discount should apply to different products, this is the screen you’ll see:
Define the following settings:
- Product requirements: define which products (and their quantity) should be in the cart before receiving the discount. You can target individual products or groups of products by categories, tags, variations, or attributes.
- Discounted products: define which products (and their quantity) will receive the discount. You can target products the same way as the 1st setting.
- How to count the discounted quantity?
- Exact quantity: the discount only applies if the exact number of additional items is purchased. For example, if the offer is “Buy 6 T-shirts, get 3 at a discount,” the discount will only apply if exactly 3 additional T-shirts are bought (so 9 T-shirts in total).
- Up to quantity: if the buyer threshold is met, the discount applies up to the specified number of discounted quantity. Using the same example, “Buy 6 T-shirts, get 3 at a discount”: if you only buy 1 or 2 additional T-shirts (instead of 3), each will still receive the discount.
- Repeat discount: if you want the offer to apply recursively (e.g. Buy 2, get 1 at 10% off, buy 4 get 2 at 10% off, etc).
The example above reads “Buy 2 shirts or hoodies, get any 1 accessory at a discount”.
Discount amount
Click Next Step to continue and define the discount amount:
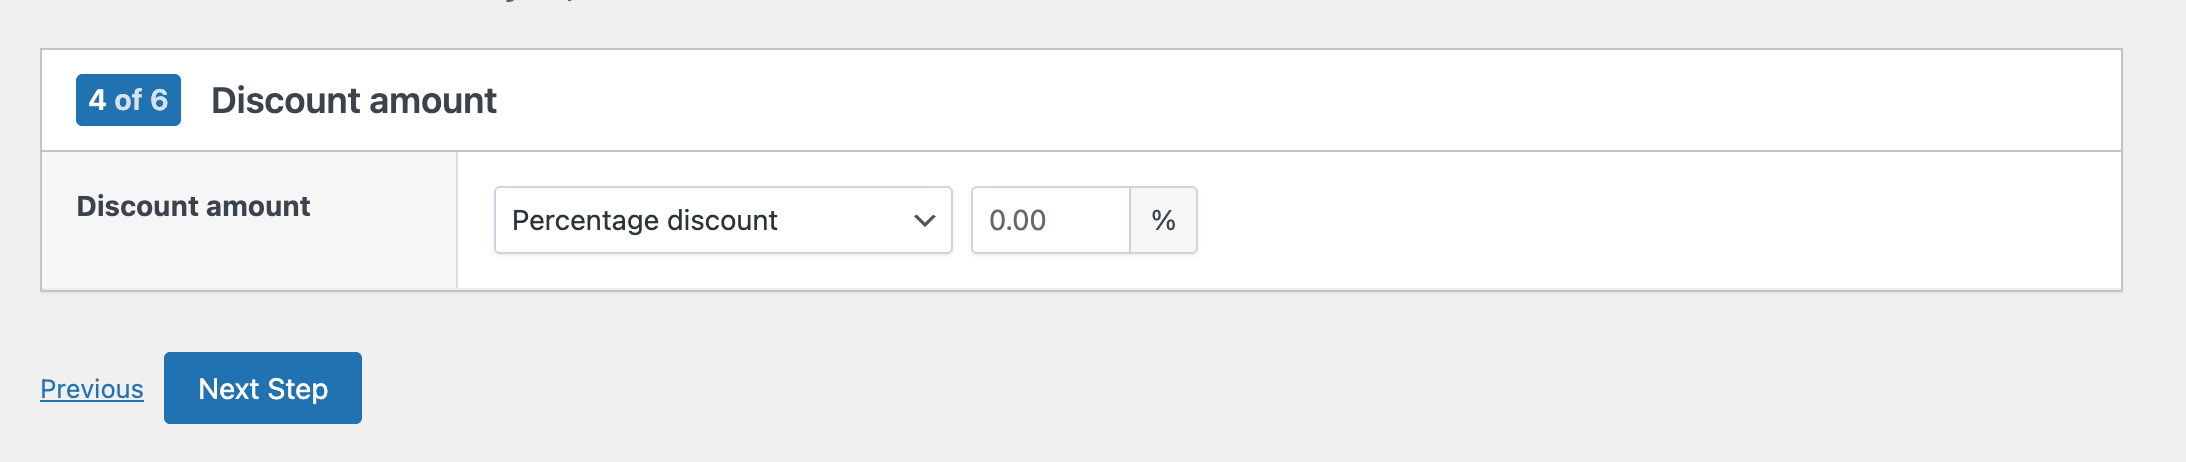
You can choose between 3 types:
- Percentage amount. Example: buy 3 shirts, get 10% off.
- A price amount per item. Example: buy 3 shirts. get $5 off each.
- A price amount over all items. Example: buy 2 shirts, get $40 off.
Quantity discounts
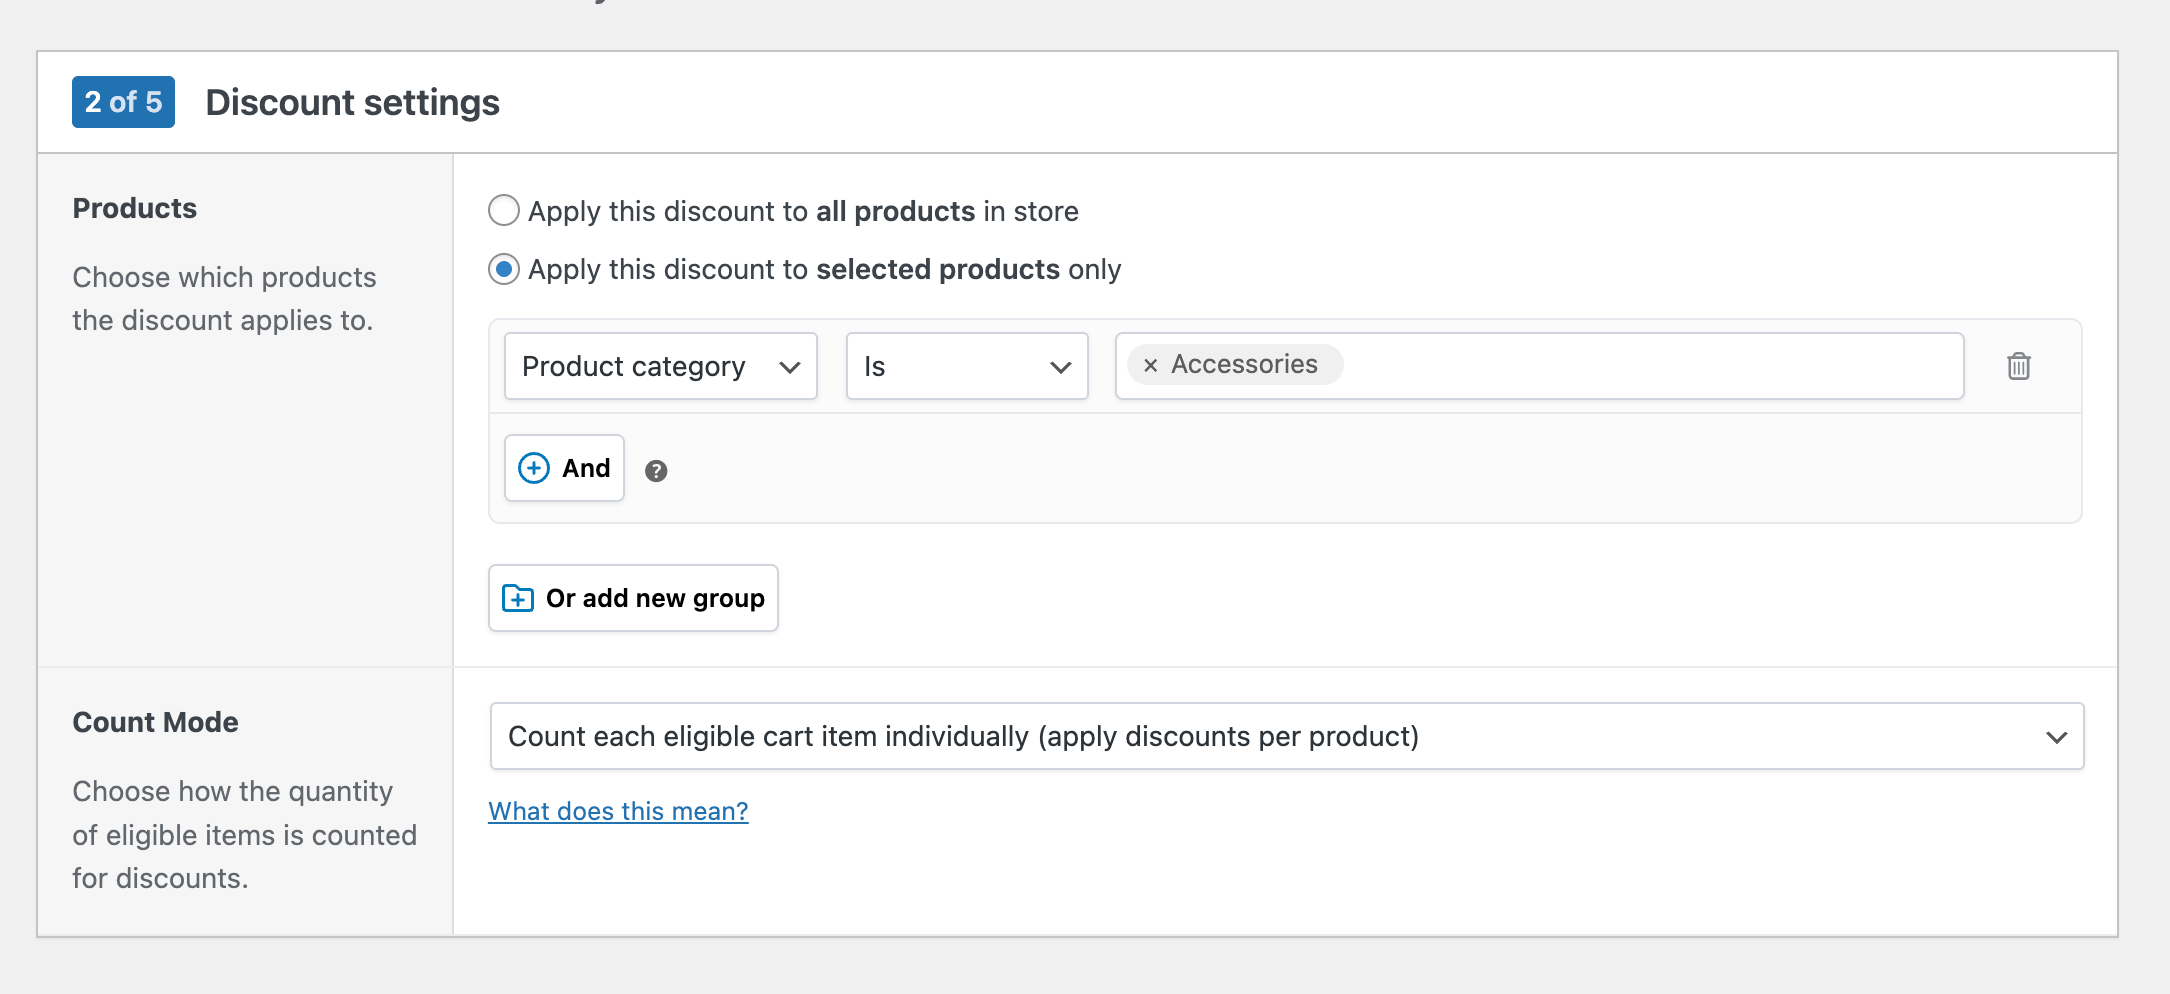
Select which products the quantity (bulk) discount applies to:
- Apply this discount to all products in store: bulk discounts will apply to all products in your store.
- Apply this discount to selected products only: limit the discount to specific products filtered by ID, categories, tags, variations, or attributes. Use conditions to combine multiple rules if needed (that’s what the “and” button in the screenshot above is for, but you will likely not need it).
Next, define the Count Mode to decide how eligible items are counted for discounts:
- Apply discounts per product: each product is counted separately. A product must reach the required quantity on its own before the discount is applied. Example: “Buy 5 get 10% off”: if the customer buys 3 mugs and 3 plates, no discount applies because neither product reached 5.
- Apply discounts across products: Quantities of all eligible products are added together. The discount applies once the combined total reaches the required quantity. Example: “Buy 5 get 10% off”: if the customer buys 3 mugs and 3 plates, that’s 6 items in total, so the discount applies.
When you’re ready, click Next Step to advance.
Quantity tiers
In the next step, you can define the bulk discount tiers:
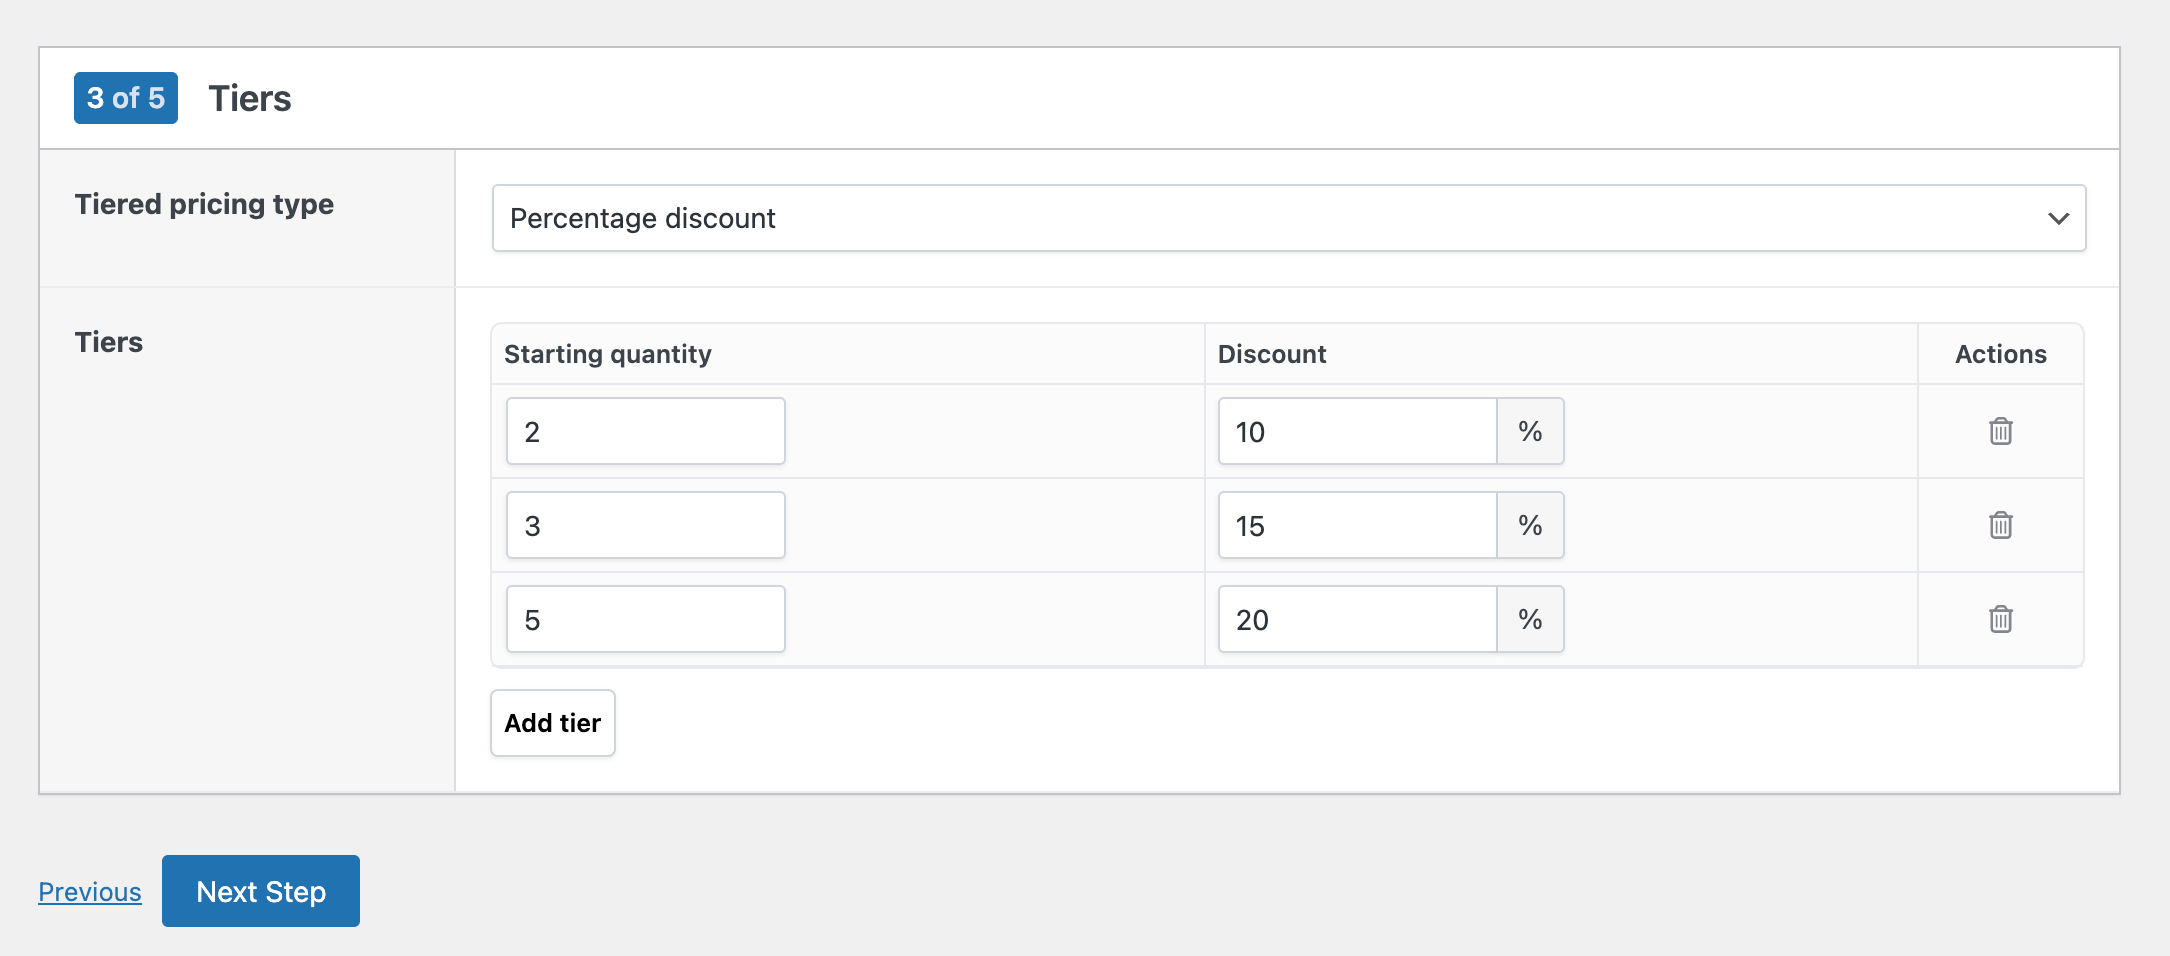
Defining quantity discount tiers is easy:
- Tiered pricing type: choose how to set the pricing for each tier. Options are:
- Percentage discount (e.g. 10% off when buying 2 or more).
- Price discount (e.g. $5 off when buying 3 or more).
- New unit price (e.g. pay $8 per item when buying 5 or more).
- Tiers: set up the discount breaks. Each tier has two settings:
- Starting quantity: the minimum number of items needed to qualify for the tier.
- Discount: the discount to apply (based on the chosen pricing type).
You can add as many tiers as needed to build flexible bulk pricing. In our example image above, we’ve defined the following discounts: buy 2+ get 10% off, Buy 3+, get 15% off, Buy 5+, get 20% off.
Shipping discount
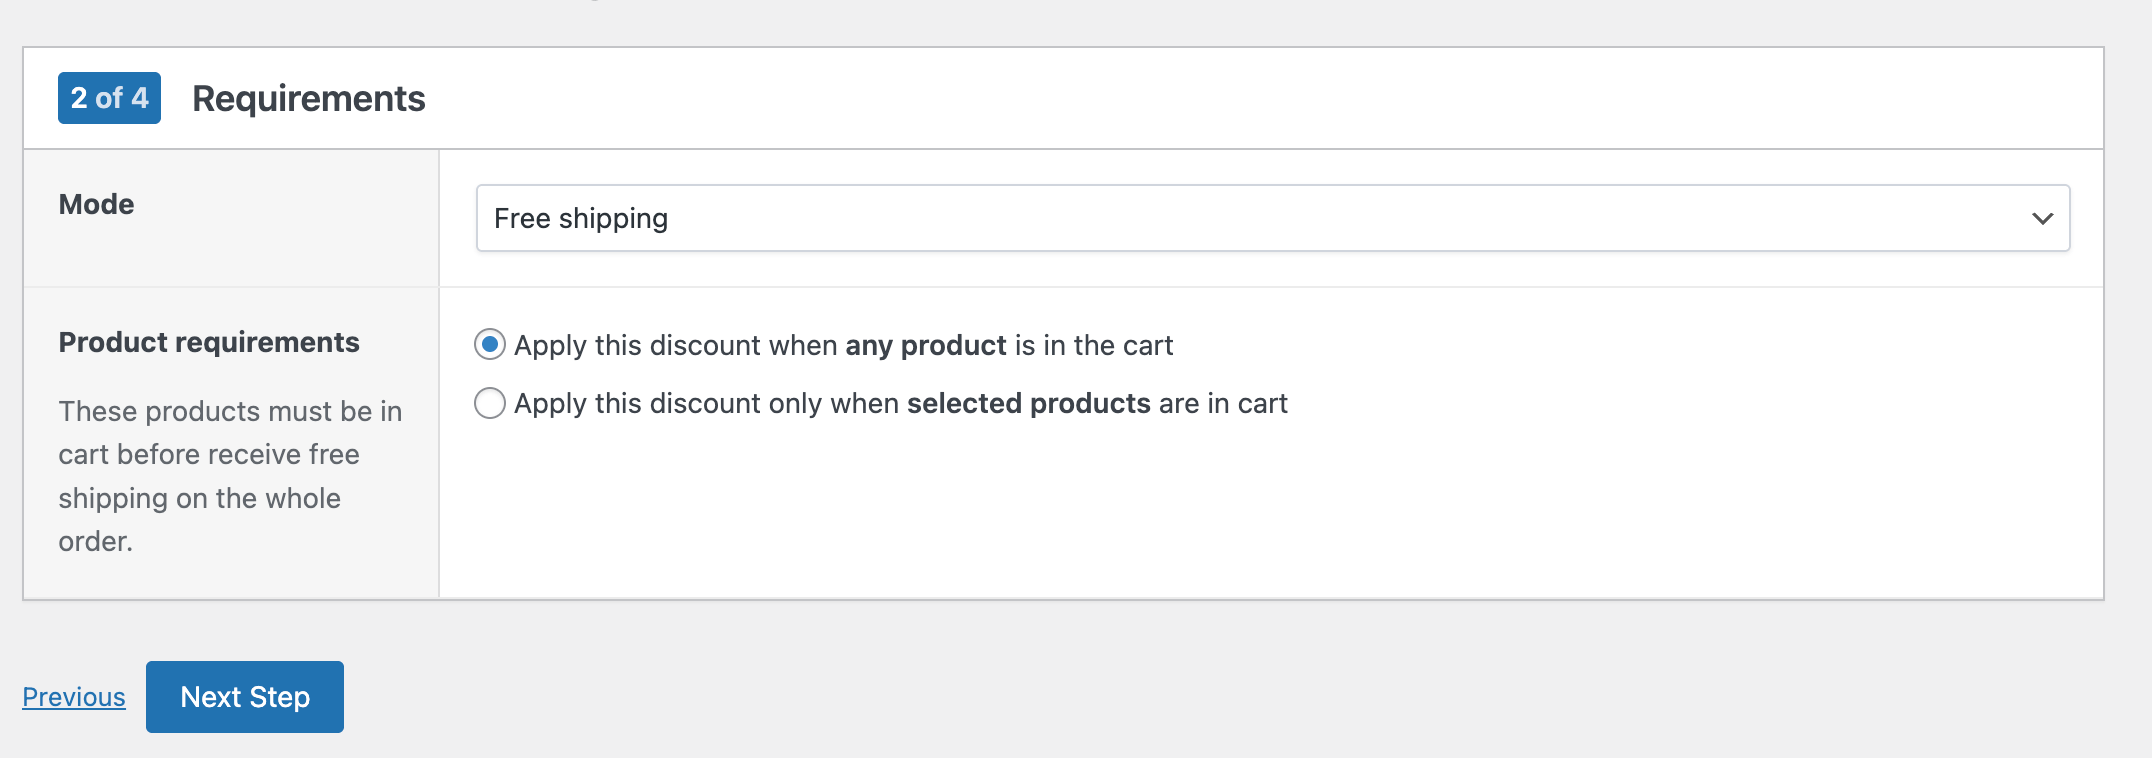
This screen is similar to that of the flat or bulk discount. Select which products need to be in the cart before free shipping is activated:
- Any product in cart: all products in your store are eligible for free shipping.
- Selected products in cart: only specific products trigger free shipping. You can define them by product name (ID), category, tag, attribute, or variation.
Step 3: content settings
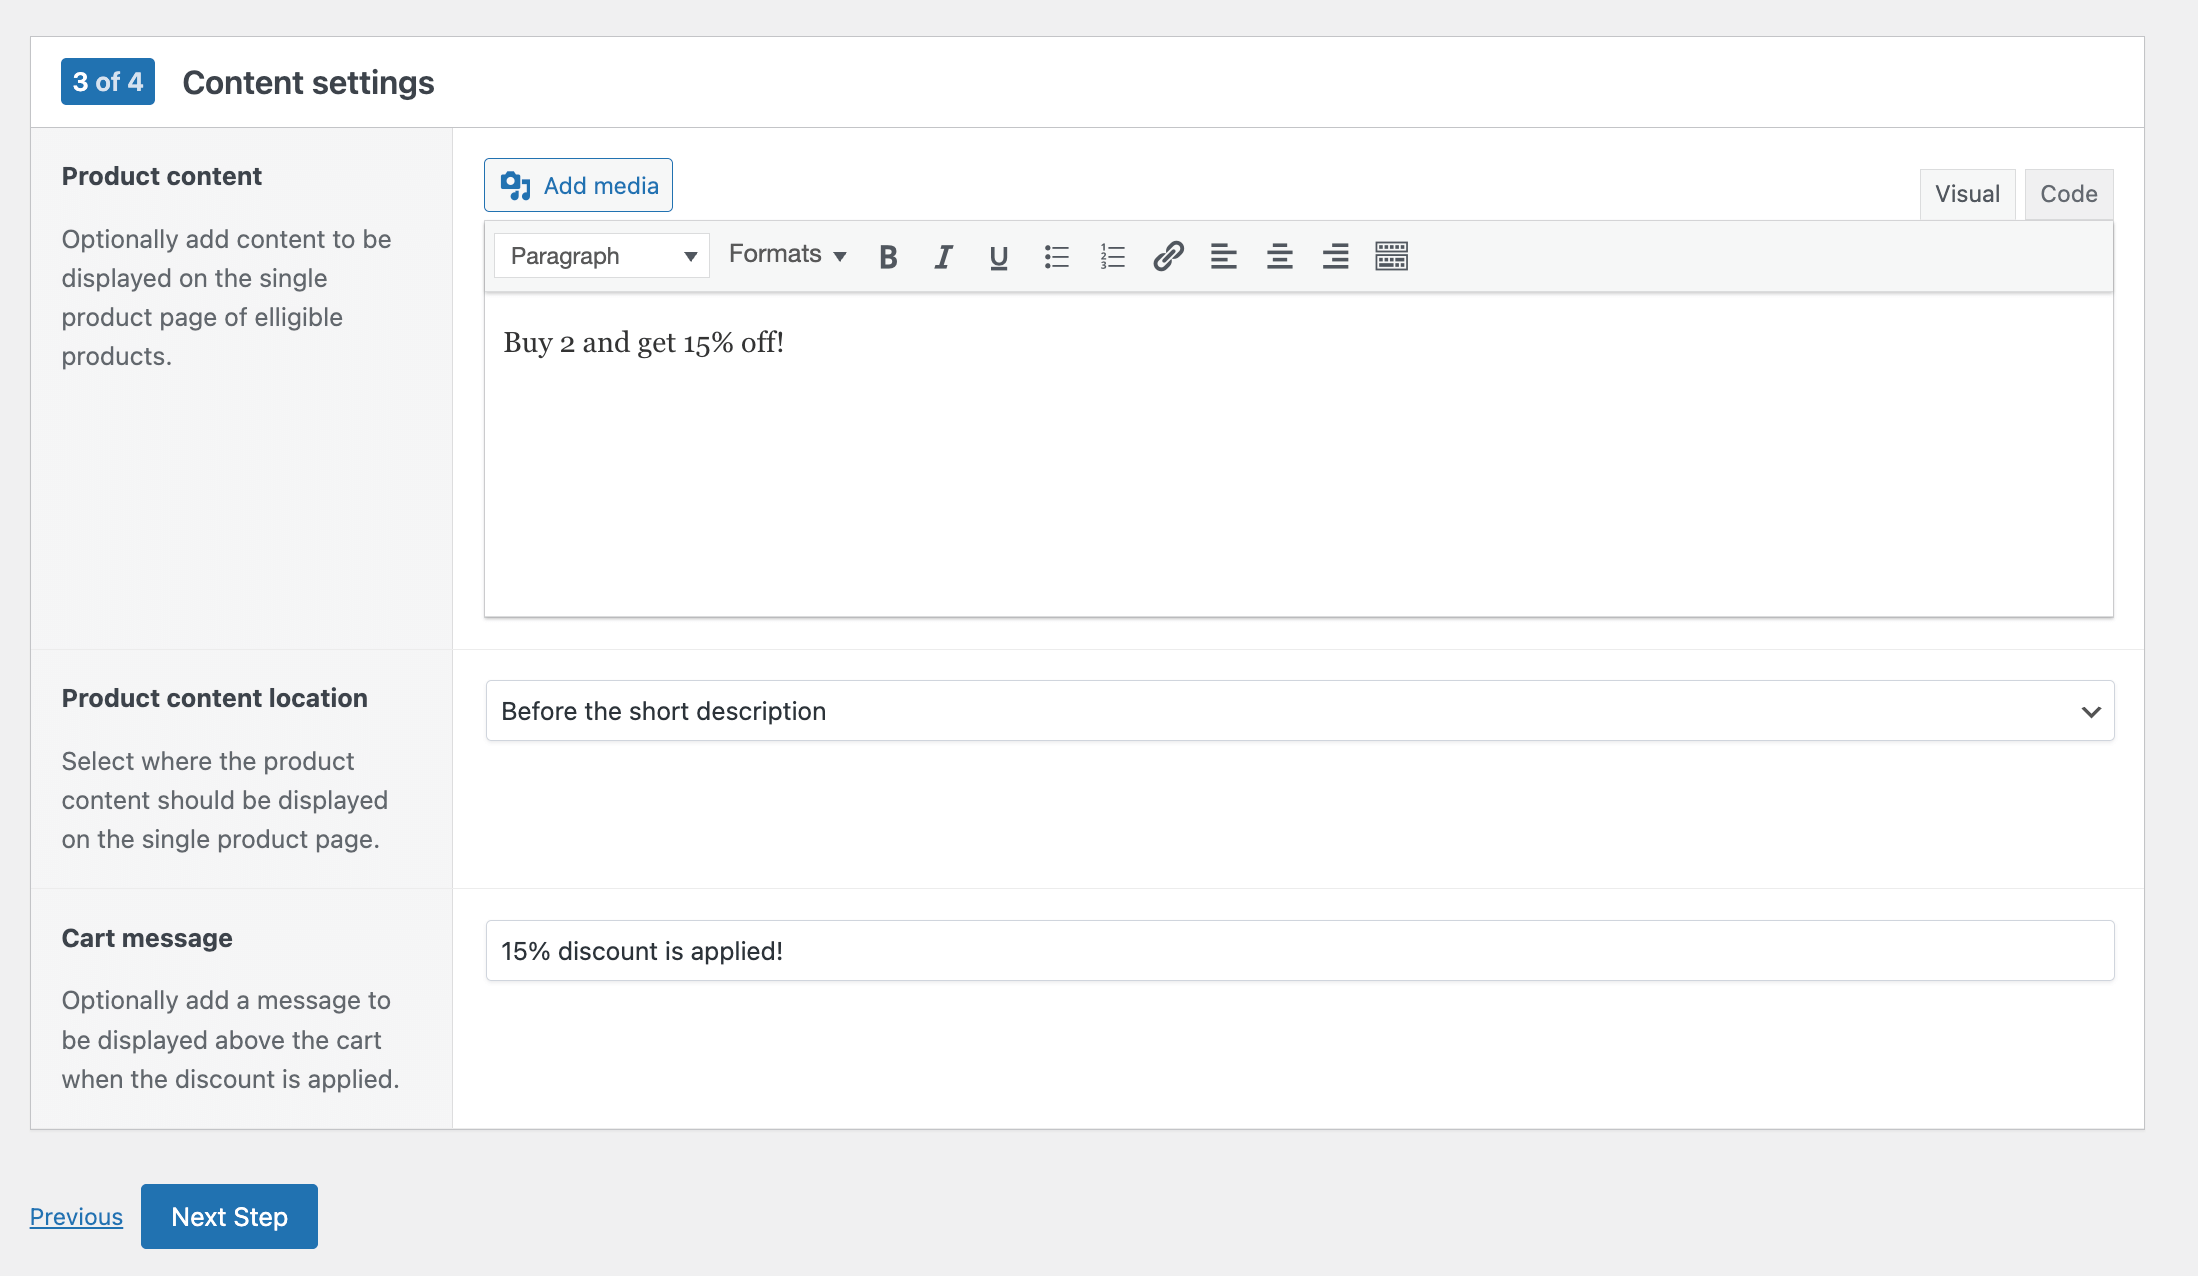
In this step, you can customize how the discount is communicated to customers.
- Product content: add promotional text or media that will appear on the single product page of eligible products (for example “Buy 2 and get 15% off!” to entice customers to buy more).
- Product content location: choose where on the product page this message will be displayed (for example, before the short description).
- Cart message: add a custom message that will appear above the cart when the discount is applied.
Step 4: discount conditions
In the final step, you can set conditions that control when and for who the discount applies.
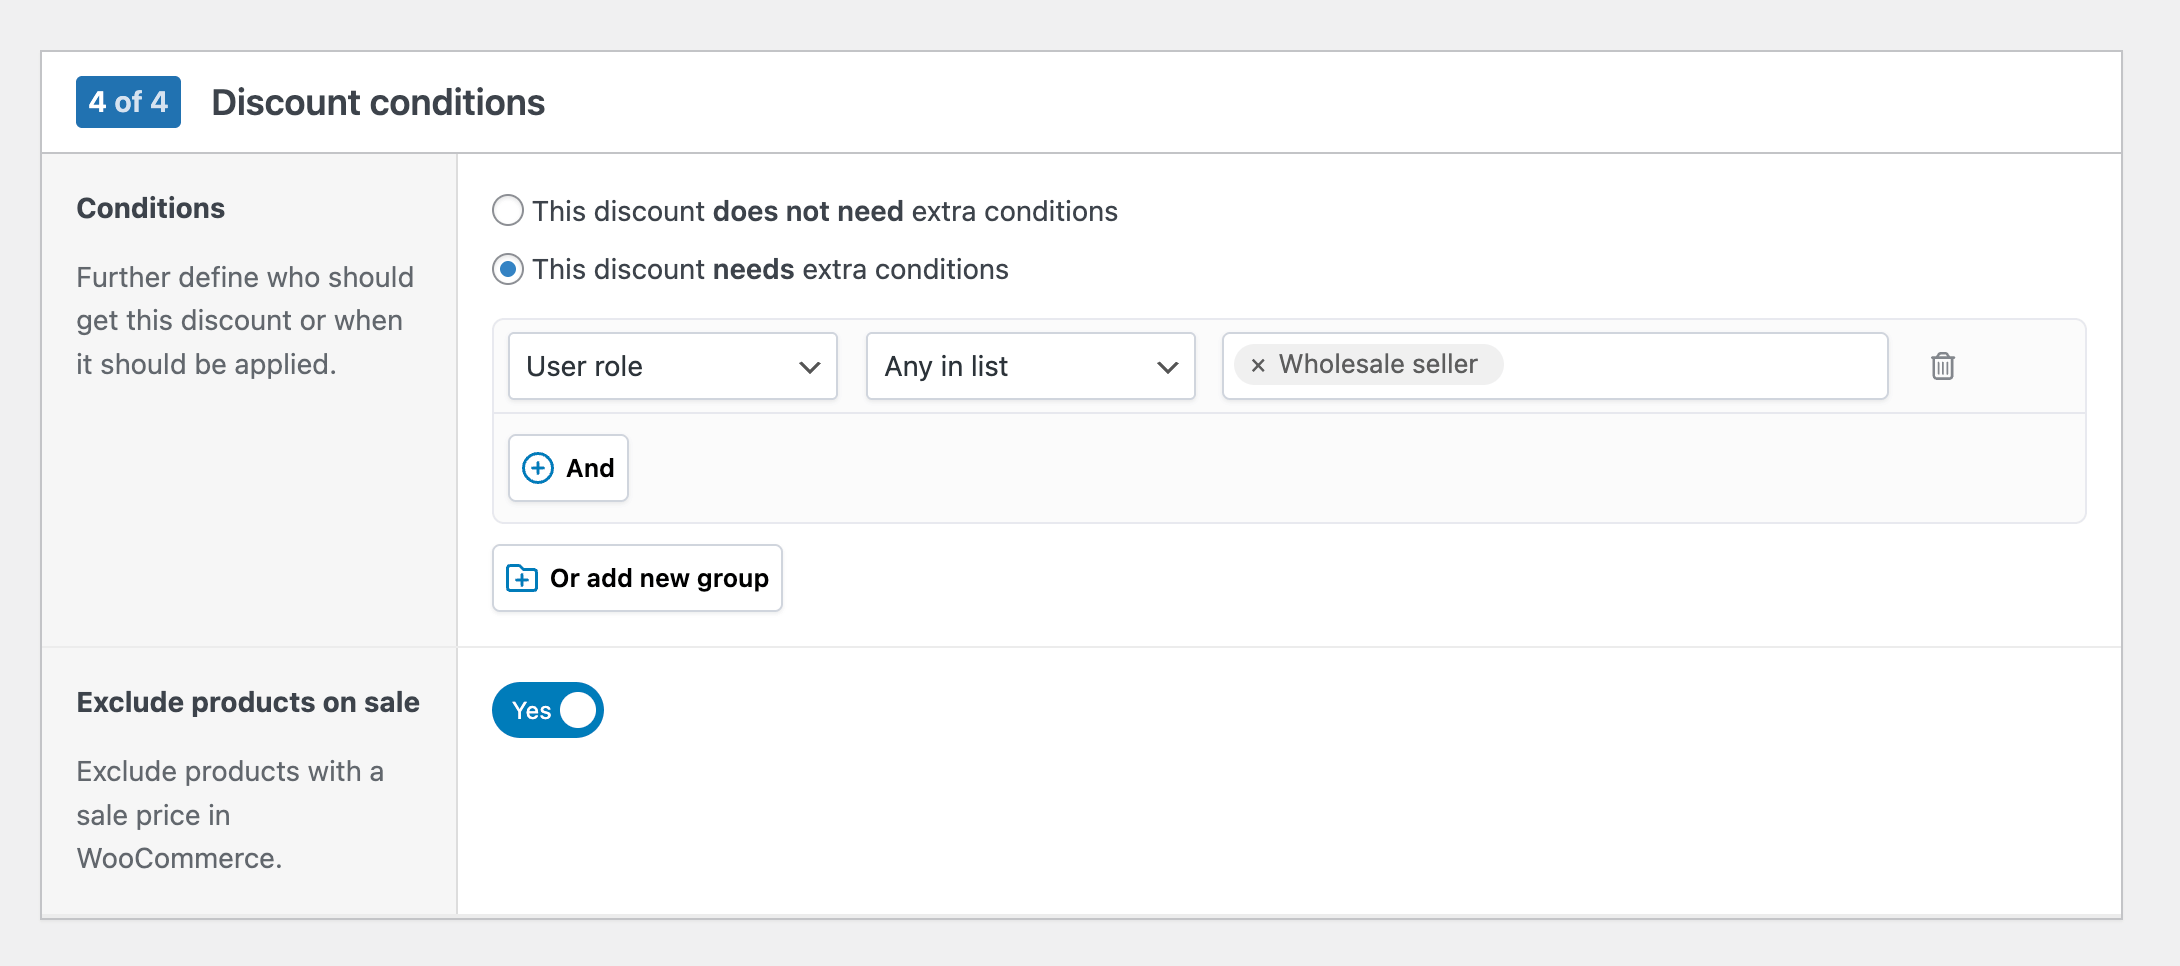
- Conditions: decide whether the discount needs extra rules. For example, you can restrict it by user role, cart total, or other conditions. You can combine multiple conditions or groups for more complex rules. Find all available conditions in this article.
- Exclude products on sale: toggle this on if you want to prevent discounts from stacking with products already on sale in WooCommerce.
Once you’ve completed all the steps, save your discount. It will be enabled by default, but you can easily disable it from the discount list: