
WooCommerce is a powerful e-commerce tool, but if you want to add a checkbox to a product, you’ll need a little help. By default, WooCommerce doesn’t have a way to add a checkbox input field to your site’s product pages.
That’s where this tutorial comes in. We’ll show you exactly how you can add a checkbox to your WooCommerce product pages with the help of a powerful extra plugin.
Even better, you’ll be able to do it in 2 easy steps! If you want to dive in deeper, we’ll also teach you how to:
- Add one or more checkboxes to a WooCommerce product page.
- Charge an extra cost depending on which checkbox(es) have been selected by the customer.
- Add conditional logic to show other input fields when the checkbox is selected.
- Limit the total allowed selection.
Examples of WooCommerce products that need checkboxes
A tactic for running a successful WooCommerce store is to increase the average order value (AOV), which in turn increases your profits. One way to do that is to offer personalized products. Those are products for which your user can select extra options to tailor the product to their specific needs.
With that in mind, you want the ability to add checkboxes to your products. Let’s go over a few examples of when you might want to add checkboxes to your WooCommerce products:
- Gift wrapping. You can ask your customers if they want their purchase gift wrapped for an additional $3.
- Purchase additional warranty. A checkbox lets customers quickly buy a 2-year product warranty. This works great for tech items like TVs and computers. When customers select the checkbox, the product price goes up. It’s a simple way to increase your sales with minimal effort!
- Extra verification. Some products require additional handling or extreme care. Other products are not suited for a younger audience. To help customers become aware of how your product deviates from the norm, you can add one or multiple verification checkboxes.
- Express delivery for print stores. Show a checkbox so customers can ask to get their product printed faster. This adds them to the front of your print queue and increases your profit margins.
Now that we’ve got some ideas, let’s dive into adding a checkbox to your WooCommerce product pages.
How to add a checkbox to your WooCommerce products
In order to add a checkbox to a product in WooCommerce, you’ll need to:
- Install the product fields plugin, Advanced Product Fields for WooCommerce.
- Create your custom checkbox field.

The easiest way to add checkboxes to WooCommerce products!
Find out moreThat’s it! Below we’ll outline these steps in detail so you can start selling customizable products for your customers.
Step 1: install Advanced Product Fields for WooCommerce (APF)
To get started, purchase the flagship plugin Advanced Product Fields for WooCommerce from the Studio Wombat store. You can buy the cheapest version to add checkboxes to your WooCommerce products.
This plugin allows you to add various input fields to your products so your customers can customize them. You can add checkboxes to products, but also:
- Various text fields
- Number fields
- File upload fields
- Radio buttons
- Date pickers (calendar fields)
You’ll also have the option to add or subtract an extra cost to your product for each field you include. This is handy to add an additional cost when the customer enables the checkbox.
Once the plugin is installed on your WordPress site, navigate to WooCommerce → Settings → Product fields to activate the license key given to you at the time of purchase. Once you paste your license key, click on the Activate button and the Save changes button to continue.
Step 2: create the checkbox on your WooCommerce product
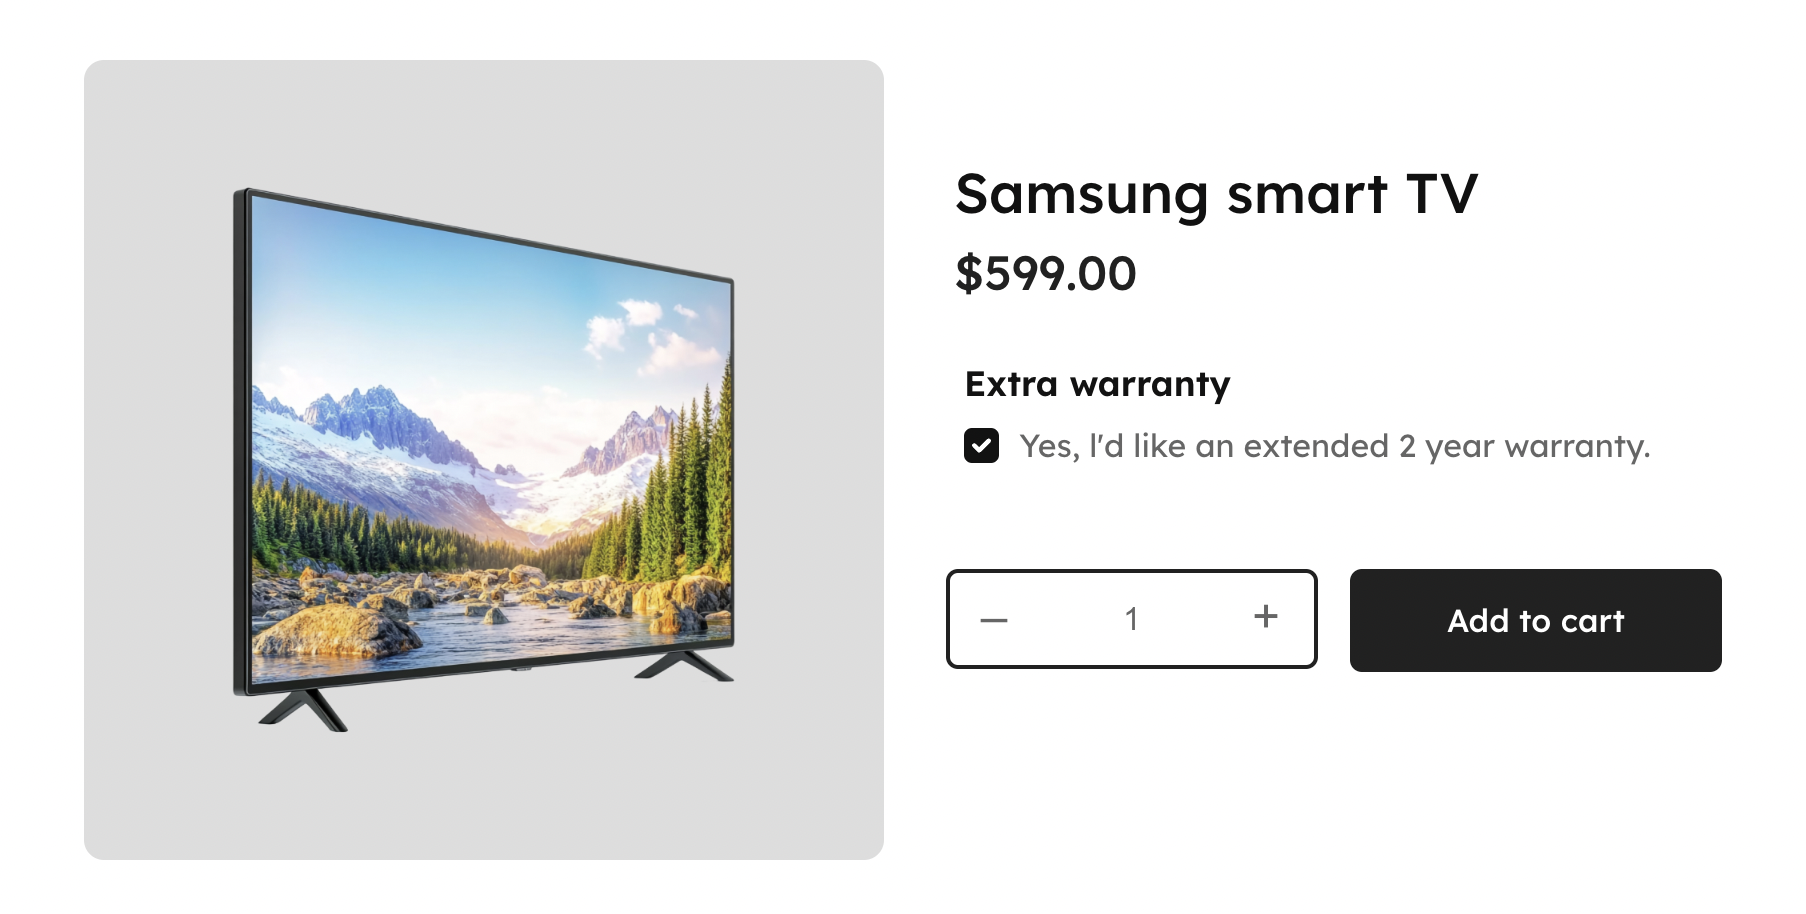
In this example, we’re going to add a checkbox to offer additional warranty to a TV product. We’ll be adding this to the product page itself, but if you have multiple products that require the same checkbox, you can add these globally instead to save time.
Here’s how you can add a checkbox to your WooCommerce product:

- Navigate to Products → All Products and edit the product you want to add a checkbox to.
- Scroll down to the Product Data section and activate the Custome Fields tab.
- Click Add your first field to add an input field.
- Set the Field Type to Checkbox.
- Click the Update button on the right to save your changes.
In the Custom fields section shown above, you can add all form input fields that should appear on your product page. When you click Add your 1st field, you’ll see a section appear with all the options for your new field. We’ll go through the most important settings here:
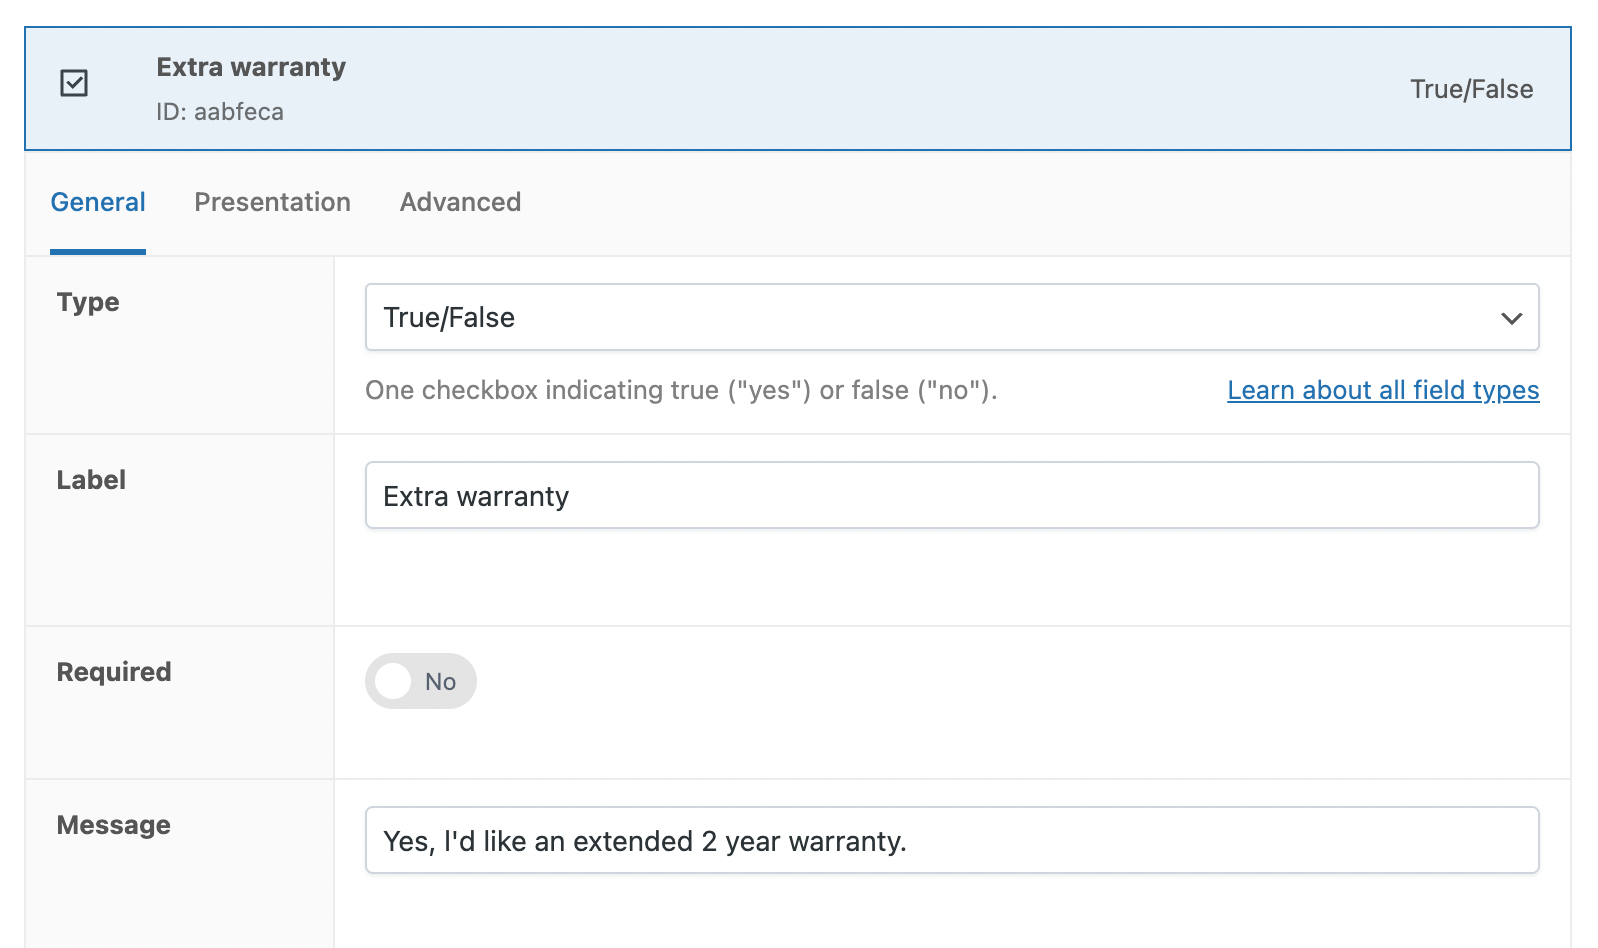
- Type: This is the type of field you want to create. Select True-False if you want to create one checkbox. Select Checkboxes if you’d like to create a group of multiple checkboxes. For the purpose of this tutorial, select True-False.
- Label: Next is the text you want to show above or below the checkbox field. In this case, add “Extra warranty”.
- Message. An additional message appearing next to the checkbox. Enter “Yes, I’d like an extended 2 year warranty”.
When finished, your checkbox field’s settings should look like this:
Once done, simply update your product by scrolling back up to the Publish section of the Edit product page. You’ll then see your new checkbox field live on your site:
Bonus step: selection limits
To enhance user experience and prevent order mistakes, APF lets you set the minimum or maximum allowed selections for checkboxes. To do this, simply find the relevant Selection Limits settings:

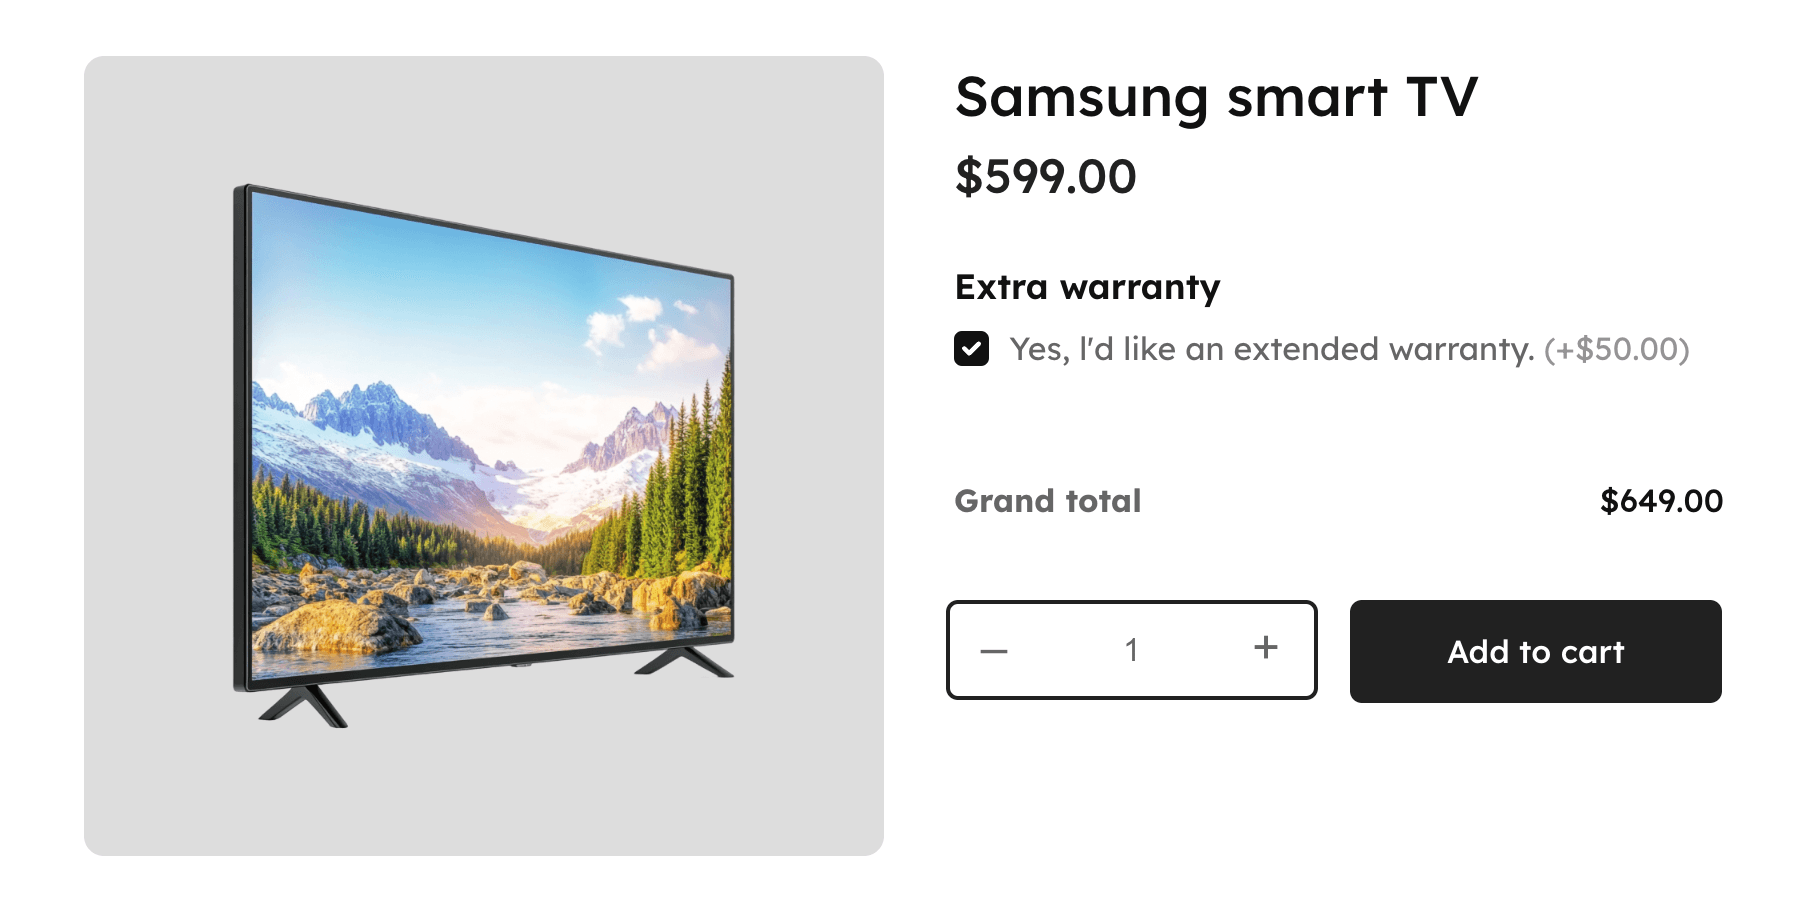
Bonus step: increase the product price when the user selects a checkbox
We want our checkbox to increase the final product price. After all, extra warranty does not come for free.
Using the Advanced Product Fields plugin, you can add an extra price to a checkbox when it is checked. When the user selects the product add-on checkbox, the final product price will increase with your desired amount.
Here’s how you can add an extra product price to a checkbox in WooCommerce:
Edit the field you created in step 2 of this tutorial, and enable the Adjust Pricing setting, so that when the checkbox is checked, the final product price increases. Select a Quantity based flat fee and enter 50 as the amount.
When finished, your product page should look similar to this:
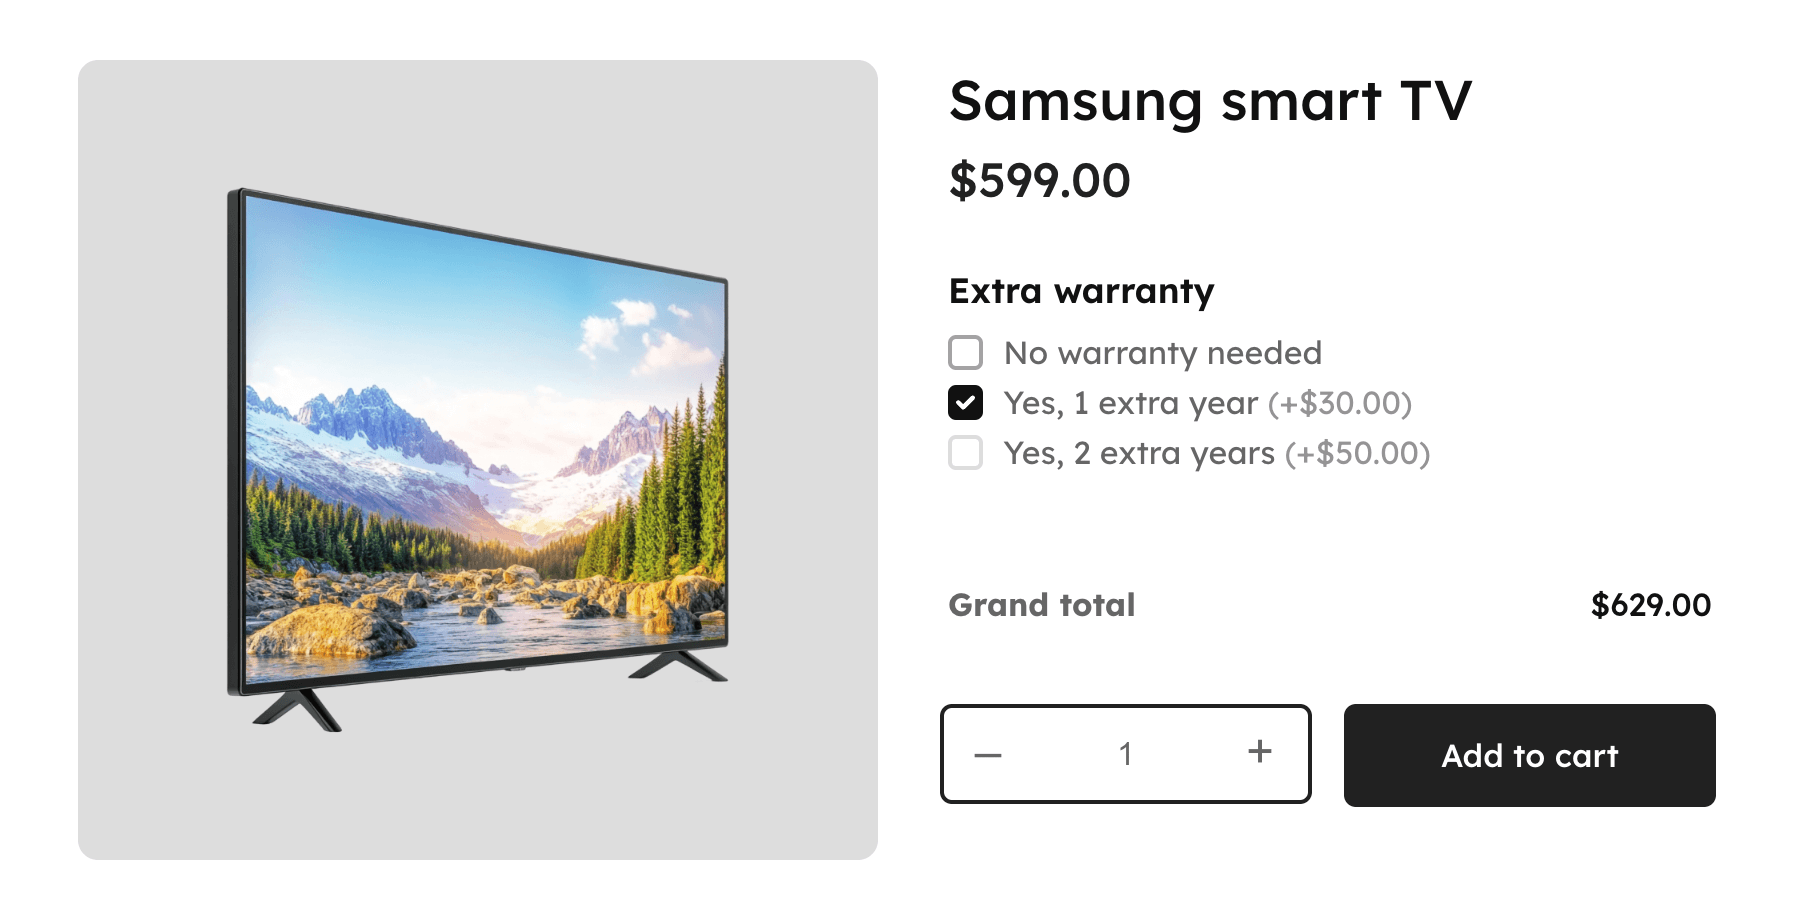
Adding multiple checkboxes to a WooCommerce product
In the previous sections of this tutorial, we’ve added just 1 checkbox to our product page. But what if you’d like to display multiple checkboxes in a group?
The Advanced Product Fields plugin does not limit you to 1 checkbox. Let’s find out how to add multiple:
Edit your product and go back to the Custom fields section as shown earlier. Add a new field:

- Set the Label to “Extra warranty”.
- Turn on the Required toggle, making sure customers have to select an option before proceeding.
- In the Options section, create your checkboxes. We’ve created 3 in our example above.
- In the Adjust Pricing setting, select Quantity-based flat fee to make sure this checkbox increases the final product price. Set your desired Pricing amount too.
- On one of the checkboxes, enable the Selected setting so it is pre-selected when the page loads. This makes it visually easier for your customer to understand.
Here’s what multiple checkboxes look like on your product page:
Display additional fields when a checkbox is selected
Advanced Product Fields for WooCommerce also allows you to display other fields when a client selects a checkbox. This method is called conditional logic.
By adding conditional logic for products, you can display certain product options when a customer enters a specific value for a different field. Here’s how you can do it:
- Create a new field (of any type) with the same method described in step 2.
- Edit your checkbox field and find the Conditionals section.
- Click Add new rule group.
- In the next section that appears, you can select when the checkbox field should appear. In all other cases, the checkbox field will be hidden.
Make adding checkboxes to products simple
That’s it, your WooCommerce store now has the ability to add one or multiple checkboxes to a product in WooCommerce. Once you have this up and running, you’ll be able to offer product customizations and attach prices to those customizations.
Make these changes quickly and easily with Advanced Product Fields for WooCommerce.

is it possible to have a checkbox + Price for that option + quantity for the checkbox item. (not calculated on the basis of whole product quantity) ??
Hi Craig,
Yes, that would be a simple “number” field next to the checkbox. Our plugin allows you to create many types of fields. 🙂
Hello,
is is possible the added price for checkbox to be 2x (double the product price) and not flat?
Thanks in advance
Hi!
Yes, that is possible 🙂
Perfect, thanks! Two more questions:
– if I have 2 or more checkboxes, every checked checkbox will a price add on top?
– if I have upload file input field, where and when the file is uploaded?
thanks in advance
Hi!
1) Yes, that is possible.
2) The files are uploaded immediately or when the customer adds to cart. They are uploaded to your server.
Hello,
I have a question.
Is there any possibility to show products attributes as a checkbox as additional options (products or services) not under the product, but as a widget on the shop page? To be able to select one or more options.
Thank you in advance!
Hi,
This is currently not possible, sorry.
I have no idea but your Plugin is just not working on my product page. I do see the Custom field option and do the settings for Simple product and checkbox group. But after saving teh changes, nothing reflects on my product page.
Hi there
This sounds like a specific issue we need to look into. Please contact us through our technical support form here.