
You’ve got a flash sale launching tonight, but your BOGO discount is clashing with existing coupons. Your checkout calculations are off by $20. The revenue isn’t what it should be, and you get desperate.
Sound familiar?
Many WooCommerce store owners find themselves in this unpleasant pickle. You want to boost revenue with sophisticated discounts and upsells, yet each new feature feels like playing Russian roulette with your checkout process. A wrong plugin, or an untested rule, and your conversion funnel becomes a conversion disaster.
Some stressful scenarios include:
- Discount rules that mysteriously break cart totals.
- Core Web Vitals scores tanking after installing “just one more plugin”.
- Pricing errors discovered only after customers complain.
- Site speed crawling during Black Friday campaigns.
Thankfully, these nightmares aren’t inevitable. This guide shows you exactly how to implement growth strategies systematically – testing each layer, validating every rule, and maintaining performance throughout.
No more crossed fingers at launch time. Just predictable, profitable growth.
The foundation every sales strategy needs first
Before you add a single discount or upsell, your checkout needs to be rock-solid.
Here’s what that includes:
- Cart calculations remain accurate regardless of discount combinations.
- Promotional rules never conflict or create calculation errors.
- Page load times stay within acceptable limits (under 3 seconds).
- Every scenario gets tested before customers see it.
Without these fundamentals, you’re building on quicksand.
Essential checkout optimizations that increase conversions
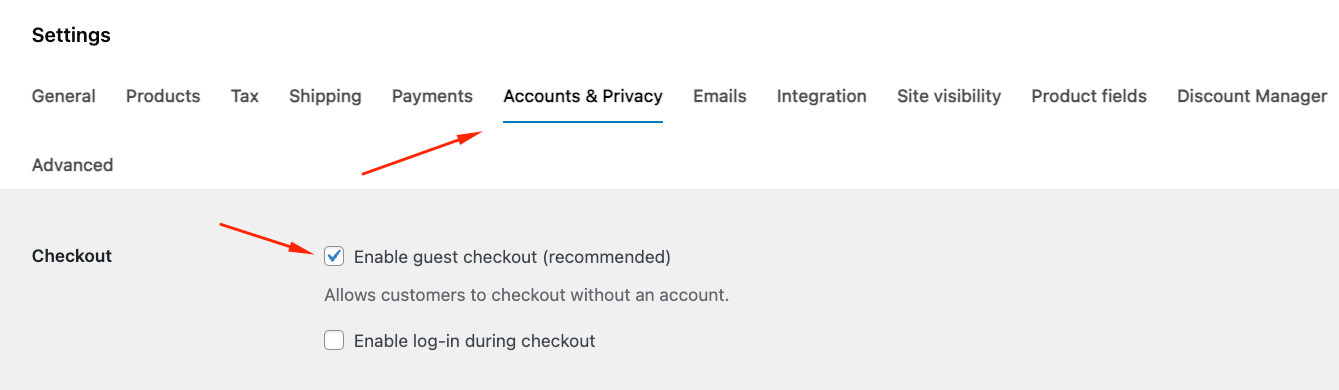
Start with the biggest conversion killer: forced registration. 19% of shoppers abandon their carts when forced to create an account – that’s nearly 1 in 5 sales lost before the customer even enters payment details.
To combat that, enable guest checkout immediately from the WooCommerce settings page > Accounts & Privacy. It’s a 1-minute fix that recovers almost 20% of lost revenue.
Next, make sure you offer multiple payment options, such as:
- Credit/debit cards
- PayPal
- Digital wallets (Apple Pay, Google Pay)
- Buy now, pay later options
Your checkout flow matters too. Test single-page checkout against multi-step versions – results vary by industry, but single-page typically wins for simple orders that don’t require too much information. The downside of those is that they can overwhelm customers if they’re too long. In that case, consider using a multi-step checkout where customers can easily see how far through the process they are.
Finally, set up automated cart recovery sequences. A simple 3-email series (sent at 1 hour, 24 hours, and 72 hours) can help bring customers back and address some of their potential concerns. You can also include a reasonable discount in the last email for maximum impact.
Setting up automatic discounts without conflicts
Now your checkout process is optimized, it’s time to boost sales by offering a discount. Coupon codes are the default for WooCommerce, but they are definitely not the best option for most stores. A more effective strategy is to use automatic discounts that apply instantly, creating a frictionless buying experience.
WooCommerce Discounts is a plugin that gives store owners all the tools to build complex discount rules, without any coding or conflicts; just rules that work exactly as intended.
Create these revenue-boosting promotions in minutes:
- Store-wide percentage off with smart category exclusions
- Volume pricing tiers for bulk purchases that encourage larger orders
- BOGO and “Buy X Get Y” promotions that increase average order value
- Member-only pricing rules for VIP customers
- Bundle pricing that offers fixed prices for product sets
Each discount type serves a specific growth goal: Store-wide sales drive urgency, volume tiers increase order size, and BOGO is great for moving inventory while maintaining perceived value.
Mastering discount priority with WooCommerce Discounts
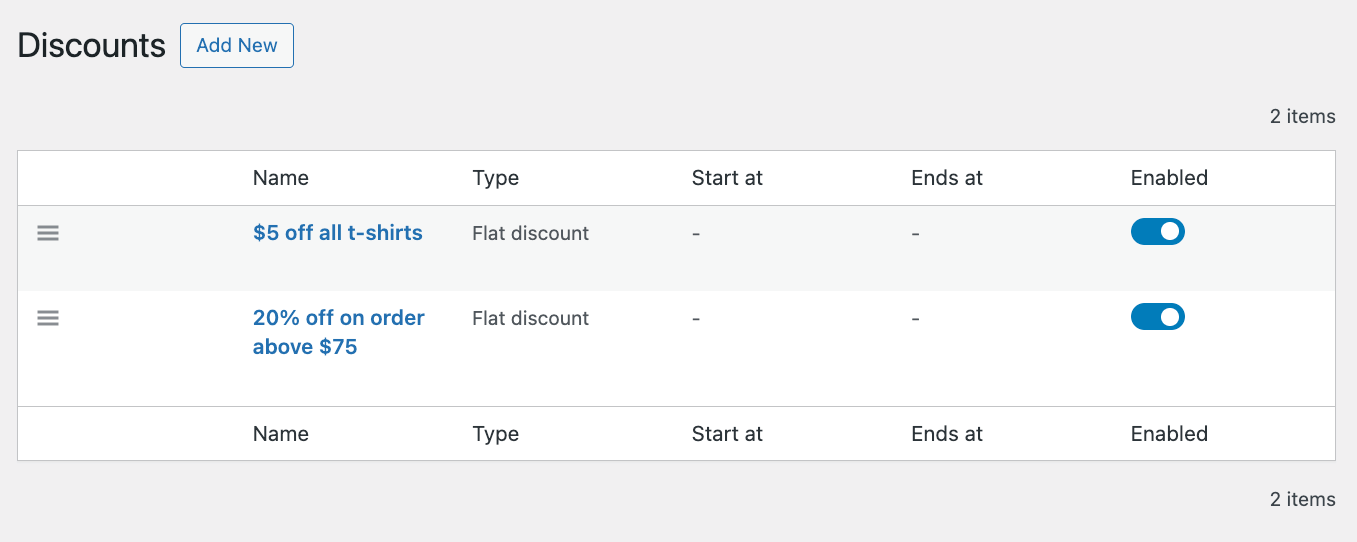
Picture this scenario: You’re running $5 off all T-shirts plus 20% off orders over $75.
A customer adds 3 $30 T-shirts to their cart. Which discount applies first? Does the percentage calculate before or after the fixed discount? Get it the wrong way round, and you’re either losing margin or frustrating customers.
Let’s take a look at how WooCommerce Discounts eliminates this guesswork entirely.
First, you can easily create both rules in just a few minutes. Let’s start with $5 off all T-shirts:
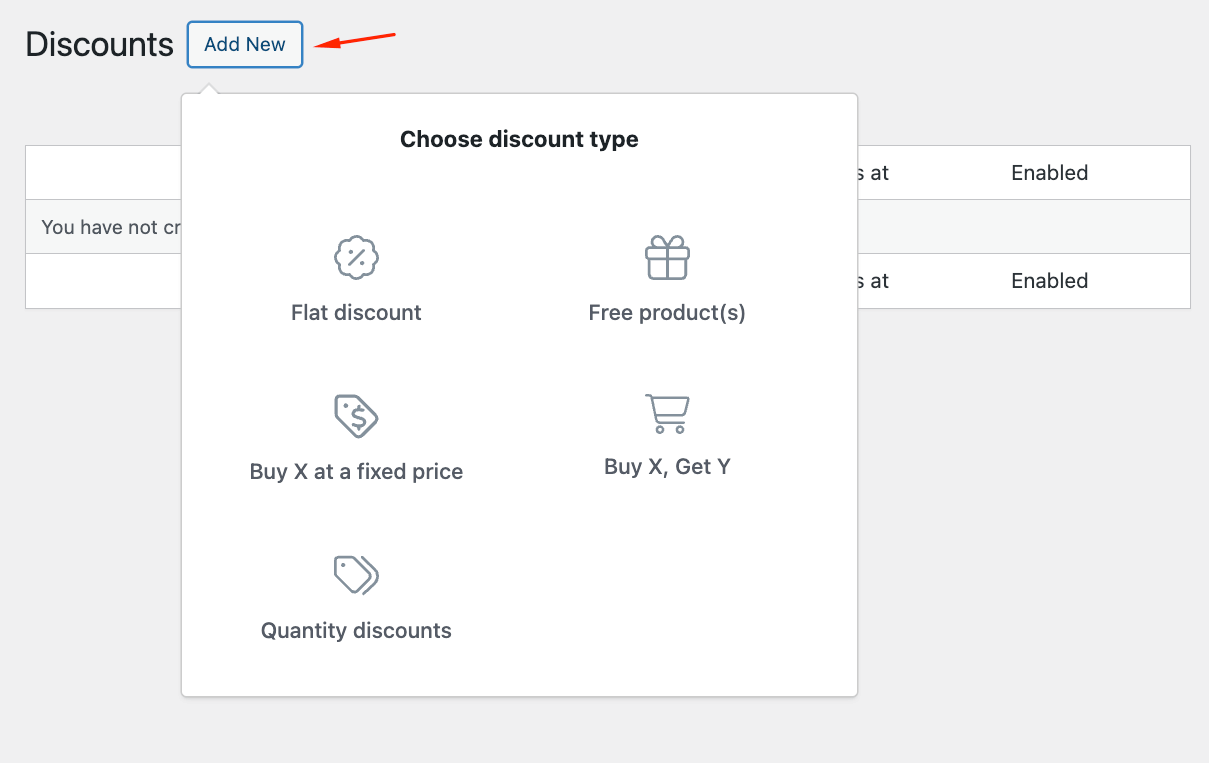
- After installing and activating the plugin, go to Marketing → Discounts and click on Add New.
- Name and schedule your discount (if you don’t want it to start immediately).
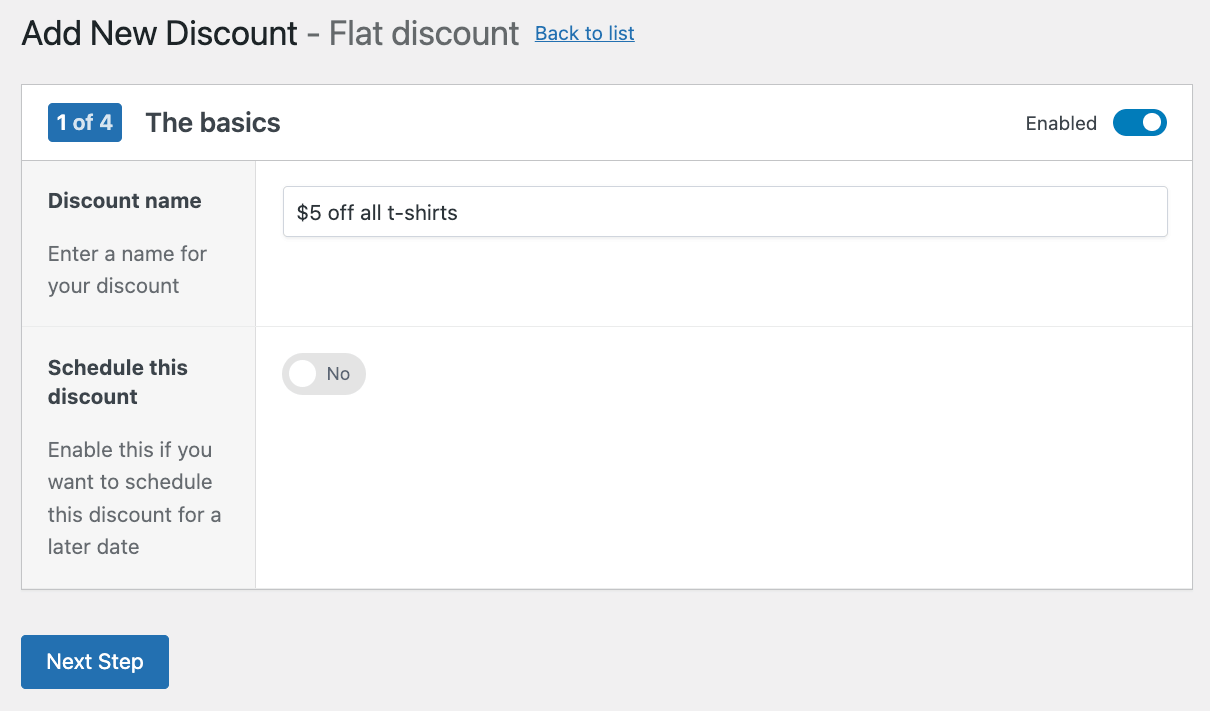
- Select “Apply this discount to selected products only” and choose the appropriate category. Then, add the discount amount.
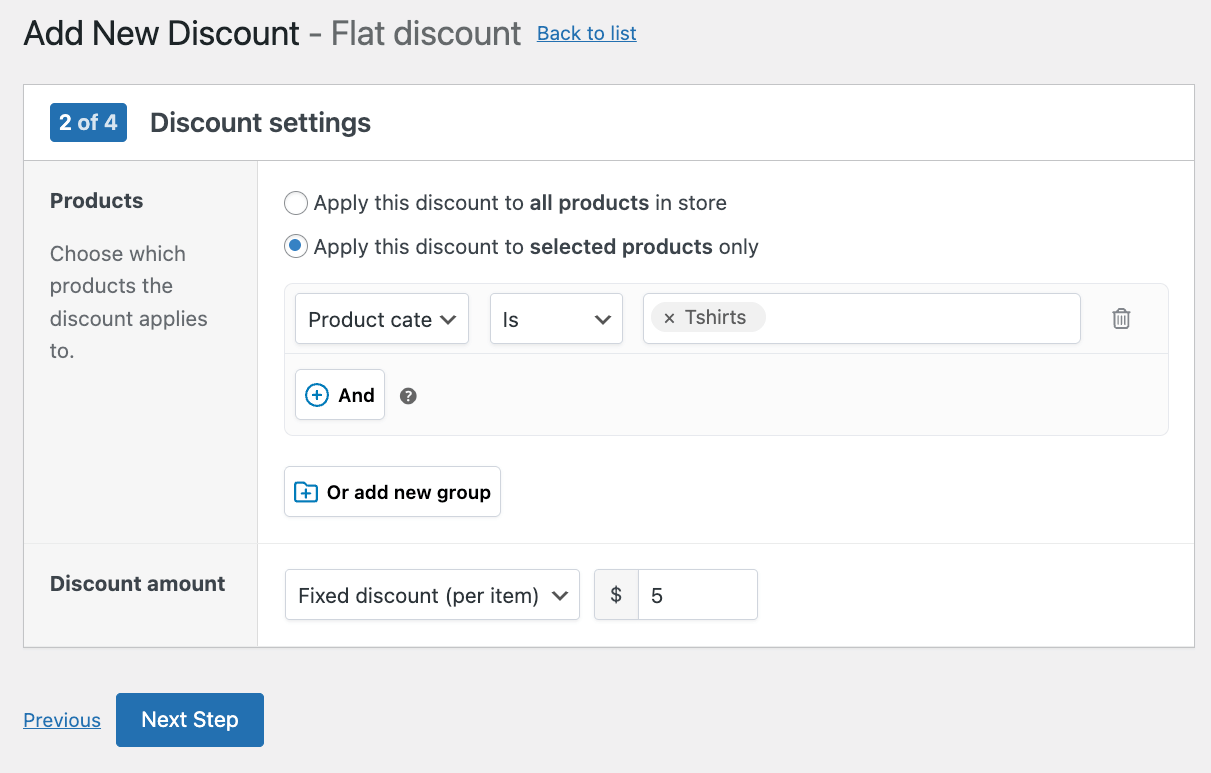
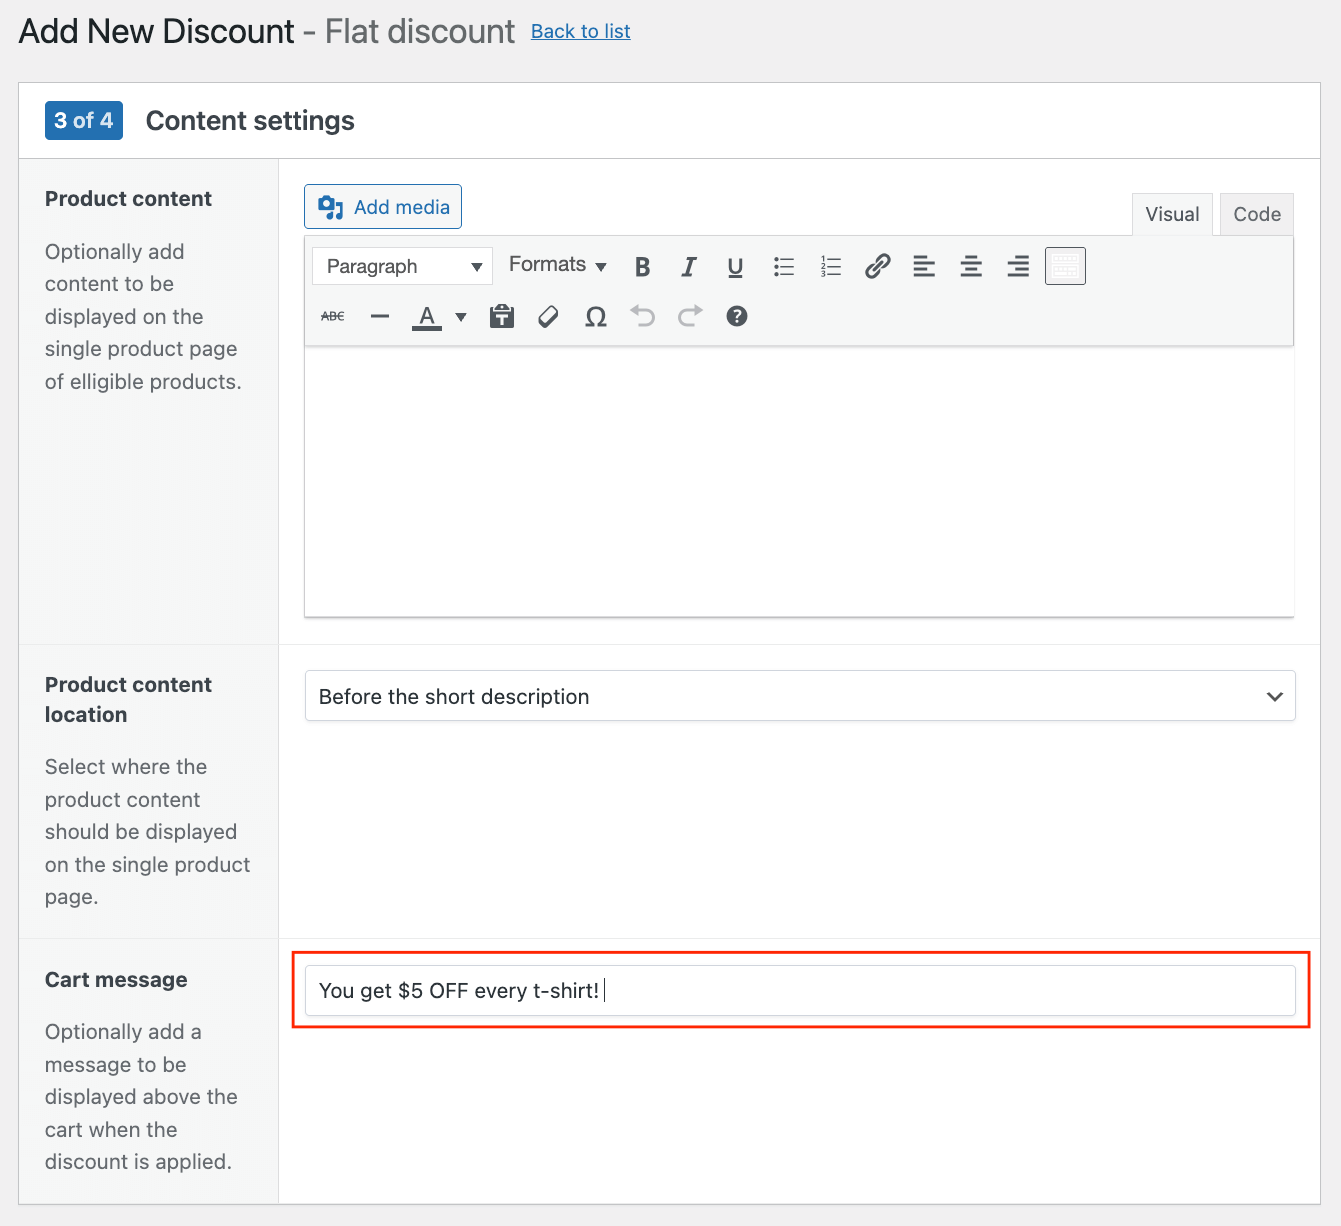
- Add some customized content on the product page and cart, if you want.
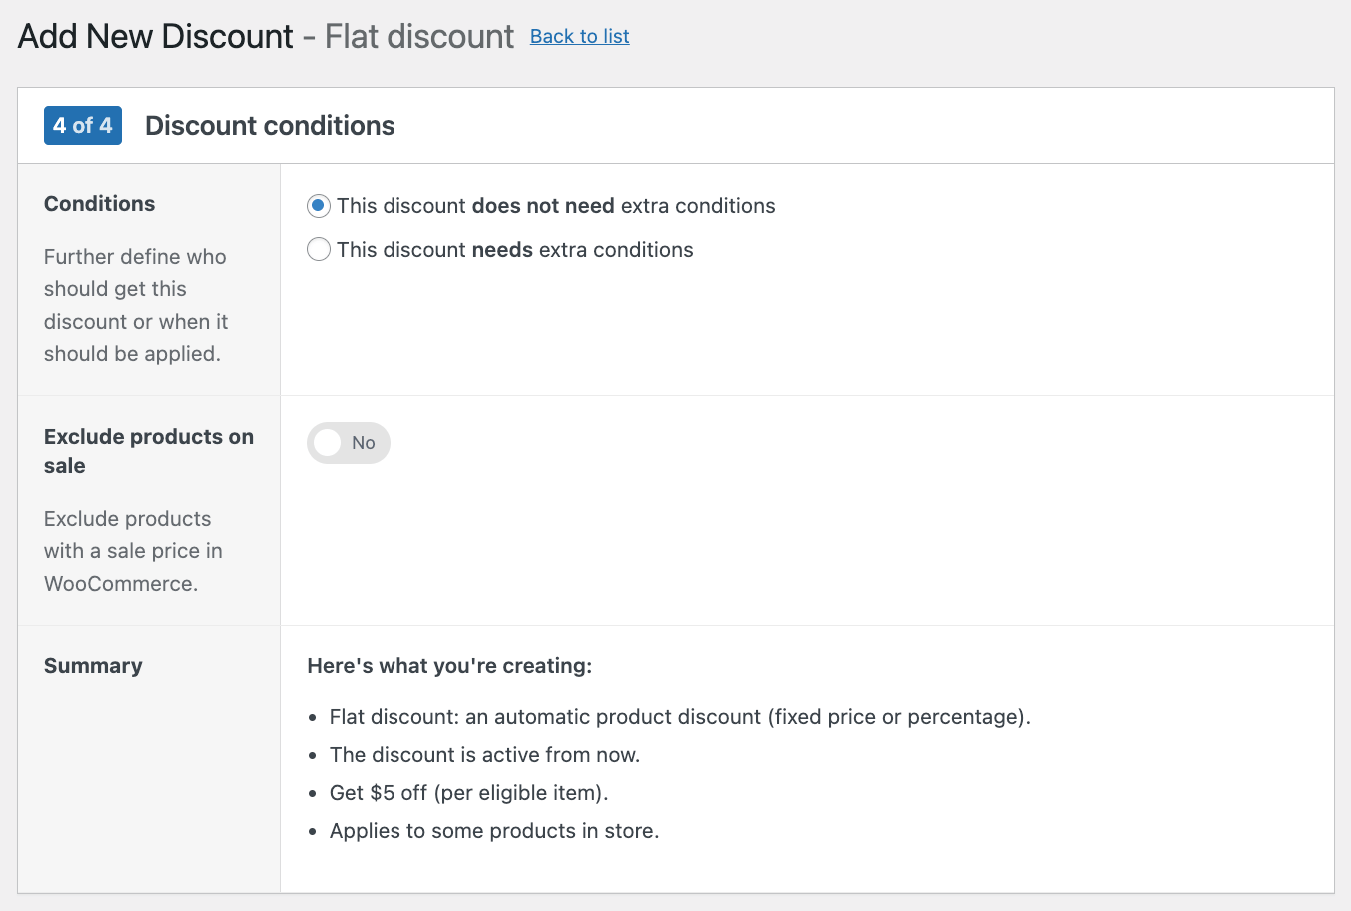
- You can add extra conditions at this stage, but for now, we’ll keep it simple. Save your discount.
Okay, we’re done with the first discount. Now, let’s do the second one!
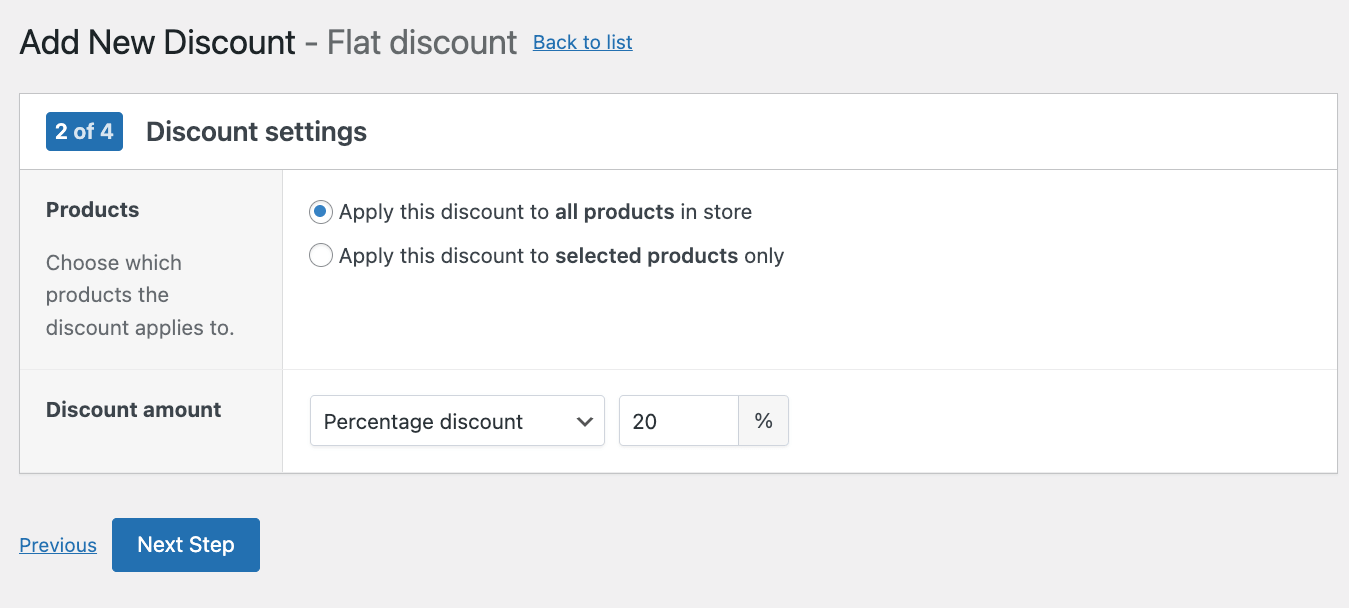
- Create another flat discount and name it accordingly.
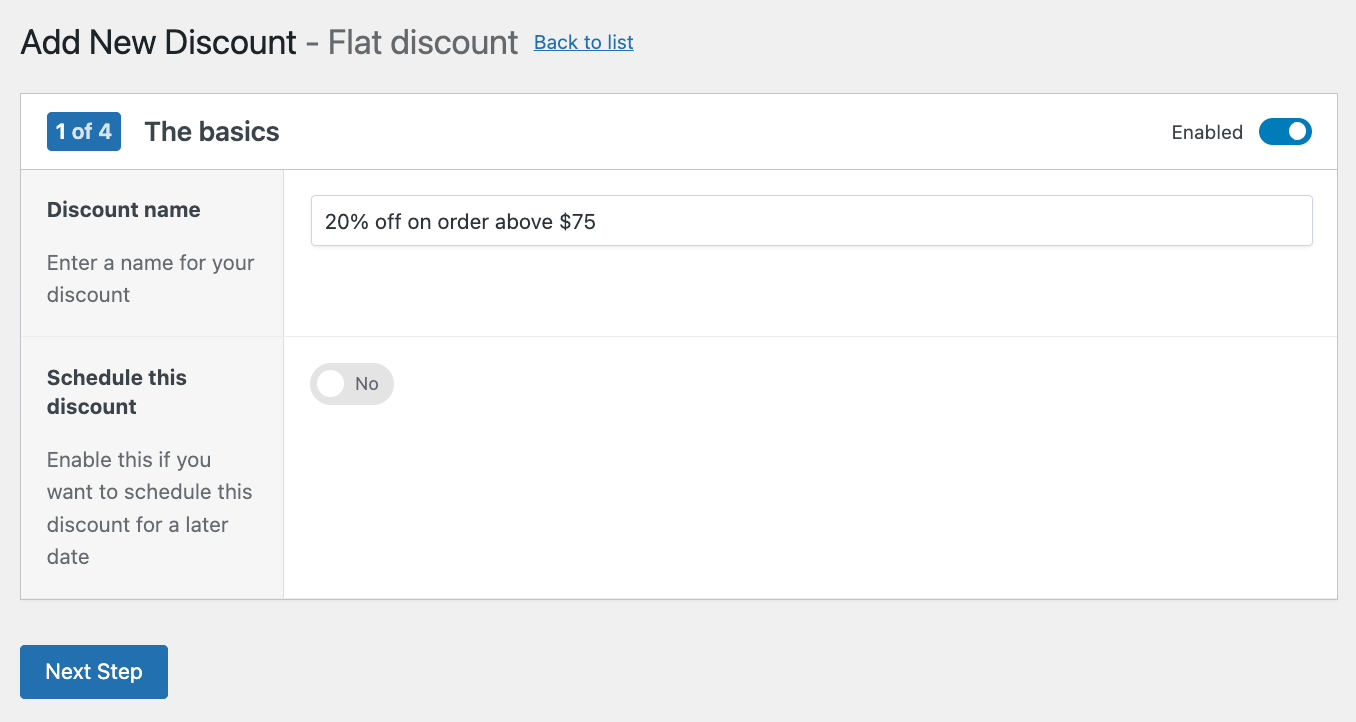
- Leave the Products setting on “Apply this discount to all products in store” and put in 20% as the discount amount.
- In the last step, select “This discount needs extra conditions.” Then, create a new filter that requires a cart subtotal of more than $74.99 (to avoid someone having $75 exactly and the discount not triggering) for the 20% discount to be applied.
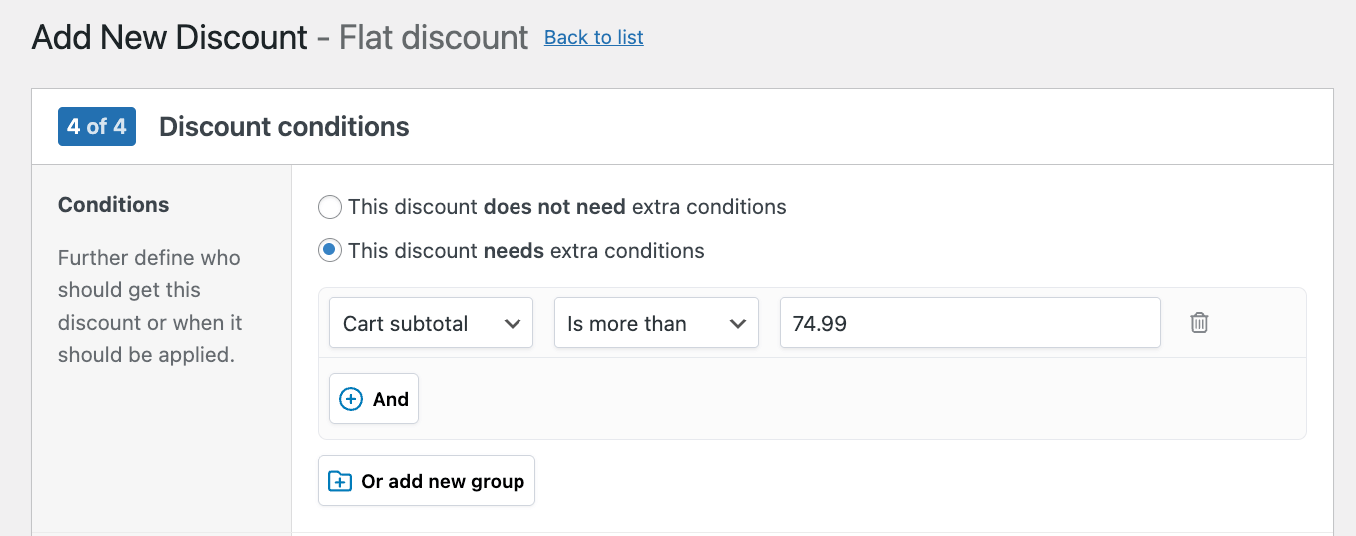
- Save your settings.
Now that you have both discounts, drag them into the correct order. The T-shirt discount processes first, reducing the cart to $75. Then the 20% triggers on the new total. Easy!
Smart priority patterns that protect your margins:
- BOGO rules → Enable “first match only” to prevent customers from using it multiple times.
- Member pricing → Position above general sales to honor wholesale agreements.
- Flash sales → Place last if they should override everything else.
Set your priorities once, and the system handles every edge case automatically. Discounts apply as expected and customers see consistent pricing.
The priority test protocol
Never launch a campaign without this 5-step validation process:
1. Map your active discounts
Create a spreadsheet listing:
- Every active sale price
- All discount rules currently running
- Any manual coupons in circulation
Flag any discounts that could potentially overlap.
2. Create test scenarios
Build these specific test cases:
- Single product with multiple applicable discounts
- Mixed cart with different discount types
- Edge cases (wholesale customer + bulk discount + sale item)
3. Document expected outcomes
Before testing, write down:
- Which discount should win in each scenario
- Maximum allowable discount percentage
- Where rules must block each other
This becomes your validation checklist.
4. Test each scenario
In your staging environment:
- Process each test scenario methodically
- Screenshot every cart calculation
- Compare results against your expected outcomes
Any deviation means adjusting your rules before going live and then retesting.
5. Set explicit priorities
Using WooCommerce Discounts:
- Arrange rules in your tested order
- Configure whether discounts combine or override each other
- Save your configuration with clear documentation
This protocol might feel like a lot of unnecessary work, but a couple of hours’ prep is worth it to be sure sales will run as intended.
Speed testing before major campaigns
Your Black Friday sale goes live in 24 hours. Traffic will spike 10x. Will your discount rules tank site performance when you need speed the most?
Quick performance check:
- Baseline your current speed. Run GTmetrix on your cart and checkout pages. Screenshot the results.
- Add your discount rules. Activate all planned campaign discounts in your staging environment.
- Test again. Same pages, same tool. Compare results.
- The simple rule. If load times increase by more than 30%, you need to optimize. Either reduce discount complexity, upgrade hosting, or improve caching.
Reality check: This test shows if your discounts work efficiently, but not how they’ll perform under traffic. For true load testing, you’d need specialized tools and significant setup time.
Instead, use these practical safeguards:
- Run a smaller flash sale first (like a 2-hour preview) to test under real conditions
- Have your hosting support on standby during launch
- Set up monitoring alerts for slow response times
Caching configuration for dynamic pricing
Standard caching breaks dynamic discounts. Here’s the configuration that actually works:
| Cache type | Configuration | Why it matters |
|---|---|---|
| Page cache | Exclude /cart/* and /checkout/* | Prevents stale prices |
| Object cache | Enable Redis/Memcached | Significantly speeds up discount calculations |
| CDN | Bypass cart endpoints | Ensures real-time price updates |
| Browser cache | Set no-cache headers for cart/checkout | Ensures customers always see current prices |
Remember: Some caching tools may interfere with dynamic pricing, so test their compatibility with performance plugins like WP Rocket.
You can also exclude specific pages from being cached. Simply navigate to Settings → WP Rocket → Advanced Rules and add /cart/ and /checkout/ to “Never Cache URLs.”
Test this configuration during off-peak hours first. Then run a smaller flash sale before your major campaign. Better to discover issues with 50 customers than 5,000.
Effective upsell implementation
There are different ways you can increase sales and while we’ve mostly talked about discounts, there’s another very useful strategy: upsells. Now, you might feel like they can be a bit pushy, and that’s absolutely true in some cases, but they can also be very helpful when done correctly.
A well-placed upsell increases average order value without annoying customers. A poorly timed pop-up drives them away entirely.
So, here’s how you can make the most of upsells:
- Product page bundles: “Complete the set” or “Frequently bought together” sections work because they solve a problem. Customer buying a camera? Show the memory card and case they may need anyway. Make it a 1-click add with a 10% bundle discount.
- Cart quantity breaks: Display volume savings clearly: “Buy 2 more and save 15%!” This works especially well for consumables. Show the per-unit price dropping as quantity increases.
- Post-purchase offers: Send a “Thank you” email within 30 minutes, offering a free gift with their next order, if it’s above $30.
- Checkout order bumps: Selling shoes? Offer a waterproof spray for $5 or special socks for $3. Whatever it is, make sure it actually adds value instead of being an empty add-on.
The cardinal sin: Never use disruptive popups mid-browse. If you must use popups, trigger them on exit intent only.
90-day implementation roadmap
Weeks 1-2: Foundation assessment
Start by understanding what you’re actually working with.
Audit every active discount, document which rules conflict, and benchmark your current performance. Most stores discover discounts still running from last year’s campaigns.
Critical tasks:
- List all active discounts and expiration dates.
- Run GTmetrix tests on key pages.
- Document rule conflicts in a simple spreadsheet.
- Clone your site to a proper staging environment (optional).
This phase feels slow, but it saves weeks of debugging later.
Weeks 3-4: Modern discount system
Time to replace your patchwork of plugins with a single, lightweight, coherent solution.
Install WooCommerce Discounts and migrate rules individually. Test each migration thoroughly – rushing here causes checkout disasters.
Implementation checklist:
- Install and configure your discount plugin.
- Migrate existing rules (test after each one).
- Validate that performance stays within acceptable levels of the baseline.
- Create standard operating procedures for future discounts.
By week 4, your discount system is stable.
Month 2: Growth features
Layer in cart abandonment recovery, smart product recommendations, and email automation. Monitor metrics carefully.
Revenue multipliers to implement:
- 3-email abandonment sequence
- “Frequently bought together” on product pages
- Post-purchase email flow with time-limited offers
- Weekly conversion rate tracking
Month 3: Campaign optimization
You’re nearly ready. Now everything just needs to be optimized.
Schedule next quarter’s promotions, run A/B tests on discount amounts (15% vs 20% off), and refine based on results.
Optimization priorities:
- Pre-schedule all seasonal promotions.
- Test discount types (percentage vs fixed amount).
- Analyze which rules drive the highest AOV.
- Plan next quarter’s testing calendar.
Measuring success
Track these KPIs to ensure your changes are having the desired outcome:
| Metric | Target | Why it matters |
|---|---|---|
| Conversion rate | +1% per month | Direct revenue impact |
| Average order value | +15% by day 90 | Measures upsell effectiveness |
| Page load time | Under 3 seconds | Ensures performance |
| Support tickets | -50% discount-related | Indicates system stability |
Success looks like fewer panicked midnight fixes and more predictable revenue growth.
Making this your most profitable quarter yet
The difference between struggling stores and thriving ones is simply systematic implementation.
So, here’s your next 48 hours: Start with the foundation audit. List every discount, benchmark your performance, and create that staging site. This will help ensure all discounts run smoothly.
- Test thoroughly. Not because you’re cautious, but because you’re professional. A single untested rule can derail an entire campaign.
- Build systematically. Each layer depends on the one below. Checkout stability enables discounts. Clean discounts enable upsells. Upsells enable advanced campaigns.
Ready to transform your revenue? Download WooCommerce Discounts and implement your first automatic discount in under 10 minutes.
