Custom pricing lets you set flexible product prices based on criteria or user inputs – like letting customers name their price, offering member discounts, or implementing wholesale tiers.
Sounds great, right? But how can you actually make this happen?
WooCommerce doesn’t give store owners a lot of freedom by default, so to unlock these options, you need to go with a dedicated plugin.
Today, we’ll show you how to implement various custom pricing strategies using two powerful plugins: Advanced Product Fields for WooCommerce and WooCommerce Discounts.
Advanced Product Fields has a free version with 10 field types, flat pricing, and conditional logic. The Pro version adds 18 field types, formula-based pricing, and AJAX add-to-cart tech for modern themes. Meanwhile, WooCommerce Discounts focuses on flexible, rule-based promotions – like quantity discounts, bulk pricing, or fixed-amount offers.
But first, let’s begin with one very important question…
What are the benefits of custom pricing?
If you’re not convinced that you need custom pricing options, we’re here to prove you otherwise. These customizable options bring you:
- Higher conversion rates: Tailored pricing attracts more customers by matching their price expectations.
- Increased customer loyalty: Personalized discounts for repeat customers or members encourage return visits.
- Revenue maximization: Adjusting prices for different customer segments increases overall profit margins.
- Competitive advantage: Offering unique pricing options sets your store apart from competitors.
- Flexibility and control: Greater control enables quick adaptation to market changes or customer preferences.
- Enhanced customer experience: Giving customers pricing control creates a more engaging shopping experience..
Common use cases for custom pricing
Custom pricing works for any product where customers should control the amount they pay:
- Gift cards and vouchers let customers choose denominations that work for their budget.
- Donation products allow supporters to contribute any amount to your cause or nonprofit.
- Tips and gratuities let customers add optional service appreciation to orders.
- Pay what you want products give customers complete pricing control to build goodwill and test price sensitivity.
Product-based vs systemic pricing
When implementing custom pricing in WooCommerce, it’s important to understand the two main types:
- Product-based pricing: Product-based pricing applies to items like gift cards, custom orders, and made-to-measure products, where customers trigger price changes based on product options and customizations.
- Systemic pricing: Systemic pricing applies store-wide rules like role-based discounts, BOGO deals, and bulk pricing that activate automatically based on conditions.
As we mentioned, Studio Wombat offers plugins to make both types of custom pricing easy to implement:
- For product-based pricing changes, use APF. Advanced Product Fields lets you create custom fields globally and reuse them across products. You can assign fields to specific products, entire categories, or product tags. This saves time when many products need identical pricing options.
- For systemic pricing changes, use WooCommerce Discounts. This tool helps you set up complex discount rules and pricing structures that apply across your store.
Why use a plugin instead of custom code?
Plugins handle updates, compatibility, and security patches automatically, while custom code requires ongoing developer time to maintain after every WooCommerce or WordPress release.
Plugins include built‑in input validation and sanitization to prevent security vulnerabilities and malformed prices. They also provide clear admin interfaces so non‑technical users can adjust pricing rules, fields, and conditions without knowing their CSS from their HTML. And alongside custom pricing, the right plugin allows you to showcase products in minutes, from T-shirt designs to software, for a really immersive customer experience.
Even for experienced developers, custom code would need to hook into WooCommerce’s cart, pricing, and checkout logic, handle validation, and build a custom admin UI. It would also need to be tested and updated after every core or plugin update.
Ongoing maintenance makes a dedicated plugin a more practical and sustainable choice for ambitious WooCommerce stores.
Step-by-step guide to creating custom prices for gift cards with Advanced Product Fields
Gift cards with custom amounts are a popular product for many e-commerce stores. They allow customers to choose their preferred gift value, making them perfect for various occasions. This approach works for any “name your price” product where customers set the amount.
Let’s walk through setting up a custom price input for gift cards using Advanced Product Fields (APF):
First, you need to install and activate Advanced Product Fields for WooCommerce:
- Purchase the plugin and log in to your Studio Wombat account.
- Go to the downloads tab and click on the plugin to save it locally.
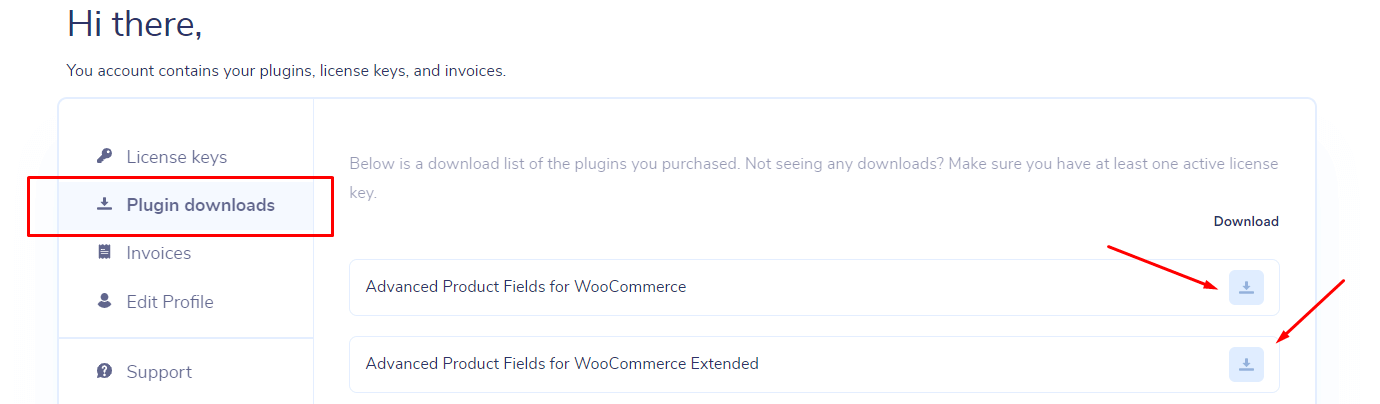
- Go to your WordPress dashboard → Plugins → Add New and upload the file.

- Activate the plugin, and you’re done!
Now, let’s create a gift card product.
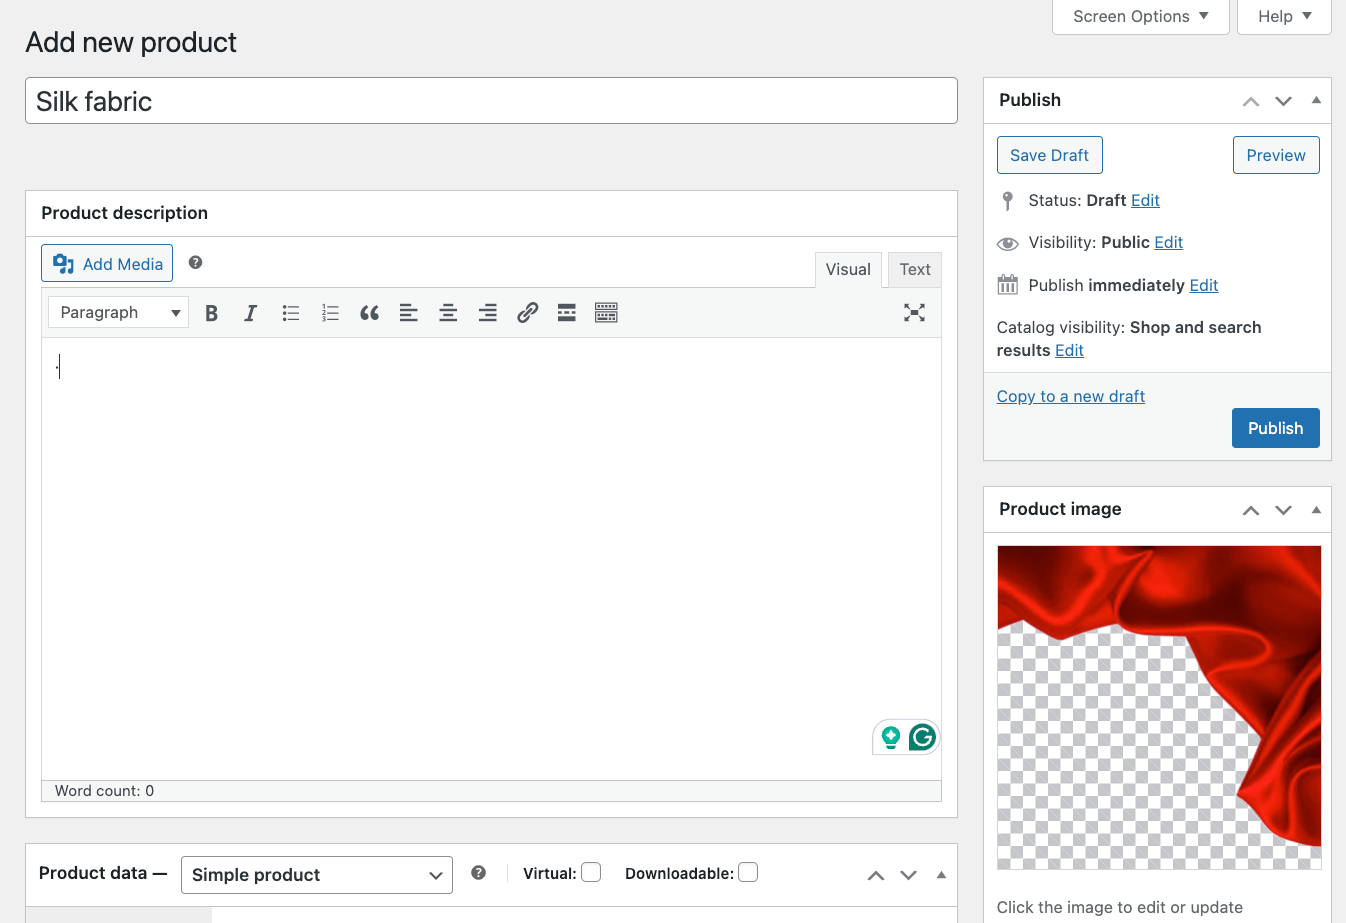
- Navigate to Products → Add New (or edit an existing product) and set the product name (e.g. “Custom Amount Gift Card”).
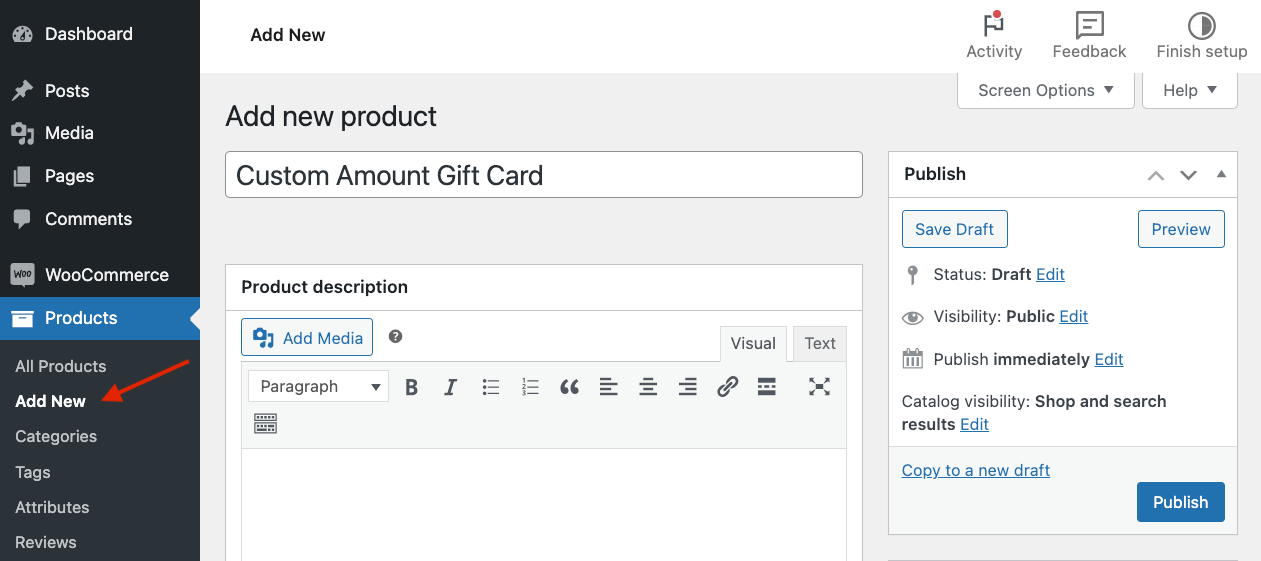
- Add a product picture.
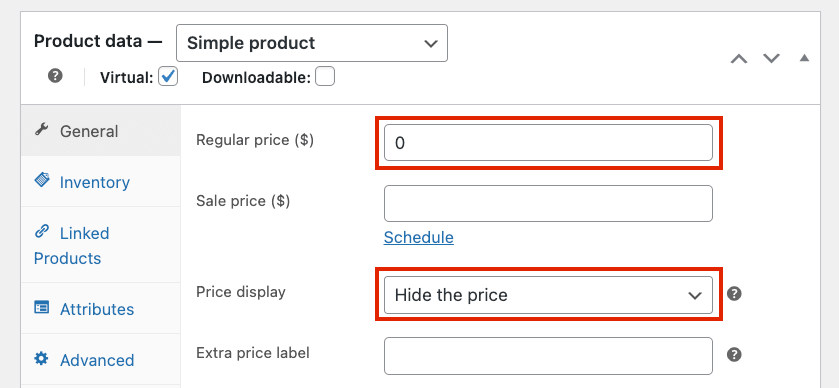
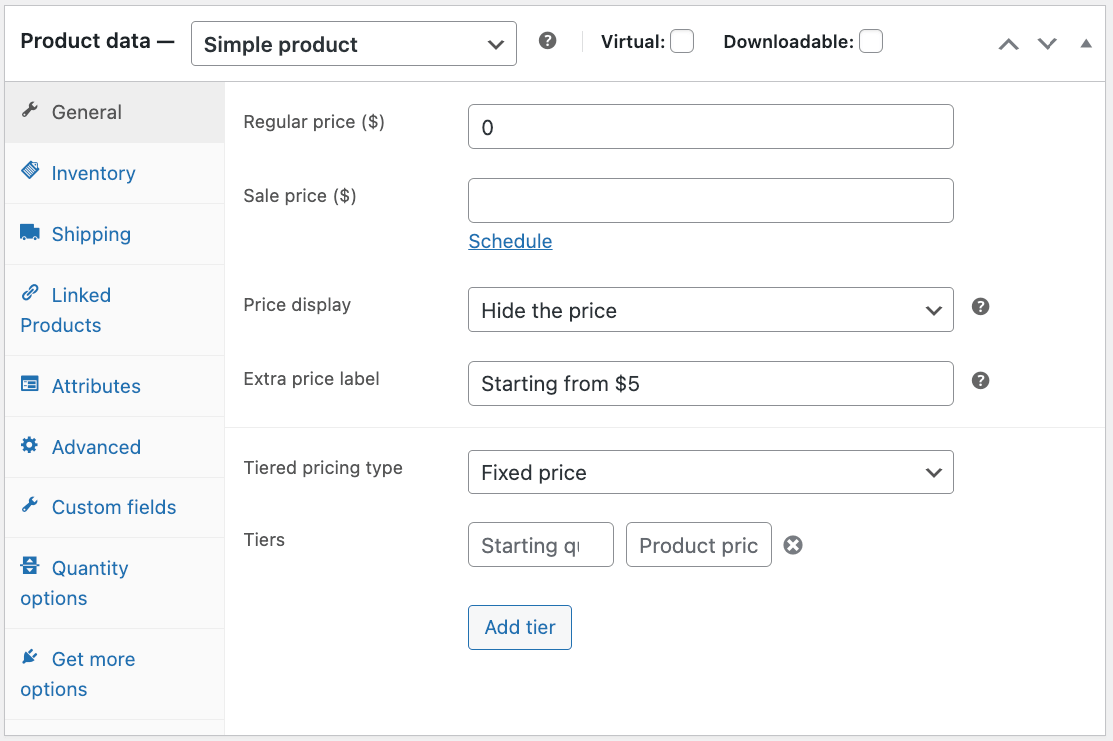
- In the Product Data section, select Virtual as the product type (since gift cards are typically delivered electronically) → Set the regular price to “0” and then on Price Display, choose Hide the price – APF will replace it with your custom field and can show text like “Starting at $X” or “From $X per unit”.
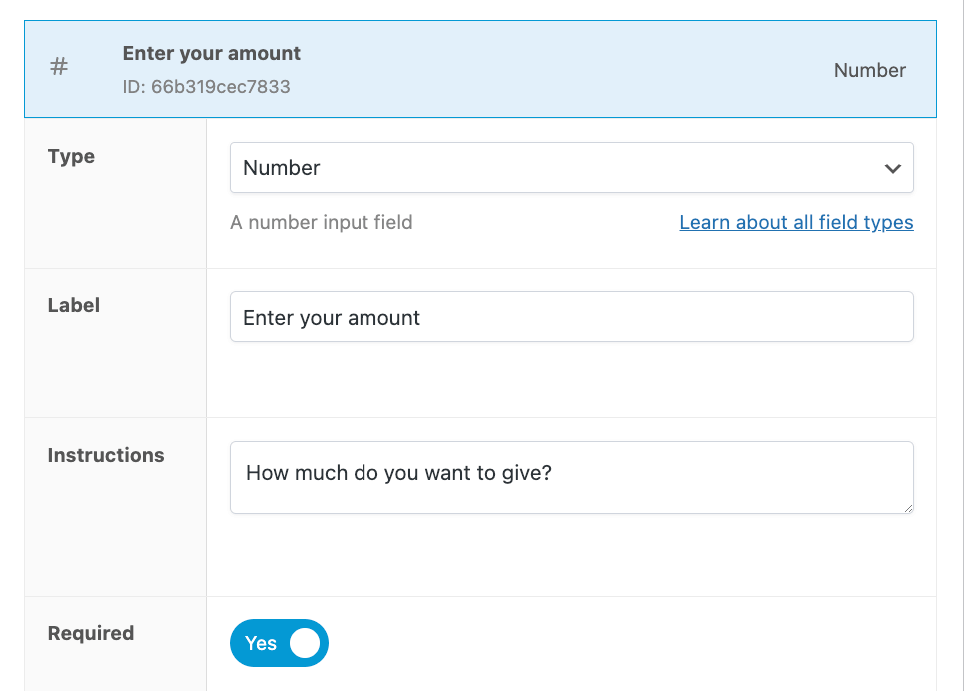
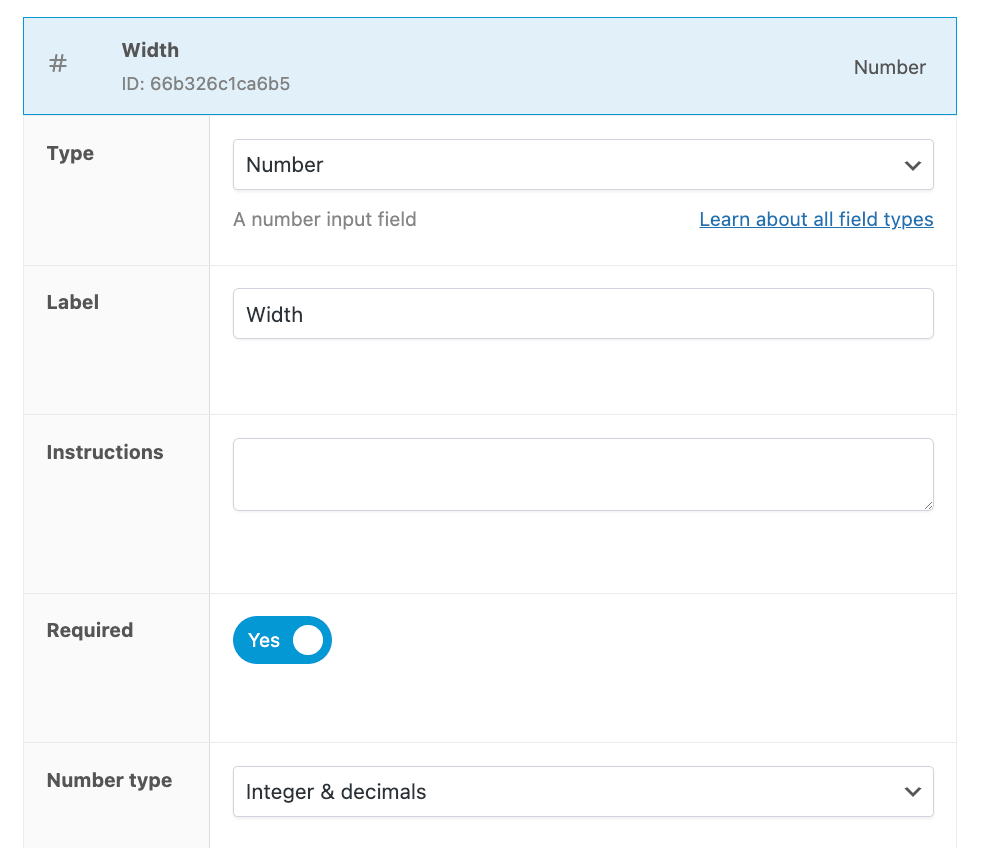
- Go to Custom Fields and create your first field. APF includes 18 field types including Number, Text, Dropdown, Checkbox, and Radio buttons. For gift cards, select Number as the field type since customers will need to enter a monetary amount.
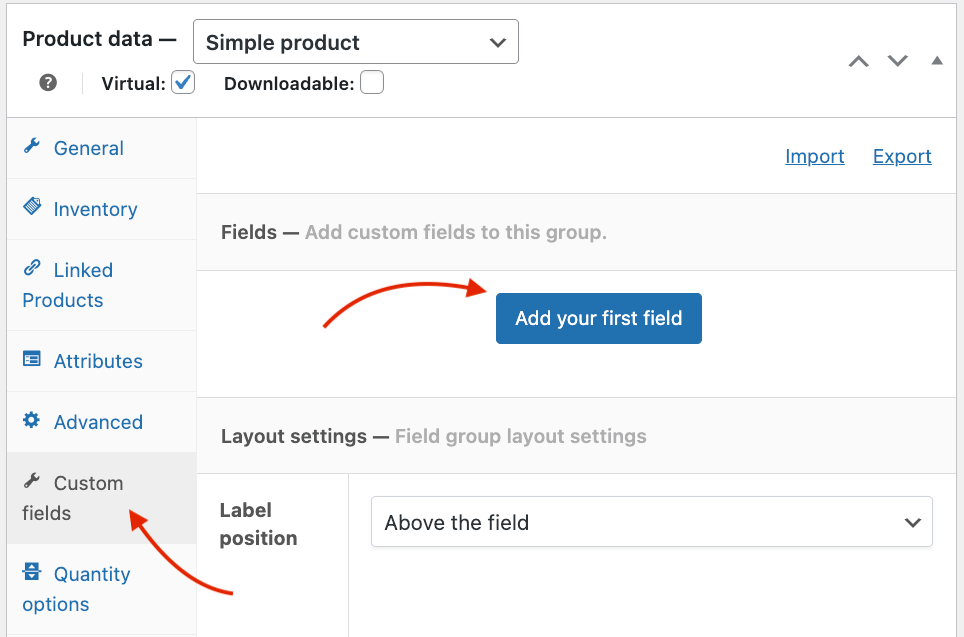
- Choose a label and instructions. You also need to mark it as Required so customers can’t make the purchase without entering an amount first.
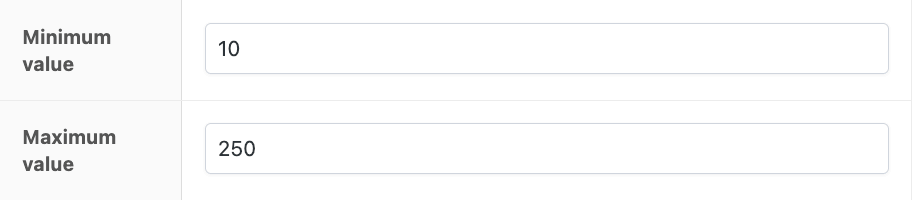
- Then, you need to select minimum and maximum values. In our example below, we’ve manually set the minimum value to $10, with the maximum at $250.
- Next, toggle the Adjust pricing field and select Amount x field value x qty. This formula will adjust the pricing depending on the value users enter in the field and the number of gift cards they decide to purchase.

- Click Publish to save your product.

Now, when customers view this gift card product, they’ll see an input field where they can enter their desired gift card amount. The product price will automatically update based on their input.
Creating custom price formulas with Advanced Product Fields
APF supports 3 pricing approaches:
- Fixed amounts for flat fees.
- Percentage-based pricing for proportional charges.
- Formula-based calculations that combine multiple field values.
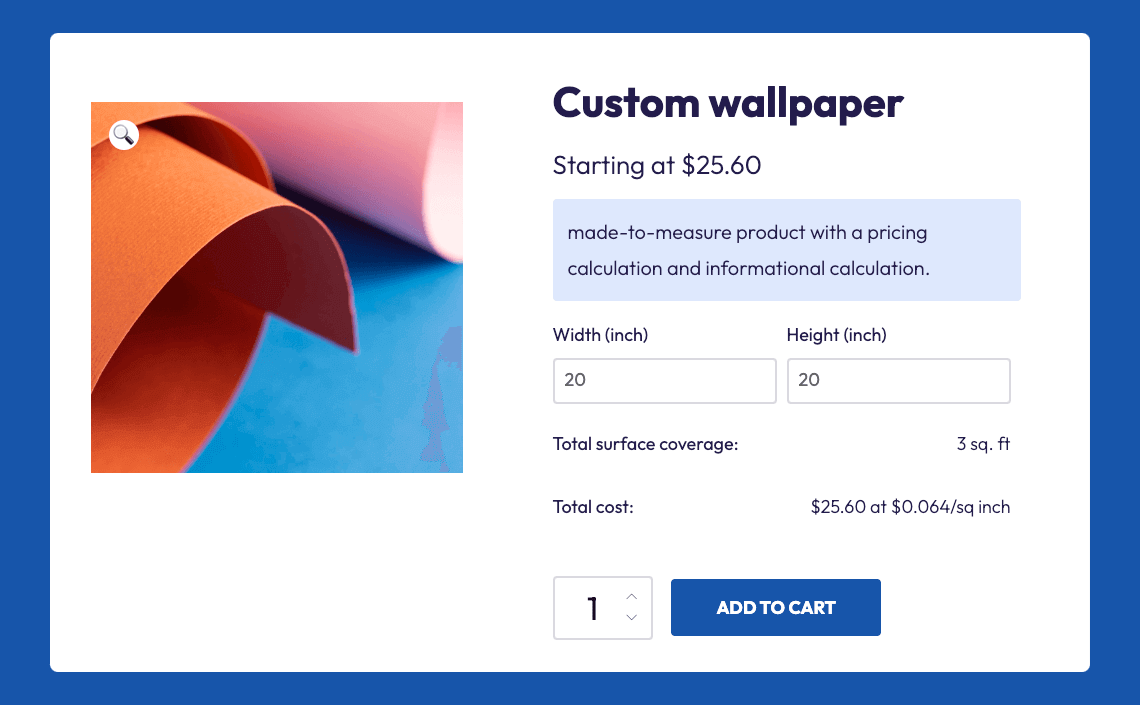
The plugin allows you to create complex pricing formulas for scenarios like selling custom amounts of fabric, wallpaper, or other measurement-based products.
Here’s how to set up a more advanced formula:
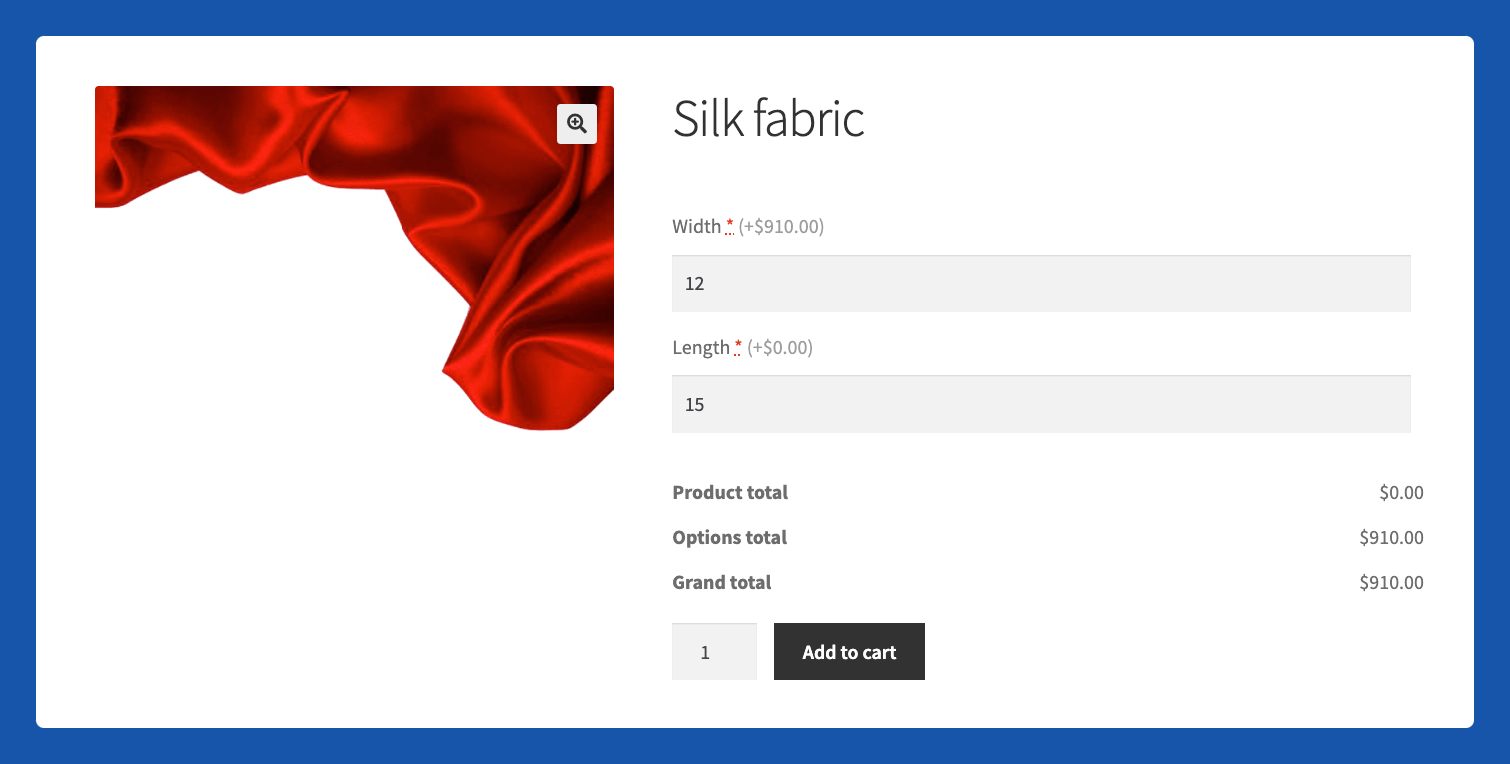
- Create a new product, for example, silk fabric.
- Set the regular price to 0 and select Replace WooCommerce price with text. Then add a label for a starting price of 1 square meter, for example.
- In the Product Fields section, add 2 Number fields: → Label the first field Length → Label the second field Width.
- For the Width field, enable the Adjust pricing toggle and select Formula based pricing.
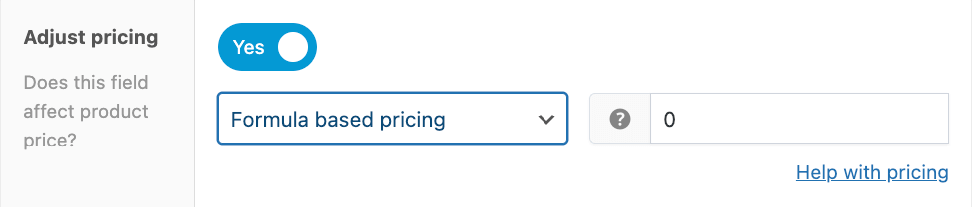
- Click the help symbol to open the formula builder. This tool makes it easy to create complex formulas without manual typing.
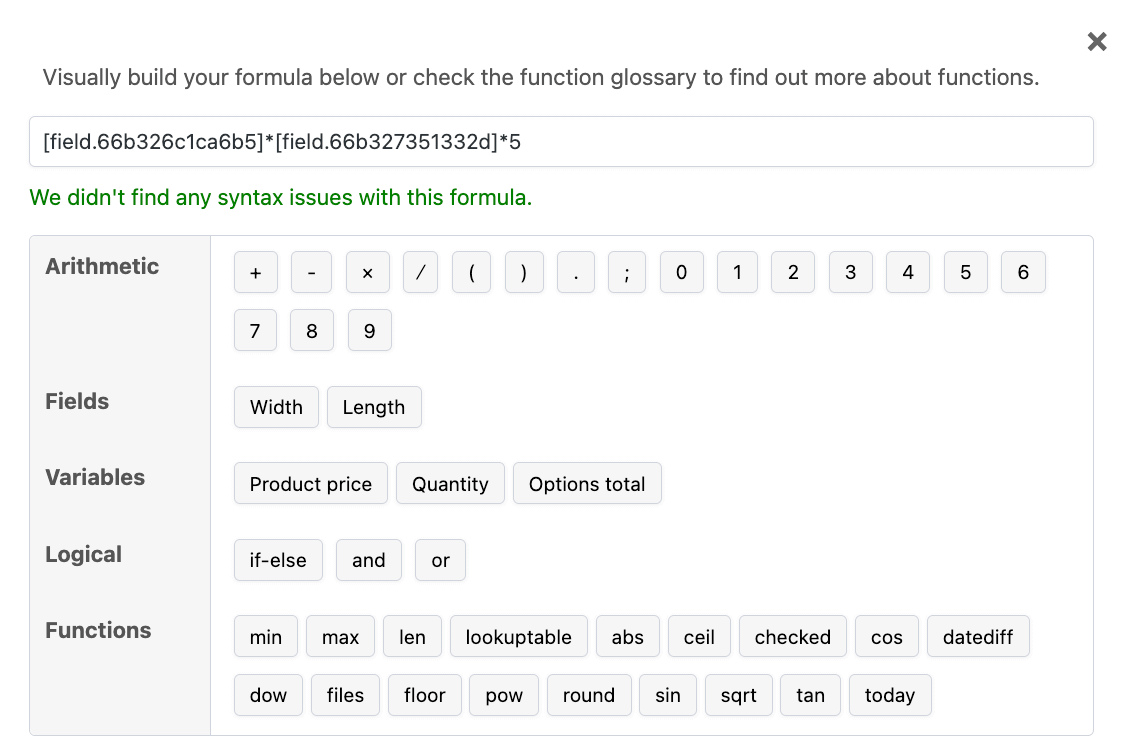
- In the formula builder, construct your formula. For example, to calculate the price of fabric at $5 per square meter, your formula would be: [field.length] * [field.width] * 5. This multiplies the length by the width to get the area, then multiplies by the price per square meter.
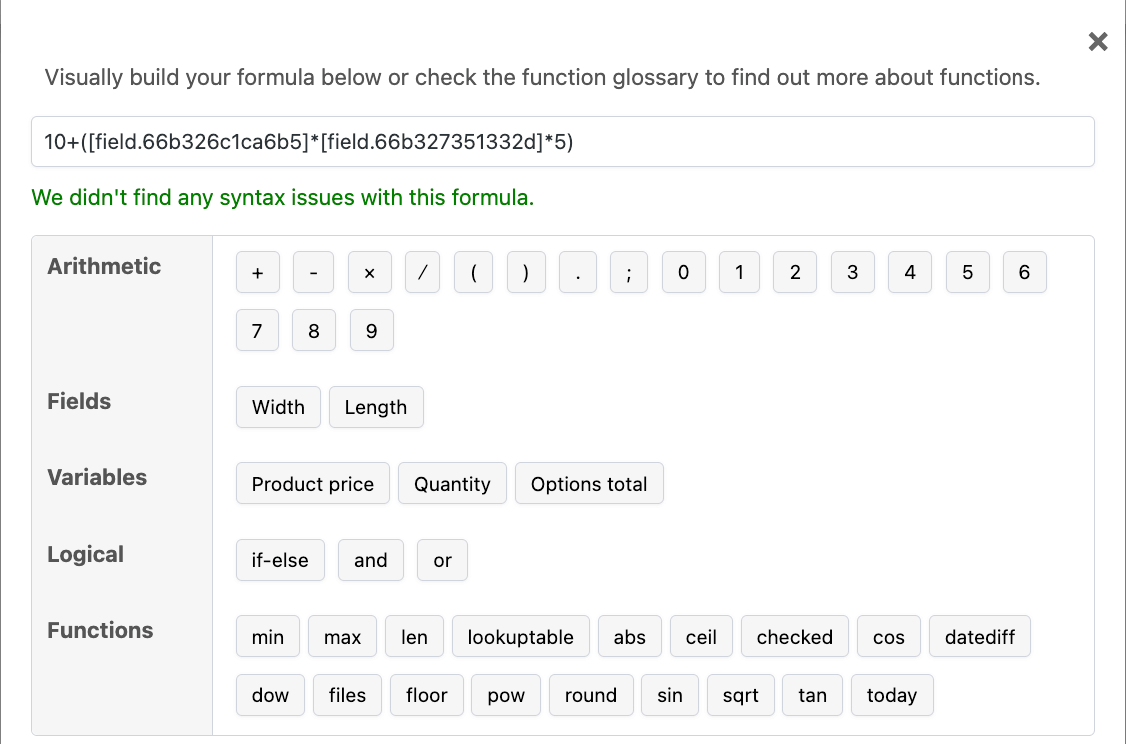
- You can add more complexity to your formula. For instance, to add a base price of $10, you could use: 10 + ([field.length] * [field.width] * 5).
- For even more advanced pricing, you can create custom variables. Maybe you create a variable for price per square meter that changes based on the total area ordered. For example, instead of $5, it becomes $4 if people order more than 50 square meters.
APF includes conditional logic to show or hide fields based on customer selections. You can create rules with AND/OR operators to display relevant options that are dynamically based on previous choices. - Save your product and test it to ensure the pricing updates correctly as customers input their desired measurements.
Applying custom pricing to product variations
Variable products have multiple versions with unique attributes like size, color, or material. APF works with variable products through the Variations tab in the Product Data section.
You can apply custom pricing fields to all variations at once or configure each variation separately. This lets customers input custom amounts for specific product options, like engraving length for different jewelry sizes.
How to create BOGO offers with WooCommerce Discounts
Storewide sales are very important, but WooCommerce doesn’t allow owners to implement them efficiently. Common pain points include:
- Manually applying discounts to multiple products
- Managing complex discount rules across various product categories
- Ensuring discounts are applied correctly and consistently
- Updating prices when sales periods begin or end
These challenges can lead to errors, wasted time, and frustrated customers. Fortunately, the WooCommerce Discounts plugin offers an ideal solution for creating and managing sales effectively. You can install the plugin in the same way as you did with Advanced Product Fields.
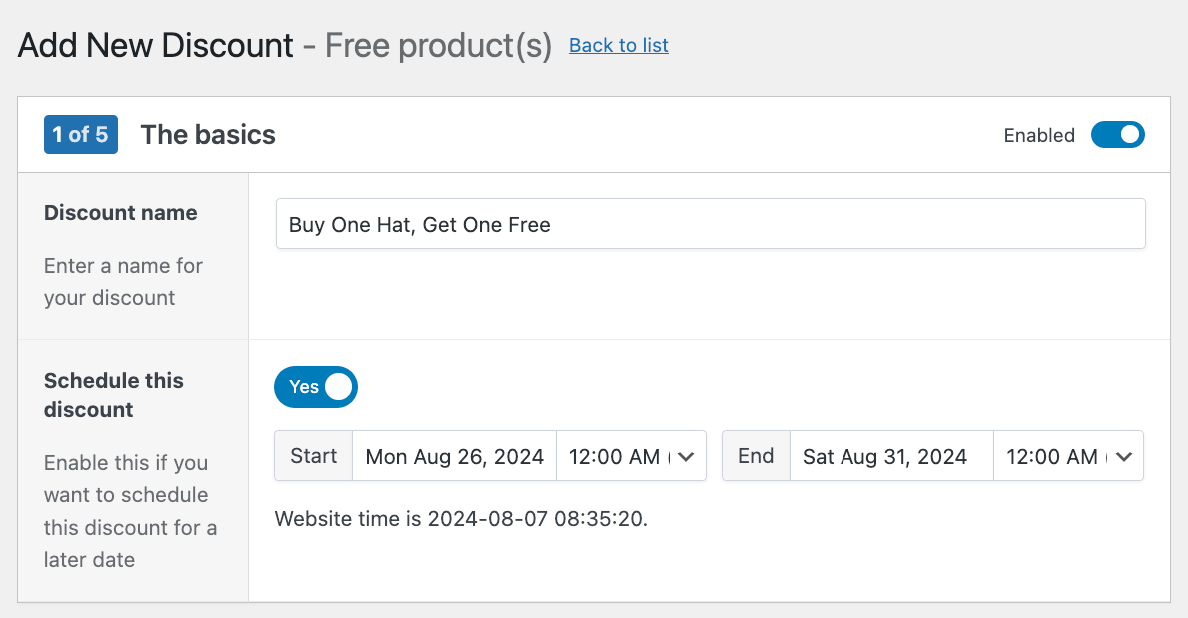
Now, let’s walk through an example of setting up a “Buy one hat, get one free” offer:
- Navigate to WooCommerce → Discounts → Add New and choose Free product(s).
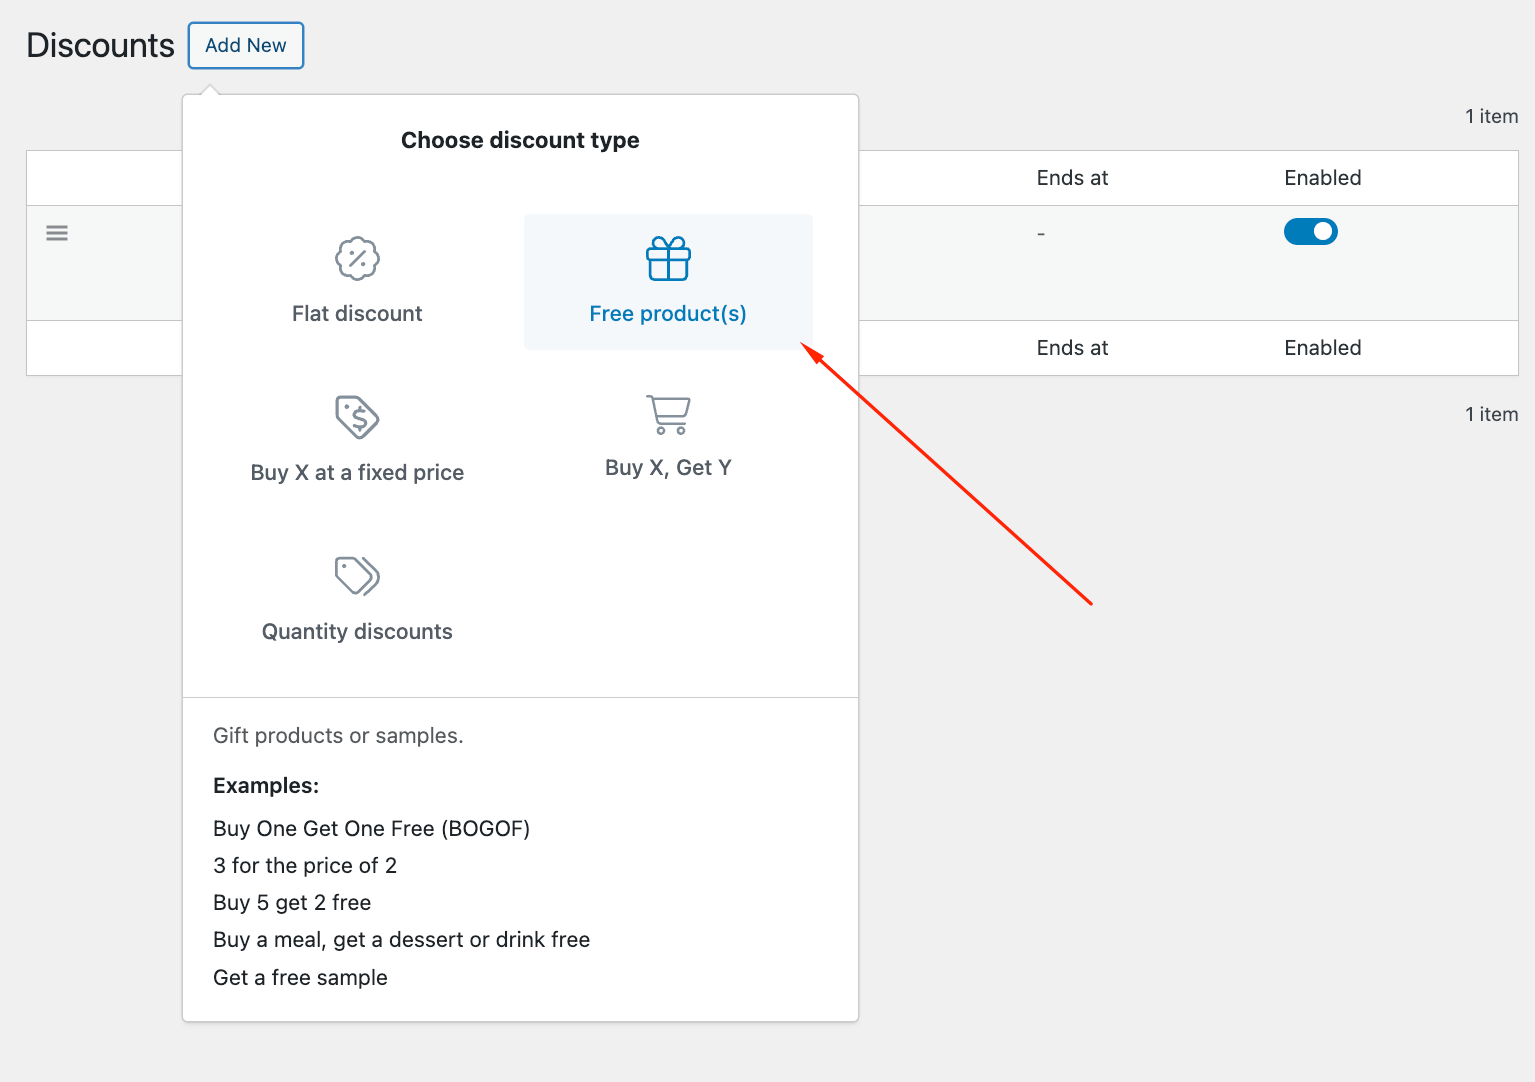
- Name your discount: “Buy One Hat, Get One Free” and choose whether you want to schedule this for a specific period.
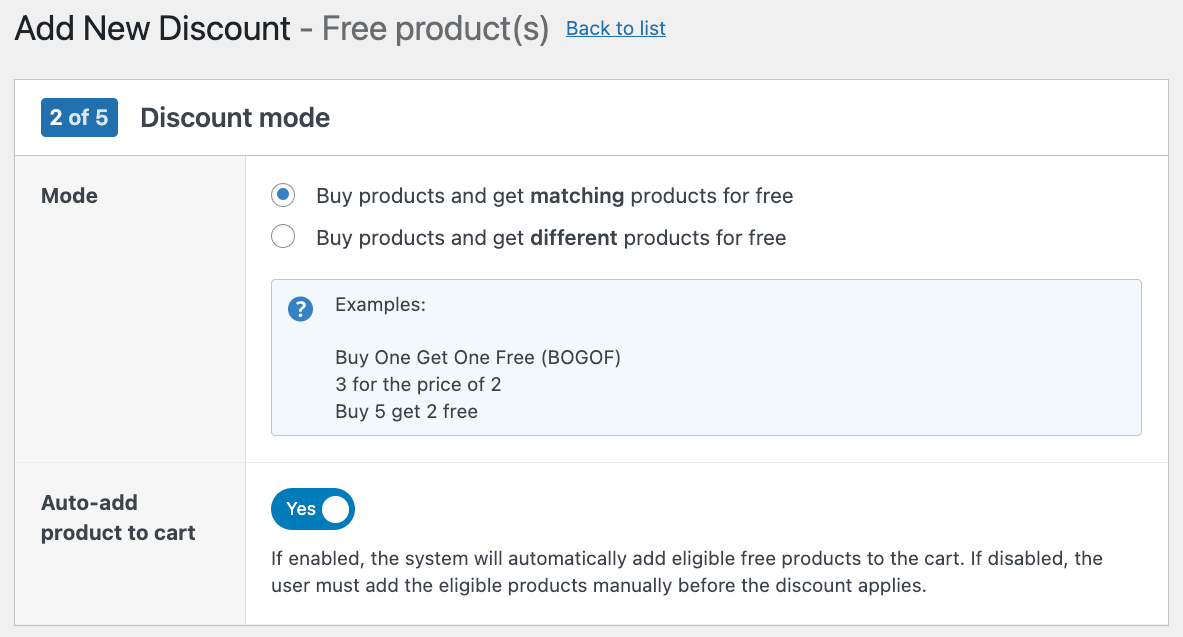
- In the next step, choose the option “Buy products and get matching products for free” and then decide whether you want the system to automatically add the free products to the cart.
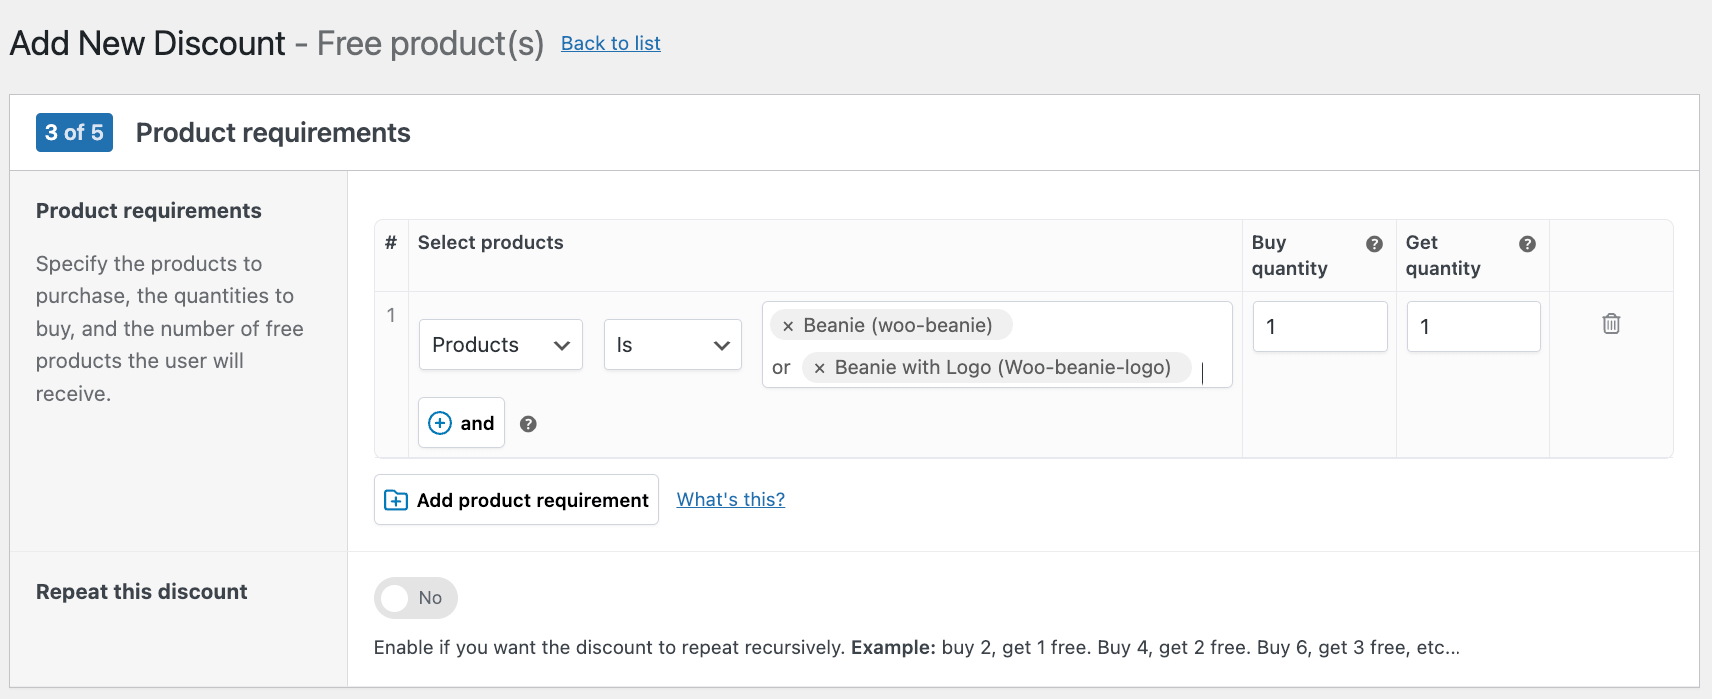
- Add the products that will apply to this discount and choose your Buy and Get quantities.
- Next, you have the option to add some content and a cart message.

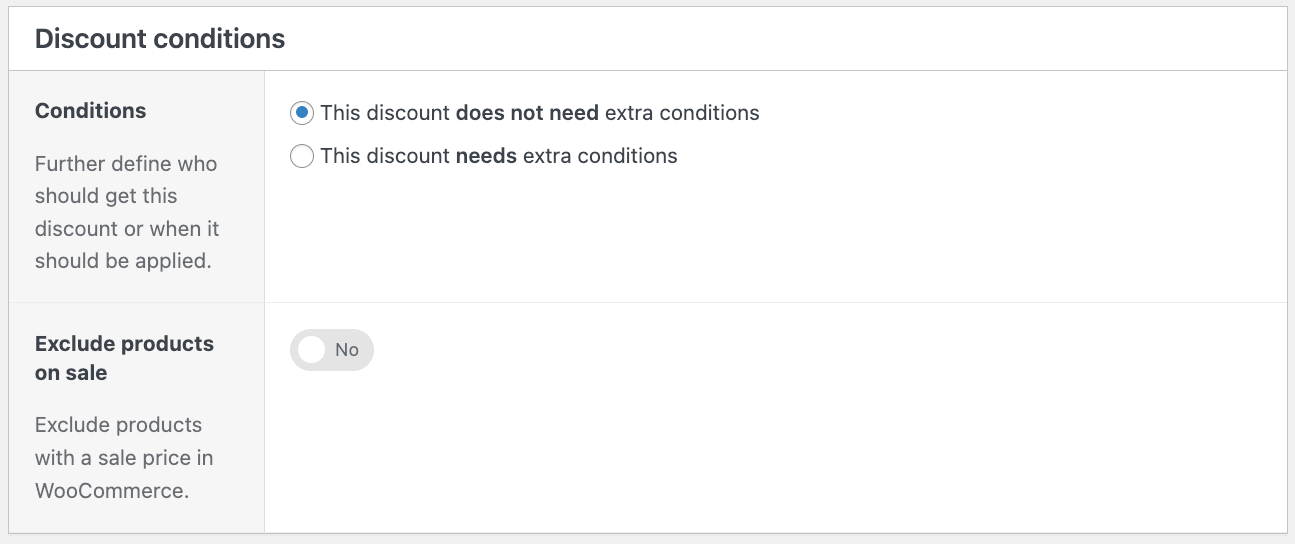
- Finally, you can decide whether you want to add extra conditions. In this example, we’ll keep it simple and leave it as is.
- Click Save discount to activate the discount.
Once set up, customers who add two hats to their cart will automatically have the second hat discounted to $0 at checkout.
The WooCommerce Discounts plugin isn’t limited to simple BOGO offers. It also allows for more complex variations, such as “Buy X, get Y” deals so you can sell similar products together. You could also create an offer like “Buy one hat, get a pair of sunglasses 50% off”. This flexibility enables you to create cross-product promotions, encourage larger purchases, and introduce customers to new product lines.
Using WooCommerce Discounts for role-based pricing
As we touched on earlier, role-based pricing allows you to offer different prices or discounts to specific groups of customers based on their user roles, for example, wholesalers.
Role-based pricing is a strategic approach that can really benefit WooCommerce stores. It allows you to tailor your pricing strategy to different customer segments, potentially increasing both sales and customer loyalty. By offering specialized pricing to certain groups, you can:
- Attract and retain high-value customers
- Encourage bulk purchases from wholesalers
- Reward loyal customers or members with exclusive discounts
- Create tiered pricing structures that incentivize customers to increase their spending
Common use cases for role-based pricing include:
- Offering wholesale discounts to business customers
- Providing special rates for VIP or premium members
- Giving educators or students access to discounted prices
- Rewarding long-term customers with loyalty discounts
Setting up role-based discounts with WooCommerce Discounts is easy! You can adjust this in the Discount conditions settings by clicking “This discount needs extra conditions” and choosing the relevant user role. 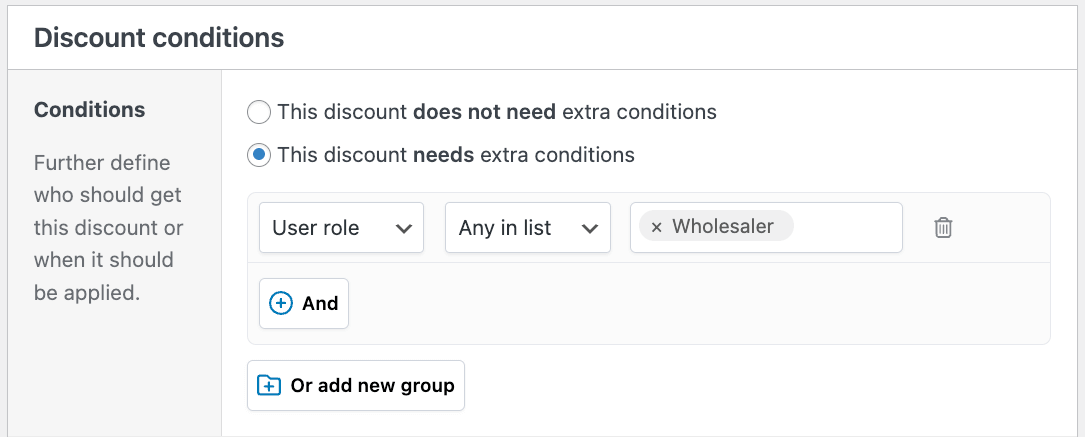
Take your WooCommerce store to the next level with custom pricing
Custom pricing in WooCommerce opens up a world of possibilities for creating personalized shopping experiences. With strategies like user-input pricing, complex formulas, BOGO offers, and role-based discounts, you can cater to individual customer needs and potentially increase your average order value.
Studio Wombat’s plugins make it easy to implement various custom pricing strategies:
- Advanced Product Fields allows customers to choose how much they’ll pay and customize products in numerous ways, greatly improving the customer experience.
- WooCommerce Discounts enables quick and easy implementation of sitewide sales, BOGO offers, and role-based pricing.
By combining these powerful tools, you can create a unique and flexible pricing system that sets your store apart from the competition. Start implementing custom pricing on your WooCommerce store today with Studio Wombat, and watch your customer satisfaction and sales grow!
