Many online stores need input fields on their product pages so the customer can customize their product before purchase. One example of an such an input field is a date picker. In this tutorial, we’ll go over how you can add a date picker to your WooCommerce product pages, so customers can select one or more dates. Store administrators can see the selected date on the order admin screen.
A date picker is often also named a calendar field. They both refer to the same thing. This tutorial uses WordPress, WooCommerce, and an additional plugin to add the date picker.
Let’s get started!
What is a date picker?
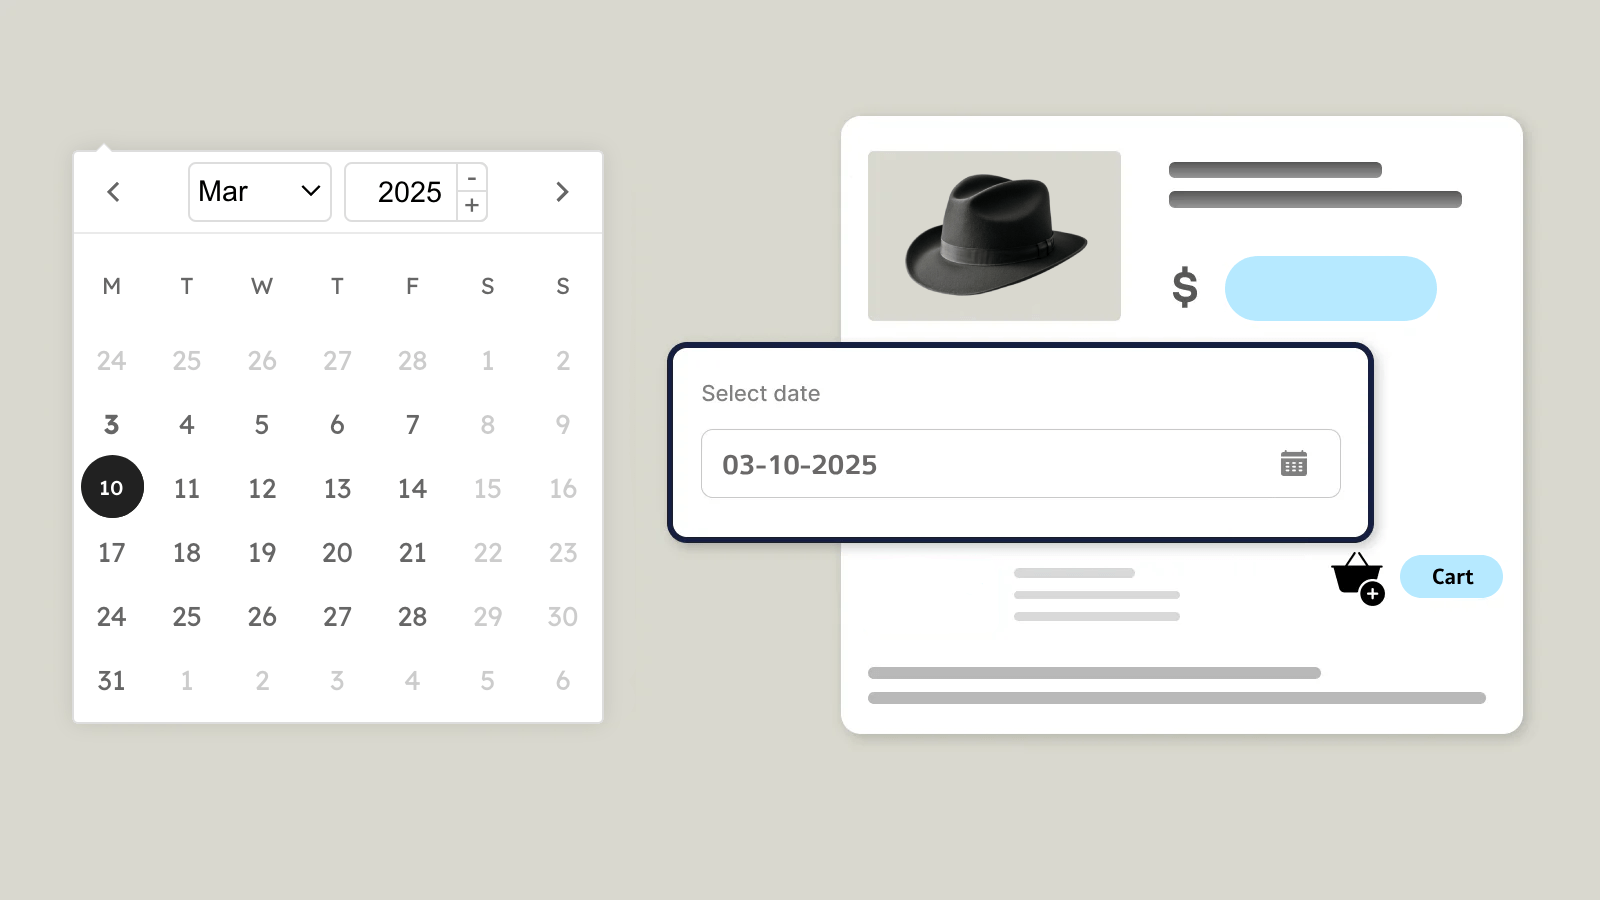
A date picker is a “custom field” that looks like a regular text input field, but when a customer clicks on it, a calendar pops up that allows them to choose a date. Here’s how it looks:
Here is an example of a date picker on a product page. You can see it works well on large screens, as well as smaller screens (mobile).
Advantages of using a datepicker in WooCommerce
One advantage of using a date picker field is that it can help to prevent formatting errors when entering dates. Dates can be written in a variety of different formats around the world, and it can be easy to make mistakes when typing them into a normal text field.
For example, the month and day may be reversed or the year may be abbreviated. With a date picker, users can simply select the desired date from a calendar, eliminating the risk of formatting errors. This can improve the overall user experience and reduce the possibility of errors in the data input process.
A date picker can also provide additional functionality that can be useful for certain applications. For example, a date picker may allow users to select a range of dates rather than just a single date. This can be useful for booking a vacation or reserving a rental property.
When to use a calendar field
Date pickers are typically used for bookable products, but there are many more use cases. Let’s look at some examples:
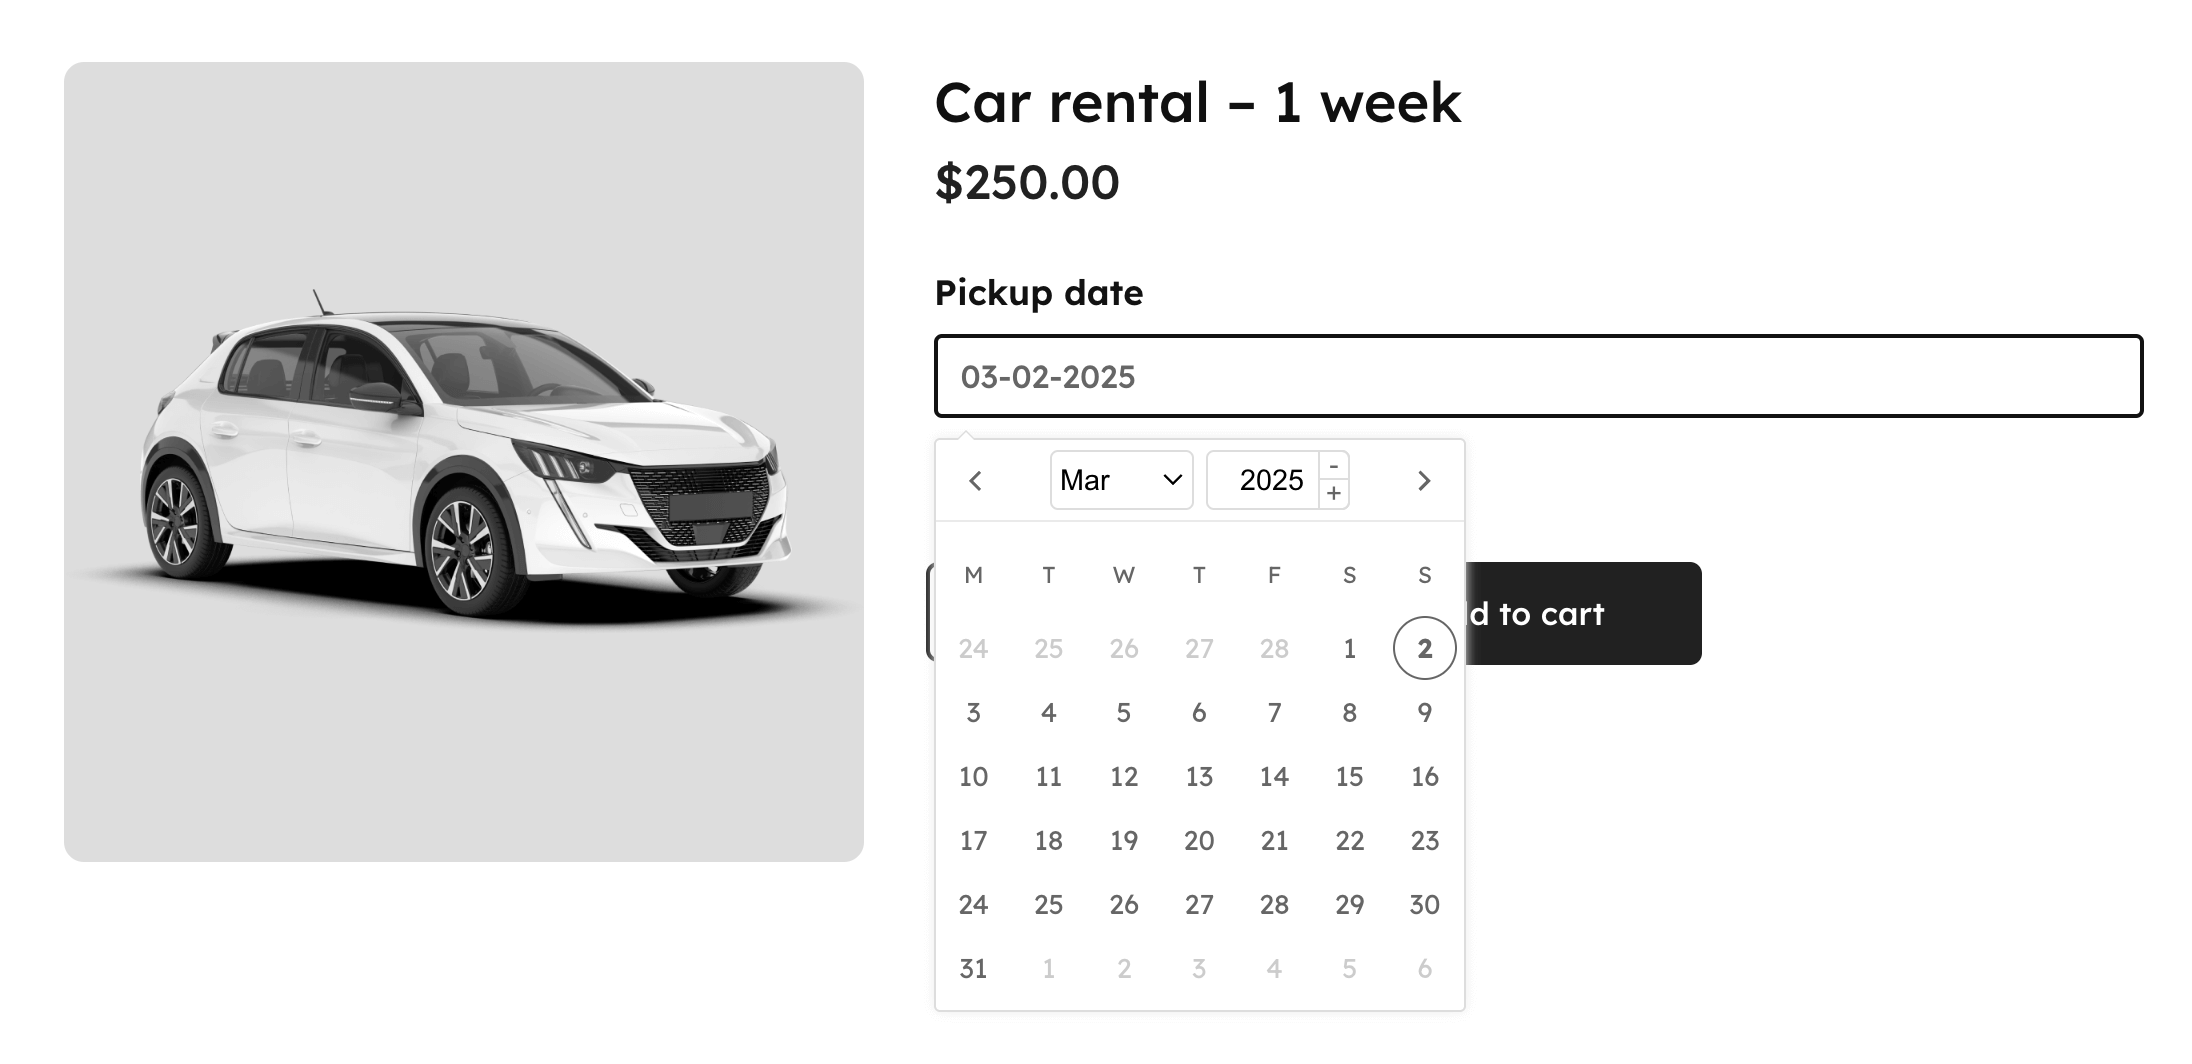
- Rental products: If you’re running a car rental business, you may want your users to select 2 dates – a pickup date and a return date. Good to know: You can determine the product price based on the number of days between those selected dates! If the daily rate for renting a vehicle is $50, and your user selects 3 days in the calendar, the final product price becomes $150.
- Flower stores: If you have a flower shop, you can sell flowers online and add delivery features. Your customers can select when they want their flowers delivered.
- Hairdressers, wellness & spas: You can allow your customers to book their appointments online. They can select a date when they would like to use your services.
How to add a date picker field to WooCommerce
In this section, we’ll explain how you can add a date picker to your WooCommerce products. Unfortunately, WooCommerce does not have an out-of-the-box solution to add advanced form fields to products.
That’s why you’ll need a plugin to add those input fields. We’ll be using the Advanced Product Fields for WooCommerce (APF) plugin to add the date picker. This plugin also allows you to add other types of fields to your products, which are not available in standard WooCommerce. Customers have to fill out the form fields before they can add the product to cart. Even better, you can change the final product price depending on the values your customer selects!

The quickest way to add a date picker to your WooCommerce products
Check out the pluginLet’s begin the tutorial!
Step 1: install the plugin
These are the steps to install Advanced Product Fields for WooCommerce (APF):
- If you haven’t done so already, get the plugin here.
- Download the plugin and install it on your WordPress site via Plugins → Add New.
- Once you’ve installed and activated the plugin on your WordPress website, navigate to WooCommerce → Settings → Product fields from the dashboard to activate your license key.
Step 2: enable the date field in the WooCommerce settings
Go to WooCommerce → Settings → Product Fields and enable the date field there:

On the same screen, you can also define the date format to display all dates in.
Step 3: add a date picker field to a WooCommerce product
Edit the product you’d like to add a date picker field to via WooCommerce → Products. In the Product data metabox, navigate to the Custom fields section and click Add your first field.
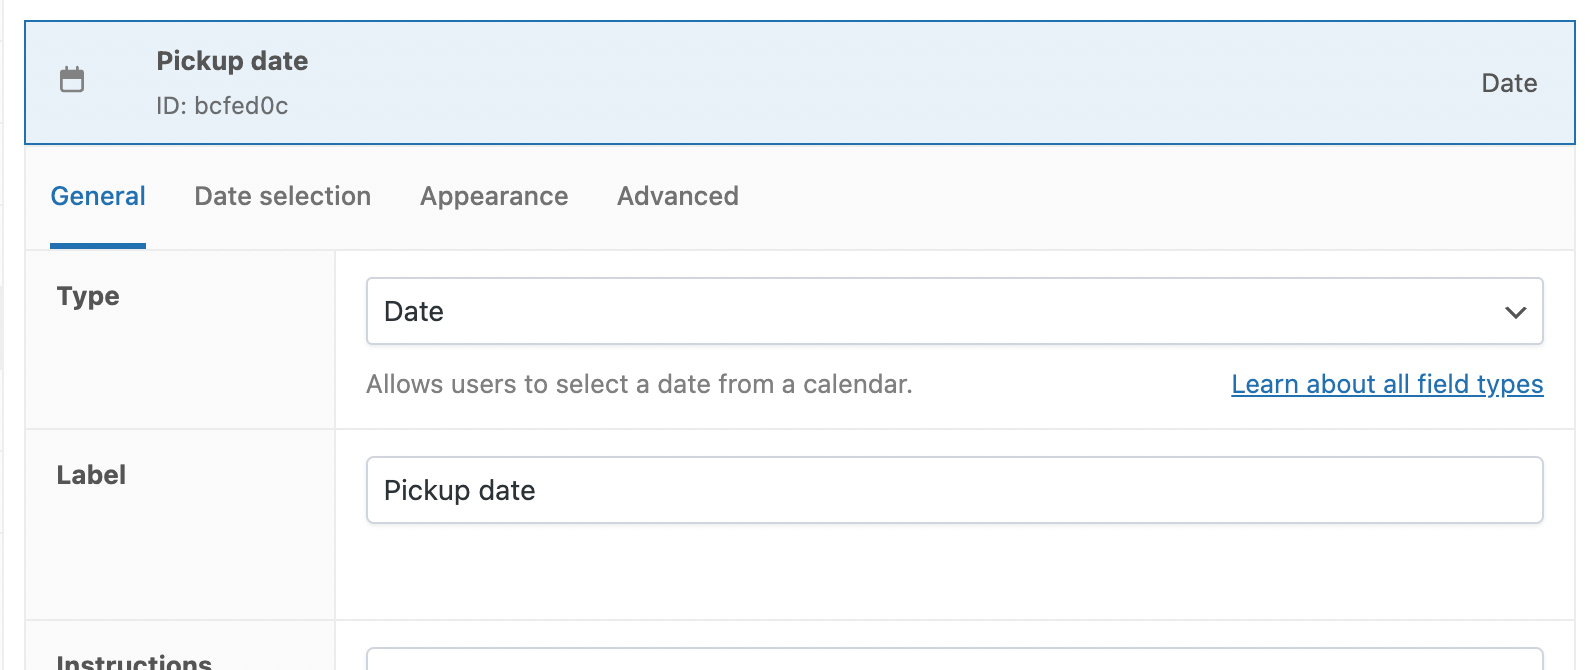
Set the field’s Type setting to Date and add a Label, such as “Pickup date”.
Now save your product. This will add a date picker field to the WooCommerce product page!
Step 4: adjust the calendar settings
You’ll probably want to configure some restrictions to the calendar. For example, users shouldn’t be able to select dates in the past. Advanced Product Fields for WooCommerce, especially its Extended version, has plenty of settings to configure your date calendar field. Click on the Date Selection tab near the top, and let’s go over all the available settings:
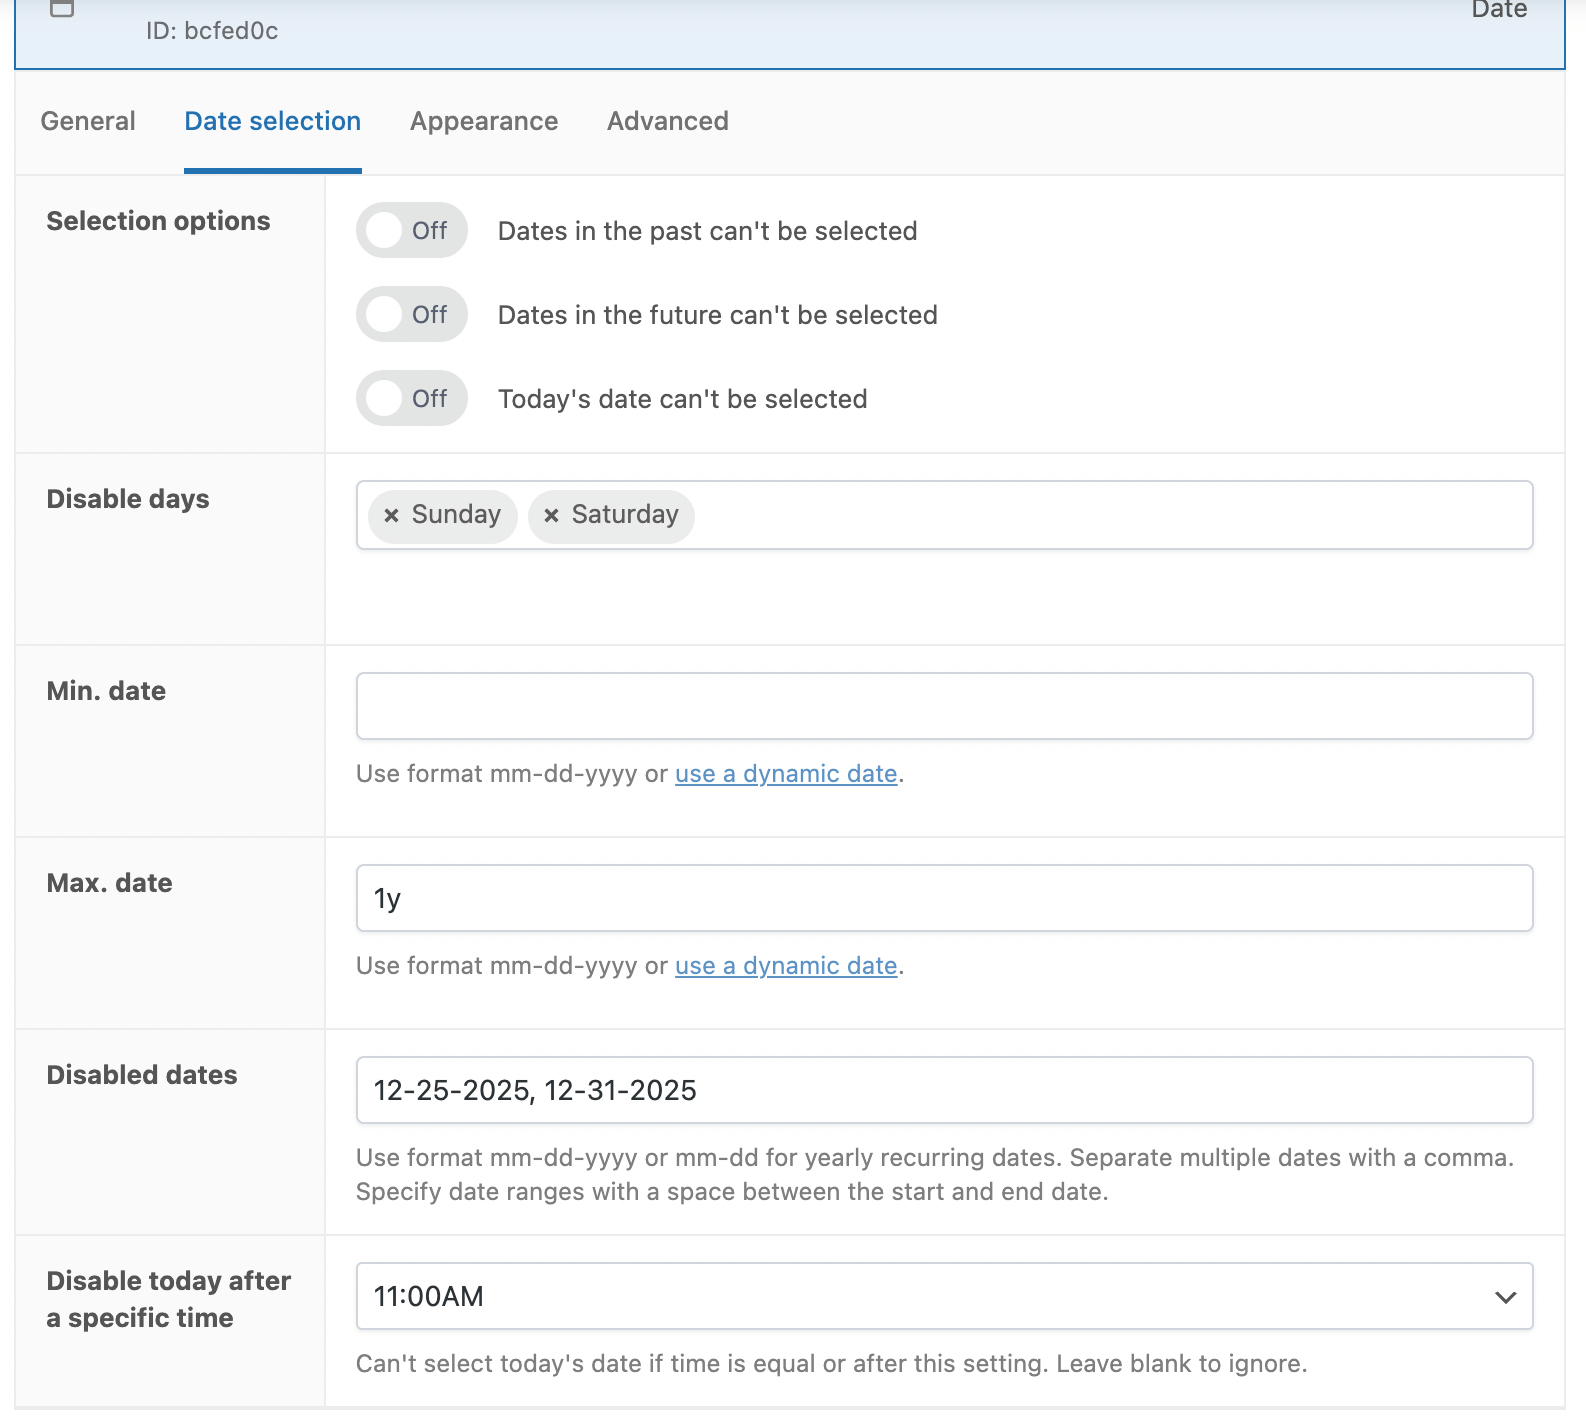
- Selection options: This allows you to define if dates in the past/future should be selectable.
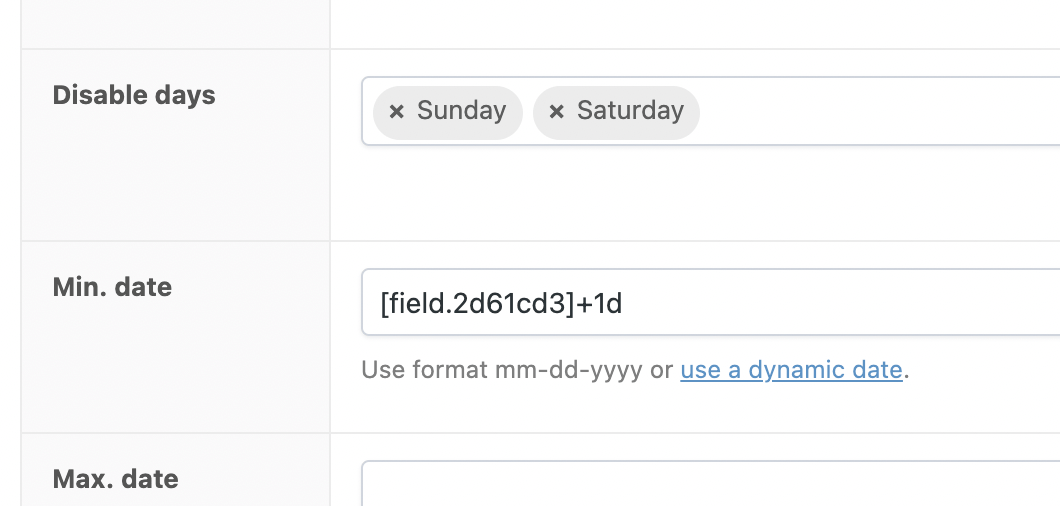
- Disable days (available in the Extended version): Define which weekdays (such as the weekend: Saturday & Sunday) can’t be selected.
- Min. date (available in Extended version): Define the minimum date that can be selected. Any date before that won’t be valid. You can also add dynamic values such as “7d” which means “7 days from today”. For example, if you run a print shop and your delivery time is 2 days, you can make sure your customers can’t select today or tomorrow for delivery.
- Max. date (available in Extended version): Define the maximum allowed date. Any selected date after that won’t be valid. Just like the min. date setting, you can add dynamic values.
- Disabled dates (available in Extended version): Define a comma-separated list of dates that can’t be selected. This setting is handy to define vacation days or holidays.
- Disable today after a specific time (available in Extended version): This setting allows users to select today’s date only if the current time is before the specified time. This setting prevents delivery businesses from delivering on the same day when it’s already too late in the day.
Advanced usage: Change product price based on the number of days between 2 dates
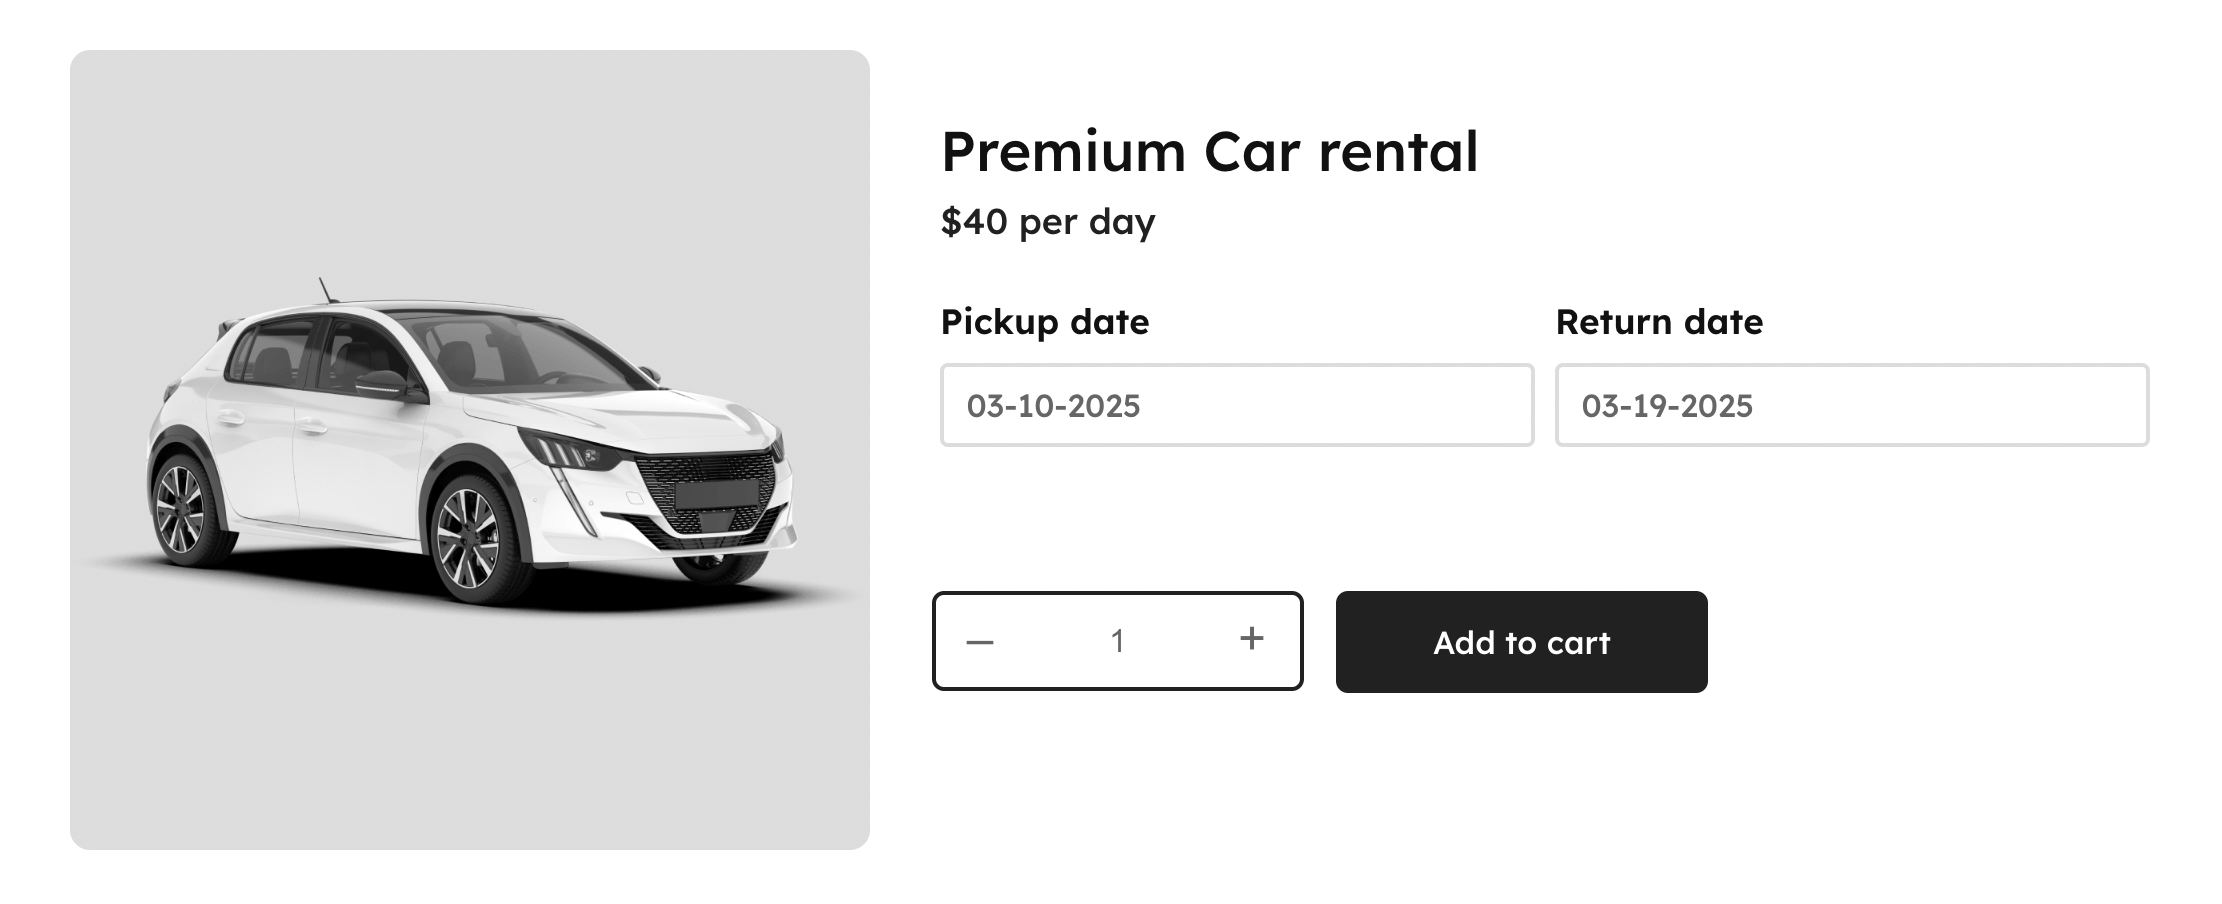
Let’s say you own a car rental service. You’ll want to give your customers the option to define their pickup and return date. The product price is then calculated based on the number of days between those dates.
Please note, this feature is only available in the Extended version of Advanced Product Fields.
Step 1: add a second date field
Follow the same steps from before to add a 2nd date field to your product, with a small change. The return date must be after the pickup date. This means users can’t choose a date before or on the pickup day.
We’ll configure this by setting a dynamic Minimum Date in the settings. We can use the formula [field]+1d to make sure the user can only select a return date after the pickup date.
You can also make sure the dates appear side-by-site by setting the field width in the Appearance tab. When you’ve completed the steps, this is what your product page should look like:
Step 2: prepare your WooCommerce product
Since we’ll use Advanced Product Fields for WooCommerce to calculate the final rental price, we can set the product price in WooCommerce to zero and show a label “$40 per day” instead:

- In the Product data metabox, navigate to the General section and set the Regular Price to zero.
- Switch the Price Display setting to “Replace WooCommerce price with text”.
- Add the price label. In our example, we want to display “$40 per day”.
Step 3: adjust the final product price
Your customers can now select a pickup and return date. The customer should be charged $40 per rental day. To achieve this, we’ll use the formula pricing features of APF.
Follow these steps to change the final product price depending on how many days are selected:
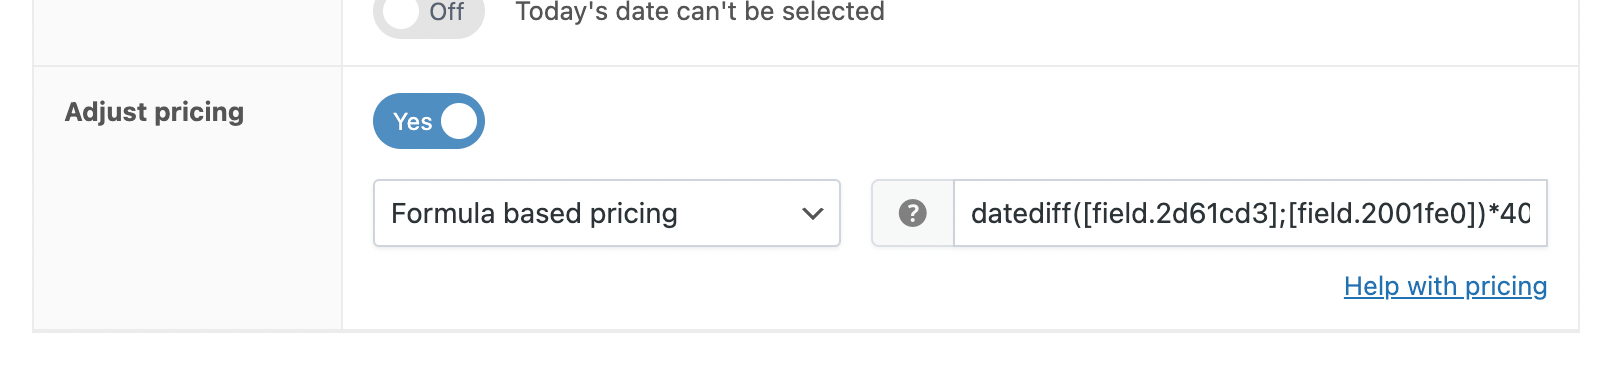
- Edit the return date field and enable Adjust Pricing.
- Set the pricing type to Formula Based Pricing.
- Enter this as a formula:
datediff( [field.2d61cd3]; [field.2001fe0] ) * 40. It looks complex but it’s a fairly straight-forward formula. It counts the days between 2 dates and multiplies with the daily price. You’ll need to make 2 edits to this formula to match the ID’s with your fields.
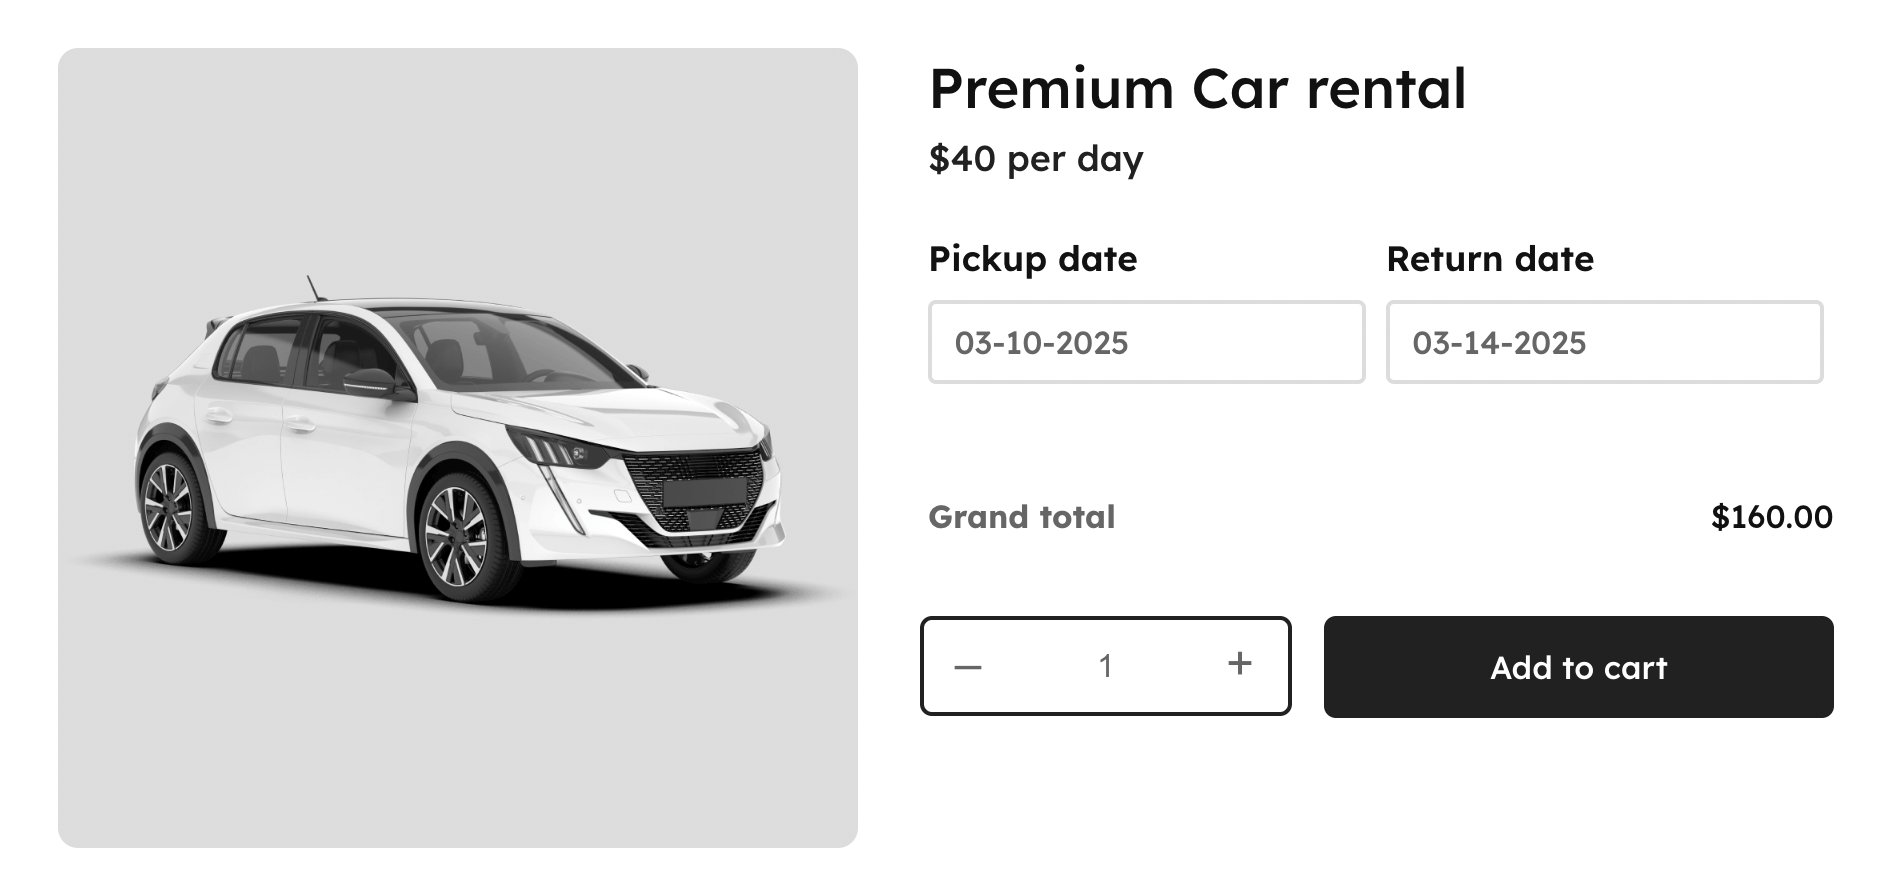
Once you’ve done that, you’ll see the plugin calculates a total product price depending on the selected dates:
Make adding a datepicker to WooCommerce products easy!
By adding a datepicker to your products, you make it easier for your customers to book those products and/or select a delivery and return date.
Are you ready to start adding a date picker to your WooCommerce products? Get started with Advanced Product Fields for WooCommerce now!
The easiest way to add a datepicker to your WooCommerce product
Check out the pluginHere’s a recap of the questions we answered in this post:
WooCommerce: how to add a date picker to product pages?
You can easily add a date picker to your WooCommerce products by installing the Advanced Product Fields for WooCommerce plugin. To add a date picker, follow these steps:
- 1: Install the plugin.
- 2: Enable the date field via WooCommerce → Settings → Product Fields
- 3: Edit your product and add a date field via the ‘Custom fields’ section
Can I use date pickers and adjust the final product price?
Yes! You can use multiple date pickers on your Woo product pages. Depending on the dates selected, you could increase or decrease the final product price. For example, if you offer a rental service, the final product price will depend on how many days the customer books your service.
Does adding a date picker slow down my site performance?
No, aside from a tiny 5kb script, no extra code is added to your site. It should remain as fast and snappy as before installing the plugin.
Do I need a date picker for my Woo products?
If you are selling any type of bookable product or service, such as selling flowers or having a car rental business, you may need to offer customers a way to select the date of delivery. In that case, a date picker is exactly what you need.

Hi,
The code below
max(0;(datediff([field.62135b82e0de9];[field.62150bfd67be2])*[price])-[price])doesn’t seem to work.
I have changed the field ID for both date pickers.
Hi there!
This sounds like a technical support request. Please contact us through our support page instead. Thanks!