
Most WooCommerce stores miss valuable opportunities to capture customer preferences and enable product customization. While standard product pages work for simple items, they fall short when customers need to personalize products, specify custom requirements, or configure complex options.
Custom fields transform this limitation by turning static product listings into interactive experiences. They enable real-time pricing adjustments based on customer selections, visual product configuration through image swatches, and collection of personalization details like engraving text or custom measurements.
The impact extends throughout your store: Product pages become dynamic configurators that guide customers through options, variations intelligently show relevant fields based on previous selections, and your checkout process captures all customization details accurately for order fulfillment.
When implemented correctly, custom fields deliver measurable results including higher conversion rates through better product configuration, increased average order values from upsells and add-ons, and improved operational efficiency by capturing requirements upfront rather than through back-and-forth emails.
WooCommerce’s default setup won’t deliver this: Product attributes are too limited, standard variations can’t handle complex scenarios, and basic checkout forms miss revenue opportunities.
Custom fields bridge this gap. From simple personalization text to sophisticated pricing calculators – we’ll show you exactly how to implement them across your entire store.
What are custom fields in WooCommerce?
Custom fields are additional data collection and display elements that extend WooCommerce’s standard product functionality. They fall into 3 main categories:
- Product information fields: Display supplementary product details like care instructions, warranties, or technical specifications directly on product pages to help customers make informed decisions.
- Customer input fields: Interactive form elements where customers provide information, from simple text inputs for product personalization to complex configuration options that adjust pricing. Essential for businesses offering customizable products or requiring specific customer details.
- Checkout and registration fields: Collect additional customer information during checkout or account registration, such as VAT numbers for B2B stores and delivery preferences.
Types of WooCommerce custom fields
Understanding available field types helps you choose the right solution for your specific needs:
Text-based fields: Single-line text, text area, email, and URL inputs for collecting customer information or instructions.
Selection fields: Dropdown menus, radio buttons, and checkboxes for predefined options like sizes, colors, or add-on services.
Interactive elements: Interactive checkboxes, image swatches, color pickers, and file upload fields that enhance visual product selection and allow customers to submit designs or documents.
Advanced inputs: Date pickers for delivery scheduling, number fields with quantity controls, and calculation fields that dynamically adjust pricing based on customer inputs.
Specialized options: Conditional fields that show/hide based on other selections, user role-specific fields for B2B functionality, and approval-required fields for custom orders.
Here’s how you might use various field types:
| Field type | Use case example |
|---|---|
| Text input | Engraving text, delivery instructions |
| Text area | Special requests, detailed specifications |
| Dropdown | Size selection, delivery preferences |
| Checkbox | Add-on services, terms acceptance |
| Radio buttons | Exclusive options, payment methods |
| Image swatch | Color/pattern selection, material choice |
| File upload | Custom designs, documentation |
| Date picker | Delivery scheduling, event dates |
| Number field | Quantity limits, measurements |
| Calculation | Dynamic pricing, area calculations |
Why add custom fields to your WooCommerce products?
Custom fields transform static product listings into interactive experiences that benefit your business and customers across multiple touchpoints:
Enhanced product presentation: Display unique features, certifications, and detailed specifications that differentiate your products from competitors while improving search engine optimization through rich, structured content. Think features, awards, and specs, and make it easy for both people and Google to understand by using clear, well-organized content with things like headings, bullet points, images, and charts.
Increased average order value: Interactive customization options and add-on selections naturally encourage customers to spend more, while personalization creates an emotional connection to purchases.
Streamlined business operations: Collect essential customer information, delivery requirements, and customization details upfront, reducing post-purchase communication and order processing time.
Improved customer satisfaction: Provide all necessary information for confident purchasing decisions while enabling product personalization that creates memorable shopping experiences.
Better data collection: Gather valuable customer insights through checkout fields and product preferences that inform inventory decisions and marketing strategies.
Two methods to add custom fields to WooCommerce products
You have two primary implementation approaches, each with distinct advantages depending on your technical resources and long-term needs:
- Custom coding approach: Offers complete control and lightweight implementation but requires ongoing PHP development skills and maintenance commitment as WooCommerce evolves.
- Plugin-based solution: Provides user-friendly interfaces, regular updates, and extensive functionality without coding knowledge, though it involves subscription costs and potential feature limitations.
For most store owners, top plugins like Advanced Product Fields offer the optimal balance of functionality and manageable implementation, especially when dealing with complex field types or multiple implementation contexts.
| Approach | Pros | Cons | Best For |
|---|---|---|---|
| Custom Code | Lightweight and full control | Requires technical skill, ongoing maintenance, time-intensive | Developers with specific requirements |
| Plugin (Advanced Product Fields) | User-friendly, no coding required, regular updates, comprehensive features | Not as flexible as code | Most store owners seeking a comprehensive solution |
Most store owners will find that a plugin is the right option, as it’s faster and designed to make your life easier. We’ll cover how you can use APF for various use cases below.
How to add custom fields to WooCommerce with Advanced Product Fields
Adding product page custom fields
Setting up custom fields transforms static product pages into interactive experiences.
First, you’ll need the APF plugin from Studio Wombat. You can choose between the Pro, Extended, or Bundle license to suit your needs.

Here’s the complete process using Advanced Product Fields:
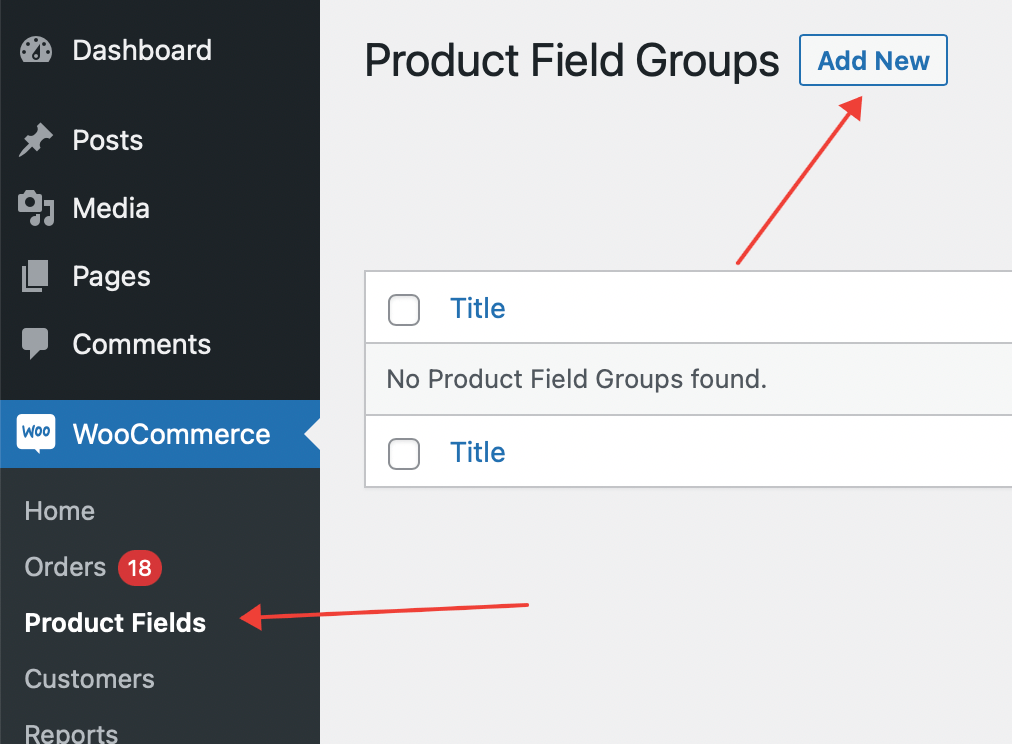
Step 1: Create your field group
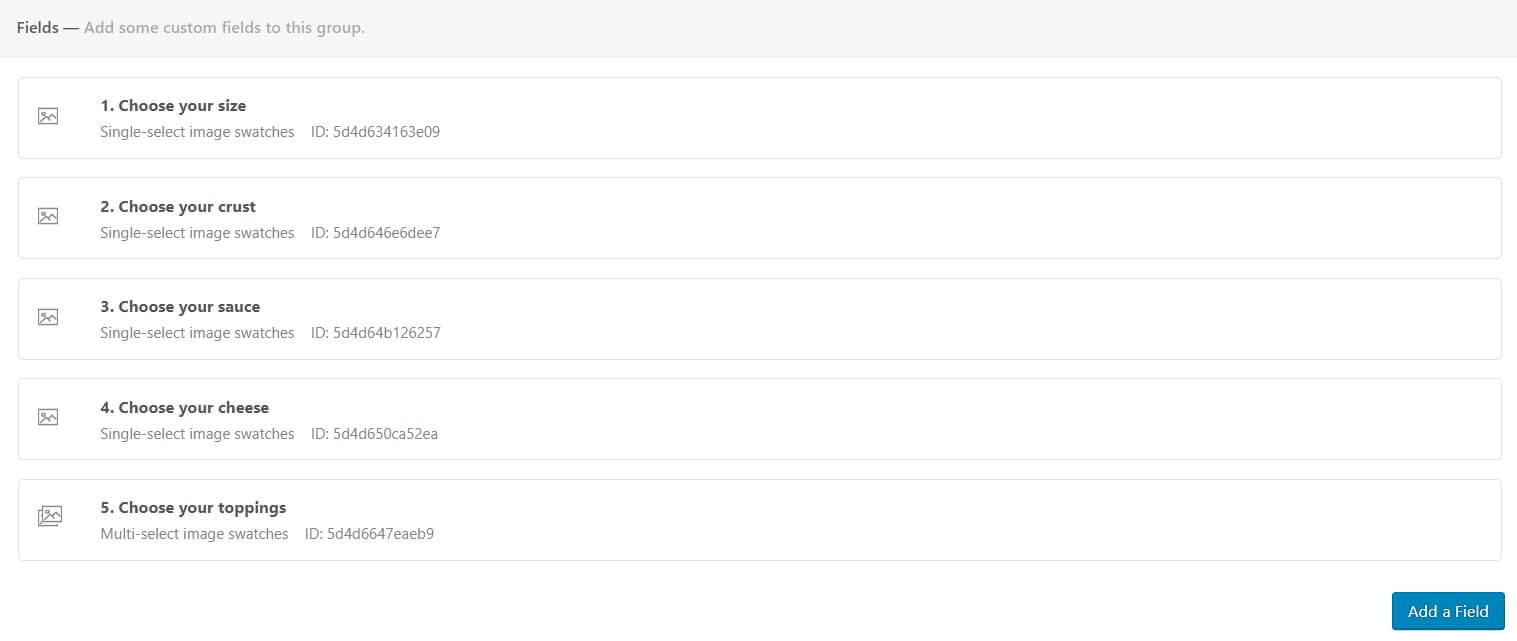
Navigate to WooCommerce → Product Fields → Add New. Give your field group a descriptive title (for internal reference only) like “T-Shirt Customization” or “Furniture Specifications.”
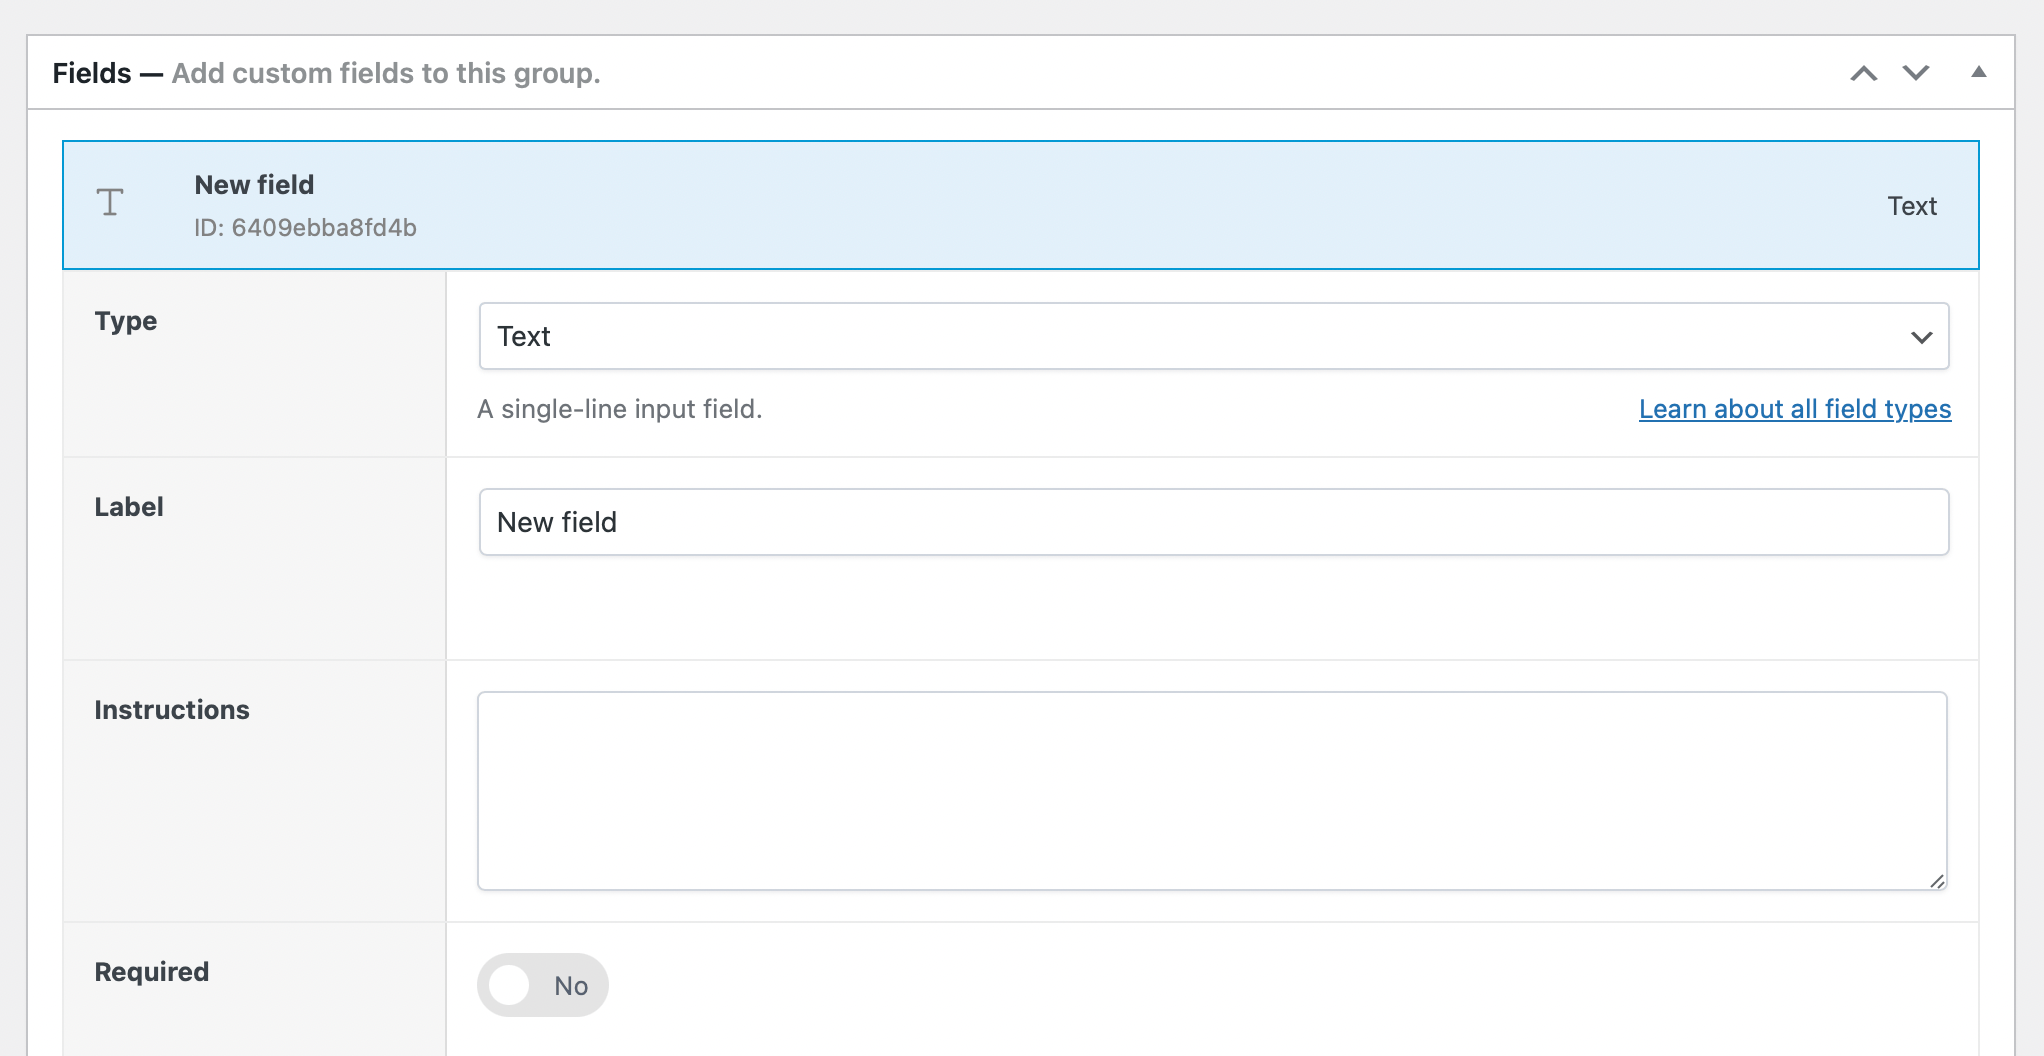
Step 2: Add your first field
Click “Add Your First Field” to create a new input. Choose your field type, from options including:
- Text fields: for names, custom messages, or specifications
- Dropdown lists: for predefined options like sizes or materials
- Image swatches: for colors, patterns, or visual options
- Number fields: for quantities, dimensions, or measurements
- File uploads: for custom designs or documentation
See the complete list of 18 field types for specialized options like calculations, child products, and shortcodes.

Step 3: Configure field settings
Set the customer-facing label (appears on product page, cart, and checkout).
Add instructions if customers need guidance. Mark as “Required” if selection is mandatory before adding to cart.
Step 4: Target specific products
Not every product needs every field. A gift-wrapping option makes sense for jewelry, but not digital downloads. Custom engraving works for metal products, not clothing. Smart field targeting keeps your store clean and prevents customer confusion.
In the Conditions section, click “Add Your First Rule” to show fields only on relevant products. Target by category, product type, or individual products. Leave empty to show on all products.

Step 5: Enable pricing adjustments
In “Adjust Pricing,” set flat fees, percentage increases, or formula-based calculations. Example: charge $5 for gift wrapping, or a 10% surcharge for premium materials.

Working with product variation custom fields
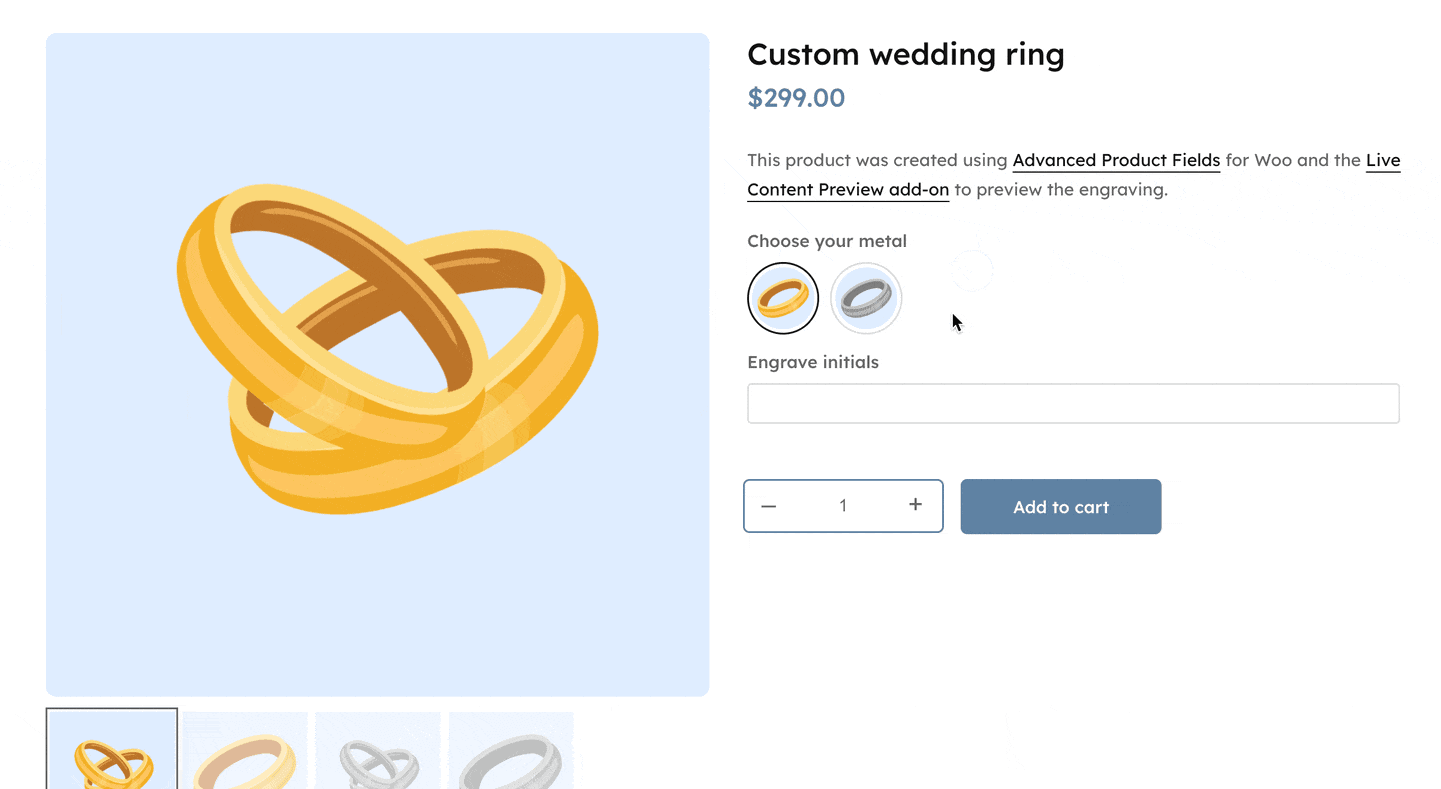
Smart stores show different customization options based on customer selections. When someone clicks on a piece of jewelry, they see various metal types, sizes, along with other standard options like sizing.
Let’s say you want to offer an option for engraving when a customer selects a premium metal (e.g. gold, platinum). Here’s how to set this up.
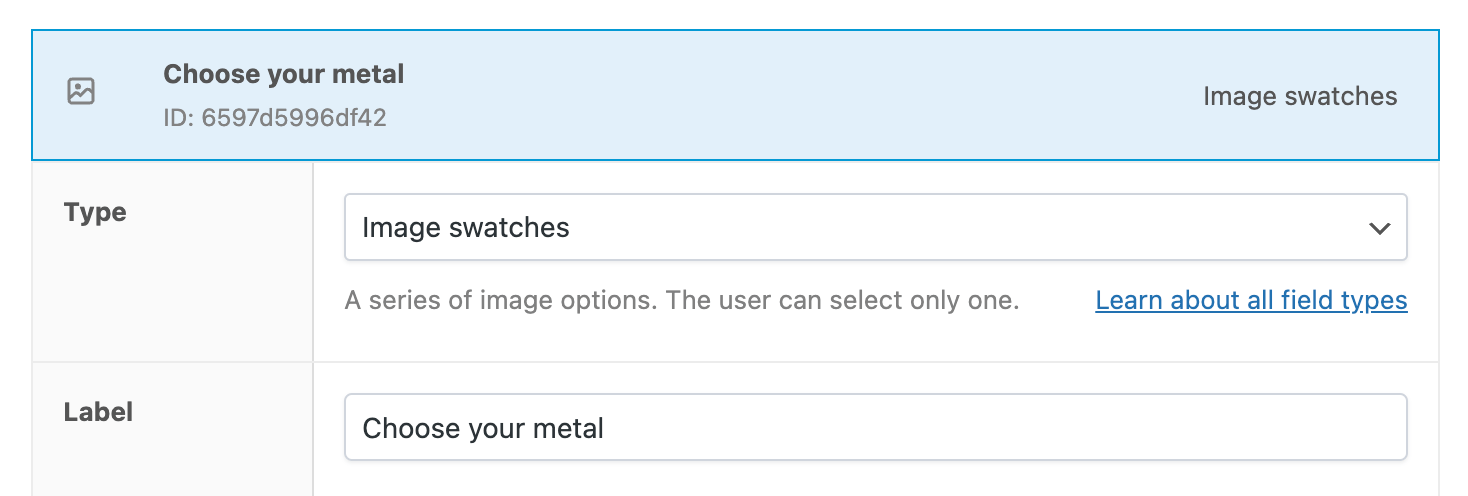
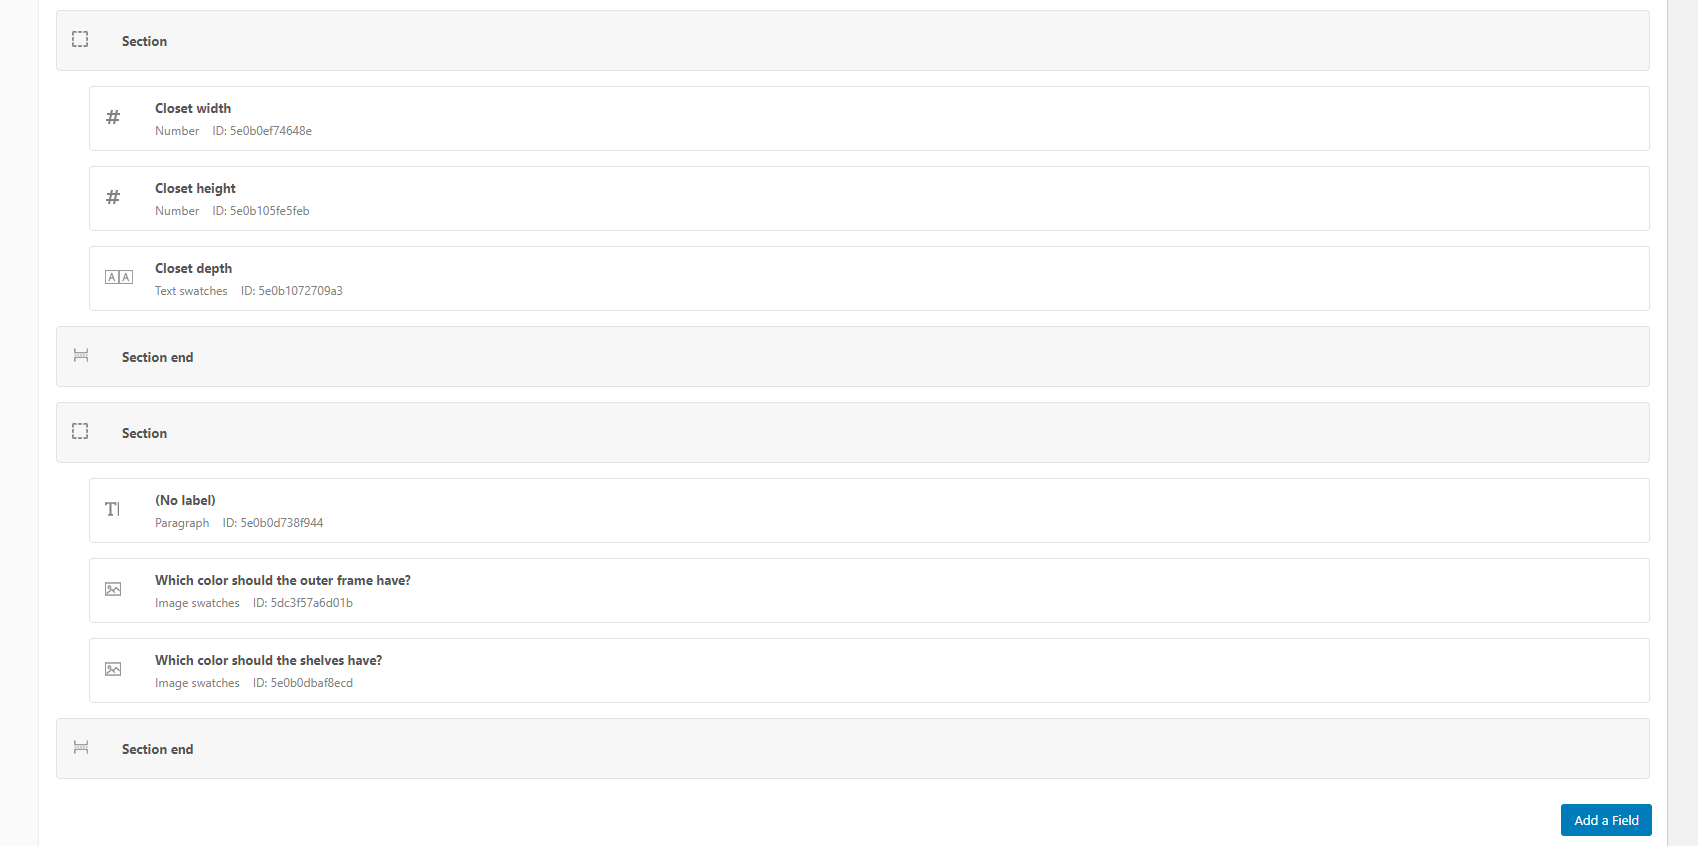
Step 1: Create your base selection field
Navigate to WooCommerce → Product Fields → Add New. Create a field group for your main product.
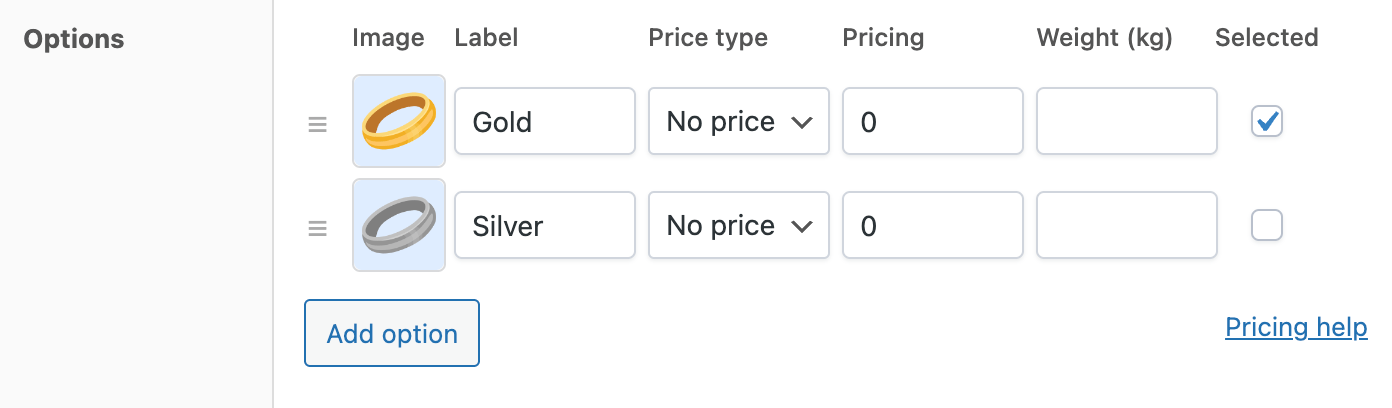
Add an “Image swatches” field labeled “Choose your metal” with options for Gold and Silver. Upload distinct images for each option so customers see exactly what they’re selecting.
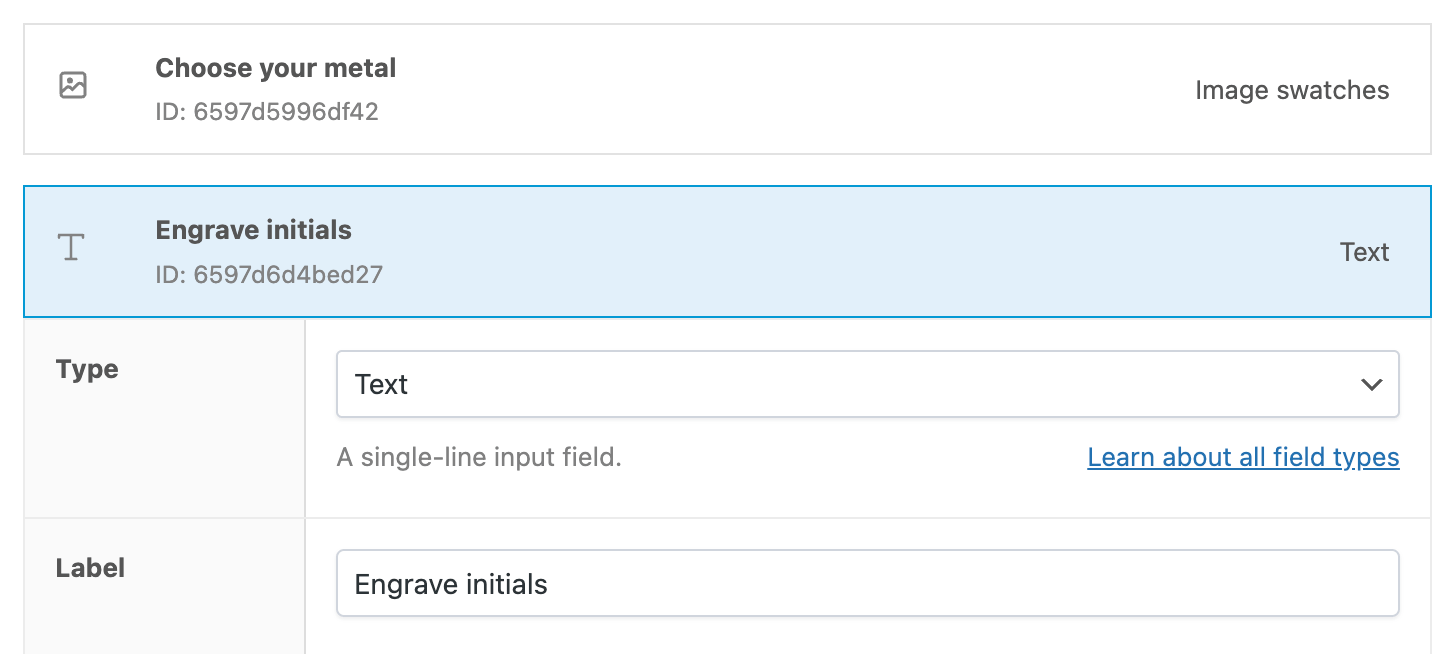
Step 2: Add conditional custom fields
Create additional fields that appear based on the metal selection:
For premium options (Gold), add a “Text” field for custom engraving with these settings:
- Label: “Premium engraving (up to 5 characters)”
- Instructions: “Available in decorative fonts”
- Show this field when: Metal = Gold
For standard options (Silver), add a simpler text field:
- Label: “Simple engraving (up to 5 characters)”
- Instructions: “Standard font only”
- Show this field when: Metal = Silver
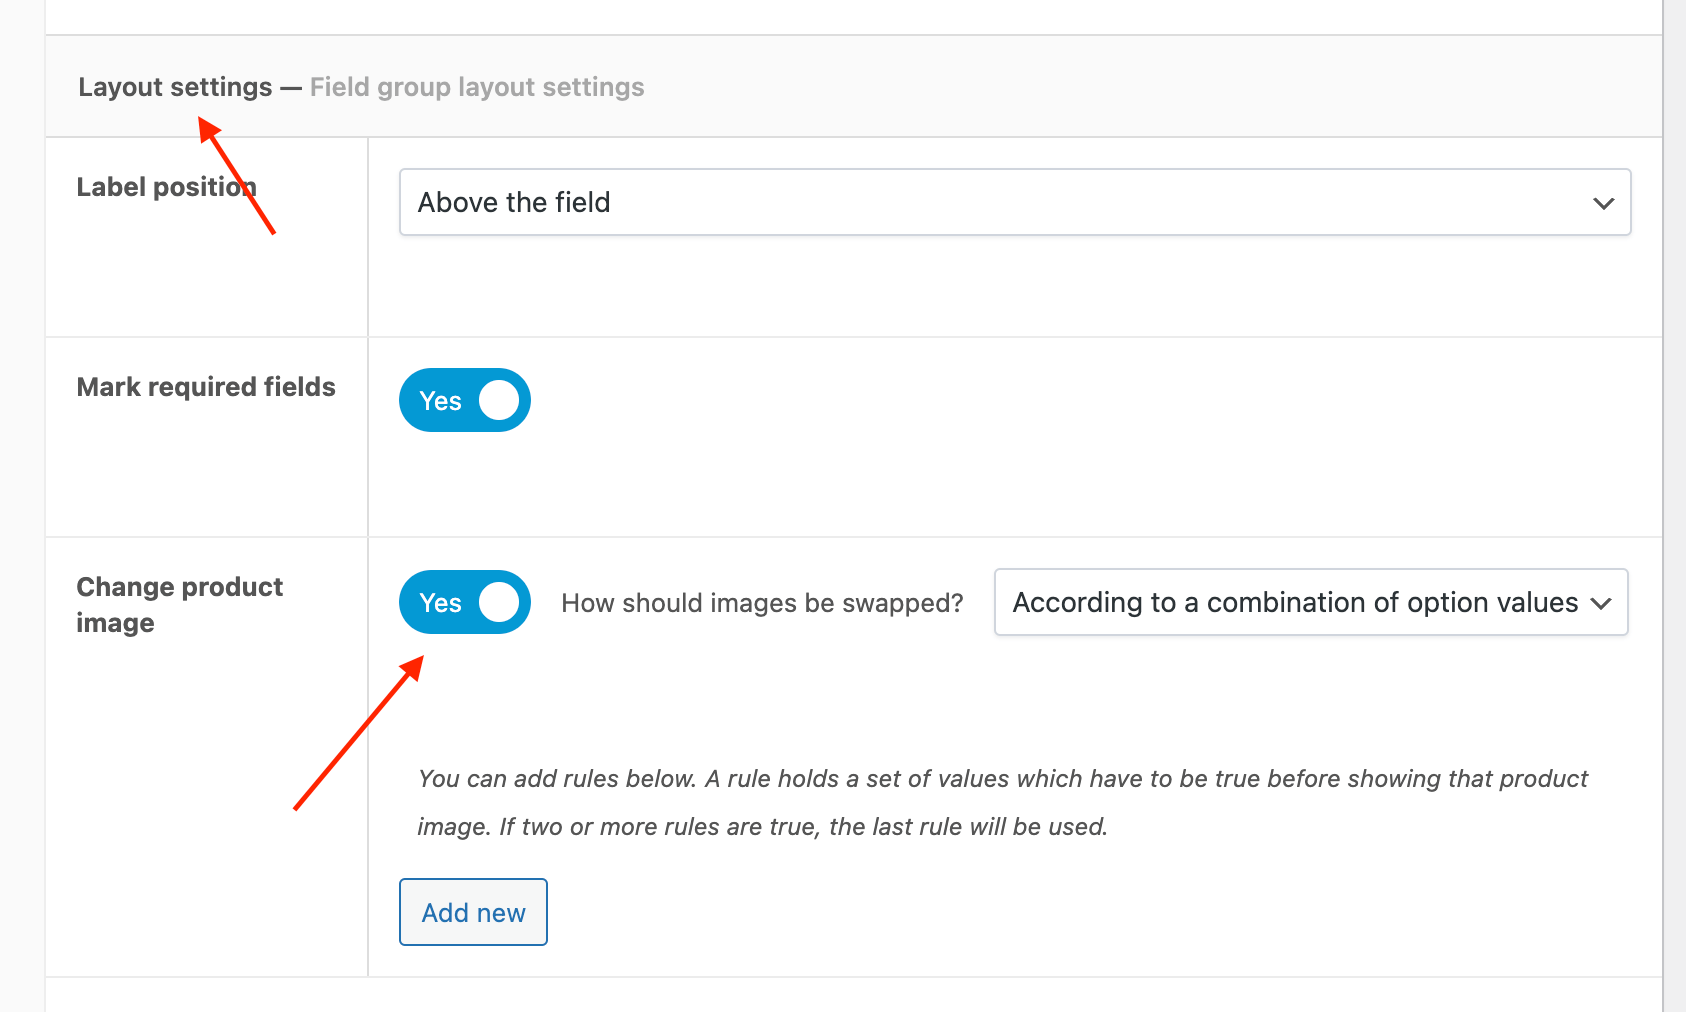
Step 3: Enable image switching
In the Layout section, turn on “Change product image.” Set rules to show gold product images when Gold is selected, and silver images for Silver selection.
Step 4: Configure pricing differences
Set pricing adjustments in each conditional field, e.g.:
- Gold engraving premium font: +$20
- Silver standard font engraving: +$10
Result: Customers see relevant options without confusion, and you capture higher margins from premium selections.
Adding custom fields to cart and checkout pages
Product page custom fields automatically appear in checkout with Advanced Product Fields. No extra setup required. Customer selections for engraving, sizing, or customization flow seamlessly from product page to cart to checkout.
If this isn’t working, you’ll need to troubleshoot your cart and checkout fields with the following process:
Navigate to WooCommerce → Settings → Product Fields. Ensure “Display in cart” and “Display in checkout” are enabled (they are by default).
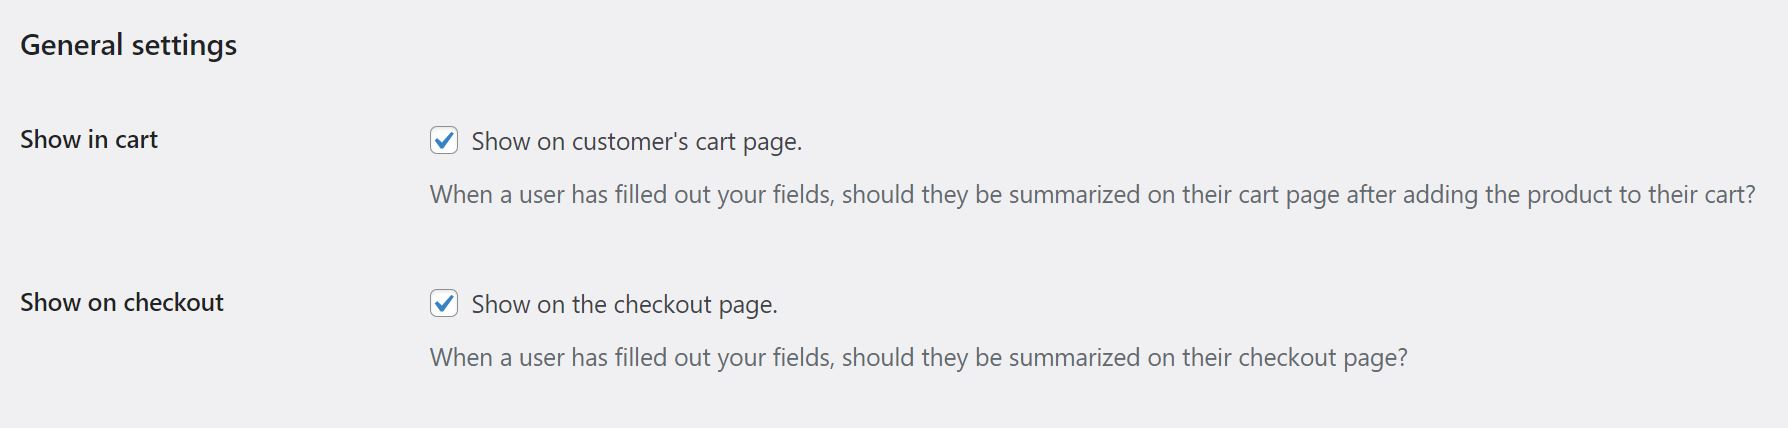
Your product custom fields now appear automatically in checkout alongside customer selections.
What can I expect from Advanced Product Fields: Features and use cases
Advanced custom fields do more than collect data – they create smart business logic that improves operations and customer experience.
Conditional logic systems: Create intelligent field relationships where selections in one field determine visibility or options in subsequent fields. Pizza ordering systems might show topping limits based on size selection, while B2B stores display different pricing fields based on customer classification.
Dynamic pricing calculations: Implement real-time cost adjustments based on customer inputs – square footage calculations for flooring, weight-based shipping for custom orders, or quantity discounts that encourage larger purchases.
Multi-step customization: Break complex product configuration into manageable steps, guiding customers through logical decision sequences while preventing overwhelming choice paralysis.
Integration capabilities: Connect custom field data with external systems like platforms for lead nurturing.
User-role-specific fields and B2B applications
Role-based field visibility creates tailored experiences for different customer segments, which is particularly valuable for stores serving both retail and wholesale markets.
B2B field implementation: Display specialized fields exclusively for business customers, e.g. bulk quantity requirements with tiered pricing breaks, custom product specifications for manufacturing needs, department or cost center codes for internal billing, and preferred packaging options that meet corporate receiving standards. These product-level fields streamline B2B purchasing by capturing essential order details upfront.
Wholesale pricing integration: Combine user role detection with dynamic pricing fields that automatically adjust displayed prices and available options based on customer classification, eliminating manual quote processes.
Compliance requirements: B2B transactions often require additional documentation, such as safety certifications, regulatory compliance confirmations, or industry-specific data collection that automated field systems can standardize.
Customer experience optimization: Business customers expect streamlined reordering capabilities and account-specific customizations that role-based fields enable through saved preferences and simplified repeat purchase processes.
Conclusion: Enhancing your WooCommerce store with custom fields
Custom fields transform ordinary ecommerce stores into dynamic, interactive platforms that capture customer preferences while streamlining business operations. From product page personalization and variation-specific configurations to checkout optimization and B2B functionality, strategic custom field implementation creates competitive advantages through superior customer experience.
Success requires balancing customization complexity with user experience simplicity by providing enough options to meet diverse customer needs without overwhelming decision-making processes. The most effective implementations start with clear business objectives, progress through systematic testing, and evolve based on customer behavior analysis.
Ready to elevate your WooCommerce store? Get started with Advanced Product Fields for WooCommerce from just $59 and enhance your customers’ product selection experience!

Add custom fields to your WooCommerce products in seconds.
Find out more