How to create custom signs, flags, and banners in WooCommerce
Custom-printed banners, signs, and flags are great products to sell. Customers can personalize them to their liking, and you get the higher margins that come with made-to-order work.
WooCommerce gives you the tools to sell these products, but standard variations weren’t built for this kind of flexibility. A single banner with a few materials, multiple size ranges, and finishing options quickly turns into hundreds of variations. That slows down your product page a lot and makes inventory (and also the backend config) harder to manage.
Turning to plugins fixes this!
Advanced Product Fields for WooCommerce fixes this with a simpler approach. Instead of creating endless variations, you turn the product into a configurable product and add form fields to the product page. Customers select their banner material (vinyl or fabric), exact banner size, choose finishes (grommets and hemming), upload their artwork, and see the price update instantly — all on one page. The cherry on top is upselling accessory products!
There’s no bloat or no complex variations to maintain. Just a straightforward form that keeps your site speedy and your customers moving toward checkout.
What we’ll build: a custom banner with WooCommerce
We’re going to build a single WooCommerce product for custom print banners that handles every choice your customer needs to make. They’ll select the banner material, banner size, choosing grommets or hemming, and upload custom artwork. The final banner price depends on each selection made by the customer. We’ll also add 2 upsells: a design service and upsell accessories like nylon rope or zip ties.
Creating custom signs, banners, and flags in WooCommerce
Before we begin, make sure your store has WooCommerce (version 9 or higher) installed and ready to go. New to WooCommerce? Here’s a quick 5-step guide to help you get started. We won’t cover that part in this tutorial.
Alright, let’s dive in!
Step 1: Install Advanced Product Fields (APF) for WooCommerce
Purchase Advanced Product Fields for WooCommerce from our site and download the plugin ZIP file. In your WordPress admin, go to Plugins → Add New → Upload Plugin, select the ZIP file, and click Install Now. After installation, click Activate Plugin and enter your license key under WooCommerce → Product Fields to enable automatic updates.
Advanced Product Fields for WooCommerce
Sell custom banners, flags, or signs easily with WooCommerce + APF!
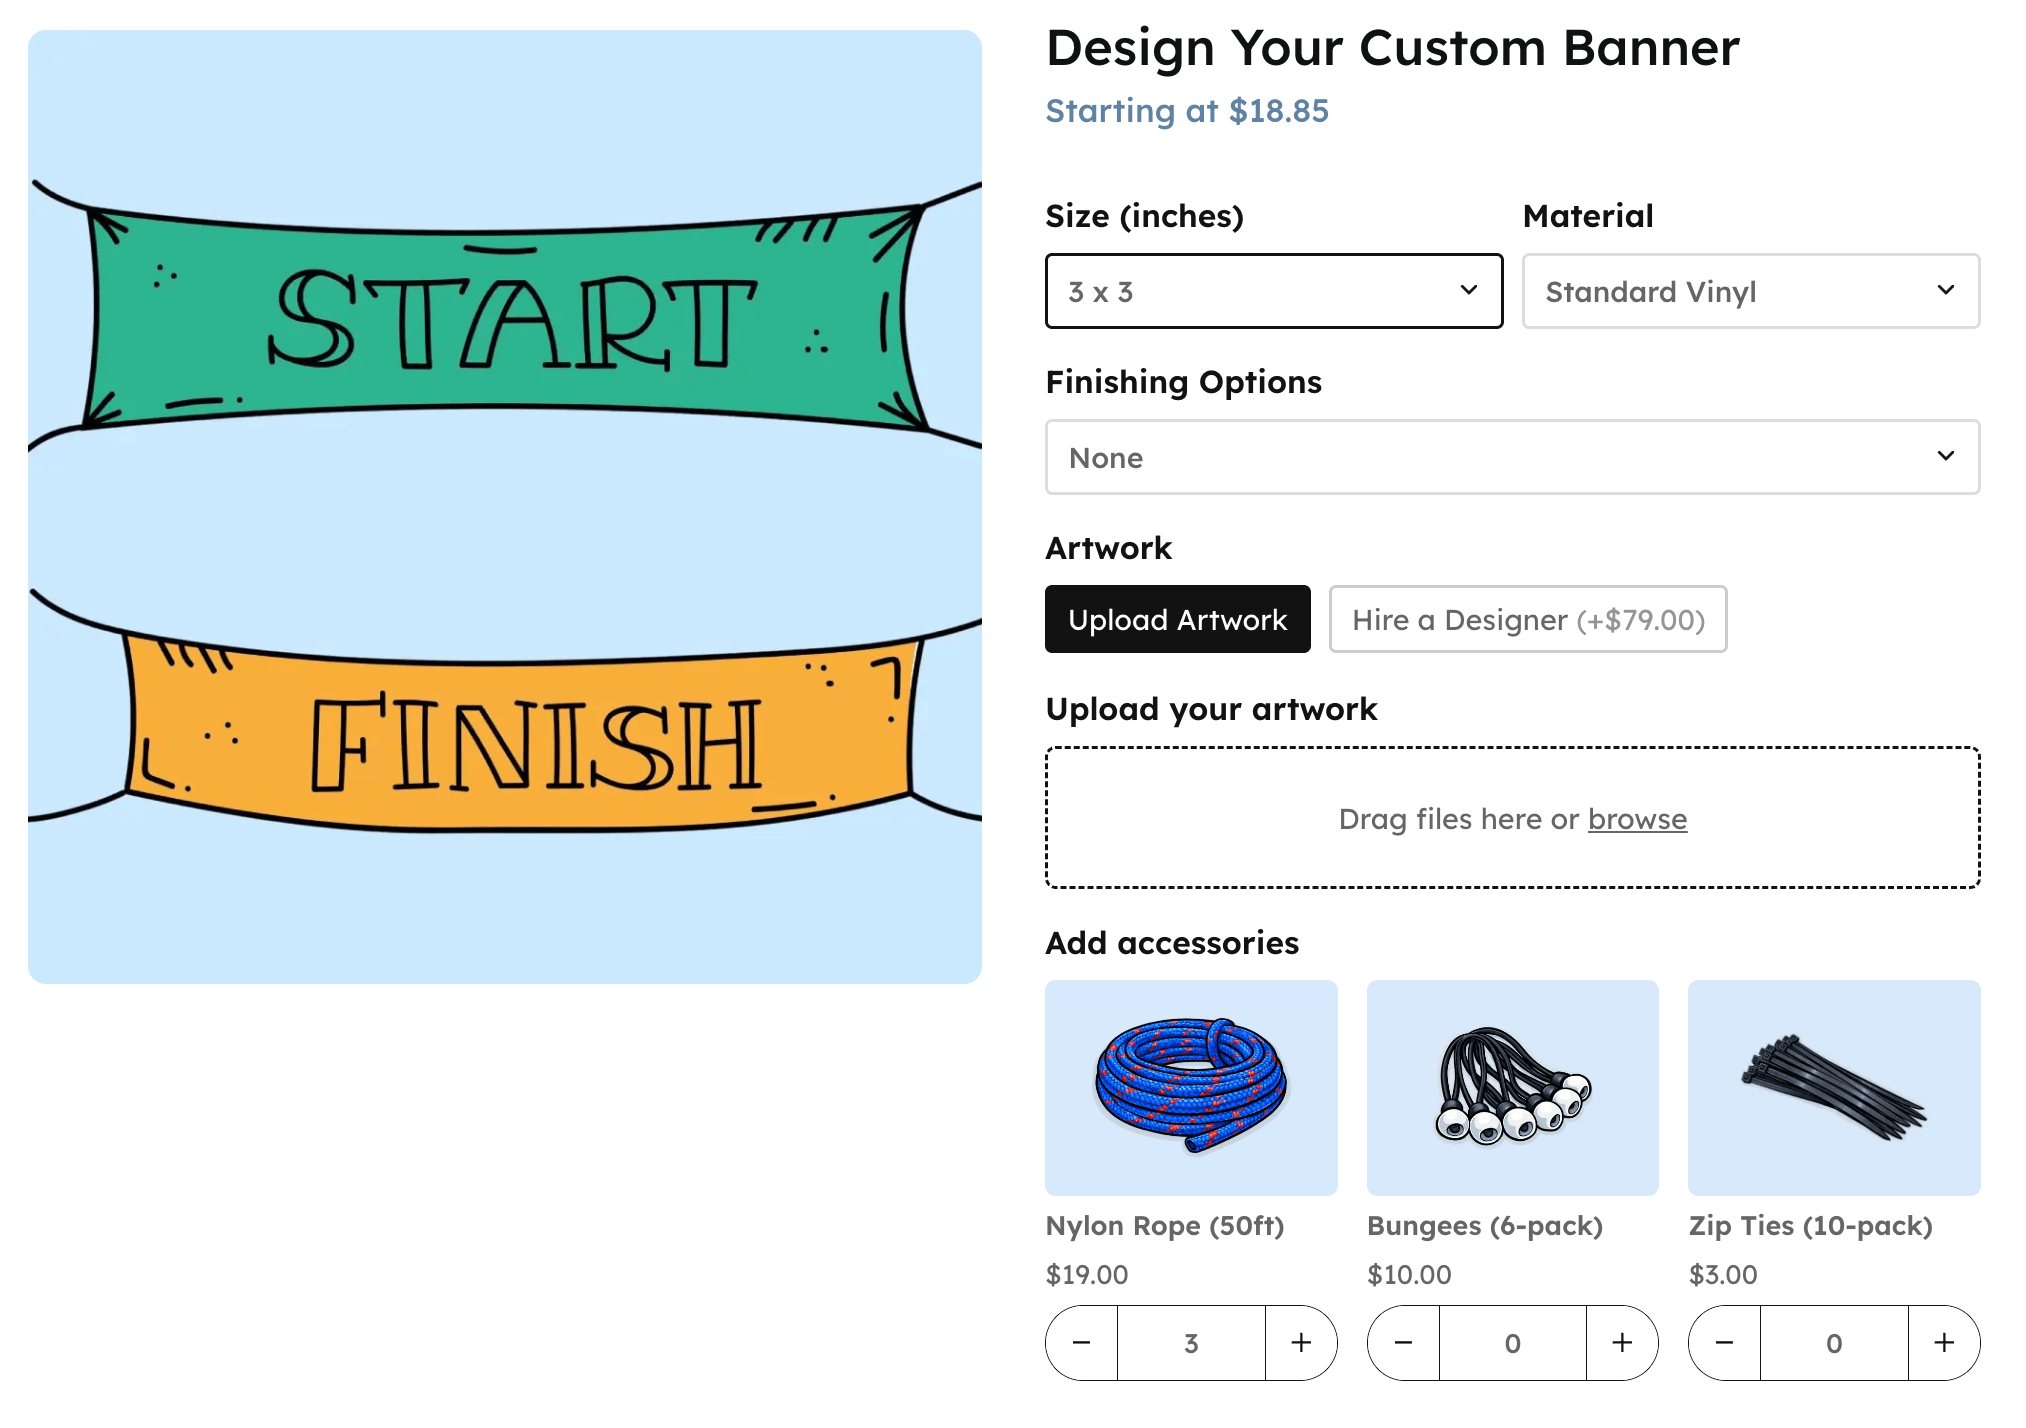
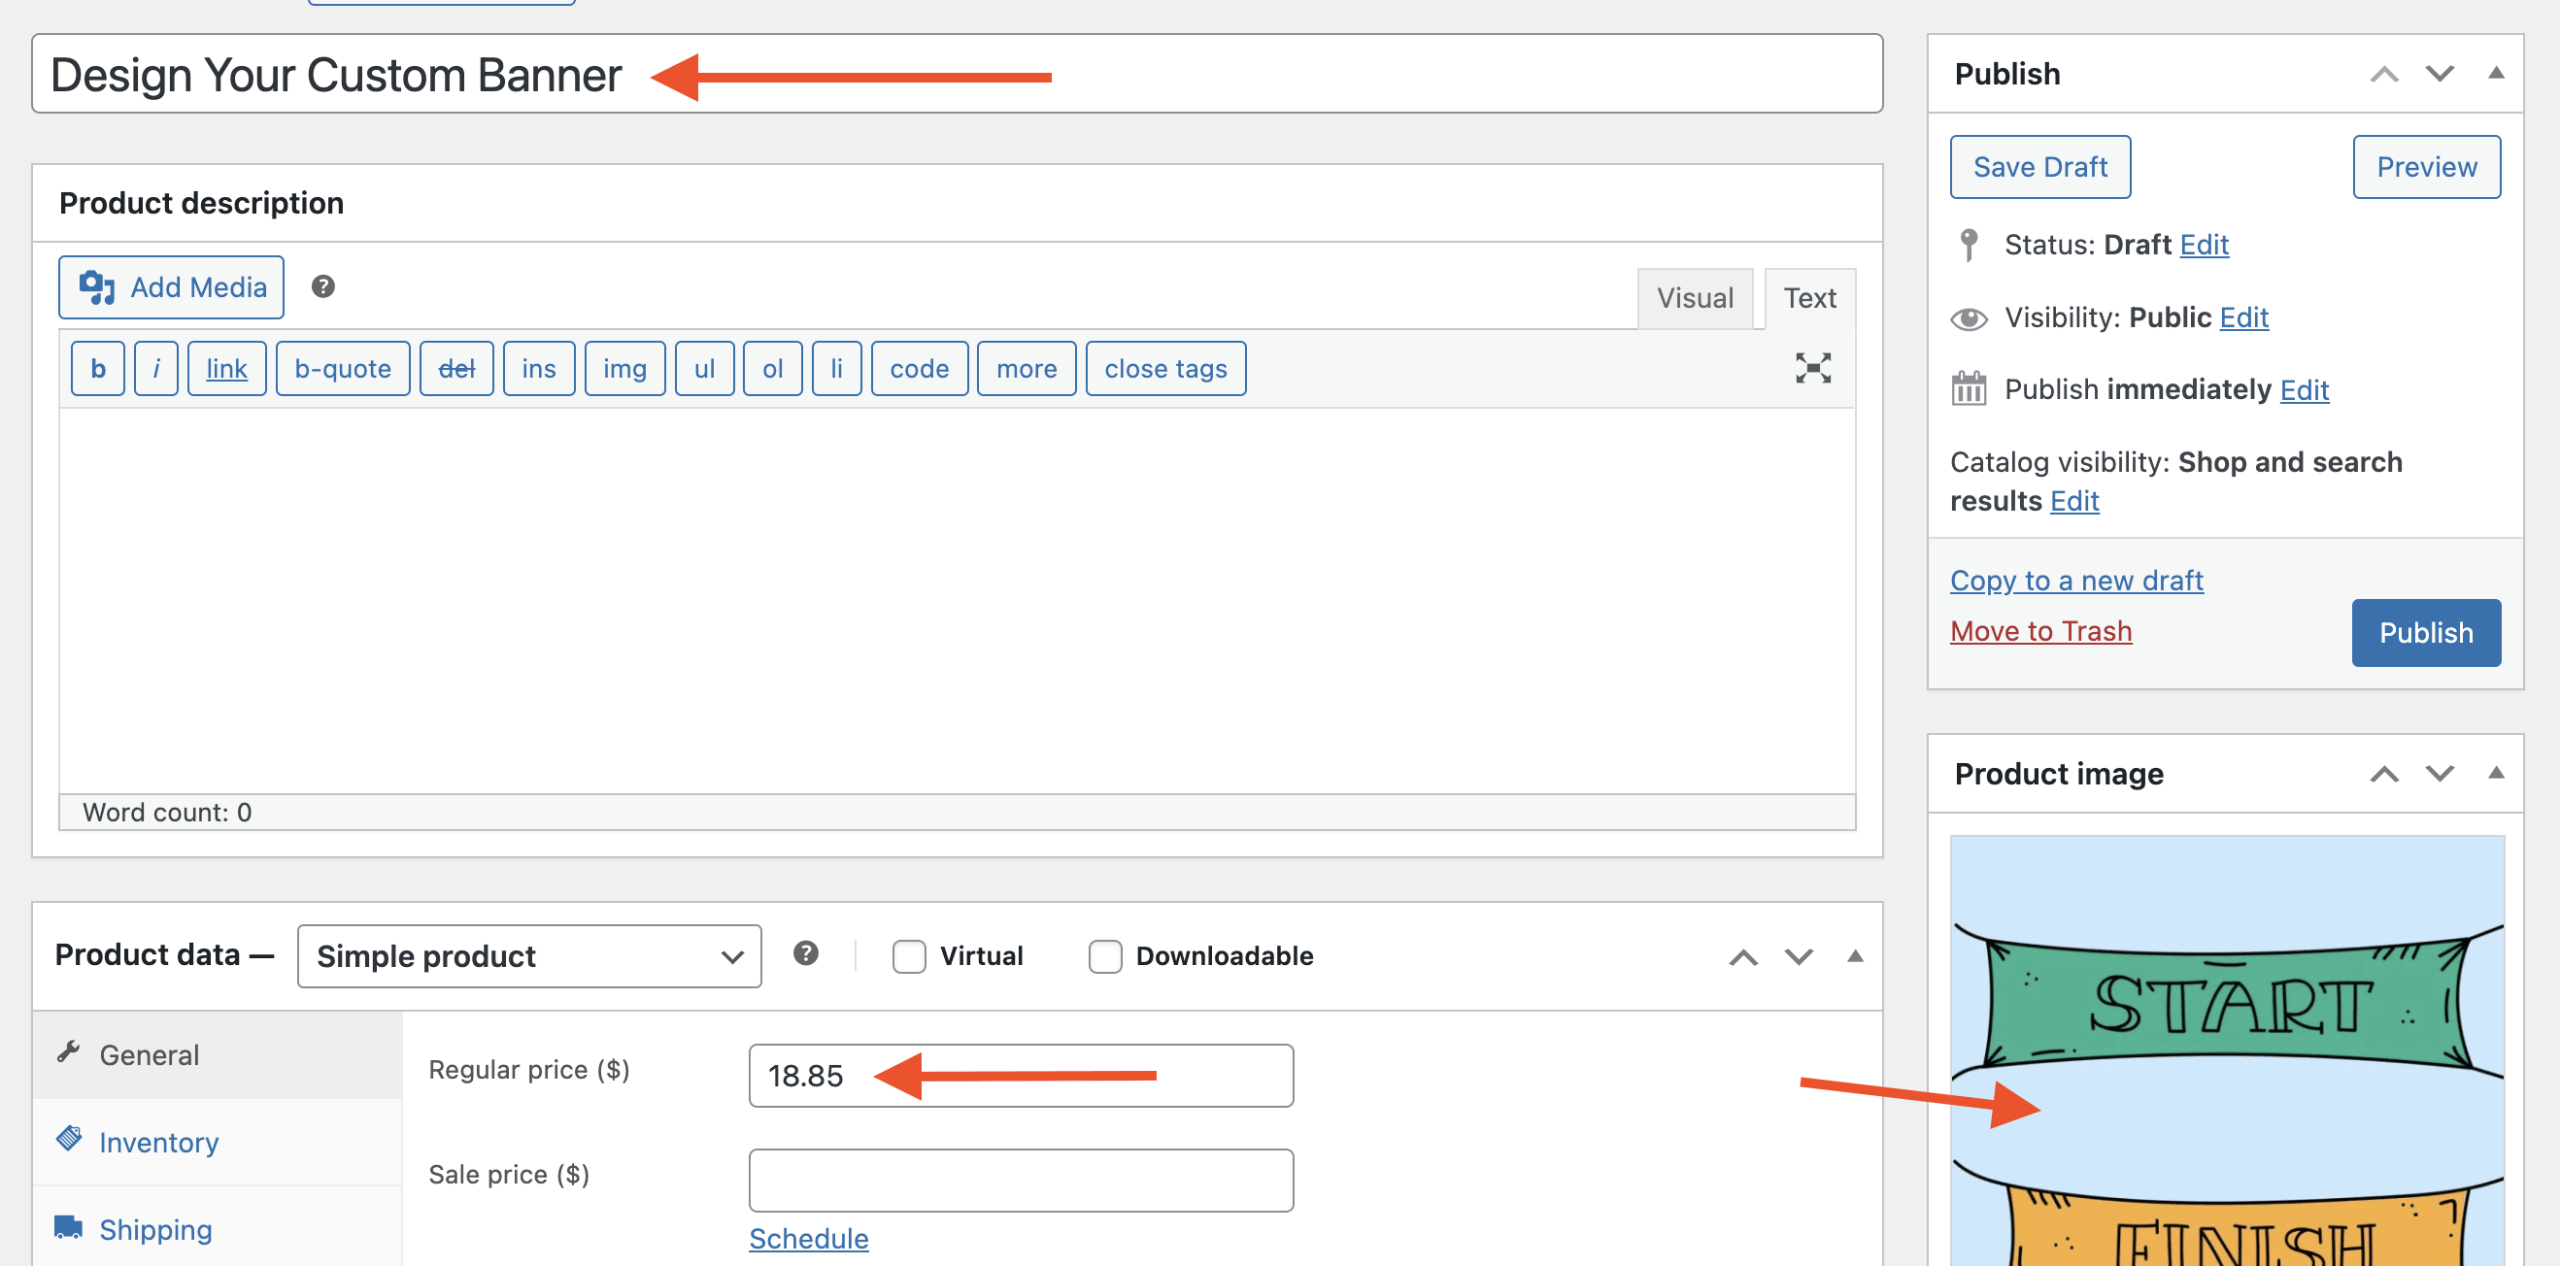
Once you’ve got APF installed, you’ll need to create your custom banner product in WooCommerce. Go to Products → Add New and add a title, image, and price. The price should reflect the lowest-cost version of your product (so the smallest size and cheapest material).
Step 3: Add the size, material, and finishing options to your product
The first step is choosing the banner size. If you can freely cut the banners to any dimension, you could use two input fields where customers can freely enter any numeric value.
However, we’ll go with a simpler approach by offering a dropdown list with predefined size options. This keeps the selection process quick and easy to use!
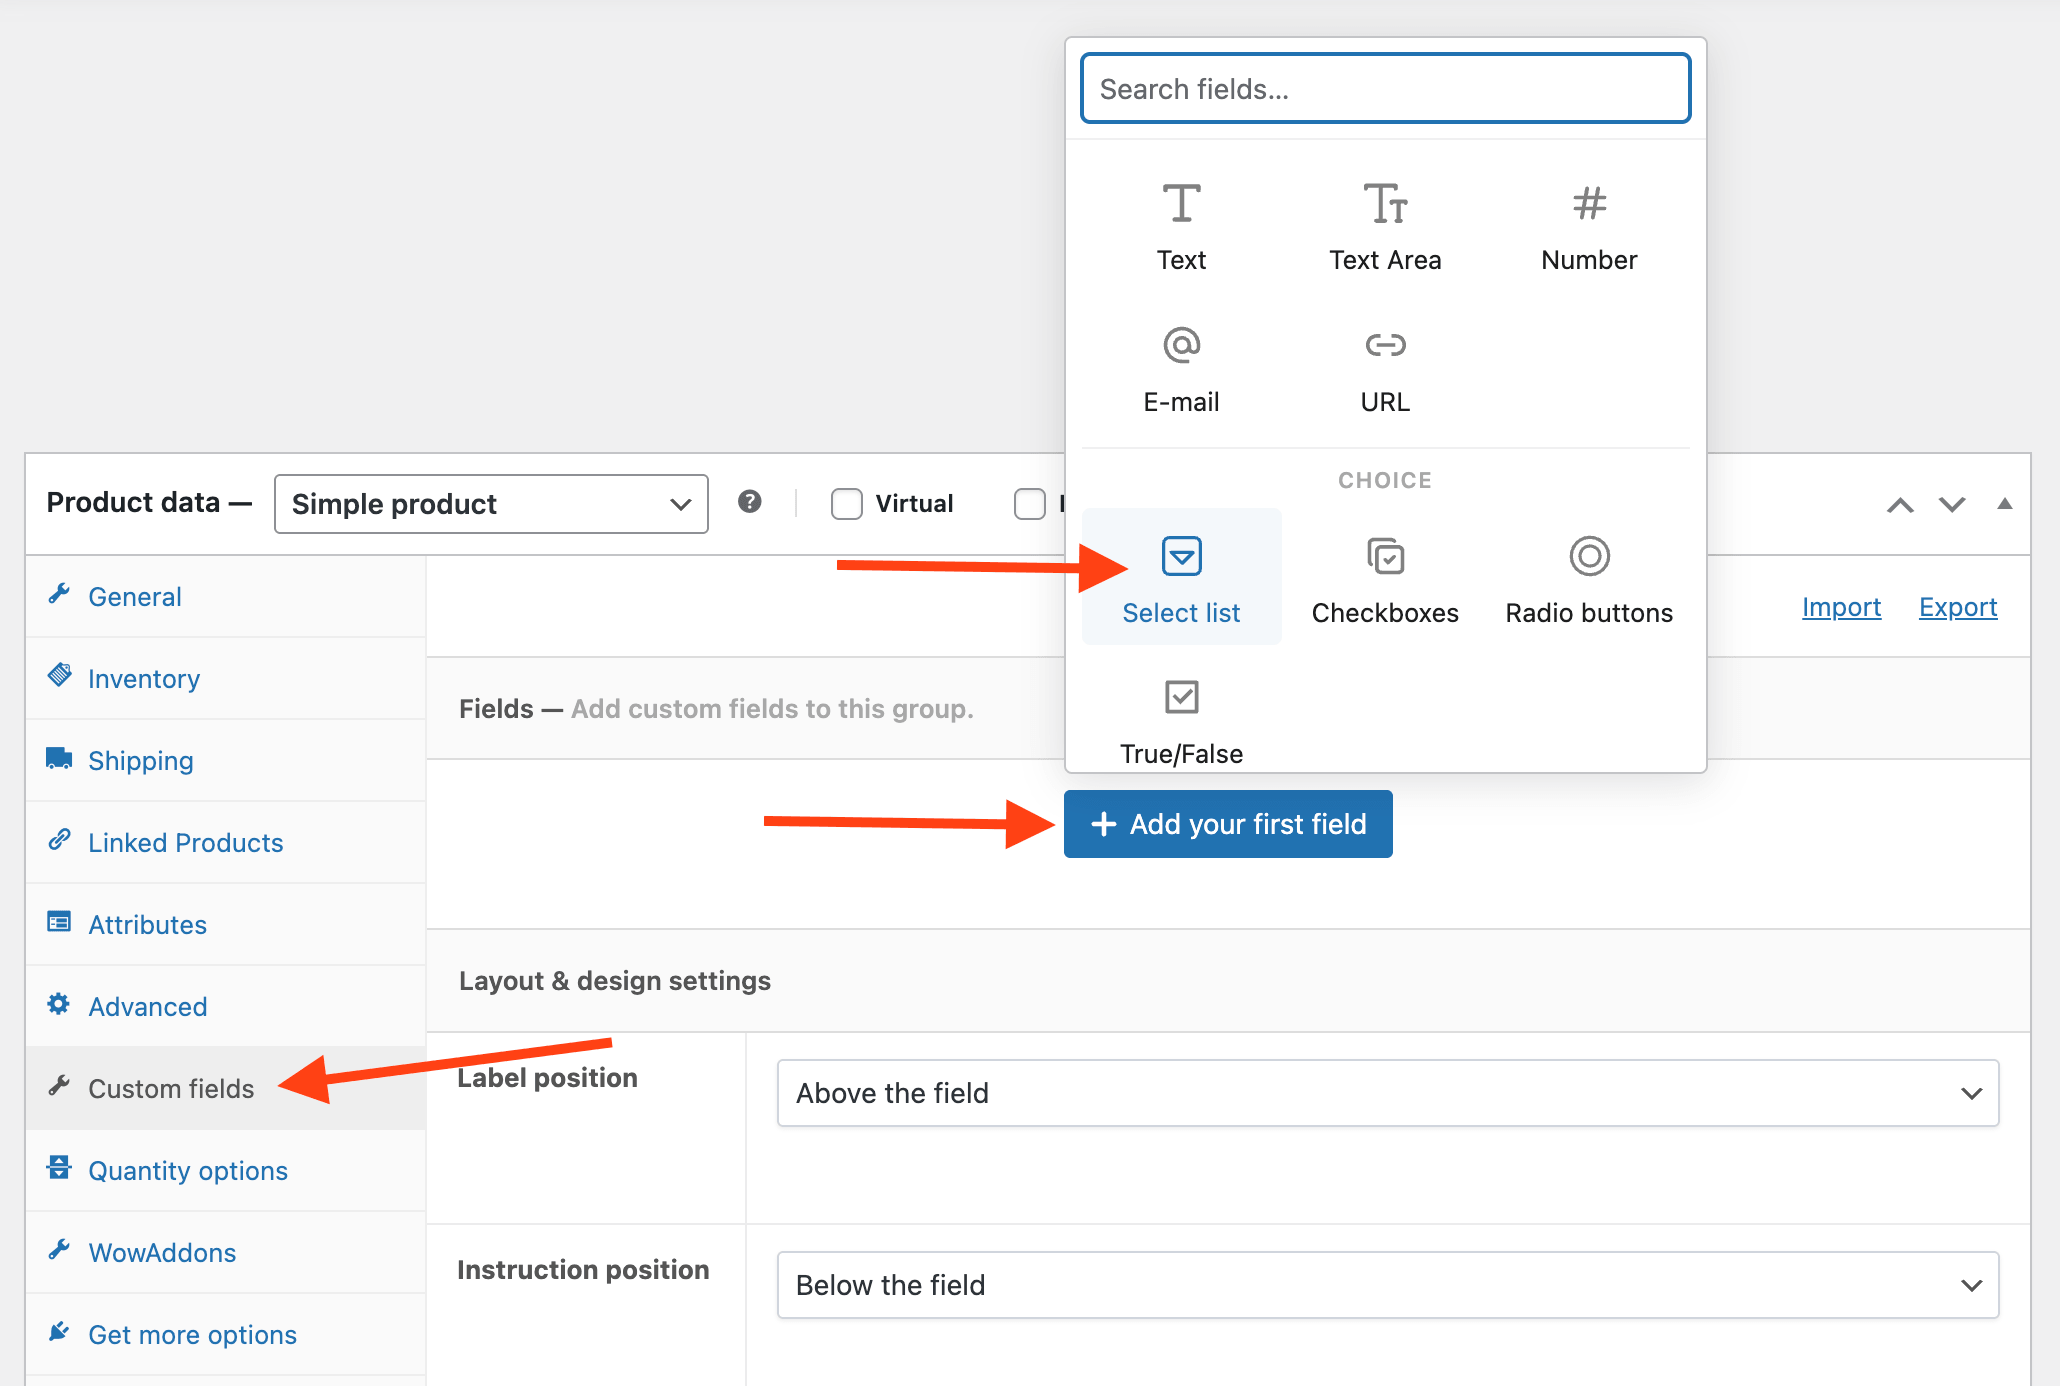
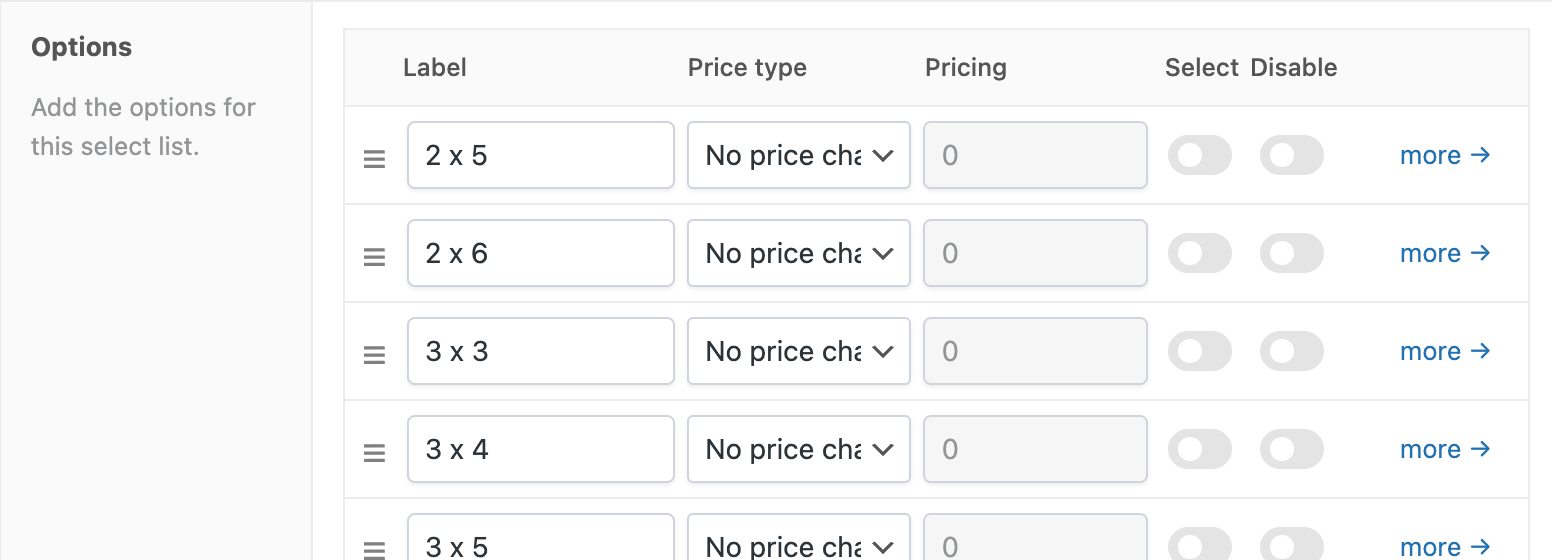
Edit your product, scroll down to the Custom Fields section, click Add Your First Field and select the “Select list” field type.
The field settings appear, allowing you to configure the following options:
The Label is the title displaying above the select list. We named it ‘Size’.
Toggle the Required setting, meaning the user has to select a value before adding the product to their cart.
Scroll to the Options section and define all items for the select list (i.e. the sizes customers can choose).
That’s it! You’ve added your first form field to your custom banner. Repeat this step to add your material and finishing options.
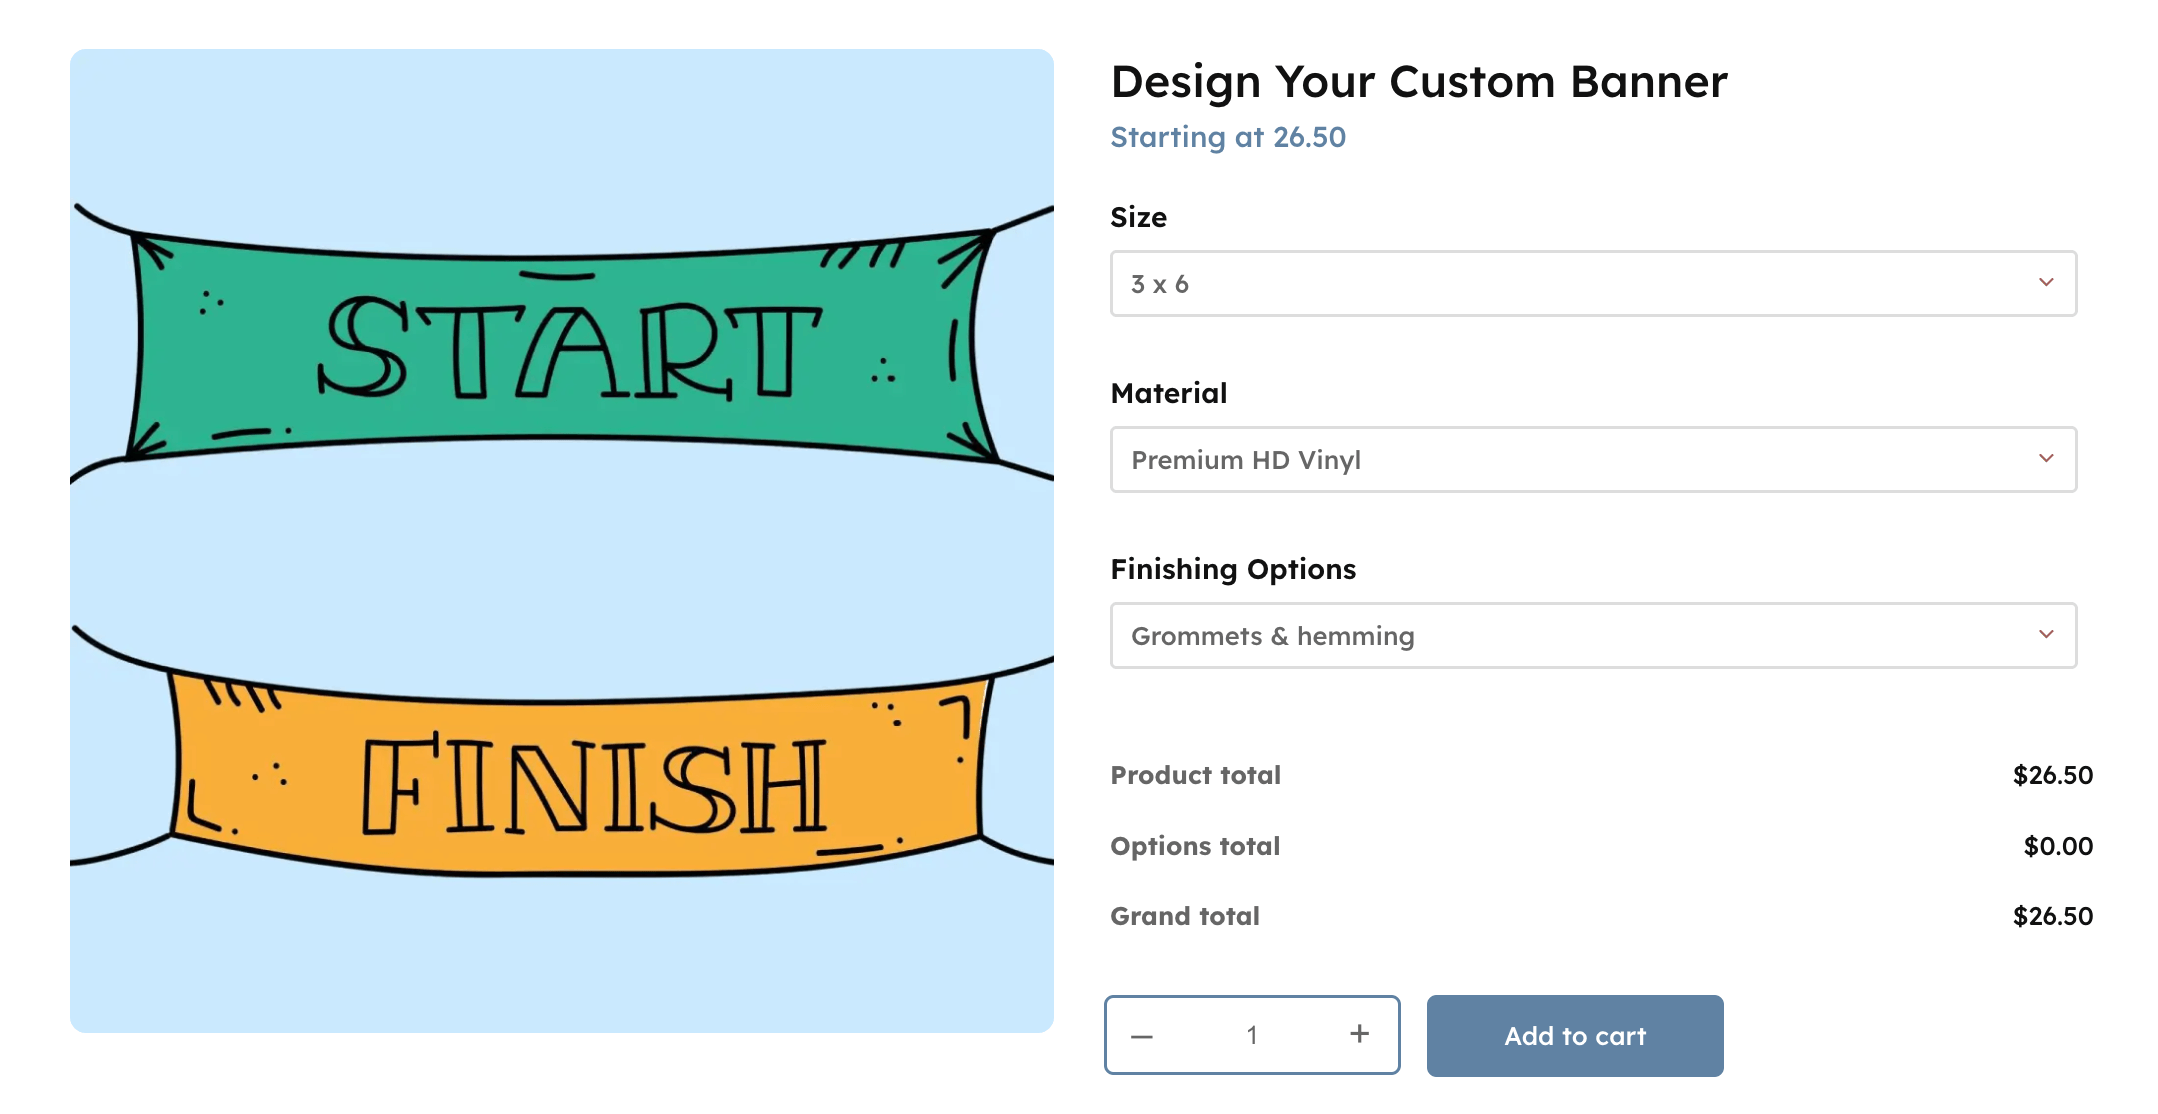
When you’re done, save your work and visit the product page to see your progress:
We’re not done yet!
Step 4: artwork and file upload with conditional logic
For the artwork, you can create an upsell opportunity by giving customers two options: upload their own file or hire a designer for assistance at an extra cost. To implement this, follow these steps:
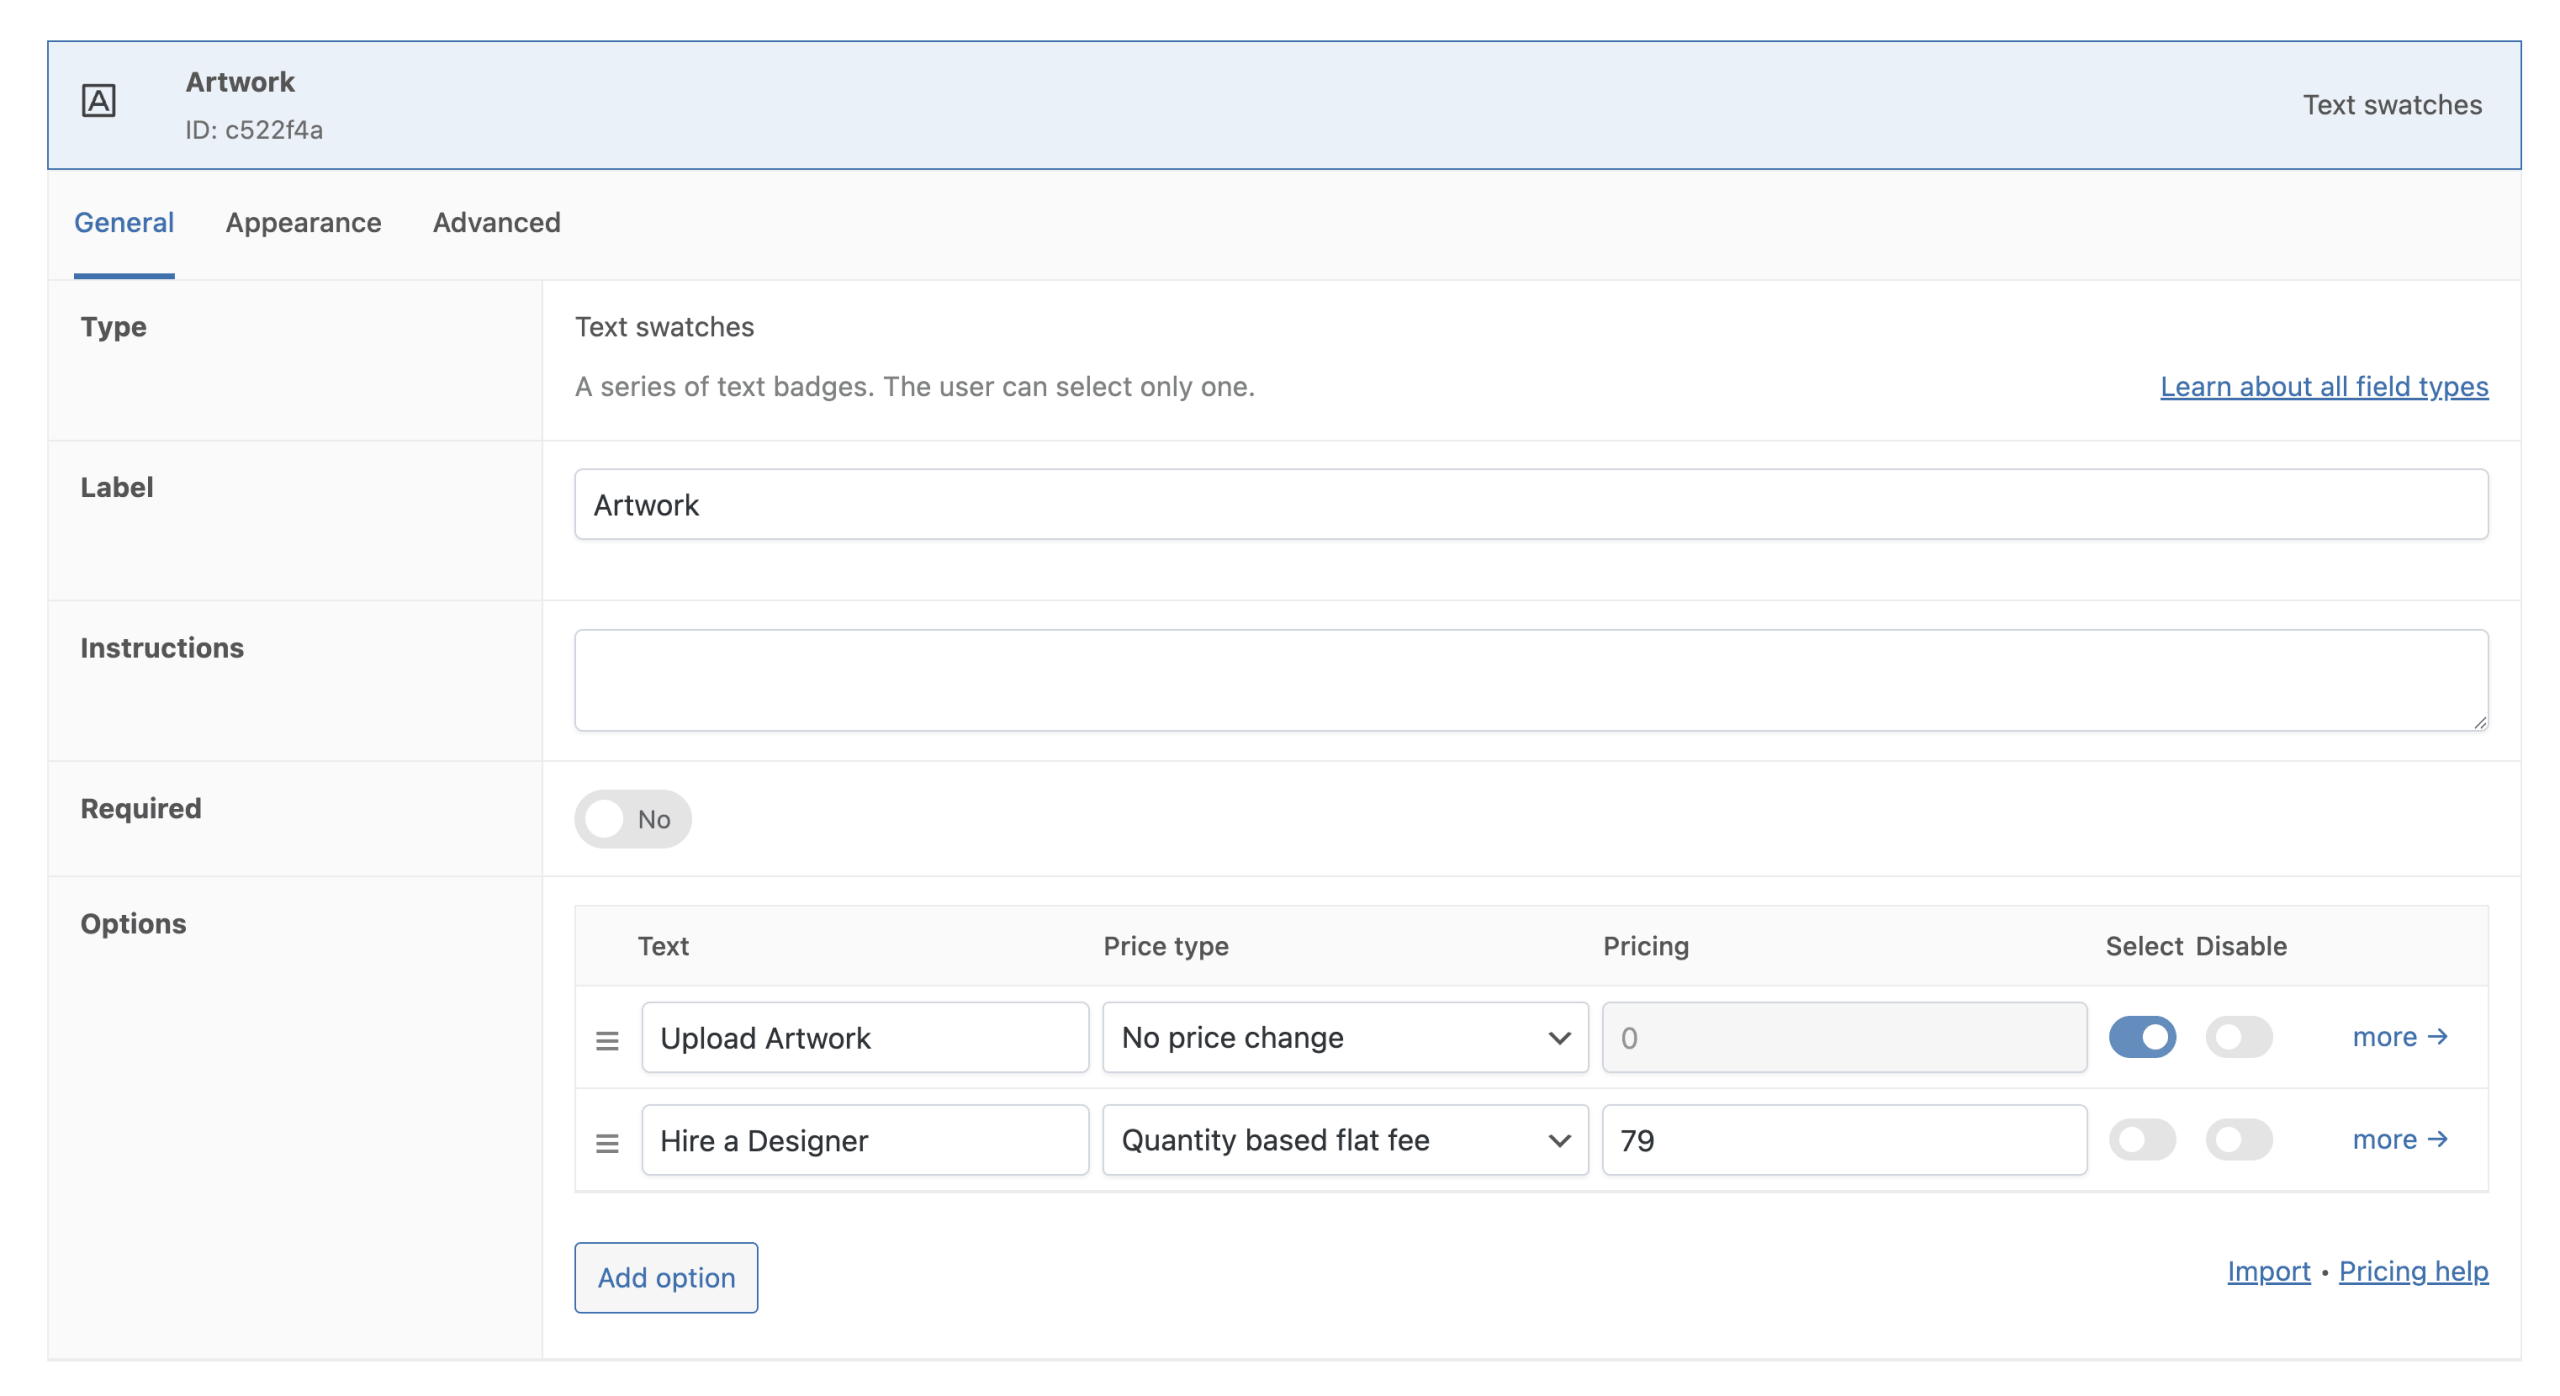
Add a field of type Text Swatches and label it “Artwork”.
In the Options section, add the 2 earlier mentioned choices.
Mark the “Upload Artwork” choice as the default so it’s pre-selected when the WooCommerce product page loads.
For the “Hire a Designer” option, set the Price Type setting to Quantity-Based Flat Fee and the Pricing setting to 79. This adds a $79 fee when the customer selects this option.
Next, let’s implement the file upload for our custom banner! Follow these steps:
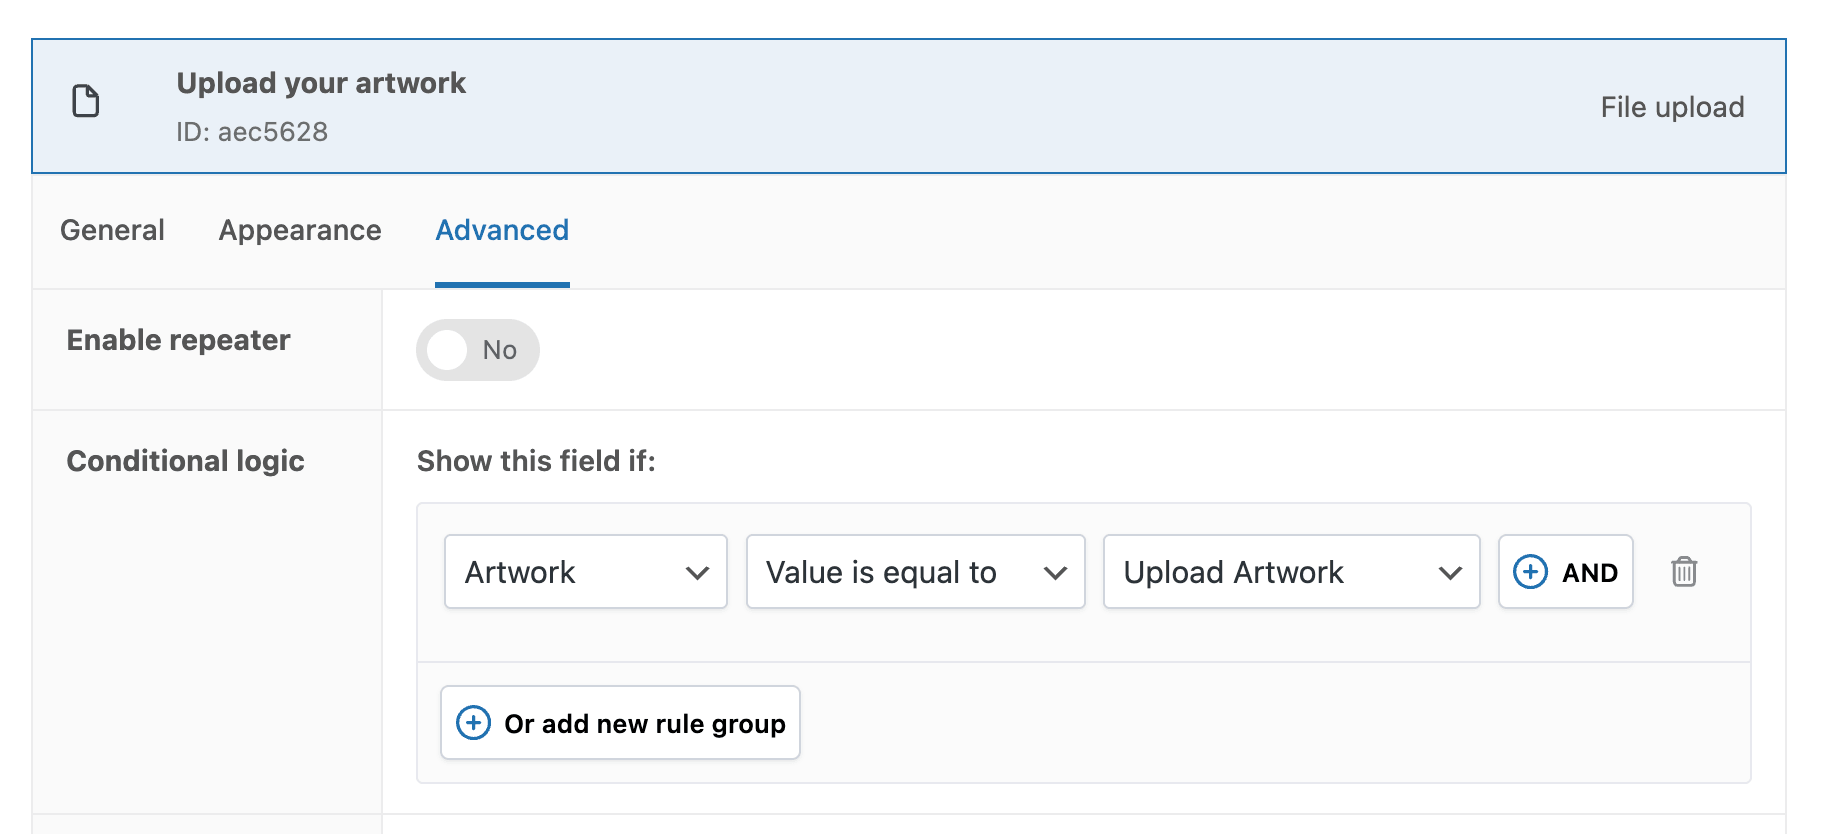
Add a new field of type File Upload and name it something descriptive like “Upload your artwork”.
Configure the Accepted File Types setting to accept only PNG or JPG files so customers can’t upload anything they shouldn’t
Set a 5MBmaximum file size limit to protect your server storage from excessive file sizes.
We should only show the file upload field when the customer selects “Upload Artwork” in the previous field. To do that, we can implement conditional logic:
Open the Advanced tab of the File Upload field.
In the Conditional Logic section, click Add New Rule Group.
Set this condition on the file field: Only show if Artwork equals Upload Artwork.
That’s it! Now, if a customer selects Hire a Designer, the upload field disappears and they just pay the $79 fee.
Step 5: calculating the product price
Custom signs and banners are priced based on multiple factors. It’s not just a fixed price. For example, if the user chooses a larger size or premium materials, the product price should increase.
This can be implemented in multiple ways; we’ll explain just one approach.
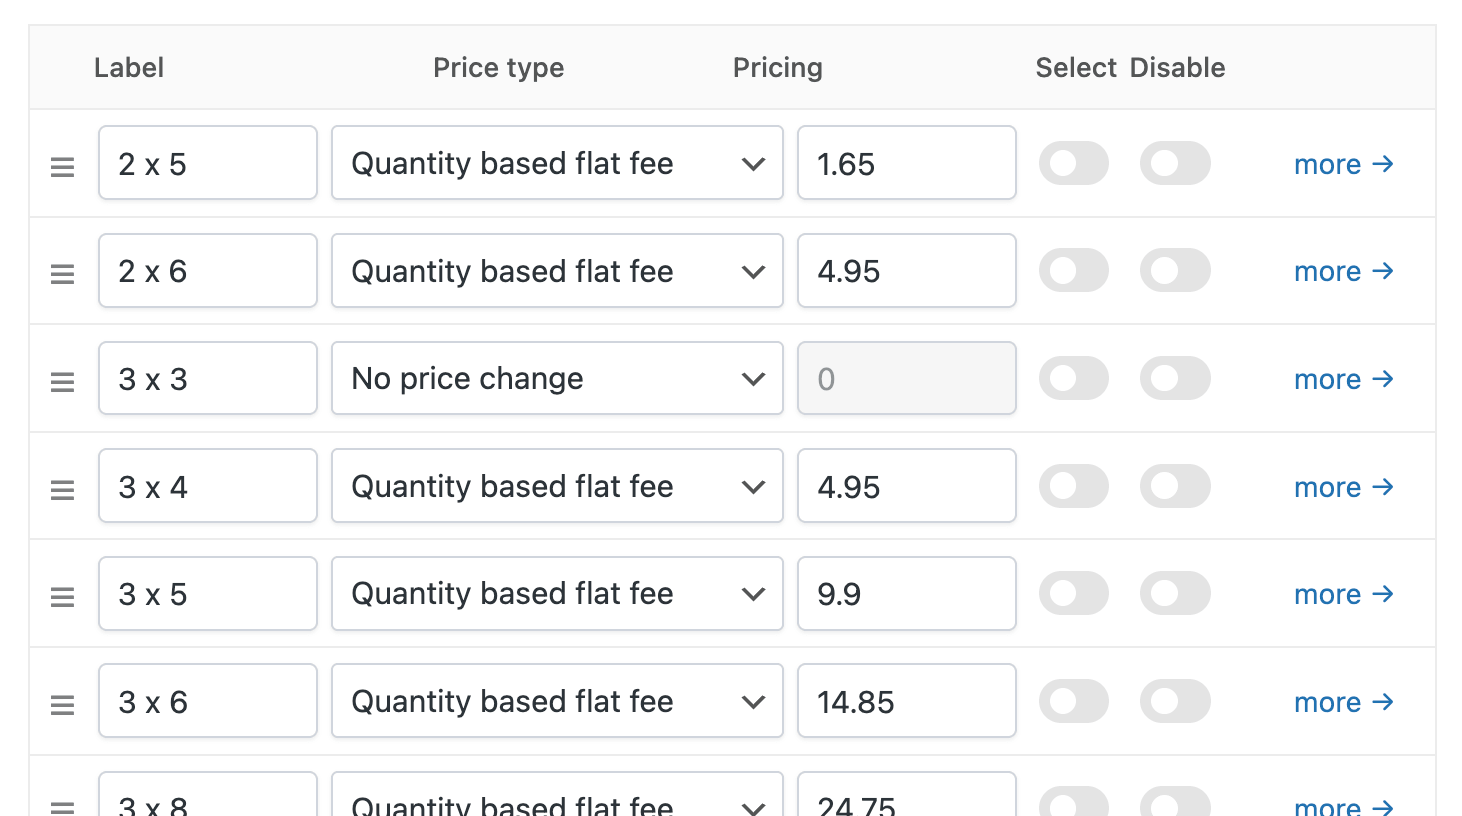
Pricing for each banner size
Go back to the Size field created in step 3 and enter the price difference for each size option. Set the Price Type to “Quantity-Based Flat Fee” and enter the correct amount in the Pricing setting. The price should reflect how much more it costs compared to the cheapest variant.
Notice that one size has no pricing defined because this is the smallest size and represents the base product price already configured in WooCommerce (in step 2).
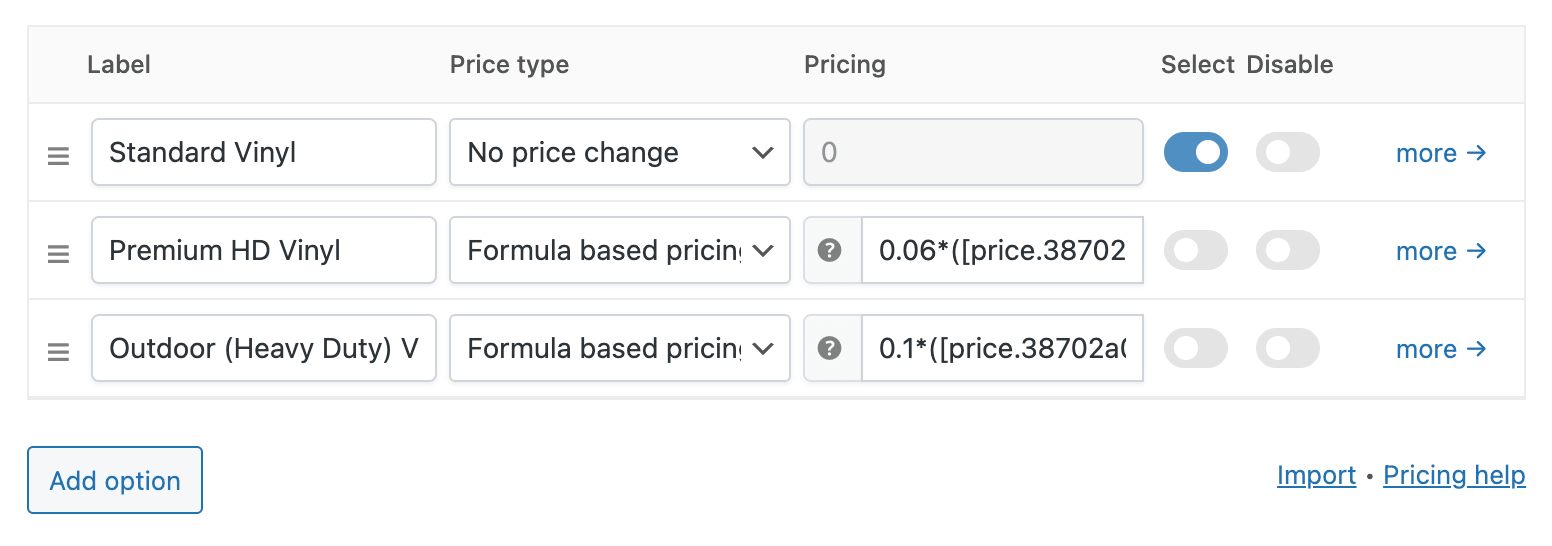
Pricing for premium materials
Next, we’ll add an extra charge based on the selected material. The easiest way is to apply a percentage increase. For example, “Premium Vinyl” adds 6% compared to standard vinyl, while “Outdoor/Heavy Duty Vinyl” adds 10%.
Let’s implement this now!
Go back to the Material field created in step 3 and open the Options section. You’ll see all material options you added earlier. Set the Pricing Type to “Formula-Based Pricing”. We’ll use a formula to calculate a percentage surcharge. Use the following formula to add a 6% extra charge:
0.06 * ( [price.38702a0] + [price] ) * [qty]
It looks complex but it’s actually quite simple! Let’s break it down:
0.06 is the same as 6 percent (it’s 6 divided by 100).
[price.38702a0] points to the price of the “size” field.
[price] points to the base product price (as defined in WooCommerce).
Adding * [qty] makes sure the whole result is multiplied by the customer’s chosen quantity.
This is what our settings look like:
You can apply the same pricing method to the “Finishing” field. For example, adding hemming can increase the price by a percentage, and selecting both grommets and hemming can increase it further.
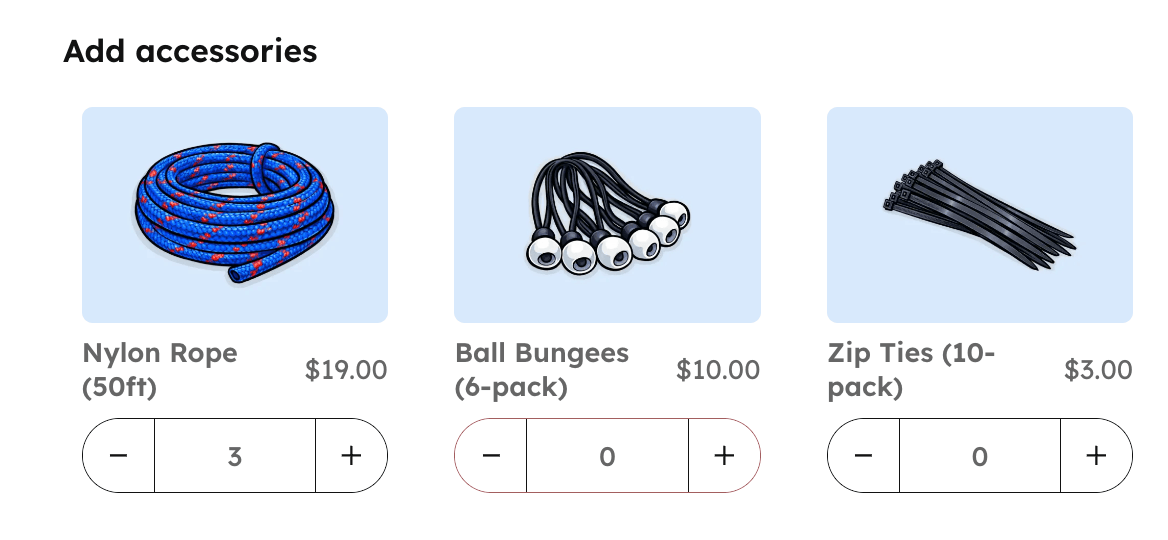
Bonus step: upsell accessories with your custom banner product
There’s another upsell opportunity to increase your Average Order Value (AOV) even further! You can offer other products as accessories. Customers will need items such as nylon rope, banner bungees, or zip ties to securely mount their custom banner.
To do this, follow these steps:
Create your accessory products in WooCommerce (just like you create any other product).
On your custom banner product, add a new field of type Products. Label it as “Add accessories”.
Set the Display setting to “Vertical Cards with Quantities”. This will allow users to enter a quantity for each product choice.
In the Included Products section, you can link your accessory products created earlier.
Open the Appearance tab and style the cards to your liking.
When all is done, your accessories appear like this on your custom banner product:
That’s it! Save your work and check the final product on your site:
Recap – creating a custom banner, sign, or flag in WooCommerce
In this complete guide, we explained how to create a custom sign or banner in WooCommerce. In this article we looked at:
How to make a custom vinyl banner.
Allowing users to personalise the product by selecting size, material, and finishing.
Allowing users to upload the artwork to print on the banner.
Providing upsell products (accessories).
Calculating the final product price using a formulas.