
Sometimes, your WooCommerce store may need some expert features for your customers, like uploading images on product pages. If you’re selling printed products, running a personalized gift store, or running a photo printing service, it is essential that your customers can upload an image (or any other file type) straight on the product page before adding the product to their cart.
In this complete guide, we will run you through all the steps on how to add image uploads on your WooCommerce store’s product pages. We will also cover some more advanced use cases like editing images before uploading them or forcing file sizes, ratios, etc…
To avoid confusion, please note that this WooCommerce guide is written to let your customers upload images on product pages, not to bulk edit and upload images via the WordPress admin!
WooCommerce guide to upload images on product pages – what we’ll cover
This complete guide contains everything you need to know about adding image uploads to your WooCommerce product pages. Since this is quite a large blog post, let’s take a moment to go through what we’ll cover. Use the quick links below to jump from section to section if you don’t feel like reading the whole post.
Here’s what we’ll write about:
- Cover the basics
- Adjust the final product price
- Upload multiple files/images
- Advanced WooCommerce image upload features
- On the admin side
WooCommerce image uploads – what are we building?
Before we start, let’s take a minute to look at what we’re building to ensure everyone is on the same page.
We’ll build a configurable product in WooCommerce which allows your customers to upload one or multiple image. As a store owner, you’ll be able to see and download that image from the WooCommerce order admin screen. Typically, the store owner needs the file to print or embed it onto the product they are selling.
To make things a bit more interesting, the customer will be able to edit the image right in the browser! They can crop, resize, or rotate the image before uploading. They’ll also see a live preview of the finished product before adding it to cart.
As an example, we’ll build a custom photo frame product. It’s the perfect product to explain all the concepts and advanced use cases that come with using WooCommerce to upload images on product pages. The customer can choose a frame design and upload their photo to go with it.
Here’s an example of what we are building:

We’ll walk you through all the steps (and more) in this complete WooCommerce guide to upload images on product pages. Let’s start at the beginning!
Using a plugin to extend WooCommerce to upload images to product pages
Unfortunately, WooCommerce doesn’t have any features out-of-the-box to upload images on product pages. It’s outside of their focus because allowing image uploads on products is considered a niche case.
Luckily, there is a plugin that takes care of uploading files and attaching them to the cart, checkout, and order. The simplest, most powerful solution to upload images is to use the Advanced Product Fields for WooCommerce plugin.
This plugin allows you to add various input form fields to your product pages. From simple form fields, to advanced fields like file uploads, date pickers, and more! Moreover, the plugin has powerful features to build the most complex product pages. You can show or hide input fields through conditional logic. You can also increase or decrease the final product price depending on what your customer selected.
In short, it’s the perfect plugin to add image upload fields to product pages.

The easiest way to allow WooCommerce to upload an image on product pages!
Find out moreHow to add an upload field to a WooCommerce product
Adding an image upload field to your WooCommerce product sounds advanced but it is fairly easy. In fact, it only takes 2 steps to complete so it can be done in under 5 minutes. Below we’ll outline these steps in detail so you can start selling customizable WooCommerce products with image upload fields.
Step 1: install Advanced Product Fields for WooCommerce
To get started, purchase Advanced Product Fields for WooCommerce from the Studio Wombat store: studiowombat.com/advanced-product-fields-for-woocommerce
In your WordPress dashboard, go to Plugins → Add New → Upload Plugin. Choose the zip file you downloaded from your Studio Wombat account. Then Click Activate.
Now that you have Advanced Product Fields installed, you can move onto adding a file upload field to a product in your WooCommerce store.
Step 2: Create your WooCommerce image upload field
Go to Products → All Products and edit the product you want to add your image upload to. In the Product Data section, click on the Custom fields tab.

In this section, you can add all the custom form input fields that should appear on your WooCommerce product page. Click Add your first field. A new section appears and this is where you can define all settings for your file upload field. Use the following settings:

- Set the Type to File Upload. This will render a file upload input field on your WooCommerce product pages.
- Add a Label. This appears above the field to inform your user what this is about.
- You can choose to add Instructions giving your customers further context if needed.
- Toggle the Required setting. This makes sure an image needs to be uploaded before the customer can add the product to their cart.
Save your work by clicking Update or Publish in the Publish box of the screen.
This is all you have to do to add WooCommerce image uploads to product pages. You can preview the result on your site:

It’s functional, but looks a bit basic. We’ll fix that in the following sections.
How to use a modern uploader with progress bar drag/drop
As you can see from the image above, the file upload field looks a bit basic. That’s because by default, the standard HTML file input field is used. Luckily, the Advanced Product Fields (APF) plugin has a way to bypass this.
To enable the modern file upload in WordPress, go to WooCommerce → Settings → Product Fields and enable Modern Uploader.
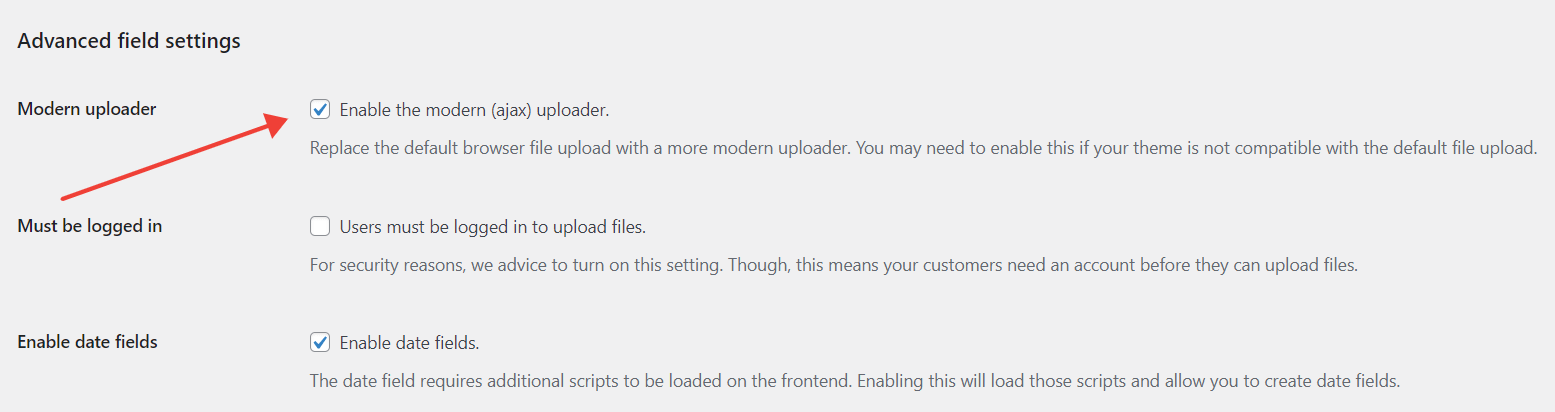
Notice how this changes the way your file upload field looks:

Using the modern file upload field for your WooCommerce products has a few advantages over the basic one:
- While files are uploading, you’ll notice a progress bar indicating how much of the file has been uploaded. This is a better uses experience because you can see that the upload process is taking place and you can deduct how much longer it will take. This is handy especially for larger files.
- You can easily drag/drop files from anywhere on your computer. There is no need to click and browse (but you can if you want to).
- Remove uploaded files by clicking the X-icon next to the file name.
- The user experience for uploading multiple files is better.
How to limit which file types can be uploaded
By default, the Advanced Product Fields plugin lets your customers upload any file type that is also allowed by WordPress. Since you expect an image for your product, you should limit the file type to images only. In other words, you should accept only jpg, jpeg, png, gif, and maybe pdf.
- Edit the same product from earlier and go back to the Custom fields tab.
- Find your File Upload field and click on it to bring back the settings panel.
- Find the Accepted File Types setting and include only the file types allowed.

Set the maximum file size for the WooCommerce file upload
To prevent your customers from filling up your server disk space with large files, you can limit the maximum allowed file size with Advanced Product Fields for WooCommerce. Follow these steps:
- Edit the same product from earlier and go back to the Custom fields tab.
- Find your File Upload field and click on it to bring back the settings panel.
- Find the Max File Size setting and enter a number.
The maximum file size is set in megabytes. Make sure to set it to a realistic number. For example, if you’re expecting images for print, you don’t want a file that is too small (below 1 or 2MB) otherwise the print quality will be affected.
Use WooCommerce image uploads with other form fields
Remember our example from earlier? We are selling custom photo frames. Aside from letting customers upload their photo, we also want them to choose which picture frame design they want. To do that, we can add another field above the image upload field.
- Edit the same product from earlier and go back to the Custom fields tab.
- Click Add a Field. This opens the settings panel for a new field.
- Set the Type to Image Swatches. This allows us to create clickable images buttons as choices. It looks more appealing than the standard drop-down list.
- As Label, enter “Select your frame”.
- Turn on the Required toggle.
- in the Options section, you can add as many image swatches as you like. Each image corresponds to a choice your visitor can make. In our example, we added 3 frames: a classic frame, a tribal frame, and an elegance frame. Each option gets an Option Label. You can also increase the product price when the customer selects this choice. For the purpose of this demo, we leave those settings blank.
- Find the Label position setting and switch it to As tooltip. Per default, the label you entered for each option is shown below the image. But it looks a bit nicer as a tooltip instead. The label is only visible when the user hovers over the image swatch.
When you are done, your settings should look like this:

On your WooCommerce product page, it looks like this:

Charge extra for image uploads (increase the product price)
It could be that the image upload is not a mandatory WooCommerce field, but if the user decides to upload an image, you may want to charge extra. Advanced Product Fields for WooCommerce allows you to increase or decrease the final product price when a file was uploaded.
Follow these steps to enable a price increase when an image is uploaded:
- Find your File Upload field from earlier and click on it to bring back the settings panel.
- Turn on the Adjust Pricing Toggle.
- Select the Pricing Type. Since we just want to charge an extra fee when a file is uploaded, select Quantity Based Flat Fee. If you’re interested in learning more about charging additional costs, check out our article listing all price types available in APF.
- Enter the Amount for the additional price.
You’ll see that the additional price will display on your product page. A pricing summary at the bottom is also displayed:

If you don’t want to show pricing hints or pricing summaries, go to WooCommerce → Settings → Product fields and you can disable both settings there.
Charge an extra cost per uploaded file
The method explained above adds an additional cost regardless of how many files are uploaded. When the user uploads no files, no extra cost is added. But when the user uploads 1 or 100 files, the same $5 additional cost is added to the final product price.
Instead, it might make more sense to charge per image uploaded. The Extended version of Advanced Product Fields allows you to add an additional cost per file. To implement it, we need to change the pricing settings we added in the previous step:
- Find the File Upload field from earlier and find the Adjust Pricing setting.
- Set the Pricing Type to Formula based pricing. Formulas are powerful and advanced ways to set up complex pricing schemes for your products add-ons. Almost any scenario imaginable can be solved with formula-based pricing.
- In the formula box, write the following formula:
files(62e4d28e38781)*5.5is the unit price per file and62e4d28e38781is the ID of your image upload field.
Below is a preview of 2 files uploaded, each costing an extra $5 (so $10 in total):

Allow customers to upload multiple images on your WooCommerce product page (bulk upload)
Up till now, we’ve only talked about uploading 1 image on the WooCommerce product page. However, if you want to accept multiple files (allow uploading in bulk), this is also possible. To enable multiple (bulk) file upload, follow these steps:
- Find your File Upload field and click on it to bring back the settings panel.
- Turn on Allow Multiple.

Customers can now upload as many files as they want. In the next section, we’ll also explain how you can limit the number of files uploaded.
Extend Advanced Product Fields with additional plugins
The Advanced Product fields (APF) plugin also comes with a few powerful additional plugins that extend the features of APF in various ways.
Why did we build some features into extra plugins? Good question! By putting advanced features in additional plugins, we keep the main plugin as lightweight as possible. If you do not need certain features, it would be a shame if they were loaded onto your website anyway. These extra scripts would slow down your overall page speed, which is bad for SEO.
This is why we build some advanced features – that not many of our users would need on a daily basis – into additional plugins (called add-on plugins).
You can see all available extensions here and have immediate access to them if you buy the Bundle of Advanced Product Fields. The bundle contains all current extensions and future extensions for a very reasonable price. For some of the advanced features discussed further in this article, you will need an add-on plugin.
Limit the number of images uploaded to WooCommerce
In most cases, you will need a fixed number of imaged from your customers. For example, when you’re selling business cards, you need exactly 2 files: one for the front of the card, and one for the back.
Advanced Product Fields (APF) for WooCommerce allows you to limit the number of uploaded images by changing 2 settings: a minimum and maximum number of allowed files.
To do this, you’ll need the Image Upload additional plugin. It’s a lightweight plugin that adds some extra powerful features specifically for WooCommerce image uploads on product pages.
Once the plugin is installed, edit your file upload field an notice these extra settings:

- Minimum file count is the minimum expected number of files. If a user uploads less files, the product will not be added to their cart.
- Maximum file count is the maximum allowed number of files. Users can upload less files than the number defined there, but not more. Set it to -1 if you allow an unlimited number of files (though this is not advised).
How to let users edit image uploads with WooCommerce
You might want to let users edit the images they upload straight into the browser! You can do this with Advanced Product Fields in combination with the Image Upload extension. Here’s what the editor looks like on your WooCommerce product pages:

Here’s what your visitors can do with the editor:
- Crop uploaded images. As a store owner, you can force the crop so images are always received in the correct format.
- Rotate images. Especially when images are taken with a mobile phone, rotating them to the correct format is handy.
- Flip images.
- Resize images by zooming in/out.
What’s even better? As a store owner, you can enable or disable these features of the image editor. You don’t want users to flip or rotate their images? No problem, just turn it off!
You can change the editor’s theme by going to WooCommerce → Settings → Product fields → Image Upload. You can switch between a light or a dark theme.

Power up your file uploads with a full-fledged image editor. Allow customers to edit their images into the browser
Find out moreHow to force the uploaded image size and format (aspect ratio)
In many scenarios, you want the uploaded image in a certain format (aspect ratio) or size (in pixels). Since the uploaded image is often printed onto the product you are selling, it is important you get the image exactly as you require it, so there are no hiccups during print.
The Image Upload extensions discussed earlier also helps with that. Let’s go over each setting to force the correct size (in pixels) of your WooCommerce image upload field:

- Minimum width. This is the minimum needed width in pixels. If the uploaded image is below the minimum, the customer will not be able to add the product to their cart.
- Minimum height. Similar to the width, this is the minimum required height in pixels.
- Automatically resize. Turn this on if you want our plugin to automatically resize uploaded images to a desired size. If a customer uploads a larger image than the desired maximum, our plugin will resize the image. The maximum width & height settings you see below the toggle are used to automatically resize the image. Leave either the width or height blank to maintain aspect ratio.
The plugin also has settings to force the correct image format (aspect ratio) by allowing users to crop the image straight in the browser.

Turn on the Enable Image Editor setting on your file upload field. When enabled, you’ll see a few other settings appear:
- How to open the image editor: here, you can specify how the editor popup should open. You can open it automatically (this forces the user to edit the image into the correct format) or by clicking the “edit” button, which allows users to upload non-edited files too.
- Enable image cropper: turn this on to allow users to crop the image into the format you need.
- Aspect ratio: set which aspect ratio the final uploaded image should be in. The aspect ratio decides the format of the image. For example, if you need a square image instead of a rectangle, pick the Square 1:1 ratio from the dropdown list.
Force uploaded image formats, sizes, etc... so you get the file you need as a store owner.
Find out moreDisplay the uploaded image onto your product gallery image (live preview)
The next part of this tutorial is more advanced but showcases a very useful feature. In our example, we are selling photo frames where customers can upload their photo to be attached inside the frame. Wouldn’t it be great if the user can preview their uploaded image directly onto the frame?
Adding a live preview function to your WooCommerce products improves the user experience and will result in less abandoned carts. Your customers can preview their finished product before placing an order and they are more likely to proceed if they are happy with the final result.
To add a live preview to the WooCommerce image upload field, we are going to use another powerful add-on plugin for APF: Live Content Preview. This plugin allows you to live preview text or images onto your product’s main image.
The most common use case for a live preview is selling personalized posters. Users can add custom text to their poster and it immediately appears onto the product image on the left.

This is not only a great user experience, but it’s also widely known that stronger visuals help you sell more products. The example above adds a live preview of text, but the plugin can also do the same for uploaded images. Specifically, this is what we are building:

Step 1: install the Live Content Preview extension
For starters, purchase the Live Content Preview extension here: studiowombat.com/live-content-preview
In your WordPress dashboard, go to Plugins → Add New → Upload Plugin. Choose the zip file you downloaded from your Studio Wombat account. Then Click Activate.
Next, go to WooCommerce → Settings → Product Fields → Live Content Preview and enter your license key. Click Activate License.
Now that you have the Live Content Preview extension up & running, you can start adding a live preview to the image upload field of your WooCommerce product.
Step 2: Add a live preview
Go back and edit the photo frame product from earlier. In the Product Data section, select the Custom fields tab, just like we did earlier in this guide. Scroll down until you see the Live Content Preview section and click Add new.

A popup opens to guide you through through setting up your live preview. In step 1, you can select the image to display the content on. You can choose your product’s main image or any of the gallery images (if any) you’ve defined in the WooCommerce product settings.
Select the image and click Next Step. Step 2 appears:

In this step, you can select which of your form field should appear on the image. You can select any of your text or file upload fields. Click Next Step when you’re done.
In the last step, you can draw an area on your image where the content should appear. In our case, we want the image to show inside the frame, so we drew an area (check the blue border below) inside the frame:

When you’re finished, click Done. You’ve now added your first content preview to your WooCommerce product!
Step 3: set the correct ratio
Thanks to the live image preview, any uploaded image will now display inside the frame. The problem is that when the user uploads a super wide image, it will be squished into the bounds of the area we drew above. This is not ideal. Instead of squishing the image into the bounds, it would be better if we enforce the user to upload the correct aspect ratio. Remember, we can do that with the Image Uploads add-on we discussed a few sections above in “How to force the uploaded image size and format (aspect ratio)”.
Manage image uploads in the WordPress admin area
As a store owner, it’s important that you can easily access the uploaded files of your customers. There are 2 places where you can access your customer’s image uploads in the WooCommerce admin section of your WordPress site:

- In the order admin screen, you’ll be able to click through to the customer’s file(s).
- In the same screen, there’s a Download files button which allows you to download all files in a zip package. This is handy if your customers can upload multiple files and you want to download them all in one go.
How secure is it to upload images on WooCommerce product pages?
Until now, we’ve mainly talked about how to build an image uploader and what you can do with it in WooCommerce. But what about security?
Uploading files can be considered a security risk if you do not properly configure the file upload itself. There are 3 things you can do to minimize the security risk:
- Limit the allowed file types to the absolute minimum. If you expect images, don’t allow Word documents or Excel files. We’ve talked about this earlier in this guide.
- Limit the allowed file size. If you expect simple images, you don’t need to allow files over 5 megabytes. This guide also explained how to do this.
- A third option is to only allow logged in users to upload files. This is especially handy if you are selling B2B, where your customers require an account to purchase from your store. Go to WooCommerce → Settings → Product fields and enable the setting there.
Advanced Product Fields for WooCommerce uses WordPress built-in capabilities to upload files, so it is already quite secure out-of-the-box because WordPress will block malicious files as hard as it can (by not allowing suspicious file types). On top of that, we’ve built an extra layer of security in our plugin.
We highly recommend staying up-to-date with your WordPress, WooCommerce, and APF versions to minimize the risk of security issues in the future.
Upload images on a WooCommerce product – final words
As you can see from the length of this blog post, there are a lot of topics to cover when letting your customers upload images on your WooCommerce products. But, together with the Advanced Product Fields plugin, you can turn WooCommerce into an upload-powerhouse!
The easiest & most secure way to add image uploads to WooCommerce product pages.
Find out moreThe plugin helps with other upload-related features too:
- Conditional logic to show or hide upload fields based on values of other form inputs.
- Increase the final product price based on images uploaded. Add an extra fee per image, or for multiple images.
By help of additional extensions, you can create even more advanced upload flows. Your customer can upload images on WooCommerce product pages, edit the images in their browser, crop, resize, and more. You can set a wide variety of parameters to configure the image upload to your store’s needs:
- Limit file size and types.
- Automatically resize images based on your needs.
- Force a certain format (square, rectangle, or any other ratio).
- Allow an exact number of images (min & max files).
- Show a live preview of the uploaded image.
Power up your file uploads with a lot of additional settings. Effortlessly set the amount of required files, auto. resize, and more!
Find out more
Customers can preview their uploaded images live onto your product.
Find out more
Hi, Is it possible to add two pictures, one as a background and one as a front picture if it makes sense?
Hi!
Yes, that’s possible. You can upload as many images as you need.
Hi,
Is it possible to let customers choose a font (and additionally a font size, which gets smaller when typing more letters)?
Hi there!
Yes, that is possible!
I found the text bounding option. How do I let customers choose the font?
Second: I have a template (PNG) with a background colour and an oval transparent cutout (for the uploaded picture). Now when uploading a picture, it sits on top of the template. Is it possible that the uploaded picture sits behind the template, so the customer can move the image around, but only sees it in that cutout?
For technical assistance, please reach out to us through the technical support option here. Thank you!
Hi,
Is it possible to upload a preview image as background. For example:
– With the product configurator the user can customize a door.
– The user can upload an image of his house so he can see how the door looks on his house.
Hi there!
Sadly, that’s not possible yet.
Great, thanks.
Is there a way to control the main price? We have 1 product which is available in different sizes/on different materials. Presumably this would have to be a variable product to get the main product page price say ‘From £25’? The smallest version is £25, the largest is £70. Would the largest have to be £45 instead of £70 so it adds the base £25? This is messy and confusing and we’d prefer a set price for each version to be shown.
I can send you a link (privately?) if I’m not clear enough to show what we want.
What you want is possible, but I’m happy to double-check and explain further if you reach out to us with the link. You can reach me through the presales form here.
Is it possible to control the size of the image swatches that someone can select? You use 300px x 300px in the demo. Is there a size option or can it only be changed via CSS?
Hi there!
Yes, the size can be set in the settings. 🙂
Hi, is it possible to change the upload directory of the files an sanitize the filenames?
Hi!
You can’t rename the upload folder. We can consider implementing this but what would be the goal? File name sanitizing is already done.
Hi
would these plugins work for phone cases? as all phone cases are have different camera positions would I need to create masks for each design? is it possible to create masks within your plugins?
is the licence for 1 store?
Thanks Marcus
Hi,
We’re currently implementing phone cases support too. It doesn’t require masks, just a transparent PNG image of the phone case 🙂
Hello,
I have three questions:
1) Is there any option to download all the order uploads with a single click? Like a bulk download where admin can get images and text in folders renamed as the order numbers?If not from the plugin, is it possible to download this from the server side?
2) Is it possible to customize the shape of live preview image? Like not just square?
3) Is there a bundle available for fields, uploads, and live preview?
Deepak
ZOCI VOCI
Hi Deepak,
Here are my replies:
1) Yes 🙂
2) Only square, oval, rectangle, and circle are possible. We will introduce custom shapes in the future though.
3) The cheapest option is to buy the 2 plugins you need separately.
Great tutorial, is it also somehow possible to show the upload image in the shopping card. Or could I make the link shown in the cart clickable so people see that they are ordering the right image there as a last check?
Hi there!
Yes, it is also possible to show either a link to the image, or a thumbnail of the image in the cart.
Is there a tutorial how to do this? I did enable the option in the control panel,but somehow it’s not showing on the cart page.
Sounds like a technical issue we may need to look into. Please create a technical support request here so we can assist you better. Don’t forget to include a link to the product so we can test :-).
Hi, I purchased your Advanced Product Fields plugin with the various add-ons, regarding the uploading of images and the relative visibility in preview that I have already managed to obtain, now I ask you a question:
In the case in which I have a pair of paintings to sell together, in which the customer would like to upload two different images and would like to see them in preview, is it possible to do it?
With a single painting and therefore a single image I have already done it. But with two or three paintings together with two/three different images, can it be done?
Let me know, thanks.
Hi
Do you have a link to an online example of what you want?
Hi
Can you contact us through our support form please? That way, your question lands in the right hands. 🙂 Thank you!
Hi,
I would like to understand how the process works after a purchase is completed. Here are the details:
Example: For a product in your demo: “House Sign Builder”
When a customer purchases the “House Sign Builder”, how does it appear in WooCommerce? Will I receive a print-ready file that I can download and send directly to my app for professional printing, like the Fancy Product Designer plugin does?
I need to understand if I can rely solely on your plugin for certain products, such as a “simple variable product”, or if I should use it in combination with Fancy Product Designer for more personalized products that require a print-ready file.
Additionally, is it possible to use your plugin alongside Fancy Product Designer on the same website?
Hi,
Sadly our plugin does not produce a print-ready file. It’s a lightweight product configurator, which is great for your site speed but this also means it doesn’t have all the features you would find in something like Fancy Product Designer.
Thank you for your response. No worries, your plugin already does a lot. I will need to have Fancy Product Designer installed in combination with your plugin. Do you think both can be used on the same website? I understand if this is not something you have tested, but if you have any insights on potential incompatibilities, please let me know.
Hi,
I’ll have to disappoint again, sorry 🙁 Both plugins do not work together because they’re “fighting” with each other to do the same thing. I’m sorry I don’t have a a better reply for you at this point.
No worries, I will find a way, maybe a subsite :). Thank you for your time.
Hi,
When customer upload multiple images (example:3), is availabe for customer to see live preview (with live preview addon) of every image? Or just thumbnail preview on right side of upload form? Thanks!
Hi!
With the Live Content Preview add-on, you can add as many live previews as you want. So you can do that for 3 images.
Can I test this in your admin demo site?
Certainly! We have an admin demo here.
I need to change the aspect ratio for the image editor depending on the variable product selection. Can you point me towards this documentation?
Hi
For technical support, please contact us here and include your license key of the core APF plugin. Thanks!
Is that possible to set a default transparency layer on the top of the upload image?
Hi there,
I’m not sure I understand the use-case of adding a transparent layer on top? Can you explain what you’d like to do>
i need to add my brand logo on bottom right what should i do for it i will visible when upload image also
Hi there
Can you explain what you mean? I don’t understand.
Hey
Is it possible only to have frame options-and remove upload option. Just selling my own photo prints.
Hi there,
Yes of course :). This is just a demo but any configuration is possible.
Is there an API for handling custom uploads from JS applications running on top of Woo?
In other words, if we install Advanced Product Fields for WooCommerce and add a file upload to a product, is there a reliable URL which can be derived from the page itself (via URL or product id or something) and used in a POST request from JavaScript?
Hi John,
I’m unsure which URL you want to derive and why? Can you explain your use case a bit more?
I assume that the element is submitted to some URL via a POST.
For the majority of our checkout workflow, we want to use the normal form submission process, but for one image we need to generate a screenshot of a in order to provide a “receipt” to the end-user in regards to a customizable product they are purchasing.
We generate that screenshot with JS and I’d like to upload it into a product field for an order.
What are the options for doing that?
Thanks and please let me know if that makes sense!
Hi John,
So the screenshot you generate is not a URL but a data blob for an image?
Not a blob (using base64 string), but otherwise correct. I may be able to do one of two things before POSTing to the actual form.
1. Convert back from base64 into an SVG file in the front-end. (That’s my first hope.)
2. Hook into the larger Woo API during FORM submission and convert the string to a file. (Hoping very much to avoid that.)
I can think of 2 options:
1) You send the Base64 in a hidden text field along and then catch it on the backend in Woo at order creation to change it back into an image. You want to avoid this but it should be fairly easy.
2) Our file uploader uses dropzone.js, which has an extensive API. If you can turn the base64 into a File object (not sure raw SVG will work) in JavaScript, it should be possible to give that to the uploader and our plugin handles the rest.
Awesome!
Sold!
(Adding extra words for commenting ability lol.)
Is it possible to add Live Content Preview fields also on general Groups?
This is currently not possible but something we are looking into providing.
Hi, how i can change language for finnish for these texts?
Hi there,
Our plugin is fully translateable via the normal WordPress translation mechanisms. But this might be easier: if you send us the translations, we can include them in the next update :).
Product total = Tuotteen perushinta
Options total = Lisävalintojen hinta
Grand total = Yhteensä
Hi,
Can I only use the Live Content Preview add-on but not the Image Upload add-on?
Hi there,
You can use both. 🙂
Is it possible to include text with the image upload?
Hi there
Not sure I understand what you mean exactly. Aside from the file upload, you can add other options to the page too, including a text field asking the user for additional text.
Hi , is it possible to just propose images ?
I mean no upload from customer but display 10 images to choose from ?
Thank you
Hi there,
Yes, that is possible too. 🙂
Seems like what I’m looking for. Is there a demo product that I can check out before downloading and paying for 3 plugins?
Certainly! We have an admin demo here and product demos here. Hope that helps!
Hi, great guide!
Is there a way to make the pictures round? (circle)
Br. Gustav
Hi,
That depends on where/when exactly. 🙂 Can you share your use case, then I can give more info.
Is it possibile to add also a minimum for a file upload? Not only pixels but also dpi control?
Hi!
With the “Image Upload” addon, you can set a minimum file count or a minimum allowed size in terms of pixels or megabytes. However, you can’t set a minimum DPI, sorry.
Hello is it possible to have the photoframe product that people can preview their foto in it and also add text to the photo ?
Hi there!
Yes, that is definitely possible with our Live Content Preview addon to add text and uploaded images as live-preview. You can also use our Image Upload addon to force uploads in a certain format/ratio.
Are we able to set different aspect ratio for the uploaded images for different products? For e.g. one of my product need 21:9 and for another need 2:1. Can I set differently or it is a centralized setup which apply al of my product?
Yes, you can select your desired ratio from our list of predefined ratios. If your ratio is not in the list, it can be added by a code snippet we can give you.
You can set different ratios per field of you want.
Is it possible to upload more than 1 image and have it previewed?
Yes, it is possible to upload more than one file. For the preview, it depends on what you mean exactly. With our Image Upload add-on, you can show a thumbnail next to the uploaded file name.
Hi,
Are we able to create bounding box limits with special shapes (stars, circle, etc)?
Hi there!
No sorry, only square and rectangle.